Sponsored Post: Complete Knife Skills with Craftsy
Friends! Welcome to my first-ever sponsored post. I’ve teamed up with Craftsy for a year-long series. See more about our partnership at the end of the post! Enjoy!
I am a self-taught home cook. I’ve never been to culinary school and I haven’t taken a cooking class since I was seven years old and my mom enrolled me in a “Kids in the Kitchen” series at our local community center. When I was young, I learned by watching my mom, my grandma Bunny, and my great-aunt Doris.
During college, I picked up a few tricks from my roommates and discovered a lot through trial and error. And when I was in my early twenties, the Food Network was my guide (people may knock Rachael Ray, but I learned a lot from her in 2002).
I’ve done pretty darn well in this vein, but there’s always been one area where I knew I could do better. Knife skills. For years, I meant to take a class on the subject, but first the budget was too tight and then in later years, I couldn’t find the time.
So, when Craftsy asked me to try out their free Complete Knife Skills course, I was a very willing pupil. Taught by Chef Brendan McDermott, the course consists of four components and takes just over an hour and 45 minutes to complete.
Chef McDermott starts out with an introduction to the necessary knives, moves into the four basic cuts, offers an array of tricks and short cuts, and finally gives you the details necessary to maintain your knives.
You’ll also learn fun tidbits, like how to sharpen a knife using the bottom of a ceramic mug, how to quickly open a bottle of beer with a chef knife (!), and even how to split a handful of grape tomatoes with a single knife stroke.
I was particularly impressed by how easy he made it look to cut a carrot into gorgeous julienned strips. I’ve long struggled to create uniform matchsticks and so always opt to use a mandoline slicer when prepping a cut like that. However, inspired by his example, I decided to make thin-cut carrots and red peppers for a refrigerator pickle, sliced up with nothing more than my mighty chef knife.
Here’s how to do it. First, prepare the brine. Mix one cup apple cider vinegar with one cup fresh water, 3 tablespoons granulated sugar, and 1 tablespoon kosher salt. Heat until the salt and sugar dissolves.
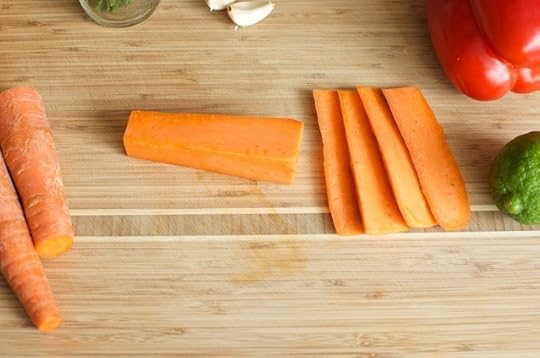
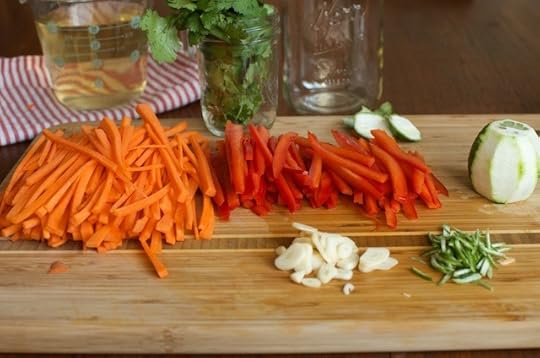
Grab two hefty carrots that weight about a pound in combination. Trim the ends and cut the carrots in equal lengths. Trim away the sides of the carrots so that you end up with a neat orange rectangle. Carefully cut the carrots into slim planks. Stack two or three of the planks and cut them into matchsticks.
Set the carrots aside and prep one red pepper by slicing off the ends. Cut the pepper into two equal halves and trim away the interior pith and seeds (Chef McDermott demonstrations this beautifully in Short Cuts component). Thinly slice the red pepper so that they roughly match the size and shape of the carrots.
Take a small lime and trim off both ends. Using a sharp paring knife, carefully slice away three or four strips of zest. Switch back to a chef knife and mince those strips into confetti.
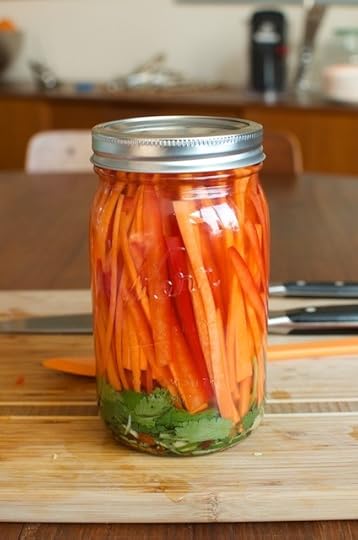
Using a clean, wide mouth quart jar, begin to build your pickles. Place 1/2 teaspoon each black peppercorn and crushed red chili flakes in the bottom of the jar. Add two garlic cloves (crushed or sliced, depending on your preference) and the lime zest confetti. Add a layer of fresh cilantro leaves and stems (about half a cup packed).
Then, gather up a handful of your carrot and red pepper matchsticks and place them in the jar. I like seeing them upright, but you can pack them in any way you’d like.
Once all the carrots and peppers are in the jar, carefully pour the warm brine over the vegetables. It should be enough liquid to fully cover the veg, but since this is a refrigerator pickle, it will be okay if there’s a bit uncovered. The carrots and peppers will act like straws and sip up the brine even if they’re not entirely covered.
Place a lid on the jar and refrigerate it for at least 24 hours before eating.
Note: For a spicier pickle, consider adding some fresh jalapeño pepper rings. I actually intended to do this, but managed to leave my jalapeño at the grocery store (truly, I know I put one in my basket, but it just didn’t make it home with me).
Sign up for Craftsy’s free Complete Knife Skills class to learn how to make these great cuts for your own batch of refrigerator pickles.
Sponsored content like this is virgin territory for me. I’ve not done anything like this up until now because I’ve never felt like the opportunities presented were the right fit. However, I’m working with Craftsy because I feel like their mission aligns with the things I try to do here. Over the next year, I’m going to be working with Craftsy on a series of sponsored content pieces and I’m excited to see where this partnership goes. I hope you enjoy the ride along with me!
Official disclosure statement: This is sponsored post from Craftsy. I was compensated for this post. However, all opinions remain my own.
Print
Carrot and Red Pepper Refrigerator Pickles
Yield: 1 quart
Ingredients
1 cup apple cider vinegar1 cup water
3 tablespoons granulated sugar
1 tablespoon kosher salt
1 pound carrots
1 large red bell pepper
1 lime
2 garlic cloves, sliced
1/2 teaspoon crushed red chile flakes
1/2 teaspoon black peppercorns
1/2 cup packed cilantro leaves and stems
Instructions
Combine the vinegar, water, sugar, and salt in a small saucepan. Place over medium heat and warm until the sugar and salt dissolve.Trim the ends and cut the carrots in equal lengths. Trim away the sides of the carrots so that you end up with a neat orange rectangle. Carefully cut the carrots into slim planks. Stack two or three of the planks and cut them into matchsticks. Repeat until all your carrots are reduced to matchsticks.
Set the carrots aside and prep one red pepper by slicing off the ends. Cut the pepper into two equal halves and trim away the interior pith and seeds. Thinly slice the red pepper so that they roughly match the size and shape of the carrots.
Take a small lime and trim off both ends. Using a sharp paring knife, carefully slice away three or four strips of zest. Switch back to a chef knife and mince those strips into confetti.
Take a clean, wide mouth pint jar and place 1/2 teaspoon each black peppercorn and crushed red chili flakes in the bottom. Add two garlic cloves and the lime zest confetti. Add the cilantro leaves and stems.
Pack the carrot and red pepper matchsticks into the jar.
Once all the carrots and peppers are in the jar, pour the warm brine over the vegetables.
Place a lid on the jar and refrigerate it for at least 24 hours before eating. Schema/Recipe SEO Data Markup by ZipList Recipe Plugin2.2http://foodinjars.com/2014/02/sponsored-post-complete-knife-skills-craftsy/
Related Posts:


