A Picture Paints a Thousand Words
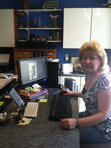
Within the Blue Fire series, I had very specific images in my mind for the various tattoos, marks, and weapons. But since I’m new to the writing world, I lack the writing vocabulary that I needed to properly describe these features. Instead of using the keyboard, I did what came more naturally to me… I grabbed my sketchbook and started to draw. With sketches in hand, I debated on how best to incorporate my artwork into my Word file. Although I’m comfortable with paper and pencil, the world of digital art is completely new to me. Seeing my frustration, my husband came home one day with a scanner. That allowed me to transfer my art into the digital world but, no matter how much I fiddled with the scanner setting, the images didn’t come in as clean as I would have liked. I was going to need to do some online digital editing.
When I asked others for advice, they told me that I should use Photoshop and get a digital stylus. They said, “You can then just draw directly into the software,” as if saying the words would make it as easy as using my paper and pencil. Their theory was confirmed when I went online and found videos that showed beautiful artwork being created in a blink of an eye. Since it looked so easy, I decided to give it a try. My husband, once again, took care of me and fed my addiction by buying me a Bamboo stylus, which came with Photoshop Elements and Corel Painter Essentials 4. He also brought home the full version of Photoshop. Yes… my writing hobby, which wasn’t supposed to cost anything, quickly headed into the red. I know that my limited book sales will never allow me break even, but…oh well. I’m completely hooked and can’t stop now.
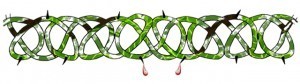
To make a long story short, digital art is really hard and those in the videos are aliens from another planet. A stylus is NOT the same as a pencil—not by a long shot, and Photoshop is…let’s just say… beyond intimidating. I’ve never used such curse words in my life. I know the tool can do tremendous things but first you have to be able to find the feature and then you have to decipher the millions of settings, of which none of them use terms I understood. I tried using tutorials people have posted on YouTube but I banged my head against my desk in frustration, trying to replicate their actions. For Tianna’s wrist mark included within book 2, Sleeper Wakes, I have no idea how I did it the coloring effect. It happened on accident while I was just clicking around and I can’t seem to replicate it. Ugh! I like it, so I kept it.
Once my images were ready, I couldn’t figure out what file type to use. There are .gif, .jpg, .png, psd, and the list goes on. Initially I decided on .gif files but quickly ran into issues. Although .gif seem to be the smallest in storage size, the picture quality suffered when converted into the book’s final format. I switched to .jpg. Given my lack of abilities with Photoshop, I gave up on the background transparency issue so my images have white squares behind them. If my books ever become popular, I’ll have to learn how to fix this and republish with better, transparent background images. I’m sorry if these blinding white boxes drive you crazy while reading my story in a night mode on a reader. I think all my cover art turned out great and I am fond of the mask I used to represent my series. I think I am getting better.

Since I have just published book 2 and have 3 more books to finish—including artwork—I picked up the local community college catalog. I guess it is time to teach this old dog a new trick and learn the world of digital imaging. Look out Photoshop class…here I come. I’ll let you know how that goes. 
If you would like to see all of the images that I’ve published so far, take a look at http://www.facebook.com/BlueFireNovels. I’m trying to add a gallery to this web site but I’ll have to wait for technical support — my son — to set it up for me. I’m technically pathetic!