
Marly Bird's Blog, page 160
August 30, 2017
Announcing the 2017 Crochet Along with Marly Bird
[image error]The 2017 Crochet Along with Marly Bird is sponsored by Red Heart.
Here we are again moving into fall and starting another Crochet Along. This year we decided to get your input to figure out what our group project would be, thank you for participating. After pulling all the results we found that you wanted to make the Granny Square Cardigan that I designed!
*This post contains affiliate links. By clicking one of these links and making a purchase a portion will go to the blog. The price you pay will not be changed. Thank you for your support of the blog.*
What is a Crochet Along (CAL):
Let’s start at the very beginning. If you aren’t familiar with the term ‘crochet along’ let me explain it to you. A crochet-along, or CAL, is a group of people coming together to crochet the same project in the same timeframe. The best part about the CALs that I run are that I have a special Facebook group (read more about this below) that is full of helpful crocheters working on the same project and there to offer support. If you are not able to start when I post the first section or if you are new to crochet and don’t feel as fast, you don’t have to worry. The content and pattern will always be available and is always FREE, thanks to Red Heart.
About the 2017 CAL Project:
Our project for this Crochet Along will be using Red Heart Unforgettable. This is the same yarn that we used in the last CAL when we made a poncho. If you didn’t participate in that CAL you can always go back follow along at any point. The Granny Square Cardigan looks like a cardigan but is made to be oversized and cozy. Unforgettable is so soft to the touch that it adds to the cozy feel of the sweater.
The crochet along will start on September 6th and continue for the following 5 weeks (6 weeks total). During that time you can find a new section of the pattern on my blog each week along with at least one video to accompany that section. Read through to the bottom of this post to see the full schedule of when each section will be released.
CAL Community:
Before we get started on the CAL please head over to Facebook and join our group. In this group you will be joined by the many other people that will be participating in the CAL. In this group we share progress photos, talk about tips and tricks, and help each other through the tricky parts of the pattern. I will be there in the group answering your questions along with my team of admins and other crochet lovers.
The Facebook group is also where you can enter to win prizes, but more about that later.
Use the hashtag #MarlyBirdCAL to share your projects! The hashtag will make it easier for us to find the projects.
Crochet Along Intro Video:
Crochet Along Supplies:
Pick up your supplies now so you’ll be ready to go when the CAL starts!
Use the promo code CALMARLY20 from August 30-September 13, 2017 for 20% purchases of Unforgettable yarn on redheart.com.
Cardigan measures 48 (56, 64)” (122 (142, 163) cm) in width including cuffs, and 21½ (25, 28½)” (55 (64, 72) cm) in length, not including collar.
RED HEART Unforgettable: 6 (9, 11) balls in color of your choice
Susan Bates Crochet Hook: 4mm [US G-6]
Yarn needle
Split lock stitch markers (or you can make your own using the tutorial that I did)
The sample cardigan in the written pattern was made in the color 3968 Regatta. Any color of Unforgettable works for this sweater.
Crochet Along Schedule:
Each week on Wednesday during the CAL you will be able to get the new section of the pattern here on my blog. At the end of the CAL you will be able to get the full pattern in PDF form for FREE on the Red Heart website. Even after the CAL the information will be available for FREE on my blog.
Along with the new written pattern each week there will be a video released to help explain the new section. Be sure to subscribe to my YouTube channel to be sure you are notified as soon as the video goes live.
Week 1 Wednesday, September 6
Selecting the your size, and motif construction
Week 2 Wednesday, September 13
Join as you go motifs
Week 3 Wednesday, September 20
Edging
Week 4 Wednesday, September 27
Cuffs and seaming
Week 5 Wednesday, October 4
Collar
Week 6 Wednesday, October 11
Finishing, styling, altering, and how to use this as blueprint
Crochet Along Giveaways:
We can’t finish this post without talking about the giveaways that are available throughout the CAL. I bet you are glad that you made it this far in the post to hear about this!!!
Each week Red Heart will be offering a $25 prize package to one lucky person who posts a photo of their progress in the Facebook group.
Only photos posted in the Facebook group will be counted as an entry for the giveaway.
After the final video is released you will have one week to finish and post your final project photo to be entered to win a $50 prize package from Red Heart! Best of all there will be 3 winners selected from the finished projects.
To enter: Post your picture of your in-progress sweater in the Facebook group before Tuesday at 11:59pm Mountain Time (my time zone) to be entered. Winners will be announced on Wednesdays.
Week 1: Post your progress picture by Tuesday, September 12; 1 winner of a $25 prize pack announced Wednesday, September 14
Week 2: Post your progress picture by Tuesday, September 19; 1 winner of a $25 prize pack announced Wednesday, September 20
Week 3: Post your progress picture by Tuesday, September 26; 1 winner of a $25 prize pack announced Wednesday, September 27
Week 4: Post your progress picture by Tuesday, October 3; 1 winner of a $25 prize pack announced Wednesday, October 4
Week 5: Post your progress picture by Tuesday, October 10; 1 winner of a $25 prize pack announced Wednesday, October 11
Week 6: Post your completed sweater picture by Tuesday, October 17; 3 winners of $50 prize packs announced Wednesday, October 18
I can’t wait to get started with you next week!!!
The post Announcing the 2017 Crochet Along with Marly Bird appeared first on Marly Bird.


August 29, 2017
Snowman in a Square Sparkle Scrubby-Snowman Washcloth
If you have been following along you know that I have been revealing the new scrubby patterns each month for the 7 Months of Scrubby Campaign. We are approaching the last month and today I will share with you how to make the Snowman in a Square Sparkle Scrubby Snowman Washcloth.
*This post contains affiliate Links. By clicking one of these links and making a purchase a portion will go back to the blog. The price you pay will not change. Thank you for your support of the blog.*
About the Pattern:
This pattern was designed by Michele Wilcox. If you have been following along with the 7 Months of Scrubby you will have seen many of her new Scrubby patterns. She chose to use Scrubby Sparkle to make this cute Snowman Washcloth.
The final month in the 7 Months of Scrubby Campaign is all about the Holidays. A snowman is the perfect addition to this theme. You can make this, and the other, patterns quickly and get them ready for your holiday gifts. Paired with some hand lotion or soap this Snowman pattern would make the perfect gift.
[image error]
About Scrubby Sparkle:
Scrubby sparkle is another yarn in the Scrubby family. If you haven’t used this yarn before now is a great time to try it out. Read a full review of the yarn in my Scrubby Sparkle blog post.
Red Heart Scrubby Sparkle comes in TEN beautiful colors. You can combine them in so many ways or use them singly to make the perfect accessory for your home. Since this yarn is 100% polyester it is less likely then cotton to sour when used as a dishcloth. I am sure you all know what I am talking about. After some time your cotton dishcloths start to get a smell but with Scrubby yarn by Red Heart the chances of this happening are reduced, eventually you will need to replace them though.
Snowman Washcloth Materials:
RED HEART® Scrubby Sparkle™: 1 ball each 8506 Icepop A, 8001 Marshmallow B, 8260 Orange C, and 8012 Licorice D Note: Only small quantities of C and D are needed for this project.
Susan Bates® Crochet Hook: 5mm [US H-8]
Yarn needle
Download the FREE pattern
Snowman Washcloth Tutorial:
Also on the Blog:
The post Snowman in a Square Sparkle Scrubby-Snowman Washcloth appeared first on Marly Bird.
August 25, 2017
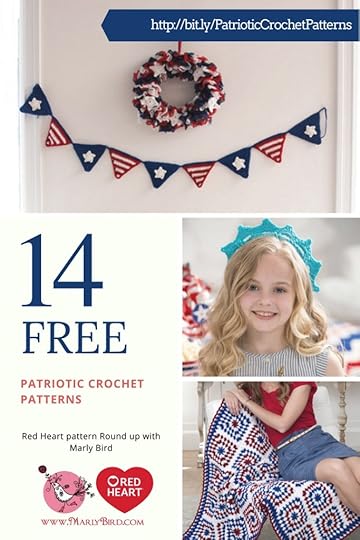
14 Free Patriotic Crochet Patterns
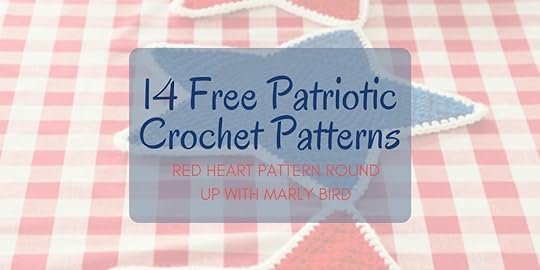
With Independence day here I wanted to share with you some of the cute patriotic crochet patterns that Red Heart has for FREE download. These patterns are great not only for the 4th of July but for Labor Day and for Memorial Day next year. There are 14 Free Patriotic Crochet Patterns in this round up and I am sure you will find one you love.
*THIS POST CONTAINS AFFILIATE LINKS. BY CLICKING ONE OF THESE LINKS AND MAKING A PURCHASE A SMALL PORTION WILL GO BACK TO THE BLOG, THE PRICE YOU PAY WILL NOT BE CHANGED. THANK YOU FOR YOUR SUPPORT.*
Free Patriotic Crochet Patterns:

America’s Ripple Throw
Download the America’s Ripple Throw Pattern
Designed By:
Marianne Forrestal
Materials Needed:
RED HEART® Super Saver®: 3 skeins each of 385 Royal A, 316 Soft White B; 2 skeins of 319 Cherry Red C
Susan Bates® Crochet Hook: 5.5 mm [US I-9]
Yarn needle
American Waves Throw
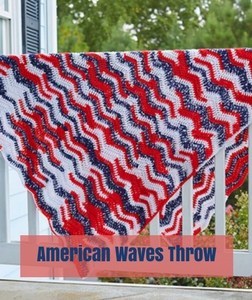
Download the American Waves Throw Pattern
Designed By:
Marianne Forrestal
Materials Needed:
RED HEART® Super Saver®: 7 skeins 3943 Americana
Susan Bates® Crochet Hook: 5.5mm [US I-9]
Yarn needle
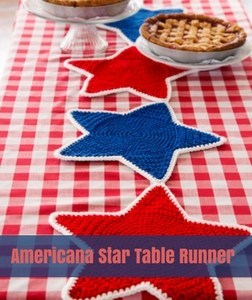 American Star Table Runner
Download the American Star Table Runner Pattern
Designed By:
Cristin Berrafato
Materials Needed:
RED HEART® Super Saver®: 1 skein each of 319 Cherry Red A, 385 Royal B, and 316 Soft White C
Susan Bates® Crochet Hook: 5.5mm [I-9 US]
Yarn needle
Stitch marker
Betsy Ross Patriotic Apron
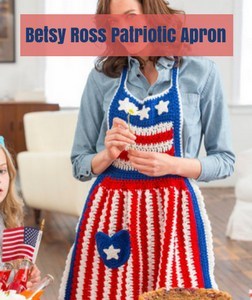
Download the Betsy Ross Patriotic Apron Pattern
Designed By:
Michele Wilcox
Materials Needed:
RED HEART® Super Saver®: 1 skein each of 385 Royal A, 316 Soft White B, and 319 Cherry Red C
Susan Bates® Crochet Hooks: 5.5mm [US I-9] and 3.75mm [US F-5] (for stars only)
Stitch marker
Yarn needle
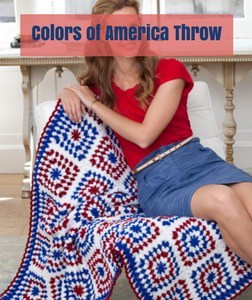 Colors of America Throw
Download the Colors of America Throw
Designed By:
Martha Brooks Stein
Materials Needed:
RED HEART® Super Saver®: 2 skeins each of 376 Burgundy A, 385 Royal B, 311 White C
Crochet Hook: 5.5 mm [US I-9]
Yarn Needle
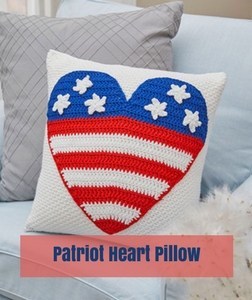 Patriot Heart Pillow
Download the Patriot Heart Pillow Pattern
Designed By:
Kristen Stoltzfus
Materials Needed:
RED HEART® Super Saver®: 2 skeins 311 White A, 1 skein each 319 Cherry Red B and 385 Royal C
Susan Bates® Crochet Hook: 5mm [US H-8] and 6.5mm [US K-10½]
Stitch markers
Yarn needle
18″ [46 cm] pillow form
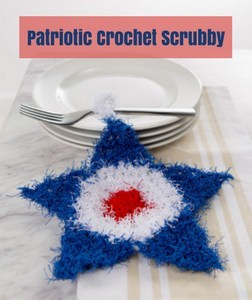 Patriotic Crochet Scrubby
Download the Patriotic Crochet Scrubby Pattern
Designed By:
Rebecca J. Venton
Materials Needed:
RED HEART® Scrubby™: 1 ball each 905 Cherry A, 10 Coconut B and 870 Royal C
Susan Bates® Crochet Hook: 5.5mm [US I-9]
Yarn needle
Patriotic Hexagon Baby Blanket
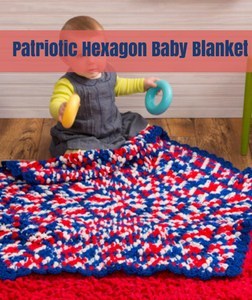
Download the Patriotic Hexagon Baby Blanket Pattern
Designed By:
Shari White
Materials Needed:
RED HEART® Super Saver®: 4 skeins 938 Stars & Stripes A, 1 skein 385 Royal B (Note: 938 Stars & Stripes is Discontinued)
Susan Bates® Crochet Hook: 6.5mm [US K-10½]
Yarn needle
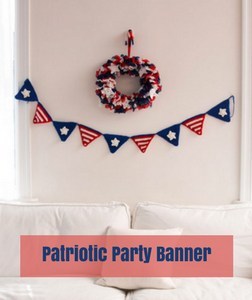 Patriotic Party Banner
Download the Patriotic Party Banner Pattern
Designed By:
Salena Baca
Materials Needed:
RED HEART® Super Saver®: 1 skein 385 Royal A, 316 Soft White B, and 319 Cherry Red C
Susan Bates® Crochet Hooks: 5mm [US H-8] and 5.5mm [US I-9]
Yarn needle
Hot glue gun
Patriotic Pentagon Doily
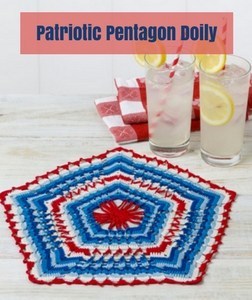
Download the Patriotic Pentagon Doily Pattern
Designed By:
Amber Millard
Materials Needed:
AUNT LYDIA’S® Classic Crochet Thread, Size 10: 1 ball each 494 Victory Red A, 487 Dark Royal B, 480 Delft C, 805 Blue Hawaii D, and 210 Antique White E
Susan Bates® Steel Crochet Hook: 2.35mm [US 1]
Fabric stiffener (optional)
thread needle
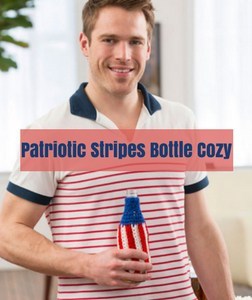 Patriotic Stripes Bottle Cozy
Download the Patriotic Stripes Bottle Cozy Pattern
Designed By:
Kristi Simpson
Materials Needed:
RED HEART® Super Saver®: 1 skein each 319 Cherry Red A, 316 Soft White B, and 385 Royal C
Susan Bates® Crochet Hook: 5mm [US H-8]
Yarn needle
Stitch marker
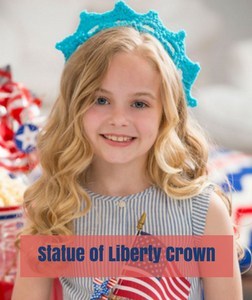 Statue of Liberty Crown
Download the Statue of Liberty Crown Pattern
Designed By:
Salena Baca
Materials Needed:
RED HEART® Super Saver®: 1 skein of 512 Turqua
Susan Bates® Crochet Hook: 5.5 mm [I-9 US]
Yarn needle
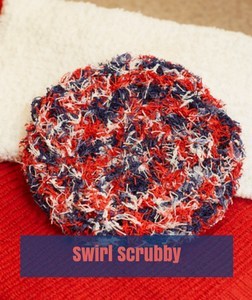 Swirl Scrubby
Download the Swirl Scrubby Pattern
Designed By:
Salena Baca
Materials Needed:
RED HEART® Scrubby™: 1 ball of 987 Americana
Susan Bates® Crochet Hook: 5.5mm [US I-9]
Yarn needle
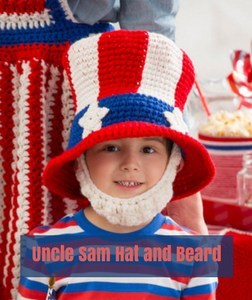 Uncle Same Hat and Beard
Download the Uncle Sam Hat and Beard Pattern
Designed By:
Sharon Mann
Materials Needed:
RED HEART® Super Saver®: 2 skeins each 319 Cherry Red A and 316 Soft White B, 1 skein 385 Royal C
Susan Bates® Crochet Hooks: 6.5mm [US K-10.5] and 3.75mm [US F-5]
Stitch markers
Yarn needle
The post 14 Free Patriotic Crochet Patterns appeared first on Marly Bird.
August 24, 2017
Thursday Trivia with Marly Bird 8/24/17 to 8/30/17
It’s time for Thursday Trivia with Marly Bird and Red Heart Yarns!
*This post contains affiliate links. If you click on one of the links and make a purchase a small portion will go back to the blog. Thank you for your support*
What can you win in Thursday Trivia:
For you to have a chance to win a prize package of $25 from Red Heart Yarns you must answer this week’s trivia question correctly. Make sure you read to the bottom of the post to get your clue for where to find the answer. Rafflecopter will help us choose a correct answer randomly to win, be sure you enter your email address so we can verify the winner.
Giveaway Timeframe:
You have one week to answer the question.
Winner will be announced the following Thursday at the launch of next week’s question.
Be sure to come back and see if you were the winner.
This Week’s question:
Please comment on this blog post (and enter the Rafflecopter widget)–What is the name of the NEW Red Heart yarn used in the Simple Crescent Shawl?
Spread the word:
Help spread the word about #ThursdayTrivia. You can find each week’s question on the blog under Thursday Trivia.
[image error] FINE PRINT:
The Thursday Trivia Giveaway with Marly Bird and Red Heart Yarns is open to US and Canada addresses only. One winner will win a $25 prize package from Red Heart Yarns. This giveaway ends on 8/30/17 at 11:59 pm Mountain US time. To enter, use the Rafflecopter form below. If you are on mobile and have difficulty entering, please use a desktop computer to enter. You must enter a blog post comment on THIS post and click the Rafflecopter button to be eligible. Click the button below to enter your information to be entered to win.
Also on the Blog:
The post Thursday Trivia with Marly Bird 8/24/17 to 8/30/17 appeared first on Marly Bird.
Planned Pooling Crochet Basics-Basic Crisscross Pattern
[image error]Planned Pooling Crochet 102 –how to achieve the basic crisscross pattern
There are two ways to get into the pool. You can slowly wade in from the shallow end, learning how things work and taking your time to carefully plan or you can just go ahead and jump into the deep end.
This tutorial is for those of you who want to learn how things work and take the time to carefully plan your project.
*THIS POST CONTAINS AFFILIATE LINKS. BY CLICKING ONE OF THESE LINKS AND MAKING A PURCHASE A PORTION OF THE SALE WILL GO BACK TO THE BLOG. THE PRICE YOU PAY WILL NOT BE CHANGED. THANK YOU FOR YOUR SUPPORT OF THE BLOG.*
Pooling simply means the colors gather in one area to create a pool of color. There are many ways to pool variegated yarns. Some are accidental and others are more structured and planned. Any pooling pattern that you love is a great pattern.
We will address how to achieve the basic crisscross pattern using the single crochet, chain one version of the moss stitch. You can use one or two turning chains as you please. I find two beneficial as it provides an easier space to fit in the last stitch of the next row.
There are two things that are critical to getting that straight, clean, crisp pattern. The first is you need to have the same number of stitches per color consistently throughout the project. You don’t need each color to have the same number of stitches, but each instance of any one color must have the same number of stitches*.
The second thing that is critical to achieving the ninety degree angles is making sure that each color is one stitch offset from itself two rows below. This will require you to adjust your tension or use other methods to get more work from a color or to use up extra color length. See fig. 001 to understand what is meant by a one stitch offset. The first and last stitch of each color is one stitch over from where that first or last stitch was two rows below.
[image error]
Fig. 1. This shows the offset two rows below. The blank squares represent the chain one between each sc and the turning chain(s). Notice how the first blue stitch moves over one stitch as you go up to the next odd numbered row.
Ideally each stitch should be a single color, without any half one color and half a different color. The best way to do this is to make sure you are using the right hook size for your yarn and your personal tension. Use the information from your swatch made during hook size selection to make a color planning chart.
[image error]
This is my swatch created during hook size selection. I found the best hook size to use was the 5 mm. Note: some pictures show the 5.5 mm hook. These were taken after the tutorial was finished and I realized I didn’t have the right pictures.
[image error]
For Example:
When working through my swatch, I noticed there is a maroon section between purple and red. I decided to call this red and it is included in the stitch count in my chart.
There is also a section between blue and green that isn’t always distinctly blue or distinctly green. When working my project, I make sure I get five stitches from the beginning of green to the end of blue. That middle stitch can be mixed, but it is mostly green most of the time, so my chart reflects that as a green stitch.
There are several ways to get started; the most common way and the one this tutorial addresses is working through one color sequence.
Once you have chosen the correct hook size, make a chain longer than you want your project width to be. It doesn’t matter at all where you start in the chain and it doesn’t matter how many color sequences you work through. You can use your pooling yarn or you can use a separate yarn to create the foundation chain. I prefer to make the foundation chain in the color I intend to use for my border.

When you are ready to start your first row, you want to do so when you have a distinct color change on your hook. That is the working loop on your hook should be a different color than your last chain. If you’re using a separate yarn for the chain, slip stitch to attach your pooling yarn to the first chain after the slip knot; chain two and single crochet in the same stitch. This will give you a chain two loop on the first row to work into on the last stitch of row two. See fig. 002
[image error]
Fig. 002 Top shows starting row one with purple as the new color when using a separate yarn for the chain. Pro tip: measure the length of yarn used to slip stitch and chain one, then start that distance from your first color. Bottom shows starting with yellow as the new color when using the pooling yarn for the chain.
You then work in moss stitch through one color sequence using your planning chart to determine the number of stitches in each color. End row one with the working loop on your hook, after your turning chain(s), being the same distinct color where you started row one. I find I often have to fiddle around a bit here to get this is in just the right spot. So you may have to undo a couple of stitches in row one to make them looser or tighter, but do what you must to get the start for row two the same as the start of row one. (See fig. 003).
[image error]
Fig. 003 The loops on my hook is the same place in the sequence as it was for row one. Notice I have already completed my turn turning chains.
Notice also in fig. 004, I have worked around the starting chain for row one. This is because in row two and beyond, you will be working into a chain one space and not into a chain. It takes a bit more yarn to work around a chain than it does to work into a chain.
[image error]
Fig. 004 Working the first row around the foundation chain to get a proper stitch count for subsequent rows.
Marly explains how to work around the chain in her 10 Secrets to Perfect Planned Pooling video.
*Creating the offset will change the stitch count for one color every other row. Earlier I said you need to maintain your stitch count to get a perfect pool. There is one exception to that. To make a perfect crisscross pool, you need one additional stitch in your color sequence every other row. The total number of stitches per row doesn’t change, just the number of stitches to complete one sequence. Rocky Cee did a great tutorial on how to create the offset and have nice clean edges.
Next you will work row two making sure you get the same number of stitches as indicated in your planning chart, except for in your chosen offset color. Your row two should be an exact copy of row one, but in the opposite direction, again, with the exception of the offset color.
You can see here in fig. 005 that when I approached the end of row two, I had three spaces left to work into and I am about to start my orange. I chose orange as my offset color as I noticed it is often a little short to get three stitches.
[image error]
Fig. 005 The left shows that at the end of row 2, I have 3 spaces left to work into and I am about to start the color orange. When working my swatch, I decided to use orange as my offset color. The right shows my completed row 2, with only 2 orange stitches and one red. This creates my offset.
When I turn at the end of row two, having completed one red sc, I should have three left to work at the beginning of row three.
[image error]
Fig. 006 Ready to start row three with the remaining red.
Once you have turned at the end of row two, you continue to work and as each new color appears on your hook, look two rows down to make sure you are starting one over from where you started on the previous even/odd row.
Fig. 007 below shows the diagonal lines that are created by the two up, one over offset. (You may see this referred to as one up and one over, but it is actually two rows; it is one odd/even row up).
[image error]Fig. 007 Diagonal lines demonstrating the offset Ready to start row three with the remaining red.When you look at fig. 007 and your project in your hands, you will see minor imperfections, such as the green peeking through some of my yellow stitches. The amount of attention and adjustment to make a project with zero flaws is more than I am willing to take on. I still want to enjoy my crochet.
When you look at the fabric as a whole, the minor imperfections are much less noticeable. See Fig. 008 & 009.
From here, you should be able to create your masterpiece, but if you get into any trouble, please pop in to our FB group and ask for help. There is always someone there willing to help a fellow yarn crafter develop the addiction that is planned pooling with crochet.
[image error] [image error]
WHO IS BRENDA-LEIGH:
My name is Brenda-Leigh and I taught myself how to knit when I was seven using a book. Shortly after I began knitting my mother wanted to learn as well so I taught her. It was a great bonding experience to be able to show her something I had learned.
When I was eleven I taught myself how to crochet and my first project was a pineapple doily made with crochet thread.
I’ve continued with both over the years and have recently fallen in love with crochet. When planned pooling became popular last fall, I caught on right away and have had to opportunity to teach others. Since that early experience with my mother, I’ve loved being able to teach others and witness their success. Nothing makes me happier than giving someone that “aha!” moment.
You can find me on Ravelry as CrochetbyAlexina.

PLANNED POOLING CROCHET BLOG POSTS WITH MARLY BIRD:
Thanks so much to Brenda-Leigh for sharing with us planned pooling crochet basics. If you want to learn more about Crochet Planned Pooling you can view my other posts on the topic. Prefer learning through video? On the Marly Bird YouTube Channel you will find an entire Planned Pooling Playlist. Be sure to subscribe so you don’t miss a new video.
The Best Crochet Planned Pooling Argyle Tutorial
10 Secrets to Perfect Planned Pooling in Crochet
Planned Pooling-Finished Starting Chains
How to create Crochet Planned Pooling Argyle Charts
Multiple Sequence Planned Pooling Crochet
Granny Stitch Planned Pooling Crochet
Planned Pooling Crochet: Choosing the Best Hook Size
Planned Pooling Crochet: Color Placement
Planned Pooling Crochet: Deciding Where to Create Your Offset Shift
Basics of Planned Pooling
Also on the Blog:
The post Planned Pooling Crochet Basics-Basic Crisscross Pattern appeared first on Marly Bird.
August 23, 2017
Birgitta, a Knit Tunic Perfect for Layering
[image error]Through midnight MST tonight (8/23/17) you can purchase the Birgitta pattern for only $1 in the Marly Bird Ravelry Store. Pattern must be purchase in the Marly Bird Ravelry Store. The code must be applied to the purchase before the discount will be applied. Click the image above for the code to automatically be applied to your basket. Due to the nature of digital products I will not be able to offer a refund, be sure to use the code and be logged in to your account before you purchase.
*This post contains affiliate links, which means if you click on the link and purchase something I will receive a small percentage of the value of your order. The amount you pay is not changed.*
[image error]The Birgitta pattern is a fabulous lightweight knit tunic, perfect to wear in warm or cool weather. The feminine styling and smart shaping creates a slimming silhouette. With a deep cross over V- neck highlighting the bust line and a beautiful lace and bobble stitch pattern skirt perfectly shaped into an A line that flatters many body types. Knit in 75% yak and 25% bamboo yarn, the ‘Birgitta’ has a shine that allows it to be dressed up or down. The top is worked in pieces from the bottom up then seamed together. It is beautifully cut and very female.
Birgitta Knit Tunic Materials:
Bijou Basin Ranch “Lhasa Wilderness”, 75% yak/ 25% bamboo; 180 yards (165 m); 2 oz (56 grams); CYCA size 2 sport 12-ply: ruby 3 (3, 4, 4, 4, 5, 5, 6, 6, 6) hanks.
Size US 4 (3.25 mm) 24″ circular needle; size US 2 (2.75 mm) 16″ and 32″ circular needles, or size to obtain correct gauge.
US E/4 (3.5 mm) crochet hook
stitch markers
stitch holders
tapestry needle
[image error]
GAUGE IS IMPORTANT:
As in all of the other garments that I make, I highly suggest making a hanging gauge swatch before you get started. This is important to see how gravity will alter the size of your cardigan after wearing it. Starting with a swatch will also save you the headache of making the wrong size before you even start. To make a hanging gauge swatch I start by making a swatch of the stitch pattern that is at least 6 inches square. Then I hang the swatch to a hanger or cloths line and add additional cloths pins to the bottom to simulate gravity. Take a before and after measurement of your swatch to see what happens to it.
Also on the Blog:
The post Birgitta, a Knit Tunic Perfect for Layering appeared first on Marly Bird.
August 22, 2017
How to make the Simple Crescent Knit Shawl
[image error]Red Heart recently released a BRAND NEW yarn called Hopscotch. Today I want to share with you one of the new patterns designed with this new yarn and show you how to make it. The Simple Crescent Knit Shawl is a great option for fall and even summer in you air conditioned building.
*This post contains affiliate links. By clicking one of these links and making a purchase a portion of the purchase will go to the blog. The price you pay will not change. Thank you for your support of the blog.*
Rea Heart Hopscotch comes in 7 colors and is a medium weight 100% acrylic yarn. The yarn is super soft and great to work with. This shawl is made in a crescent shape, not the traditional triangle shape. Try out this new yarn with this great new shawl pattern.
We will use circular needles to hold all of the stitches and increase using the yarn over method. I will walk you through this increase if it is new to you and teach you how to make each part of the shawl. If you are using stitch markers and want to make your own I have a great video to show you how.
Simple Crescent Knit Shawl Materials:
Download the Simple Crescent Knit Shawl Pattern
RED HEART® Hopscotch: 2 balls 7958 Kickball
Susan Bates® Circular Knitting Needles: 5mm [US 8] 36” (91 cm) long
Stitch marker (optional)
Yarn needle
Simple Crescent Shawl Video Tutorial:
Also on the Blog:
The post How to make the Simple Crescent Knit Shawl appeared first on Marly Bird.
August 21, 2017
Introducing Michelle Hunter
Introducing Michelle Hunter, or as some know her ‘Knit Purl Hunter’, as we welcomed her for the first time to the Yarn Thing podcast with Marly Bird!
[image error]
Michelle says: ‘I am best known as the creator of the knitting education website, Knit Purl Hunter, where my videos have been viewed by millions of knitters. My books, Building Blocks, Building in Color, and Building with Lace are skill building series designed to progress the knitter through the major knitting principles. My time is divided between teaching classes nationwide and online instruction. My designs have been featured in various publications and are all supported with video tutorials. I consider myself the luckiest person alive to be able to combine my passion for teaching with my love of knitting.’
[image error]
[image error]
The Best of Knit Purl Hunter is an inspiring collection of 25 patterns from designer Michelle Hunter. Many of these patterns were originally featured as Knit-Alongs through her Progressive Needles series and are backed with the educational videos we’ve come to know and love from Michelle. Featuring all new stunning photography and a variety of projects such as socks cowls shawls and more. This book is a must-have for every knitter!Featured yarns include HiKoo CoBaSi CoBaSi Tonal Kenzie Llamor Rylie Simplicity Simpliworsted Simplinatural Sueno and Sueno Tonal along with Schoppel Zauberball and Zauberball Crazy. For those in the Seattle area, you’ll be tickled to know, Michelle will be teaching at Makers Mercantile (owned by Skacel who is the publisher of this wonderful book) the weekend of September 16 & 17.
For more information, go to knitpurlhunter.com. Don’t miss her blog and also, find Michelle in Ravelry, Facebook, and Twitter.
If you missed getting to hear this visit live, check out the video Marly posted LIVE in Facebook or listen to the podcast episode as archived: http://www.blogtalkradio.com/yarnthing/2017/08/22/introducing-michelle-hunter
Please visit our sponsors and thank them for their support of the Yarn Thing podcast.
[image error]
The post Introducing Michelle Hunter appeared first on Marly Bird.
Photo Tutorial-Making A Pompom Package Topper
[image error]After spending hours completing your handmade gift for someone special you may want to add a little something special to the packaging as well. Today I am going to show you how to make a pompom topper for your next gift. This photo tutorial will walk you through each step to create you pompom package topper with your leftover yarn and your hands.
*This post contains affiliate links. By clicking one of these links and making a purchase a portion of that purchase will go to the blog. The price that you pay is not changed. Thank you for your continued support of the blog*
A friend of mine showed me this cute idea of using the leftover yarn from my project to make a pompom topper for my gifts. She was making baby blankets and wanted an easy way to wrap them up and was wrapping them with tissue paper. The next step was to come up with something for the top of the package to give it a finished look. Ribbon or a pre-made bow wouldn’t cut it when the gift inside was carefully handmade. She decided to use the scrap yarn from the project to give the package a little something extra.
[image error]
Pompom Package Topper Photo Tutorial:
To start off you will need to wrap your project in tissue paper or any wrapping paper of your choice. Your package could be square or rectangle or really any shape works for this topper. Once you have your project wrapped up you are ready to get started on the pompom package topper.
Making your pompom:
First select the yarn that you will use for your pompom package topper. In this tutorial I will be using Red Heart Super Saver which was used to make the baby blanket that is wrapped. Typically I use the left over yarn from the project that I just finished, like in this case. It is a great way to use up the extra yarn and tie the colors together to the package. When making a pompom there are many different ways to make it. For this tutorial I am going to use my hands as my pompom maker.
[image error]
To start off I wrap the yarn around my fingers, as many times as I want. The more you wrap, the fuller your pompom will be. Typically I try to get around 20-30 wraps, but it isn’t something that you need to get exact.
[image error]
After you have done your wraps you will need to tie it off in the center to keep all the strands together. Cut a length of yarn that will go around your wraps and be long enough to tie a square knot.
[image error]
[image error]
Once you secure the middle of the pompom it is time to cut the yarn and make it look like a pompom. Take your scissors and stick it through the loops that were made from the wraps and the center tie. Make sure you cut all of the loops. Don’t worry if they aren’t all the same length, you can clean that up once you have cut all of the loops.
[image error]
Guess what, you just made a pompom!!! Best of all you made it without having to purchase any new tools! Now we just have to attach it to the package.
Attaching your pompom:
Attaching the pompom to your package is quite simple. First I take the yarn that I used to make the pompom and wrap that around the package. Again, this is something that you can use your designer eye on to determine how many times you want to wrap the package. Once you have the package wrapped you will tie the yarn in a square knot and leave long tails.
[image error]
Using the tails that you left, you will use a square knot to attach the pompom to the package.
[image error]
[image error]
The last step is to trim the ends of your pompom until you like the look. Now you have a beautiful handmade present and a beautiful package to present.
[image error]
Pompom Package Topper ideas:
I love using these pompom package toppers for my handmade items but they can also be used on any package. Try changing up the colors that you use or even combining colors together. Another great idea is to add two or more pompoms to the package.
Also on the Blog:
The post Photo Tutorial-Making A Pompom Package Topper appeared first on Marly Bird.
August 18, 2017
The Basics of Planned Pooling Crochet
There are two ways to get into the pool. You can slowly wade in from the shallow end, learning how things work and taking your time to carefully plan or you can just go ahead and jump into the deep end. This tutorial is for those who want to just jump into the deep end of planned pooling crochet.
*This post contains affiliate links. By clicking one of these links and making a purchase a portion of the sale will go back to the blog. The price you pay will not be changed. Thank you for your support of the blog.*
First let’s talk about pooling. Pooling simply means the colors gather in one area to create a pool of color. There are many ways to pool variegated yarns. Some are accidental and others are more structured and planned. Any pooling pattern that you love is a great pattern.

We will address how to achieve the basic crisscross pattern using the single crochet, chain one version of the moss stitch. You can use one or two turning chains as you please. I find two beneficial as it provides an easier space to fit in the last stitch of the next row.
Even jumping into the deep end requires a swim suit and checking the water depth and temperature.
Step 1: Identifying the color sequence (your swim suit)
To make any repeating pattern, you need to know your color sequence. You will want to pull out several meters to identify the repeat. Once you identify a repeat of colors, make a circle (see fig. 001, fig. 002) with the yarn to compare the color lengths. Make sure each instance of the color is close to the same length. It doesn’t have to be exact, but it does need to be close.
I split it into two photos to make it easier to see. I have pulled out three full color sequences and you can see in fig. 001 each instance of red and each instance of orange is very close to the same length. In fig. 001 each yellow starts in the same place and in fig. 002 you can see each yellow ends in the same place. Fig. 002 also shows each instance of green, blue, and purple are very close to the same length.
Swim suit is in place; now let’s check the depth of the water.
[image error]
Fig 001
[image error]
Fig 002
Step 2: Choosing your hook size (water depth)
You can use any hook size you like, however it is best to start with the hook size recommended on the yarn label. If you are a tight crocheter, you may find it beneficial to use a hook size larger than that indicated on the wrapper. Conversely, if you tend to work very loosely, a smaller hook size may be best.
Step 3: Make your foundation chain (water temp)
Using your chosen hook size, make a chain longer than you want your project width to be. Many tutorials suggest chaining through one full color sequence, but that isn’t necessary; it just needs to be a little longer than your desired project width. You can use your pooling yarn or you can use a separate yarn to create the foundation chain. I prefer to create the foundation chain in the color I intend to use for my border, in this case RHSS Soft White. If you’re using a separate yarn, do not cut it until you have completed the first row.
[image error]
Fig 003-Foundation chain not fastened off
Step 4: Row one (swimming)
If you have used a separate foundation chain, slip stitch to attach your pooling yarn to the first chain after the slip knot; chain two and single crochet in the same stitch (see fig. 004) with the second chain being a new color, right after a color change in the yarn. If you are using your pooling yarn for the foundation chain, single crochet in the third chain from the hook.
[image error]
Fig 004-Attached Mexicana with slip stitch and sc in same chain. SC is in my new color (purple)
Note: It might require a little fiddling to get it so your slip stitch plus chain two has a distinct color change on the second chain. Pro tip: measure the length of yarn used to slip stitch and chain one, then start that distance from your first color.
You then work in moss stitch through your color sequence until you get close to the end of your chain/number of color sequences you desire. I’ve chosen to work around the foundation chain as it uses slightly more yarn than working into the chain. In row two and beyond, your single crochet stitches will be worked around your chain one between each stitch. You can work into the foundation chain if that is your preference, but perhaps try to make those first row stitches slightly looser than normal.

Row two should start in the same spot within the sequence as row one. So the working loop on your hook should be the same distinct color change as when you started row one after you have done your turning chain(s). I find I often have to fiddle around a bit here to get this is in just the right spot. So you may have to undo a couple of stitches in row one to make them looser or tighter, but do what is needed to get that same color change for the start for row two as you had in row one.
[image error]
Fig 005-End of Row 1, before turning chains. Black arrow indicates the change in color to purple, which is hard to see in this picture.
[image error]
Fig 006-Beginning of row two – first sc is in purple. Black arrow shows change in color to purple, which is hard to see in this picture.
Now you are going to go ahead and work in your normal tension. You will have some stitches that are two different colors and some instances of a two stitch offset instead of a one stitch offset. When you look at the fabric as a whole, it will look pretty cool and your non crochet friends will think you are a yarn wizard!
This is my fabric made just using my normal tension. I made it using the size 5.5 mm hook recommended on my RHSS Mexicana, while I was watching television and enjoying a cool beverage. It has some mistakes and half stitches, etc., but overall the fabric is quite pretty and I had zero stress making it.
[image error]
Fig 007-This is the ‘right’ side of the fabric showing the less precise, less stress results.
[image error]
Fig 008-This is the ‘wrong’ side of the fabric showing the less precise, less stress results.
Fig. 009 Shows a close up of the same fabric where you can more easily see the imperfections. If you want to get rid of those, stayed tuned for Planned Pooling The Basics 102, coming to the blog on next week.
[image error]
Fig 009-the black line shows how the yellow stitches have a one up, one over configuration for several rows. This one up, one over is what is meant by a one stitch offset. You can also see there are places where it is one up, two over; commonly referred to as a two stitch offset. The circles are just a few of the many stitches that have two colors.

WHO IS BRENDA-LEIGH:
My name is Brenda-Leigh and I taught myself how to knit when I was seven using a book. Shortly after I began knitting my mother wanted to learn as well so I taught her. It was a great bonding experience to be able to show her something I had learned.
When I was eleven I taught myself how to crochet and my first project was a pineapple doily made with crochet thread.
I’ve continued with both over the years and have recently fallen in love with crochet. When planned pooling became popular last fall, I caught on right away and have had to opportunity to teach others. Since that early experience with my mother, I’ve loved being able to teach others and witness their success. Nothing makes me happier than giving someone that “aha!” moment.
You can find me on Ravelry as CrochetbyAlexina.
PLANNED POOLING CROCHET BLOG POSTS WITH MARLY BIRD:
Thanks so much to Brenda-Leigh for sharing with us planned pooling crochet basics. If you want to learn more about Crochet Planned Pooling you can view my other posts on the topic. Prefer learning through video? On the Marly Bird YouTube Channel you will find an entire Planned Pooling Playlist. Be sure to subscribe so you don’t miss a new video.
The Best Crochet Planned Pooling Argyle Tutorial
10 Secrets to Perfect Planned Pooling in Crochet
Planned Pooling-Finished Starting Chains
How to create Crochet Planned Pooling Argyle Charts
Multiple Sequence Planned Pooling Crochet
Granny Stitch Planned Pooling Crochet
Planned Pooling Crochet: Choosing the Best Hook Size
Planned Pooling Crochet: Color Placement
Planned Pooling Crochet: Deciding Where to Create Your Offset Shift
Also on the Blog:
The post The Basics of Planned Pooling Crochet appeared first on Marly Bird.
Marly Bird's Blog

- Marly Bird's profile
- 19 followers


![[image error]](https://i2.wp.com/www.marlybird.com/wp-content/uploads/2017/08/Fig-001.jpg)
![[image error]](https://i1.wp.com/www.marlybird.com/wp-content/uploads/2017/08/Fig-002.jpg)
![[image error]](https://i0.wp.com/www.marlybird.com/wp-content/uploads/2017/08/Fig.-003.jpg)
![[image error]](https://i0.wp.com/www.marlybird.com/wp-content/uploads/2017/08/Fig.-004.jpg)
![[image error]](https://i0.wp.com/www.marlybird.com/wp-content/uploads/2017/08/Fig-005.png)
![[image error]](https://i0.wp.com/www.marlybird.com/wp-content/uploads/2017/08/Fig-007.jpg)
![[image error]](https://i0.wp.com/www.marlybird.com/wp-content/uploads/2017/08/Fig-008.jpg)
![[image error]](https://i1.wp.com/www.marlybird.com/wp-content/uploads/2017/08/Fig-009.jpg)