
Marc Spagnuolo's Blog, page 74
July 30, 2015
One Eternal Round
I am a kinetic sculptor and a lover of wood. To create One Eternal Round, I used every tool in my shop including the lathe, scroll saw, CNC, rotary tools, plus of course, table saw, joiner, planer, and various sanders.
I used black walnut, oak, and ash which I harvested myself plus maple burl and snake wood.
I was interested in exploring circular motion in all its beautiful complexity. In this sculpture, the marbles move and the wood is shaped in circles within circles, vertically, horizontally, concentrically, and randomly.
Because still photos don’t capture the kinetic nature of my sculpture, I’ve put together a video.
Also, I have more details on my Facebook page at https://www.facebook.com/halekinetics.
The post One Eternal Round appeared first on The Wood Whisperer.


July 25, 2015
Mark’s Refurbished Workbench
When I bought my Scandinavian workbench in 1984, I could not have imaged the countless hours of use it would see; every activity from building the furniture for my home to repairing lawn mower engines. After 30 years of use and abuse, it was time to give it a good cleaning and tune-up.
My first thought was to hand plane the top and try to make it as level as possible. The front of the tail vise was about 1/16th lower then the rest of the bench. When I reviewed The Wood Whisperer Video on “how to flatten a bench top with a router”, I knew this was the way I wanted to go. I purchased a Freud 1-1/2” bit and followed the instructions in the video. I could not have been more pleased with the results.
After some light sanding, I finished the bench with Tung Oil, replaced the vice handles with my own (verawood/brass), added a monogram inlay to replace the existing logo and now the bench is ready for the another 30 years!
The post Mark’s Refurbished Workbench appeared first on The Wood Whisperer.
July 22, 2015
Justin’s Wee Lassie
This project started for me in June of 2013, after flipping through both Featherweight Boatbuilding by Mac McCarthy and Canoecraft by Ted Moores. Due to the size of my one car garage shop, I was limited in options but went with the Wee Lassie design out of Fbb because, well it fit and the entire book describes specific instructions for that exact boat. With just enough room to walk all the way around the molds comfortably. I began ripping 1/4″ strips out of 1x8x12 select pine boards, then running each one through the router for a bead and cove on each strip. I cut the slots out of the molds for gluing, clamping, and tying each piece one at a time which took a considerable amount of time to let each one cure together before being able to move to the next, vs stapling each piece to each mold. The strips went on simple enough until getting to the big transition of the side to the bottom of the hull. The best method I found was to free-hand the angle on the table saw to fit good, then clamping and tying to the other side in order get an accurate cut to meet the keel and sister strip.
Once the basic hull was constructed, I faired it, but by this time it was getting cold in Ohio, so I continued the project in the middle of the living room. I was obligated into a water-based stain to adhere properly to the epoxy/resin. I researched and found to use conditioners to prevent blotchy spots in the pine, I sanded and sanded, raised the grain and sanded. It went on like paint on a brush, thick and smeary with the brush strokes and it was still blotchy after wiping. I sanded a quarter of the boat back to bare wood and re-coated it thick and dark. Although I would go back and buy the conditioner, I got the bolder look and it hid a lot of small imperfections.
After laying the cloth and putting on 4 coats of epoxy/resin, (buy the 15$ epoxy spreading tool and save days of sanding) pulling it off the molds and flipping it over was a great feeling. The rails and thwart are red oak epoxied to the hull and really adds a nice looking trim. The red oak seat was mortise and tenoned together with holes all the way around for hand weaving with natural cane which was a nightmare. The compartments were cut from a piece of plywood with red oak and pine strips glued to it and epoxied in place around the door. The decks had one piece of red oak down the center, then pine on each side, finishing with hickory. The paddle is all hickory except for 4 pieces of pine. Two full-length pieces and the the rest cut with a jigsaw, faired with a belt sander, epoxied together to form cupped ends to scoop the water, and then sealed with epoxy.
Everything was coated with 4 coats of marine grade UV,Z-spar Flagship varnish to protect the epoxy and the color from fading. Finally after countless hours of sawing, planning, sanding, brushing, and sanding, I was able to sit in my little boat floating in the river, laughing to myself thinking I made it, everything is good. I only spent maybe 20 minutes on the water due to the weather, after all it was November in Ohio! All I could think was that all the work was so worth it!
There was a huge learning curve in this build and I’m sure I would spend half the time building another one by doing things more efficiently. The total cost was around $700: hull-$90, epoxy resin fiberglass-$400, varnish-$100, and paddle-$40. The experience of building this boat and imagining all the time I’ll spend on the water going to different states and exploring new waters and wildlife, is truly gratifying and I encourage anyone wanting to build a similar boat to buy Featherweight Boatbuilding and to just go for it.
The post Justin’s Wee Lassie appeared first on The Wood Whisperer.
July 21, 2015
Kid’s Table and Chairs
This is a kid-sized table and two chairs that I built for my niece’s birthday. The chair frames are made from douglas fir 2×10’s ripped down to 1.5″ width. The back chair legs have a curve cut on the table saw. I picked out construction fir boards with nice grain and no knots. The table legs and apron are also douglas fir–a ripped down 4×4 for the legs (about 3×3). The table top and seats are a pine project panel from the big box store. Attached with figure 8 fasteners to allow for movement. Because I used construction lumber and a project panel, the lumber cost was probably around $60.
I stained with general finishes dye stain (antique cherry) which made the pine table top match the reddish tinted fir frames–the General Finishes dye stain was outstanding. I then finished with several coats of Arm-R-Seal, and 3 coats of gloss Arm-R-Seal on the table top, because it’s a kids table and will likely take plenty of abuse.
I went with fir after reading a Christopher Schwarz article on using construction grade lumber for workbenches. I expect the kids will be hard on this set but douglas fir is strong, can take a beating, and isn’t expensive. Perfect for children’s furniture.
The joinery was primarily pocket screws for the frames with a mortise and tenon for the seat back. If you build anything for kids, put felt pads on the bottom, they push everything around and will destroy floors. All together the project was solid, not too difficult, and the kids are very pleased.
The post Kid’s Table and Chairs appeared first on The Wood Whisperer.
July 17, 2015
A Woodworking Pep Talk
I occasionally receive emails or comments from discouraged woodworkers. Local woodworker Keith recently emailed me the following:
Just watched your video on your outdoor sitting bench. You make everything look so damn easy. I am in awe of how everything you touch comes out so perfect. What you do is a piece of art that some of us strive for but will never attain. Thank you for showcasing your talent. The only problem someone like myself has is I won’t do anything that you have done, because when it doesn’t look like yours, I feel I have failed. That is another reason I won’t be nearly as good. You have to practice to be good and I expect perfection because I see you make it look so easy. Still enjoy watching you work. Your neighbor, Keith
Keith’s mentality is something I encounter a lot. Many folks are easily discouraged when they see seemingly average people putting out exceptional work. I consider my own work better than average but not exceptional. Keith is being very kind. But we tend to be our own worst critics, right? Understanding where your work fits into the greater hierarchy can be a good thing if coupled with a dose of humility and an optimistic perspective. But not everyone has an optimistic perspective and knowing where you sit on the scale of skill could sour your taste for the craft. I’d hate to see that happen. So here’s a modified version of the pep talk I gave Keith and it’s one that just might resonate with you too.
Don’t Be So Hard On Yourself!

Pondering my choices in 2005
Woodworking (as a hobby) should be fun. If it’s no longer fun, for whatever reason, it’s time for some reflection. Keith is comparing his work to mine but is that a fair comparison? Let’s look at our virtual resumes. I have been doing nothing but woodworking for the last 12 years. Not only that, the last decade has been spent teaching others the fundamentals of the craft. As a result, I’ve gotten pretty good at the basics. I now have very high standards for basic joinery, basic design, and overall finish quality. Because The Wood Whisperer is a business and the primary lifeblood of my family, I have invested in nice equipment and I have a great space to do my work. My brain is in this stuff 24/7 and my livelihood allows/requires me to improve every day. My guess is that most people reading this are not in the same situation. You probably work hard at a full-time job and you’re limited to woodworking on nights and weekends when you’re not spending time with your family. Bottom line is this: I’m on my path and you’re on yours. Both paths are valid, necessary, and worthy and both are capable of facilitating the production of beautiful projects that will dazzle onlookers in their own unique ways.
Aim For Your Personal Best!
Keith used the word “perfect” in his comments but I can assure you my work is anything but. See some of my lessons learned from past projects here. And something Keith may not realize is that there are MANY woodworkers out there who make me look like a rank amateur. I’m very aware of this fact but I don’t let it get me down. Everything is relative and we all have our place in the hierarchy. So how do I manage to not be depressed by the fact that I am not as good as someone else? Because those people are the genesis of my own self-improvement. By example, when I used to sit in my garage looking at pictures of “dream shops” I never once thought to myself, “That dude sucks! Must be nice. I’ll never have a shop like that because I can’t afford it.” Instead, I thought “That’s impressive. I’d love to have a shop like that. What steps can I take today that put me on a path that eventually leads to that dream shop?” Ten years later this happened.
So the same idea applies to observing the work of others. You shouldn’t view someone else’s skill and success as a reflection of how bad your situation is. Instead, use their work to help you set goals and discover ways to improve so you can put yourself on that path to greatness. And let’s clarify what I mean by greatness. We can’t all be “the best” woodworker but we can be our personal best woodworker. So as you move along your path to greatness, you should gauge your progress not by how close you are to the end-all-be-all, but by how much you’ve improved over your previous attempts. If you notice that project after project you just aren’t getting better, you need to find out why and squash it. My guess is it’s a mental block and not a physical one.
Practical Advice
When you’re finished with a project, take time to evaluate what it is you don’t like about it. If you can spot the flaws, you can usually identify when and why they occurred. To quote GI Joe, that’s half the battle. The other half is actually easier since it only requires a little research. Figure out how to prevent those mistakes and make sure they don’t happen again. And if we’re being completely honest with ourselves, most imperfections are a result of laziness, not just honest blunders. An honest mistake is something like not realizing that the table saw causes tearout when doing cross-cuts. But after you do some research and realize that you should use a zero clearance insert and a sacrificial fence on your miter gauge, the only reason you’ll have tearout again is because you made the conscious decision to take a short cut.
So be patient, be realistic, be honest about the nature of your mistakes, and most importantly: be inspired! Let the work of your betters pull you up instead of knocking you down and learn to be OK with the fact that there will always be someone who can do the job better than you. Run your own race and beat your own score. Be the master of your own destiny by setting a goal and plotting a practical course that gets you there. Don’t just daydream about what could be. Take an action today that helps make that dream a reality. Before you know it, you’ll find yourself sitting higher in the hierarchy. And if all goes well (somewhat ironically) you won’t give a crap about your place in the hierarchy simply because you’re having fun making things and doing what you love.
The post A Woodworking Pep Talk appeared first on The Wood Whisperer.
July 16, 2015
TWW “‘Black’ Friday in July” Sale
 It’s a “Black” Friday Sale in The Wood Whisperer Store! For one day only, all of our Black T-Shirts are drastically reduced up to 45% off. Pick the ever popular TWW Shirt like the one our model is wearing, or the “Limited Run” Black TWW Guild Shirt! Shop early cuz when they’re gone, they’re gone!!!
The fine print: Sale is subject to inventory on hand and not to be used in conjunction with any other discount codes. =)
The post TWW “‘Black’ Friday in July” Sale appeared first on The Wood Whisperer.
Outdoor Sitting Bench
Please feel free to download and build along!
SketchUp File or PDF Plan & Cut List
Metric SketchUp File or Metric PDF Plan & Cut List
A Design Exercise
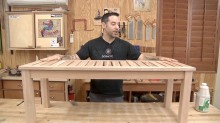
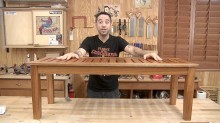
A seemingly simple outdoor sitting bench can serve as an excellent learning tool for design. To do it’s job, a bench really only needs to have legs and a top. But there are so many things we can do within those initial functional design requirements to make the piece beautiful, elegant, and worthy of your time and effort. In this project video, I’ll show you how I start with a basic design and then kick it up a notch with some simple modifications.
Construction
 As designed, the bench incorporates 46 mortise and tenon joints! All you need to make them is a router and a table saw, plus a few hand tools for finessing. While there are certainly other tools and methods we could have used for these joints, my goal was to show you that it’s possible to get the job done using the fundamentals and a Hybrid Woodworking approach. Since the project will live outside, I used an outdoor-friendly glue for the entire assembly: Titebond III.
The Finish
 I’ve used a lot of different outdoor finishes over the years with varying levels of success. There’s one particular finish method that I like to call “bulletproof” and it involves the use of an epoxy sealer followed by a marine varnish. The sealer is a 2-part epoxy known as CPES (Clear Penetrating Epoxy Sealer). This material is somewhat unique in its application nuances so follow the instructions carefully. I apply two coats. After the epoxy, I switch over to Epifanes Clear Varnish. The key is to apply the varnish while the epoxy is still curing and the varnish layer will adhere aggressively to the epoxy. CPES is designed to cure slowly so after an overnight drying period, you should still be within the curing window and can move onto the varnish. Two coats of Epifanes clear (diluted 50% with mineral spirits) should do the trick.
 If you want a glossy finish, apply two additional coats (or more) to create a substantial varnish film that should provide a great deal of protection. If you’re like me and you don’t much like the super glossy look, you can follow up with a couple coats of Epifanes Woodfinish Matte. I dilute the stuff by about 10% with mineral spirits just to make it easier to brush on. By the way, I sand between every coat of this entire process with 320 grit paper just to remove any lumps and bumps.
The End Result
 Personally, I think the fancier version of the bench has a lot going for it. What was square and blocky now has a touch of elegance and grace. The changes aren’t crazy obvious, but they give the bench that certain something that the first version lacked. I’m sure lots of folks will like the first version better and that’s perfectly fine. We all have different tastes and the most I can do is discuss my own opinions and the logic behind them. I encourage you to develop your own design opinion and exercise them as much as possible.
The post Outdoor Sitting Bench appeared first on The Wood Whisperer.
July 14, 2015
Modern Day Lumberjack: Matt Cremona
If you stop to think about it, the fact that we woodworkers can take a rough milled piece of lumber and transform it into a piece of furniture or art is quite amazing actually. For most of us, woodworking begins at the lumber yard, but for Matt Cremona, woodworking begins in the outdoors hunting for logs for his projects.
At first glance, you probably wouldn’t guess that Matt harvests and mills full size logs as a side business and as part of his woodworking routine. He may not be a burly dude, but it is rumored that he eats pancakes for breakfast every day!
Of course, he’s also a very accomplished woodworker and he does a bang up job teaching others what he knows. I’ve found his channel to be extremely useful in learning all about milling your own lumber along with a heap of great woodworking tips. I even learned that there are contraptions out there that turn a chainsaw into a mill that can slice up slabs from a log. Who knew!!
I’ve been following Matt for a while now, and I wanted to dig a little deeper and learn more about him and his work. A few months ago, he decided to make a career change to pursue his woodworking passion full-time. I had to take the opportunity to learn more about him and squeeze some great business tips out of him as well.
Enjoy the interview!
Who is Matt Cremona?
I build furniture starting with cutting down the tree, using my own special blend of hand and power tools. My own designs tend to have a clean straight line look, but I also really enjoy building period pieces. I produce videos about woodworking and milling lumber. My videos aim to motivate other woodworkers to challenge themselves and try something new. I also sell the majority lumber that I produce.
Who or what has had the biggest impact on the progression of your work?
Surrounding myself by people who are more accomplished than me has been the single most influential thing that has caused me to grow as a woodworker. Rather than be intimidated by their skill and accomplishments, it has been a constant motivator to learn from them and to try to achieve what they have done.
Throughout your journey as a woodworker, what accomplishments are you most proud of?
 On the tangible side, the secretary desk is the project that I am most proud of. It was a massive undertaking for me and was such an incredible learning experience. I am also very proud of what I have been able to teach myself through trial and error. There is a lot you can learn by just getting out in your shop and building something. Sure, you’ll make mistakes. But for me, making mistakes has been by far the best way to learn. There is a sense of accomplishment looking back at those mistakes and realizing how it’s shaped you into a stronger woodworker.
I am also proud and really humbled by the interactions with other woodworkers through YouTube and other media. I receive messages from people who, after watching one of my videos, have been inspired to try something that they have always been hesitant to do. That is easily the best feeling in the world knowing that you got to play a part in their new experience. For example, my wife surprised me by making me a dovetailed beer carrier for Father’s Day this year—something she likely wouldn’t have ever tried if I wasn’t a woodworker. I don’t think there has been a prouder moment in my life.
What part of woodworking do you struggle with?
I have the hardest time staying focused on one project. At some point I’ll totally lose interest in working on something and I’ll switch to working on some other project. I’ll usually have multiple projects going at the same time because of this.
Which do you enjoy more: Building furniture or harvesting your own logs? Why?
 That’s a really hard question. For me, they are so intertwined and they both provide me with enjoyment and experiences that the other can’t. For instance, being out in the woods getting logs makes for a physically exhausting day which I love. Being in the shop allows me to turn an idea I have in my head into something that exists in the physical world. The best thing about doing both is the project starts out in the woods. Most of the time I don’t have a project in mind when I fell a tree, but I have plenty of time to come up with a great use for it or I’ll have a project come to mind and I’ll know exactly the right set of boards to use for it.
What made you decide to switch careers and focus on woodworking?
When I lost my job in Dec 2014, I started looking for a new job based on my professional experience. Around the same time, my YouTube channel was really starting to grow. With each job application I filled out and each interviews I went to, it became clear that teaching others about woodworking was what I am truly passionate about and that I had been given a great opportunity to try to do what I love. In March, I officially ended my job hunt and have never been happier.
What worries you the most about your career change, and how do you overcome those fears?
I think most people who go off on their own worry most about the change in income style and I am no exception. Going from a regular job to being self-employed is frightening. I was used to receiving a constant pay check. I knew how much I was going to make months in advance. I had paid vacation and holidays. I don’t have those anymore. No one is paying me not to work.
What’s really reassuring for me is every month the business grows. I get to look back and see how far this thing has come – all the way from nothing. That keeps me motivated and excited for the future.
How has becoming a full time woodworker affected your woodworking? My time now consists primarily of making videos and everything that goes along with that. So really since I made this career change, I’m actually woodworking less than I ever have, at least measured in hours spent in the shop. However, what I’ve realized is now I am much more focused. I know exactly what tasks I want to complete when I head out to the shop. Overall that makes me more productive while I’m out there (although I still spend too much time looking for things I put down somewhere… who keeps moving my tape measures and pencils?!)
Thanks Matt!!
Be sure to check out Matt’s YouTube channel. Learn more about milling, learn from his tutorials, and see what’s going on in the shop. If you’ve ever considered harvesting and milling your own logs, you’ll want to check out all his videos about it. You can also check out his website to see more of his projects, take a peek at the lumber he has in stock, and more!
Big thanks to Matt for taking the time out of his busy schedule to do this interview with me.
The post Modern Day Lumberjack: Matt Cremona appeared first on The Wood Whisperer.
July 13, 2015
Shannon’s Mini Waffle Cone Holder
I am a classically trained Chef. Before I obtained my degree in the Culinary Arts I was a union carpenter in NYC. Using my skills as a carpenter, I made a display to hold mini waffle cones. I was making an appetizer portion of chicken and waffles for a function I was catering. I knew I wouldn’t be able to find a wooden mini waffle cone holder, so let the build begin.
Its made of 1 x 3 pine, stained with coffee and finished with olive oil since it will be in contact with food. I used the Kreg Jig for joinery.The end result worked out fantastic and the party was a success!
The post Shannon’s Mini Waffle Cone Holder appeared first on The Wood Whisperer.
July 9, 2015
Marc Recommends
Welcome to The Wood Whisperer Amazon.com Store. This is where you’ll find some of my favorite shop tools, accessories, books and consumables. The categories below contain hand-selected, Wood Whisperer-approved items. If you don’t find what you are looking for, please feel free to simply click the link to go directly to Amazon.com. You directly help support our efforts by shopping at our affiliate! Buy the stuff you need and let the vendor kick a few cents our way, at no additional cost to you! Simply click the links below, make sure purchase, and the magic happens automatically. Thanks so much for your continued support!
Featured ProductsFinishingLie-NielsenMarc's ShopGlueClampsSafety EquipmentSandingHand ToolsBooks & DVDsGift GuideTurner's CornerSharpening Central
Empty tab. Edit page to add content here.
Empty tab. Edit page to add content here.
Empty tab. Edit page to add content here.
Empty tab. Edit page to add content here.
Empty tab. Edit page to add content here.
Empty tab. Edit page to add content here.
Empty tab. Edit page to add content here.
Empty tab. Edit page to add content here.
Empty tab. Edit page to add content here.
The post Marc Recommends appeared first on The Wood Whisperer.


