
Marc Spagnuolo's Blog, page 73
August 20, 2015
Gadget Station-Inspired Crib
This crib was designed and built for our first child. I wanted to do something special and meaningful that would last longer than baby clothes and stuff like that.
The legs are inspired by Marc’s Gadget Station. I loved the design and thought they would look nice scaled up. The legs are 12/4 stock, and everything else was resawn from 8/4 stock. I wanted to try doing more resawing to reduce wasted wood due to planing and I was very happy with the results. the slats are just over 3/8″ thick, the stretchers are 3/4″, and the top rails and side legs are about 1 1/4″. This is a transitional crib, so it goes from a crib, to toddler/daybed, to full size bed. All hard maple with a shellac and waterlox finish.
Thanks to Marc and his family for everything. You teach and inspire me with everything you do. Thank you!
The post Gadget Station-Inspired Crib appeared first on The Wood Whisperer.


Woven Panel Rolling Hamper Pt. 2
Please feel free to download the plans and build your own Woven Panel Rolling Hamper!
SketchUp File or PDF Plan & Cut List
Metric SketchUp File or Metric PDF Plan & Cut List
Finishing Touches
We have a lot to do before assembly. First, we need to add chamfers just about everywhere. This easing of the edges not only looks cool, but in the case of the weave pattern, it will make our job a whole lot easier! The top front rail receives two relief cut-outs that not only provide additional air circulation, but also make for a nice finger zone when raising and lowering the lid. The lid panels are dyed to help disguise the lighter-colored veneer face. And all parts are sanded through 220 grit.
Assembly
I consider numerous different ways to assemble the hamper but all of them proved difficult. What you see here is the least of the evils. Each side is assembled first using a partial glueup where the rails are glued to only one leg. If both legs were glued on, there would be no room for inserting the weave strips. Once all of the strips are installed, the second leg is added and cauls are used to pinch the strips into a single row making it possible to insert them into the leg groove.
Once both sides are glued up, we’ll apply the same partial glueup methodology to the front panel, starting with the front rails being glued to only one of the hamper sides. After the weave strips are installed, the second side can be glued on all at once with the rear rails, the back panel, and the bottom panel. As you’ll see in the video, getting the strips into the leg groove proved to be tricky but I managed to get the job done.
Finishing
I considered pre-finishing parts of this project, specifically the weave elements, but decided against it. First, pre-finishing 33 thin strips would have added a significant amount of time onto this project. Consider two coats with additional time added for optimal curing and that’s a pretty big delay. Second, new finish has a tendency to grab. Before the finish itself is fully cured, it can bind to other finished pieces in such a way that it might make the weaving process even more difficult instead of easier. And third, the weaving process itself would scuff and scratch the finished strips requiring me to do some additional finishing anyway. So I opted to apply finish after the assembly was complete and guess what! It wasn’t that bad.
Two coats of Teak Oil (outdoor-friendly Danish Oil) applied with a brush and wiped up with a rag really did the trick. The oily finish readily absorbs into the fibers and seeps into the nooks and crannies. So if anything should move in the future, it won’t expose unfinished wood. I let the first coat dry overnight and applied a second coat the next day. This isn’t a heavy duty finish by any means but it keeps the natural look and offers at least some protection. Furthermore, its super easy to repair.
Hinges & Casters
The hinges I used are Rockler’s Torsion Hinges (15 inch-pound) and they are incredibly easy to install. These hinges are self-supporting and are great for things like blanket chests, toy boxes, and even hampers! The casters were simple 2″ heavy duty casters from my local Home Depot. And here’s the final result!
Helpful Links
Rockler Torsion Hinges
Cotton laundry bags
Snap Button Screw-In Studs
Canvas Fastener Kit
General Finishes Water-Based Dye
The post Woven Panel Rolling Hamper Pt. 2 appeared first on The Wood Whisperer.
August 19, 2015
Woodworkers Fighting Cancer Submissions
Thank you for participating in the Woodworkers Fighting Cancer campaign. Below are some general requirements of your participation:
Submit your photos by November 30th 2014!
Do not submit photos of toy chests you've made in the past. Only toy chests modeled after the Multi-Function Toy Chest will count towards the charity.
You can submit multiple photos, but only one will count towards corporate matching
Attach a quality image of the toy chest, preferably with you or the recipient (recommended size at least 800 x 600 pixels and no larger than 1 MB).
If you like, provide us with a story about the project. We may feature it on the website & Facebook page!
Name:*
Email:*
Your Website (If You Have One)
Toy Chest Photo 1*
Acceptable file types: doc,docx,pdf,txt,gif,jpg,jpeg,png.
Maximum file size: 2mb.
Toy Chest Photo 2
Toy Chest Photo 3
Share Your Story (optional)


CAPTCHA Code:*
The post Woodworkers Fighting Cancer Submissions appeared first on The Wood Whisperer.
August 17, 2015
Eddie’s Guitar Stand
This is the second guitar stand that I have made. The first one was made of Maple with purple heart accent. The current project is walnut with purple heart accent. It is a bent lamination project and I guess you could say it is 2.0 version. I made some improvements from the prototype and it is significantly better. Working out the curves and angles took some playing around with, but the result was much better. I used four strips of Walnut and one strip of purple heart 1/8 inch thick. The lengths vary, depending on the size of the guitar. I rounded out pretty much all of the edges with a 1/8 router bit and then assembled everything. The piece where I connected all of the pieces together at the bottom was given some personality by using a 1/2 inch cove bit.
And then the sanding began. Although I did do some pre-sanding, the real work started after it was all put together. Sanding took into account how it all flowed. Once the sanding was done, I attached the leather pieces with contact cement, being careful not to get it on the leather or wood. I then applied five coats of tung oil, buffing in each coat to a high shine. The final finish looks great.
The post Eddie’s Guitar Stand appeared first on The Wood Whisperer.
August 14, 2015
Leave Your Comfort Zone
 I don’t know who said it first (Robert Allen?), but there are a few quotes out there that say something like “Everything you want is just outside your comfort zone.” There was a time when I would have dismissed that quote as something successful people say just to sell books. But there’s definitely truth to it and I truly believe it applies to anything you’re trying to get better at: exercise, diet, education, and yes, even woodworking. And it must be true because I wouldn’t be able to make a stupid Willy Wonka meme if it weren’t.
When you are first starting out in the craft, one of the best ways to progress quickly is to throw yourself into a project you’re interested in and then sink or swim. Most of us are resourceful enough to swim, even if it is just a doggy paddle. We can always work up to the breaststroke and synchronized swimming later. I personally believe that people do their best work and are most receptive to learning when the stakes are high and the results matter. There’s nothing wrong with taking an afternoon to practice joinery but don’t stay in practice mode too long. Start making things as soon as possible and even if they don’t turn out great, I guarantee you someone if your inner circle would appreciate owning your hand-made creations. Furthermore, every success you have on the project will be a solid reinforcement of your skills and every mistake you make will be memorable, assuring you won’t likely repeat the mistake again.
Because my “job” is to teach people woodworking, I often find myself sticking to what I know. It’s hard to teach something effectively if you don’t exhibit the confidence that comes with experience. But in the online space, we have a significant advantage over traditional media outlets in that we are allowed to screw up. In fact, we’re encouraged to by our fellow woodworkers! While some folks prefer to see a master woodworker execute a flawless joint, many more prefer to see a beginner or mid-level woodworker struggle through the process. The latter tends to provide a more relatable and dramatic story filled with excited expectation, miraculous victories, and depressing pitfalls. In other words, you get to see someone figure it out in the exact same way YOU will need to figure it out. As I approach my 10th year of doing videos online and after publishing my first book in traditional media, I have to constantly remind myself which camp I hail from.
 In my most recent project, the Woven Panel Rolling Hamper, I had an opportunity to do something I haven’t done in a while: design on the fly. This is something I did extensively in older series like the Sculpted End Table and the Gadget Station and it’s something I wanted to return to along with making good on my recent promise to return to more detailed productions. While the hamper’s construction is fairly simple, the woven panels were something completely new to me. I designed it in SketchUp (with the help of my buddy Scott Seganti) but I wasn’t entirely sure it would work. After all, SketchUp doesn’t take into account how difficult it is to weave a panel while trying to connect multiple legs, rails, a bottom panel, and a back panel. Because I was investing significant time in building and filming the project, it actually could have ended in disaster and more than a little embarrassment. But much like a college student who writes a fantastic paper the same day it’s due, I sometimes do my best work under pressure.
The hamper project honestly wasn’t THAT much of a risk but it does serve as a good example of what I’m trying to convey: leave your comfort zone by exploring new techniques and new materials. Of course you’ll want to do at least some research so that you don’t do something unsafe or stupid, but don’t fall into that “paralysis by analysis” state of mind. Pick the project, design it well enough to get started, and start making some sawdust. Before you know it, you’ll be creating things you previously thought were beyond your grasp and you’ll pretty much be a woodworking hero to your friends and family.
Obviously, not everyone has the same aptitude for woodworking. Some folks need more hand-holding than others and there are certainly people out there who would benefit from a slower-paced instructional curriculum (like we provide in the Wood Whisperer Guild). But the above logic still applies even if you aren’t a naturally-gifted woodworking god. The key lies in knowing yourself and knowing your comfort zones. Find that line and set your next goal just beyond it. Do this on every project and you will get better!
The post Leave Your Comfort Zone appeared first on The Wood Whisperer.
August 13, 2015
The Artifact Sea Kayak
I’ve been a woodworker for many years, but I’ve been a sea kayak paddler and instructor for many more. I started paddling when I was 14 in the early 90s and became an instructor a few years later.
After 22 years in the industry as an instructor, a consumer, and skilled composite repair guy, I have some pretty definite ideas about what makes a great paddling kayak and designed a few different hulls. Unfortunately, the cost of building a plug, building the molds, and then building a regular composite sea kayak were too high.
So, since I have a woodshop, I decided to build my designs in cedar core on forms.
The first hull is a 16 foot play and day boat that surfs like a demon, spins on a dime, handles rough water beautifully, is neutral in winds up to 25 knots, and still has the speed to keep up with longer expedition-oriented boats. In short, it’s my ideal all-around kayak for day and short weekend paddling.
1/4″ bead and cove cedar strips were laid on the forms, followed by careful fairing and glassing. The boat was built in two sections, the hull first and the deck second.
It’s really a composite boat with a wood core, as are all cedar strip kayaks. This one has layers of carbon and 6 oz glass on the exterior with carbon/Kevlar on the interior. Deck line, hatch, and compass recesses, coaming, etc., are all carbon and glass, and the boat has three bulkheads and a footpump.
Total weight, including hatches, seat, bulkheads, footbraces, etc., is 50.3 pounds. That’s about 10 pounds lighter than a typical composite boat, but even so it’s stronger and more durable than anything else in my fleet.
During a full season of teaching and personal paddling in everything from flat water to 7 foot seas and 30 knot winds, she’s been impeccable.
The post The Artifact Sea Kayak appeared first on The Wood Whisperer.
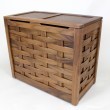
Woven Panel Rolling Hamper Pt. 1
Please feel free to download and build your own Woven Panel Rolling Hamper!
SketchUp File or PDF Plan & Cut List
Metric SketchUp File or Metric PDF Plan & Cut List
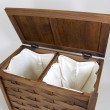
There is something that has become abundantly clear since having a kid: we make a lot more laundry! As a result, we need more space for our dirty clothes and towels. Nicole specifically requested something on wheels with double capacity and this is what I came up with. The woven panel design is not only beautiful, but functional as it allows the laundry to breathe. Mobility is provided by a set of four casters well-hidden by the lower rails. The top features Rockler Torsion Hinges for both safety and convenience. Inside the hamper are two cotton laundry bags held to the interior rails via snaps. These bags are easily removed or can be left in place.
The Frame – Expedience
 Because the woven panels were something of an unknown to me, I wanted to employ a fast and efficient way to make the primary joinery for the hamper. This way I could spend the majority of my time puzzling out the tricky parts of the project instead of laboring over mortise and tenon joints. I’m very lucky to have a Festool Domino so I used it to cut all 60 mortises in just 10 minutes! To make life a little easier during assembly, I like to glue my Domino tenons into the rail sides of my mortises. If you’re looking for tips on cutting similar joints with more basic tools, check out the Outdoor Sitting Bench video.
By the way, if you’re in the market for the Domino and you can’t decide between the 500 and the 700, check out this article I wrote that might arm you with more information.
 Even though I could have used Domino joinery for the center divider, I thought it would be fun to do a traditional sliding dovetail instead. All you need is a dovetail bit, a miter gauge, and a router table. With some careful/clever layout, the dovetail slots are located perfectly and the dovetailed rail slides right in. Just be careful not to make the fit too tight since it will be a nightmare to install once glue is applied.
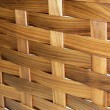
Check Out My Weave!
 The weave is constructed of 1/4″ vertical posts and numerous 1/8″ thin strips that weave in and out horizontally. Surprisingly, weaving the strips was the easy part. The only tricky part was getting the second leg installed while the strips find their home in the leg groove. Using cauls and clamps, this also turned out to be easier than anticipated. A few tips for you to consider. First, make sure the strips have room to breathe. The cut list gives the maximum width so you’ll likely want your strips to come in just a hair under 1 3/4″ wide. Also, there’s no harm in going thinner than 1/8″. It will make the weaving process easier and as long as you don’t go too thin, it shouldn’t sacrifice the integrity of the panel. With this test run out of the way, we can proceed with the finishing touches and final assembly, all of which happens in Part 2.
Helpful Links
Rockler Torsion Hinges
Cotton laundry bags
Snap Button Screw-In Studs
Canvas Fastener Kit
General Finishes Water-Based Dye
The post Woven Panel Rolling Hamper Pt. 1 appeared first on The Wood Whisperer.
August 10, 2015
Ken’s Mobile Torsion Box Assembly Table
I am a semi-retired periodontist on Long Island, New York, with a fledgling custom furniture business called Ken Gewant Woodworks. For many years, I had been using an old 3’ X 5’ formica kitchen table top on a couple of saw horses as an assembly table in my basement workshop. I was inspired to build a new, larger mobile torsion box assembly table after seeing Marc’s post, and Len’s table, as well. A ¼-scale foam board model helped in working out the details of the design. The 3” thick torsion box top is made of ½” No Added Urea Formaldehyde (NAUF) MDF skins, with the same MDF used for the internal webbing. This was a great excuse to buy my first compressor and a Grex Green Buddy brad nailer. I used ½” thick hard maple for the edging of the top, which is 40” wide and 64” long. The table top is 32” from the floor.
The base rests on 4” heavy duty casters (from Rockler), two fixed and two swiveling/lockable, in a “shopping cart” arrangement. The base is constructed of ¾” (actually, 18mm) Baltic birch plywood, attached with 1½” #8 Spax screws. I used size “0” biscuits and glue to attach the 4 dividers to the center panel. This created 6 storage bays, each of which will comfortably fit the footprint of a Festool Systainer (I have long wish list of Festool stuff!). I used 18”, full extension Accuride drawer slides (# 7432) to attach the ½” (12mm) Baltic birch plywood drawers to the base. I also made adjustable ½” plywood shelves at the top of each of the 6 bays for additional storage. The drawers each have a ½” maple false front, and the shelves have solid maple on the front edge for strength and good looks.
The base components, drawers, and shelves were pre-finished with 4 coats of shellac before final assembly. I used 6 coats of Minwax Wipe-on Poly satin to finish the top. The top was attached to the base with 24 Spax screws inserted up through the long horizontal cleats. In a few years, I can just unscrew the top, flip it over, patch the screw holes with a little wood putty, and voila, I’ll have a fresh work surface! All in all, I am extremely happy with my new mobile torsion box assembly table. It is extremely solid, with loads of usable on-board storage, and is more than flat enough for all practical purposes. Thank you, Marc, for your inspiration and great web site.
The post Ken’s Mobile Torsion Box Assembly Table appeared first on The Wood Whisperer.
August 6, 2015
Ryan’s 21st Century Six Plank Oak Coffer
The Medieval Coffer Chest was originally designed as a way for nobility and kings to store their money and valuables so that it all could be transported if necessary. The coffer chest was also used by common folk to store linens, clothing or other household items. In addition to a storage container the coffer’s flat top doubled as a seat, desk or in some cases a bed.
I have a very small wood shop set up in my basement. I usually do 2-3 commission pieces a year, but last summer I decided to make something for myself. Inspired after reading a book about life in the Middle Ages, I began thinking about a medieval reproduction style project that I could make in my free time.
This traditional six plank red oak coffer was put together with basic butt joints utilizing one piece “fishtail” style legs. I used wood screws to fasten everything together. The screw holes were countersunk and filled with oak plugs. The hinges are standard black strap gate hinges that I bent and battered to fit my purpose. I found the rams head design on a 17th century antique coffer and I thought it would give the piece a more authentic feel. I customized the design enough to make it my own. I omitted the large lock plate that most coffers had in the front and I filled that space with an elongated infinity symbol, common for the period. I added some stylized monastic quatrefoil designs to the sides and a rope design for the top.
I do all of my carving with a standard Dremel Rotary Tool. I mainly use carbide burrs in assorted shapes but I definitely favor a flame shape. I then hand sanded everything to 220 grit and finished it off with a few coats of Minwax Wood Finish in chestnut. I did a little bartering with my friend Manny at MTC Photography and he took these great photos for me.
The post Ryan’s 21st Century Six Plank Oak Coffer appeared first on The Wood Whisperer.
August 4, 2015
Lucy’s Tack Box
My first complex project presented many challenges and learning opportunities! This is a tack box for my youngest daughter, and because it will live in an unconditioned barn, it had to be durable and withstand the full range of Colorado climate conditions. To minimize expansion and contraction issues, the body of the box is constructed of cherry veneer plywood; but the top is made of solid cherry for greater durability and load-bearing capacity. Marrying the two materials with allowance for solid wood movement was a head-scratcher. The top is anchored and contained on the sides with sprung-jointed breadboard ends; and a sapele spline fixed to the plywood and screwed to the underside of the solid cherry lid through slotted holes allows free movement and adds a detail borne out of functional necessity.
Additional sapele accents inlayed into the cherry veneer plywood are complemented by a heart-shaped inset serving as a lid pull, and solid banding in the Greene and Greene inspired handles, (thanks Marc, for the inspiration in your Blanket Chest build!)
The lid’s depth accommodates built-in storage for towels and cloth wrappings. Removable interior accessories are made of birch plywood and include a sliding storage box and a grooming tool box. Exterior finish consists of sanding sealer, one coat of Watco Danish Oil, and three coats of wipe-on semi-gloss polyurethane.
The post Lucy’s Tack Box appeared first on The Wood Whisperer.


