
Marc Spagnuolo's Blog, page 70
November 18, 2015
A Woodworking Vacation and the TWW Guild
This is a guest article written by Guild member Steve Lyde about his recent experience building a Sculpted Rocker with fellow Guild member Tim Fuller.
What is a woodworking vacation? I recently went on what I call a woodworking vacation, a 2000 mile trip spread out over 3 weeks with the intent to build something great with a friend.
 I think most hunters dream of the big game safari trip and most fishermen dream of a deep sea charter trip. But what do most woodworkers dream of? Just some time off work to spend in our shops? Or maybe you dream of taking a course at one of the many great woodworking schools around the country? My vacation build consisted of traveling from Oklahoma to Iowa for a few weeks to meet an online friend and build Maloof-style rocker together. Then I would come home via Kansas City for Woodworking In America 2015.
What does this have to do with The Wood Whisperer Guild you might ask? I have followed Marc’s great videos for many years and joined the Guild about 3 1/2 years ago so I could build the Split-Top Roubo Workbench. Since then I have gained so much from being a Guild member including both project plans and woodworking techniques. What I never thought I would gain from the Guild was friendship. When Marc and Nicole created the Guild Facebook Page they hoped it would be a great place for fellow Guild members to meet up and share ideas and that’s exactly what has happened for me. Last winter, I was searching the Guild FB page for ideas on building a bucket list project: the Blacker House Chair. That search lead to becoming friends with fellow Guild member Tim Fuller.
Tim and his family recently invited me to bring my 5th wheel trailer, my dog, a few tools and come spend some time with them in Iowa. What kind of crazy people do such a thing? Woodworkers who are crazy about advancing their skills and knowledge do these things. Tim and I are both life long hobbyist woodworkers; which has developed into a passion, or some might say an obsession, for building fine furniture. We decided it would be great if we could build something together.
Early September, I hooked onto the camper and headed out on my 900 mile journey from southwestern Oklahoma to eastern Iowa. After arriving, I found that Tim had full RV hookups at his shop so I had a free place to stay. And diesel fuel is as cheap now as it has been in many years so the expense of this trip was actually minimal.
Now working in another man’s shop is a little like wearing someone else’s clothes. It took me a while to get into the swing of things to say the least. While Tim’s shop is fully equipped and larger than mine, it’s different. Different layout and different tools. Tim had already built two of the Maloof style rockers, similar to the one Marc built in a recent Guild project. I, on the other hand, had only built one chair: a G&G Blacker House chair. Now before you ask who get’s to keep the chair, it was a gift for someone in Tim’s family. They paid for the walnut from Bell Forest and we provided the labor.
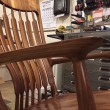
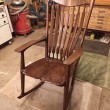
 Our chair build uses a different crest rail design and different back slats than those in the Guild chair; these are a Hal Taylor design. The crest rail is made from several pieces of vertical grain wood coopered and glued together. We went with the coopered seat and carved a recess into the top of the arm rest so they hold your arms in place as you sit in the chair. The finish is the two-part oil and wax Sam Maloof finish from Rockler. We worked on the chair for about 8 days and I spent a few days seeing the local sights. Tim’s family has some land with trees and a 1940’s saw mill which they were kind enough to fire up one afternoon. It was very exciting for a flat land Oklahoma boy to see that process. And yes I brought home a big stash of fresh cut oak and ash.

Of course you know when you spend that much time in someone’s shop, you come away with tool envy and for me that was Tim’s Nova DVR XP lathe. And as luck would have it, I found a new Nova on a special sale that I couldn’t refuse!
I spent about 2 weeks with the Fullers then headed home via Kansas City for the WoodWorking in America event. This was my first time attending a woodworking show. It was a blast!
A special thanks to the Fullers for making this trip possible, Tim and Marianne are fantastic hosts. I learned so much about working style and techniques and how to build a Maloof style rocker and of course gained a great life long friendship.
The post A Woodworking Vacation and the TWW Guild appeared first on The Wood Whisperer.


November 12, 2015
Warren High School – Construction Technology Electives
Chase Haecker is a construction electives teacher at Warren High School in San Antonio, Texas. He provides his students with real world construction job-site experience while learning about carpentry and construction. The students also get the chance to pay back to the community through various projects such as: Habitat for Humanity, Woodworkers Fighting Cancer/Research, Makers Care Org/Make A Wish, and the Elf Louise Foundation.
The students are building 5 houses for Habitat for Humanity. In fact, their first house just recently went up! They have built playhouses for Battered Women/Children’s Shelters, as well as toys for the Elf Lousie Foundation at Christmas. The students were excited to build the 2015 Woodworkers Fighting Cancer project. They had so much fun building the chairs and tables and the students really got into the “cause”! Here is a short video of what they do:
The post Warren High School – Construction Technology Electives appeared first on The Wood Whisperer.
November 6, 2015
Michael’s Leaning Ladder Shelf
I’ve done plenty of DIY home improvement projects that included some level of minor woodworking, but this was my first attempt at a piece of “real furniture”. It is a leaning ladder shelf of which I found the plans for in an old copy of Woodsmith magazine. I thought it would be pretty simple for my first piece as I am a novice woodworker. Needless to say, it threw many challenges my way!
The ladder consists of 10 “rungs” that are set up in pairs of 2 that help to secure each of the 5 enclosed shelves. It leans at a 10-degree angle against the wall; so I had to cut the top, bottom, and back (at top) to 10 degrees, as well as each of the dados for the rungs. I made a jig for my router that I could reference against the sides of the ladder to cut all of the dados.
There are 5 enclosed shelves of 3 different sizes: the bottom being the largest; the middle 2 slightly smaller; and the top 2 being the smallest. They were constructed using locking rabbet joints and have a 1/4″ birch plywood panel floating in a groove along all 4 sides. The locking rabbets were probably my biggest challenge of the project (these were a first for me). It took quite a while for me to get an accurate setup on my little job-site Ryobi table saw for each of the cuts. My test pieces came out nice, but as I was cutting all of the shelf parts, it must have tweaked a bit because the pieces were fitting extremely tight. I ended up finessing the fit on each of the parts with a chisel. The locking rabbets aren’t perfect, but I’m satisfied with this being my first attempt.
I ended up using poplar for this project; I wasn’t quite ready to work with a nice hardwood just yet. The ladder and rungs were milled to 1″ from 5/4 rough stock. The shelf parts are just over 1/2″ thick milled down from some 3/4 S4S stock from my local home center (I didn’t think it would make sense to mill down a 4/4 board to 1/2″). For the finish, I started with General Finishes gel stain (Georgian Cherry) and followed up with several coats of satin Arm-R-Seal. I ended up staining the bottom panels of the shelves prior to assembling them so that there would be no chance of any unfinished wood being exposed.
In the end, I was quite pleased with the final outcome. I learned many lessons that I will be able to apply to future projects, that’s for sure.
The post Michael’s Leaning Ladder Shelf appeared first on The Wood Whisperer.
October 30, 2015
Avoid Tearout With This Simple Trick
 Avoid Tearout With This Simple Trick! I remember the first time I starting making cuts in wood, I was dismayed by the fact that the cuts were never clean and crisp. Especially when cross-cutting, the wood would tear out at the edge and it was clear I was doing something wrong. After a little research, I realized that experienced woodworkers have numerous tricks they employ to win the battle against tearout. These things include zero clearance inserts and sacrificial fences which help support the wood fibers during the cut.
A Better Way
 But there’s another method that dates back to the days before power tools were the norm, or Norm as the case may be. By simply scribing the wood with a sharp blade, we can sever the fibers ahead of time so that when the cut is made, we’re left with a clean crisp edge.
 While you can certainly use a marking knife (or Xacto knife) and a straight edge, I find I get best results using a cutting gauge. The cutting gauge features a moveable fence that allows me to make the same scribe repeatedly, so it increases my precision and efficiency. Simple scribe the line at the desired setting and use the cut line as a guide to set up the power tool. Even without a zero clearance insert and/or a sacrificial fence, the results are nothing short of perfection!
There are a lot of cutting and marking gauges on the market today and you can see a few in action here. But if you are looking for the exact gauge I used in this video, you can pick it up at Lee Valley.
 Learn more tricks and tips in my book Hybrid Woodworking! Get your signed copy today!
The post Avoid Tearout With This Simple Trick appeared first on The Wood Whisperer.
October 25, 2015
Paul’s Tall Case Clock
I have been working on this project for several years. I purchased a set of plans that were part of a kit. After learning more about the Arts & Crafts style, I decided that I did not care for the plans that I had. I was unable to find a set of plans that matched the look I was going for. So I created my own plans in SketchUp. I really enjoyed the creative process involved in doing my own plans. I modeled my clock largely off of a version produced by L&JG Stickley.
The clock is made from quartersawn white oak. The two front stiles have been mitered so that I would have quartersawn grain on two adjacent faces. The clock also features inset doors and through tenons on the front. I started the finishing process with my own formula of Transtint dyes followed by a coat of gel stain. The top coat is four applications of a wipe-on urethane.
Building this clock was a true labor of love that I hope will be enjoyed by many generations to come.
The post Paul’s Tall Case Clock appeared first on The Wood Whisperer.
October 22, 2015
Michael’s Pie Safe
I began this project when I asked my son Nathanael what he and his future wife Pam would like for their wedding gift. He said that he would like a pie safe like the one I made for his mother about twenty years ago. Well the plans for that project was lost a long time ago. So I found a new set of plans and modified it. Knowing how much they both enjoyed fishing, I made a new plan to make the punched tin panels reflective of their interest. We worked together on this pie safe as a family project. Each of us played a role. Pam punched the tins, Nathanael helped with the assembly, Josh cut out some of the wood and purchased the new router bits that I did not have in my shop. Charity helped me find and make the tin punch patterns, Caleb also bought some equipment. In all, it took our family about six months to complete this project.
The post Michael’s Pie Safe appeared first on The Wood Whisperer.
October 15, 2015
Duplo/Lego Coffee Table
I recently finished the coffee table I’ve been working on for the basement. A rustic arts and crafts style with a bit of Asian influence. Made out of black walnut.
This was supposed to be a super quick project…but I couldn’t resist throwing in some exposed joinery and a little bit of a live edge (I figure I have to look at this coffee table for probably the rest of my life, I may as well throw in some design features that make me happy :).
My 2 year old really loves her Duplos and their home seems to have landed in the basement, since during the Summer and it’s nice and cool down there and we had just finished remodeling it. I worked in some hidden storage and a play surface. When she graduates from Duplos to Legos all I have to do is undo 6 screws and flip the play surface.
The post Duplo/Lego Coffee Table appeared first on The Wood Whisperer.
October 9, 2015
WFC 2015 Auction – (8) Jorgensen EZ-HOLD 12” Medium Duty/Spreader Clamps
 Thanks to Pony Tools we are kicking off Woodworkers Fighting Cancer with another great auction! You have until 7:00pm PST October 31st to place your bid. Good luck and remember 100% of the winning bid will go to Cancer Research Institute! Everything included in this auction:
(8) Jorgensen EZ-HOLD 12” Medium Duty/Spreader Clamps – Expandable, item #33412, (Retail value $250)
1 Year of WhisperCare in the Wood Whisperer Guild – $99
Total retail value $349.00
Important Note: You must use your full name and a valid email so we can contact you for questions. Please no fake bids, you will be banned from all of the auctions. If you are bidding outside of the US, you will need to pay for shipping separately. Please contact us for an estimated cost before bidding.
(8) Jorgensen EZ-HOLD 12” Medium Duty/Spreader Clamps and Consulting with Marc

Starting Bid: $100.00
 Starting at
$100.00
Ending On: October 31, 2015 7:00 pm
Description Bid Here Bids WatchThe winning bid of this charity auction will win (8) Jorgensen EZ-HOLD 12” Medium Duty/Spreader Clamps and one year of WhisperCare consulting with Marc Spagnuolo. The retail value of the clamps is $250 and the value of the consulting with Marc...priceless (well technically $99 ;)
You must use your full name and a valid email so we can contact you for questions and if win. Please no fake bids, you will be banned from all of the auctions.
Your Name
Your Email
URL
Enter Your Maximum Bid
Bid $100.00 or higher [?]
Reserve:
[n/a]
USD
Enter your email below to get notifications of new bids placed on the above item.
Watch this Auction Shipping DetailsShipping: Free Shipping to the US. If you are bidding outside of the US, please contact us for the cost shipping rates.
From: US
To: n/a
Payment DetailsThe winning bid will be made directly to Cancer Research Institute at https://secure.e2rm.com/registrant/do...
Be sure to check out the other auctions going on right now!
Easy Wood Tools Turning Combo Set and Consulting with Marc
(8) Jorgensen EZ-HOLD 12” Medium Duty/Spreader Clamps and Consulting with Marc
Powermatic PM2800B Drill Press and Consulting with Marc
#1 Total Shop Safety Package from MICROJIG and consulting from Marc
#2 Total Shop Safety Package from MICROJIG and consulting from Marc
Rockler Dust Collection Bundle and consulting with Marc
Rockler Turning Bundle and consulting with Marc
Rockler Clamp Bundle and consulting with Marc
Fuji Spray Q5 T70 Platinum System and consulting with Marc
Eagle America Ultimate Router Table Upgrade and consulting with Marc
The post WFC 2015 Auction – (8) Jorgensen EZ-HOLD 12” Medium Duty/Spreader Clamps appeared first on The Wood Whisperer.
WFC 2015 Auction – Easy Wood Tools Turning Combo Set
Thanks to Easy Wood Tools we are kicking off Woodworkers Fighting Cancer with another great auction! You have until 7:00pm PST October 31st to place your bid. Good luck and remember 100% of the winning bid will go to Cancer Research Institute! Everything included in this auction:
(1) Full-Size Easy Rougher, item #1200, (Retail value $129.99)
(1) Full-Size Easy Finisher, item #4200, (Retail value $129.99)
(1) Full-Size Easy Detailer, item #7500, (Retail value $129.99)
1 Year of WhisperCare in the Wood Whisperer Guild – $99
Total retail value $488.97
Important Note: You must use your full name and a valid email so we can contact you for questions. Please no fake bids, you will be banned from all of the auctions. If you are bidding outside of the US, you will need to pay for shipping separately. Please contact us for an estimated cost before bidding.
Easy Wood Tools COMBO and Consulting with Marc


Starting Bid: $100.00
Starting at
$100.00
Ending On: October 31, 2015 7:00 pm
Description Bid Here Bids WatchThe winning bid of this charity auction will win a Easy Wood Tools Woodturning Combo Set and one year of WhisperCare consulting with Marc Spagnuolo. The retail value of the Turning Set is $389.97 and the value of the consulting with Marc...priceless (well technically $99 ;)
You must use your full name and a valid email so we can contact you for questions and if win. Please no fake bids, you will be banned from all of the auctions.
The winning bidder will be contacted via email with instructions for completing their purchase and will have 24 hours to complete their donation to Cancer Research Institute. If at that time, they have not completed their donation, the next bidder will be contacted as the winner of the auction.
100% of the winning bid will go to this years Woodworkers Fighting Cancer charity, Cancer Research Institute. Thanks everyone for participating!
Your Name
Your Email
URL
Enter Your Maximum Bid
Bid $100.00 or higher [?]
Reserve:
[n/a]
USD
Enter your email below to get notifications of new bids placed on the above item.
Watch this Auction Shipping DetailsShipping: Free Shipping to the US. If you are bidding outside of the US, please contact us for the cost shipping rates.
From: US
To: n/a
Payment DetailsThe winning bid will be made directly to Cancer Research Institute at https://secure.e2rm.com/registrant/do...
Be sure to check out the other auctions going on right now!
Easy Wood Tools Turning Combo Set and Consulting with Marc
(8) Jorgensen EZ-HOLD 12” Medium Duty/Spreader Clamps and Consulting with Marc
Powermatic PM2800B Drill Press and Consulting with Marc
#1 Total Shop Safety Package from MICROJIG and consulting from Marc
#2 Total Shop Safety Package from MICROJIG and consulting from Marc
Rockler Dust Collection Bundle and consulting with Marc
Rockler Turning Bundle and consulting with Marc
Rockler Clamp Bundle and consulting with Marc
Fuji Spray Q5 T70 Platinum System and consulting with Marc
Eagle America Ultimate Router Table Upgrade and consulting with Marc
The post WFC 2015 Auction – Easy Wood Tools Turning Combo Set appeared first on The Wood Whisperer.
October 6, 2015
Michael’s Table of Ent
I found a piece of walnut on a website that I knew I must have. It was a perfect piece to make a waterfall edge table for my wife’s Christmas gift. (This was end of October last year) The slab was 2.25″ thick, 14-20”wide, 8.5’ long and had a huge sappy knot dead center. The figure was amazing and I knew she would love receiving it as much as I would enjoy making it.
This was my first experience with: live edge pieces, pieces as large as my shop (8.5′ long slab and 12′ long shop), lumber I couldn’t move, too big for my equipment and a design concept too complicated for my skill set. My designs are always too complicated and this time the complication was the bookmatch. I knew, if bookmatched just right, the knots and sap would make a beautiful face – like the giving tree or Ents (Lord of the Rings talking trees) or, as people now say, Chewbacca!
I worked on my shop floor; the only space big enough. I used a MDF track saw jig for my circular saw to straighten the bookmatch edge and found a nice man with a woodmizer who resawed the slab as well as a friend with a large jointer to clean the edge and glued it up using router-based loose tenons to keep it aligned.
Thanksgiving and Christmas were huge distractions and I was unable to get to work on the piece until early February! After 2 months the slab had relaxed and cupped over 0.4″ from center to each edge and 1.5″ end to end.
I ended up making a router jig out of MDF and aluminum extrusion to flatten the piece. However, the piece was only 1″ thick after the re-saw and I needed to remove 1/2″ to achieve flat! After removing about 0.2″ I gave up. To achieve flat I would destroy the work piece.
I brought my wife down, showed her her Christmas gift (late of course) and we brainstormed. We compromised on flat enough for a wine glass and plate. After all, it is a rustic, snarly looking piece of wood, no one needs absolute flat!
I rehabbed my father’s old hand planes from their 20 years of neglect. Removed rust, honed blades, and basically rehabbed them just enough to be serviceable and got to work. I hand flattened the boards until a plate wouldn’t wobble and a glass wouldn’t tip over if slid. (The weeble definition of flat) I then filled the knots with sawdust, dye and epoxy.
For the waterfall, I cut the ends off with a circular saw, the router made a 45° miter and the hand plane flattened the joint. I used CA glue to attach plywood clamping blocks. The glue-up went smoothly; I used dark brown/black stained epoxy for everything just in case the seam showed.
I tested 5 finishing methods on scraps before I settled on a base coat of a 1 lb cut of 1 part amber shellac and 1 part blond shellac. This really made the figure stand out more than oil mixes. I sanded the shellac back and applied 4 coats of Arm-R-Seal.
In the end, I am more than amazed at my accomplishment. My wife loves it and made it the centerpiece of the living room. It has earned its name “Table of Ent”.
The post Michael’s Table of Ent appeared first on The Wood Whisperer.


