
Marc Spagnuolo's Blog, page 69
January 10, 2016
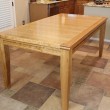
Chris’ Side Tables With a Twist
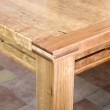
Having recently purchased a home, like many young couples, our living room was essentially empty, and lacked, well, furniture. So like any good woodworker, I volunteered to make some side tables for the one piece of furniture we did have, a couch. Again, like any good woodworker, I made sure to design something that would cost way more than buying them, and take many times longer to make. That’s half the fun right? I settled on a pair of Black Walnut side tables with a slight twist. Literally. The legs are entirely shaped by hand using rasps and an apron plane, giving them a helical twist, something I had never seen in a piece of furniture. I hoped the twisted legs would be the focal point of the table and as such, made the rest of the table quite linear to complement and highlight the twist.
This being my first actual piece of “fine woodworking” I decided to use traditional joinery (mortise and tenon for the leg to apron connections + half blind dovetails for the drawer attachments) and do as much of it as I could with hand tools. Shaping the legs were the biggest challenge of this project. At first I thought I would use a jig to do this, but the helical nature of the twist made this too difficult for a guy like me. I resorted to a couple of good rasps, a sharp apron plane, and a few episodes of Wood Talk to get me through it. This may not have been the fastest way but was quite cathartic, and yielded great results.
When it comes to finishing I try to keep things simple. I like my projects to look natural and be soft to the touch so I sanded to 600 grit and finished with four coats of “Tried and True Danish Oil”, polishing between coats. I used a plywood drawer bottom and Red oak for the drawer sides and finished the outside of them as well.
For me, the details are what separate great work from good work. Sharp lines, tight joinery, and smooth finishes are not only visually appealing, but are telltale signs of whether or not pieces will pass the test of time. I hope to be looking at these for many years to come.
The post Chris’ Side Tables With a Twist appeared first on The Wood Whisperer.


December 17, 2015
Stanley’s Christmas Boxes
I wanted to make some simple Christmas presents this year that would use some of my leftover wood from previous projects. I also wanted to do something that would allow me to try out my new plow plane. I decided to make some little boxes to hold a special treat.
I had some 4/4 sapele and cherry. The boxes were small enough (~ 3 x 2.75 x 5.25) that I could resaw the sapele and get 3/8″ sides and ends. I thicknessed the cherry to about 1/2″. I used the plow plane to put in grooves for the bottom and the top. The corners of the boxes are mitered. Up to this point, I had never done a project using splines, so I made a simple spline jig and put in maple splines. I positioned the groove for the lid to slide in so that a little over 1/32″ projected above the top edge of the box, just enough for a finger nail to engage it. I added some filler strips in the grooves at the far end so that when the lid is slid closed, there is just a little resistance before it is fully closed. I used a razor saw to cut the end attached to the lid to minimize the separation at the end.
The boxes were finished with three wiped-on coats of Formby’s Tung Oil high gloss. Sanding with 320 between coats and a final light sanding with 1500 grit. The inside of the boxes were left unfinished. The final touch was to fill each box with a variety of Ghirardelli Squares.
The post Stanley’s Christmas Boxes appeared first on The Wood Whisperer.
December 14, 2015
Why Did My Cutting Board Split?
I don’t know if this ever happens to you, but sometimes my tools just get out of whack and start to sound funny. Take a listen and let me know if you have any advice.
Why Did My Cutting Board Split?
George Cook wrote in and asked,
My first attempt at an end grain cutting board was OK but I need to fine tune. My biggest problem is that two weeks after I finished I have some large cracking. The wood was dry and the kitchen environment isn’t all that different. I used ironwood and oak. The board is about 1 1/4″ thick sealed with mineral oil. Any clues as to how to prevent this?

There are two things working against us with end grain cutting boards. The first is using multiple wood species. Not every cutting board is made from multiple species but most of them are as they tend to look cooler that way. But each species has its own wood movement properties when exposed to moisture. So by mixing multiple species, each of the little squares is moving at a slightly different rate which leads to internal stress in the board.
 The second issue has to do with grain direction. Many end grain boards end up with the grain going every which way. But as we know, wood moves most across the grain so if some are the pieces are running one way and the others are running perpendicular to that, we can once again end up with lots of internal stress.
So does this mean all end grain cutting boards are doomed to fail? Not at all. In fact most of them will do just fine as long as they are seasoned well and aren’t exposed to large amounts of moisture repeatedly. But understanding these two causes of internal stress can help you stack the cards in your favor for a successful long-lasting cutting board.
Want to make the cutting board I showed in this video? Check this out!
The post Why Did My Cutting Board Split? appeared first on The Wood Whisperer.
December 12, 2015
Limited Run TWW T-Shirt Available
 We are trying something new with t-shirts! There’s a pretty cool service that allows us to experiment with some fun new designs without having to deal with production, inventory, or shipping. Some of you might remember the fun drawings in Marc’s finishing book by our friend Scott Johnson. We decided to take those images and add some of Marc’s favorite woodworking commentary, essentially turning them up to eleven. The first t-shirt is displayed in the image here and is only available until Tuesday, December 15th. We kept the campaign intentionally short so that shipments would arrive before Christmas. Stay tuned for more t-shirts in the future. And if any of these designs prove to be popular, we just may add them to the TWW Store! Get your shirt now!
The post Limited Run TWW T-Shirt Available appeared first on The Wood Whisperer.
December 8, 2015
What Happened With Festool?!
 You may have heard through the grapevine or through my own lips that I’ve decided to pare down my Festool collection. Well, it’s true! But I promise you the story isn’t quite as interesting as you might think it is.
History & Facts
In spite of what many seem to think, Festool has not been an official sponsor of The Wood Whisperer since 2009 when they decided not to renew our agreement. A year later, Festool came on as a regular advertiser and giveaway partner and that was the extent of our relationship until just recently.
So why didn’t I seek out a new portable power tool sponsor back in 2009? Because for me, it’s not all about money. The “smart” business move would have been to contact other potential sponsors and try to arrange for a new deal. But because of my personal enjoyment of the tools and the relationships I formed with several Festool employees, it just didn’t feel right to completely bail on them. Being true to myself, I WANTED Festool’s presence in my shop. Furthermore, Nicole and I were already cooking up a new idea for bringing in revenue that would allow us to pick sponsors by preference, not by necessity. That idea was the Wood Whisperer Guild.
As time went on, it became clear to me that incorporating more accessible brands into the show would ultimately increase our appeal. After all, people tend to enjoy seeing someone build things with tools they can actually afford. But because I do this for a living, I can sometimes justify having tools that are out of reach for the average weekend woodworker. But by the time every single portable power tool in my shop featured a bright green logo I started to feel like the pendulum may have swung a bit too far. Now don’t get me wrong, I’m glad I was able to turn so many people on to Festool and what their tools can do but ultimately my goal is to encourage quality woodworking, not necessarily quality tool-purchasing. So this idea of a brand shift was something I’ve been mulling over for years and it’s at the heart of my current decision to scale back my Festool collection.
So What Happened?
Recently, after a bit of an internal reorganization including the departure of my primary connection to the company, Festool backed out of a year-long advertising agreement suddenly and without notice. Business is business so I don’t take this stuff personally. But it did allow me the opportunity to reflect upon my tool choices and the brands I use. While Festool makes great tools, there are certain tool categories I feel I’d be just as happy with if they were yellow, green, blue or whatever. And coming from a Festool-centric experience, I feel there’s a real opportunity in evaluating some of these other brands and reporting back on how my supposed “downgrade” is going.
So that’s the deal. I’m getting rid of much (not all) of my Festool gear and replacing it with more accessible brands. I’m picking the brands I think would be good contenders (Milwaukee, Porter Cable, DeWalt, Makita, Bosch, etc), using them over the next year and either selling or giving away the ones I choose not to keep.
So what’s staying from the Festool lineup? ETS and Rotex sanders, TS55 and MFT, a couple CT Vacs, and the Dominos. The Rotex, TS55, MFT, and Dominos are what I consider to be game-changer tools so they aren’t going anywhere. The ETS sander is very high quality, but I’m only keeping it because I have lots of Festool paper and the Festool sander integrates well with the CT vac. What’s going? Everything else! Drills, various format sanders, Kapex, and the routers. As you can see, this isn’t meant to be Festool mass exodus. Instead, I’m just paring down to what I consider to be the Festool essentials. I still love the brand and will continue to explore what they have to offer in the future.
So there’s no ill-will here, no fun story of vengeance or rallying against corporate greed, and certainly no reason to question my integrity (which I always find amusing). Just trying to make lemonade from a few lemons.
The post What Happened With Festool?! appeared first on The Wood Whisperer.
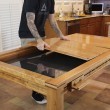
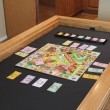
Gaming Dining Table
Nicole and I are big gamers, be they video, dice, cards or classic board games. So when I was tasked with building a new dining table I knew I wanted it to be multi-purpose, serving our needs for meals as well as gaming. And so was born the Gaming Dining Table. If you like what you see in this short video, detailed videos and plans are available for purchase in the Wood Whisperer Guild.
 A gaming table can go in many different directions depending on your personal preferences. With two young kids in the house and many years of abuse ahead of it, I knew my table needed to be a solid and durable dining table first and a functional gaming table second. We went through several versions before finally settling on the one you see here which we felt had a good balance of functionality, beauty, and sturdy construction. And by “we” I mean buddies and co-designers Aaron Marshall and Scott Seganti.
While this video is intentionally fast-paced, the instructional videos found in the Guild will walk you through the entire process from lumber selection to finishing. For those who have no interest in the deep details, I hope this quick video inspires you to come up with your own design and build one for yourself.

The post Gaming Dining Table appeared first on The Wood Whisperer.
December 3, 2015
Rob’s Lumber Rack
The inspiration for my lumber rack was TWW’s Episode 144-Lumber Rack project! Thanks for the great video and for the SketchUp model. I started with the SketchUp model provided, and made the modifications for my design.
My dad’s words “Build it sturdy!” led me to run my seven 2×4 uprights to pressure treated sleepers on the floor. (Fortunately, I already have storage for sheet goods elsewhere.) My barn was built with advanced framing techniques, so the wall studs are 2x6s on 24 inch centers, covered with 5/8 inch OSB. I also shortened the brackets to reduce their moment arm length, and to accommodate the typical lumber I use, which is seldom over 8 inches in width. The brackets are designed with plywood and 2×6 lumber to increase the contact area with the uprights.
Like Marc’s lumber rack, mine uses shop-grade plywood, dimensioned lumber (pressure treated for contact with the concrete floor), and lots and lots of PVA glue and screws. To fasten the uprights through the OSB sheathing into the wall studs, I used four 6-inch FastenMaster HeadLOK structural wood screws through pre-drilled and counterbored clearance holes in each upright. These fasteners were really easy to use, and are advertised to be replacements for 3/8-inch lag screws…but they’re not cheap!
Once I had the uprights fastened to the wall, I stretched a line at each shelf level as a guide, so all the bracket tops were in a nice plane. BTW, the plywood bracket sides are about 1/4-inch short on the wall side, so I could make sure that the 2×6 cores were in really good contact with the uprights. I added a row of metal shelf brackets near the top of the uprights, for the lighter materials I’d be willing to use a stepladder to store and retrieve.
The post Rob’s Lumber Rack appeared first on The Wood Whisperer.
December 1, 2015
What Table Saw Should I Buy?
Trying something new here. It’s a mini-series I’m calling Shop Talk. Project videos are awesome but with so much time between videos I sometimes feel a little out of touch. These periodic short format videos give me an opportunity to talk shop while also answering a specific viewer question, hopefully passing on some useful information in the process.
Updates & Thanks
I received a sticker from 5 yr old Vance, better known as #VanceMaker. Check him out on Tim Sway’s Youtube Channel.
Want to send me a sticker (and get one in return)? Send a self-addressed stamped envelope to PO Box 8203 Surprise, AZ 85374
Sean Rubino sent in a beautiful gilded/patinad board which you’ll soon see adorning my shop wall. Check Sean out: SpunjinWorks.com and YouTube/SeanRubino
Just completed the Gaming Dining Table which is available in the Guild. A short video will be available soon on the free site.
What Table Saw Should I Buy?
Skip sent in an email asking for advice on a table saw purchase. He was considering SawStop, Powermatic, and Jet. Ultimately, he decided to go with Jet for the sake of affording more tools to complete his shop setup.

What to Look For
Flat Table – The area around the blade should be reasonably flat. The rest of the table is less important since the primary reference surface exists around the blade.
Zero Clearance Inserts – Make sure the table takes either shop-made or commercially-available zero clearance inserts.
Splitter or Riving Knife – A splitter or riving knife is required equipment as far as I’m concerned. The best option is an easily-removable riving knife.
Reliable Fence – The fence should be nice and straight with no flex and should lock down reliably each and every time it’s put into position. It should also be easy to adjust.
Standard Miter Slot – Avoid proprietary or oddball miter slots. A standard miter slot is easy to build for and just about every after-market accessory that uses a miter slot will be at your disposal.
Takes a Dado Stack – Dado stacks really multiply the versatility of a table saw so make sure your arbor is long enough to take a stack safely.
What Not to Worry About
Blade Guard – Blade guards are important but if the saw doesn’t come with one, don’t fret. You can always add an aftermarket guard.
Extension Wings – If the saw has cheap plastic extension wings, that’s not all that big of a deal. Remember, the primary reference surface for the saw is around the blade. Everything is there to support the work so if it isn’t dead flat, it’s not a deal breaker.
Stock Blade – Most stock blades are fairly low quality and have a limited life. You’ll want to upgrade anyway so don’t let a crappy blade dissuade a saw purchase.
This advice really just scratches the surface but should give you a starting point for your table saw search. If you have any other tips for buying a table saw, feel free to leave a comment below!
The post What Table Saw Should I Buy? appeared first on The Wood Whisperer.
November 26, 2015
Black Friday 2015 Sale Roundup
Powermatic

On sale at Woodcraft

Powermatic and JET woodworking machines are 15% off and accessories are 20% off. JET will also be doing half off of 12”, 24”, 31” and 40” parallel clamps while supplies last at participating dealers. On sale at Rockler, Woodcraft, The Toolnut and Amazon
Amazon

From November 1, 2015 through December 31, 2015, get $25 off select $100 Makita orders shipped and sold by Amazon.com. Discount automatically applied at checkout.
From November 16, 2015, through December 22, 2015, get $25 off select DEWALT orders of $100 or more. All products must be shipped and sold by Amazon.com. Discount automatically applied at checkout.
From November 16, 2015, through December 21, 2015, you can get $25 off when you spend $100 or more on select Bosch products. All items must be shipped and sold by Amazon.com. Discount automatically applied at checkout.
Bell Forest Products They do their annual ‘black Friday sale’. It is an online sale, one day only and their biggest discount of the year – 25% off! The perfect gift for every woodworker
Woodcraft

Eagle America and MLCS

Eagle America is ready to blast off the holiday season with amazing savings. Just like Thanksgiving dinner is better when you eat more of it, our sale gets better the more you spend. This offer is STUFFED with up to 15% savings plus FREE Shipping, so we know you’ll want to GOBBLE UP these deals before they’re gone. After all, we know you’re no turkey. Act fast, though, this sale ends Sunday night…long before the leftover turkey will.
Now through Monday, 11/30/2015, check out incredible Black Friday $19.99 SALE Savings on an amazing selection of products from popular Router Bits to safety accessories, digital accessories, and more.
Rockler

The post Black Friday 2015 Sale Roundup appeared first on The Wood Whisperer.
November 22, 2015
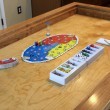
Kurt’s Poker Chip Tray
I had some purple heart and maple left over from Marc’s end grain cutting board that I made a few years ago when I happened across the poker chip tray video. And I thought, why not give it a whirl?
Pretty fast, fun, and easy project. Against Marc’s advice, I only made one set to start, just to avoid making a bunch of them with the same glaring error that went unnoticed until the end. I already have people requesting some for themselves, so I’m going to have to do a batch run of them now. Marc was right…again!
Instead of using just purple heart or just maple, I thought I’d rip some strips, glue them back together, and see what happened. I kind of like how they turned out.
My biggest problem came when I went to rout the shallow arcs in the bottom side of the tray. I did not have a bit like Marc’s, but I DID have a free night (no wife, no kids) to get the project done. So, I ran to Home Depot to get myself a bit. Surprise, surprise, nothing even close to the right size. So, I went home, sat on a bucket, and said to myself “Kurt, those trays are getting finished tonight and they are GOING to have those fancy grooves in the bottom. How ya gonna make em?”
That’s when I remembered some video I’d watched about a guy who made really neat looking coves on the face of a board by passing it diagonally over his slightly raised table saw blade. After a bit of trial and error, that’s how I made the arcs in the bottom side of my trays. I took a few different shots of that process, hopefully you all can make sense of them.
Finished the project with rattle can lacquer and can’t wait to make more. Thanks for the inspiration Marc!
The post Kurt’s Poker Chip Tray appeared first on The Wood Whisperer.


