
Marc Spagnuolo's Blog, page 67
March 31, 2016
Air Quality Upgrades
I’ll be the first to admit that I have a slight problem: I’m a little paranoid about dust. I want as little of the stuff in the shop air as possible so I continually seek out means to achieve that end. While I do wear a respirator while I work, I frequently have to talk on camera shortly after making cuts that put dust directly into the air. Recently I decided to address two concerns with two separate upgrades.
Cyclone Exhaust First, I got rid of my cyclone’s double filter stack and instead opted to vent the fine dust through the wall and outside. The Wynn filter stack I had worked well but it does require frequent maintenance. You have to blow the dust out of the pleats periodically and then empty out the fine stuff that falls into the bottom cleanout. I’m never totally confident that the filter is clean enough and it’s not clear to me at what point the filters need to be replaced. By venting the fine dust directly outside, there’s nothing to clean and I can be 100% sure the fine dust isn’t landing in the shop. A simple 8″ dryer vent is installed in the wall and a piece of flex hose is used to make the connection to the cyclone exhaust port. Special thanks to the folks at ClearVue Cyclones for helping me with the fitting I needed to make the connection!
 Next up is an exhaust fan. As good as my dust collection system is, it doesn’t catch everything. And it’s not necessarily the dust collector’s fault. Many woodworking tools are designed with dust collection as an afterthought. So if I’m in a situation where I need to talk on camera and the shop air is laden with dust, a high capacity exhaust fan would allow me to clear the air quickly and get back to work. So I installed a 30″ 5500CFM Maxxair Exhaust Fan. Within minutes, the entire volume of shop air is forced out and replaced with fresh air. I installed the fan in the back of the shop which allows me to open the front door to create something of a wind tunnel. Works like a charm!
The Test
 To test out the fan system, I kicked up a bunch of dust into the air and used a Dylos DC1100 Air Quality Meter to monitor the air quality. After turning on the fan, it took about 10 minutes for the shop to return to normal. Given how much dust I kicked up (enough to be visible to the naked eye) I was pretty impressed.
Things To Be Concerned About
1 – Air loss. If you condition your shop space in the Winter and Summer, punching holes in the wall will certainly create a source of air loss, and not just while in use. There isn’t much I can do about the cyclone exhaust but the exhaust fan can be easily covered. My plan is to simply build a hinged insulated box that will cover the fan when not in use. And I’ll need to be very strategic about when I use the fan during the Summer months.
2 – Safety. Many shops are located in basements and garages that share space with furnaces and water heaters. Venting outside and running exhaust fans creates a pressurized situation that could very well draw dangerous gasses into your shop space. My standalone shop doesn’t have any of those things within it so all I need to do is open my front door to create the needed return air. DO NOT install either of these upgrades without doing your research first!
3 – Neighbors. Both of these upgrades are noisy and depending on how close your neighbors are and how noise-tolerant they are, there could be a major issue. I’m fortunate in that there’s quite a bit of space between the houses in my neighborhood as well as the fact that being located near an air force base makes the neighborhood very noise-tolerant. Furthermore, I rarely run loud tooling after 8pm.
So if you want cleaner shop air and you have the means/desire, consider venting your dust collection outside and installing an exhaust fan!
The post Air Quality Upgrades appeared first on The Wood Whisperer.


March 29, 2016
Jeff’s Coffee Table Shadow Box
I have been building military retirement shadow boxes for over 15 years. As with any project, building similar projects begins to get old. I was approached by a General, who for the most part, was interviewing me for the project. He handed me a very small black and white photo of a coffee table and asked if I could make something similar to it but with a beveled glass top to display his military awards and achievements.
We discussed the size and I began drafting the project, the old school way with a pencil, ruler, paper and of course, an eraser. The idea was to have three drawers that were accessible from both sides so when you looked at either end they would be identical. Also I added faux key holes with oil rubbed hardware to give it a more aged look with raised panels on opposing sides.
The table’s dimensions ended up being 48” square and 18” tall. The drawers are very large to accommodate a 30-plus year career and are interchangeable in order to change the display as desired. From start to finish the project took about 60 hours and was a blast to design and build.
The post Jeff’s Coffee Table Shadow Box appeared first on The Wood Whisperer.
March 28, 2016
A Woodworker’s Surprise at Disneyland
Nicole and I recently decided to take our son to Disneyland. It’s only a 6 hr drive from Phoenix and since we’re both big kids at heart, it was the perfect choice for a 3-day getaway. We booked our stay at the Disney Grand Californian primary due to it’s proximity and access to the park. Based on the price, I fully expected it to serve our needs in terms of the vacation itself. What I didn’t expect was to be treated with an additional feast for the woodworker’s eyes at nearly every turn! Please forgive the photography that follows as these pics were taken with my phone and the lighting was less than ideal.
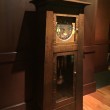
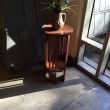
 The first surprise occurred as I walked through the front door and passed through the entryway. I was greeted with an undeniably Greene & Greene piece. I couldn’t help but wonder how many happy families pass by this table every day and never give it a second thought. I’d guess most of them. But not me! I gave the piece a good inspection while other guests gave me funny looks.
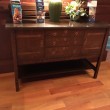
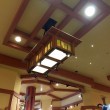
Once in the lobby proper, the view was almost overwhelming. A large central gathering area features ample seating, impressive timber architecture, and numerous pieces that reflect G&G, Mission, Arts & Crafts, and possibly even Wright-influence.


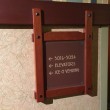
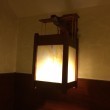
From there it became something of a personal little game as I tried to spot the less obvious details and hidden gems. It seemed the more I walked around the more details I discovered. I tried to capture some of my favorites in hopes of sharing them with you for a little inspiration. I hope you enjoy the rest of the pics. The vacation was awesome and the hotel stay was terrific. If you are ever in need of a great place to stay during a Disneyland trip, don’t hesitate to book this place. It’s impressive to say the least!


The post A Woodworker’s Surprise at Disneyland appeared first on The Wood Whisperer.
March 17, 2016
George’s Basement Workshop
I started building furniture when I was 12 years old. I took wood shop in school, and after HS I started buying whatever tools I could afford. In my early 20s I supported myself making furniture. I then had a long career in information technology. Building furniture is now my retirement gig and my passion. Some of my tools I purchased in 1969 and they refuse to die. Others such as the miter saw and planer were recently replaced. I have spent a considerable amount of time adapting dust collection into every stationary/portable power tool. My multi tool bench (planer, jointer, scroll saw, miter saw and drill press all have dust collection with independent blast gates. My rolling workbench has a built vacuum for attachment to various portable power tools. I also like to be very organized, can you tell?
The post George’s Basement Workshop appeared first on The Wood Whisperer.
March 15, 2016
Bryan’s Zebrawood Nightstand
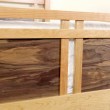
The case is a mitered box with waterfall esque grain flowing all the way around it. The miters are reinforced with maple splines. It is a 2 drawer nightstand with poplar drawers and a zebrawood front inset into the main case. The foot is a mitered walnut u-shape with continuous grain flow, and it is floating tenoned into the case. Soft close hinges and oil rubbed hardware. Finished with Arm-R-Seal Satin 4 coats and a hand rubbed wax. Both drawers can be open without tipping the piece which was my main concern, and why there are only 2 drawers.
The splines are maple because they darken and yellow with finish to more closely resemble the zebrawood. A small zebrawood spline looked strange to me with the contrasting grain in a contrasting accent, so I decided against it. I also used biscuits during panel glue up for alignment.
The post Bryan’s Zebrawood Nightstand appeared first on The Wood Whisperer.
March 3, 2016
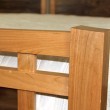
King Size Bed
As time goes on, I’m getting closer and closer to replacing every piece of furniture in my house with something I built with my own hands. A lofty goal! This King Size Bed is one of the bigger ticket items on that shrinking list!
I used Cherry as my primary wood while featuring Walnut panels. I like the contrast, but over time the Cherry will darken and the Walnut will actually get lighter. When it’s all said and done the contrast won’t be so dramatic.
A Note About ToolsThe tools I used in this video are undoubtedly “high-end” including the JDS Multi-Router and the Festool Domino. While the Domino has made numerous appearances on the show, the Multi-Router is making its debut. Most folks aren’t going to be able to justify the cost of either tool so rest assured that standard mortise and tenon joints (which I’ve shown you how to make numerous times) will suffice. In fact, the plans I’ve included show standard mortise and tenon joints instead of loose tenons as shown in the video.
Download the PlansSketchUp PlanPDF PlanSketchup Plan (Metric)PDF Plan (Metric)HardwareThere are lots of different types of bed hardware available on the market these days. And really, hardware isn’t even necessary if you want to construct some sort of wedged through tenon or even a reinforced mortise and tenon joint using threaded rod and nuts. But I went with a very simple solution on this bed by using Woodtek 160550 5” Bed Hardware.
Gallery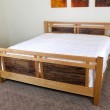

The post King Size Bed appeared first on The Wood Whisperer.
February 23, 2016
Coupon

Hi there! If you’re on this page it means you are searching the internet for a coupon code for either twwstore.com or thewoodwhispererguild.com Many websites claim to have TheWoodWhisperer.com, twwstore.com or thewoodwhispererguild.com coupons, but the truth is that we do not provide any other websites with special promotional codes.
While we’re flattered that some websites might think they can drive their own traffic by pretending they have Wood Whisperer coupons, the truth is, they don’t. Please, don’t be fooled by the sites you might find by searching on terms like these:
“wood whisperer coupon”
“tww store coupon”
“wood whisperer guild coupons”
“tww store coupon code”
“tww store free shipping”
“coupon for wood whisperer free shipping”
“wood whisperer free shipping discount code”
Because we are a small family run business we very rarely run sales. However we recognize the need to save money online. So please consider the coupon code above as our gift to you—for being loyal and dedicated customer of The Wood Whisperer. It is our way of thanking you for being our customers. Because without you, we wouldn’t be successful.
We love our customers and it will always be our mission to make it as easy as possible to shop with us. We hope you enjoyed your shopping experience with us today, and if there’s anything at all we can do to help, please let us know.
Sincerely,
Your friends at The Wood Whisperer
Marc, Nicole, Lorna and Arlie
The post Coupon appeared first on The Wood Whisperer.
Free TWW Sticker
 Looking to swap stickers with Marc? Or maybe you just want to display your love of TWW in your shop? Here’s how you can get your Free TWW sticker!
Just send a self-addressed stamped envelope to
The Wood Whisperer
PO Box 8203
Surprise, AZ 85374
Yep that’s it!
The post Free TWW Sticker appeared first on The Wood Whisperer.
February 17, 2016
Matt’s Display Case
After spending a lot of time watching as many woodworking videos as I could (WoodWorks is still my favorite along with The Wood Whisperer!), I got the itch for woodworking. So, I’ve been spending the past few years slowly building my shop. After many shop cabinets and kitchen cabinets for that matter (I recently finished remodeling my kitchen), I was ready to build something closer to fine furniture. So, when my mother asked me to make a display case for her shot glass collection, I was more than happy to do so.
While basic in its design, I found some really nice curly maple to use along with walnut for the top and accents. It has a mirror in the back and glass in the door. The finish is simply a few coats of wipe-on poly. I think it came out OK, but I still have a lot to learn!
The post Matt’s Display Case appeared first on The Wood Whisperer.
Matt’sDisplay Case
After spending a lot of time watching as many woodworking videos as I could (WoodWorks is still my favorite along with The Wood Whisperer!), I got the itch for woodworking. So, I’ve been spending the past few years slowly building my shop. After many shop cabinets and kitchen cabinets for that matter (I recently finished remodeling my kitchen), I was ready to build something closer to fine furniture. So, when my mother asked me to make a display case for her shot glass collection, I was more than happy to do so.
While basic in its design, I found some really nice curly maple to use along with walnut for the top and accents. It has a mirror in the back and glass in the door. The finish is simply a few coats of wipe-on poly. I think it came out OK, but I still have a lot to learn!
The post Matt’sDisplay Case appeared first on The Wood Whisperer.


