
Marc Spagnuolo's Blog, page 65
June 2, 2016
Benjamin’s Crib
When we found out we were expecting our first child, I knew right away I wanted to create a special piece of furniture for him. I had experimented on other smaller projects but this was my first large piece of fine furniture. I searched online to find the exact crib I wanted and found one similar to what I had in mind. It had no plans so I spent many hours researching crib safety standards and measuring other cribs in order to devise my own plans. It’s knockdown joinery so that we can transition it to a toddler bed and full size bed, making this a true heirloom for our family. It is made of quartersawn white oak and finished with 3-step process-SealACell sealer, a coat of candlelite gel stain, and ArmRSeal satin finish.
I am currently working on a matching dresser to complete this set and hope to share it with you all in the near future!
The post Benjamin’s Crib appeared first on The Wood Whisperer.


May 23, 2016
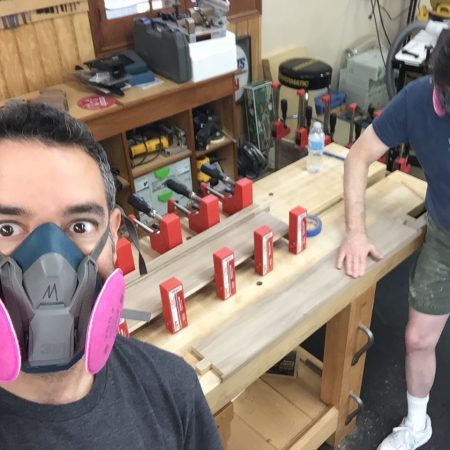
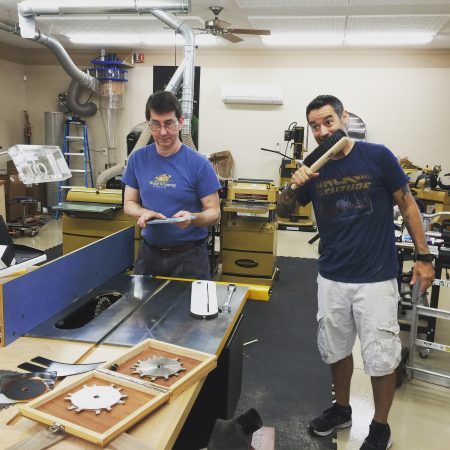
Interview with TWW Guild Apprentice David Nichols

We have many perks in The Wood Whisperer Guild and one of our newest offerings is a chance to work side by side with Marc as an apprentice on a future Guild project. Curious how you can become a future apprentice? Below is an interview with our 1st TWW Guild apprentice, David Nichols. He helped Marc build the Barrister Bookcase and graciously shared his experience and advice for any future apprentices!
If you are a Guild member and would like to apply to be the next Guild apprentice for the Tall-Case Grandfather Clock, you have until May 31st to fill out the application! If you get the “job” you would work with Marc side by side for 2 weeks (7 days a week) starting Monday, August 15th and lasting until Sunday, August 28th. The pay you would receive would be a hands on woodworking experience directly from Marc. Ideally you would want to be local, but if you aren’t you would be responsible for your own lodging and transportation (We can help you locate affordable lodging if you need).
What advice would you give to your fellow Guild members looking to do the apprenticeship? I would tell anyone applying for the position not to have a hidden agenda. They are being given a great opportunity to meet Marc and Nicole and to be a part of something beyond their day to day woodworking. The Guild videos that come out of my time with Marc will be a lasting souvenir of the experience. I would caution anyone that this experience should not see this as an opportunity to picks Marc’s brain about how to be a woodworking “star”.
What did you like most about the experience? What I liked most was getting to meet Marc and say “thank you” in person for what the guild has done for me. I look around my house at some of the pieces I have built and I almost can’t believe that I built them. I have learned so much from my participation in the Guild and I know I have found a hobby that I will enjoy for the rest of my life.
People always say learning in person is better than learning online. After your experience with the Guild both virtually and now in person, how would you say the two compare? While I would say that it is more fun to learn in person, I realize that I learn best visually and through repetition so the online learning is best suited to my needs. I frequently refer to Guild videos on how to do specific techniques even if I am not building a Guild project.
Did you learn anything unexpectedly? Yes, regarding all the different joinery, watching (in real time) the steps Marc would take to “sneak up” on and refine the fits to achieve the best results made me realize that I need to SLOW DOWN and enjoy the details.
Do you have a favorite moment? Yes, earning my “gold stars”. There was a couple of times during the month that I made suggestions about the project that Marc liked so much that he adopted them and added them to the project. Holy cow, that was so cool!
Thank you David for taking the time to drive from Kansas City to spend the month of April with us! It was an absolute pleasure getting to know you!
Here are just a few shots of Marc and David in the shop together!


The post Interview with TWW Guild Apprentice David Nichols appeared first on The Wood Whisperer.
May 19, 2016
Kyle’s Jewelry Box
My inspiration for this project was Gary Rogowski’s box featured in Episode-224. It was a beautiful design and I stuck pretty close to it, although I made some refinements and adjusted the dimensions. I did keep with the Asian theme as it is my favored style such as the infamous George Nakashima. I thought it would be perfect for a friend who helped me through a tough time last year when a table saw accident almost claimed my right thumb. Marc’s videos were a big source of inspiration to not be scared of my tools, and to heal and get back into my shop and start making dust again. I have refined the shop with safety being paramount!
The Jewelry Box is made out of Douglas fir, purple heart and mahogany on the lid. I kept the joinery simple with box joints, stopped dados and a breadboard lid. Finish is Linseed oil with Bees wax and turpentine buffed out.
I have to thank Marc for all the work he has put out there for someone like me who felt stuck. It was a good kick in the pants to start again!
The post Kyle’s Jewelry Box appeared first on The Wood Whisperer.
May 16, 2016
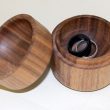
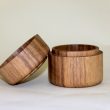
263 – Turned Box
At first glance, a turned box doesn’t look all that complicated. It’s essentially two bowls that come together with a mortise and tenon joint. But to pull this “simple” project off you’ll need to execute a specific series of steps giving you access to the inside and outside of both the lid and the base, and you’ll also need to carefully finesse the joint so that the two pieces come together in a satisfyingly snug fit.
The Blank
I used some scrap 12/4 walnut to make my box, which yielded final box dimensions of 2 3/4″ in diameter and 3″ in height. You can make your box smaller or larger but make sure your blank will accommodate the desired size. Also be sure to include extra material in the length of the blank to serve as handles for the turning process. Extra length also means more room for fixing mistakes. 2″ should be enough for everything.
If you don’t have 12/4 stock, you can always glue together multiple pieces into a lamination. This could create a very cool multi-colored look! Have fun with it.
The Steps
Use the chuck spur and the live center to bring the blank into round.
Create a dovetail “handle” on each end of the blank.
Separate the blank into two pieces creating a lid and a base.
Switch to a chuck with dovetail jaws and secure the lid.
Turn the inside of the lid, creating the mortise wall at the same time.
Install the base piece into the chuck.
Create the tenon on the base using the lid for test fits.
Turn the inside of the base, leaving at least a 3/16″ wall for the tenon.
Attach lid securely to the base and turn the outside surface of the lid and base.
Turn the top of the lid, then remove.
Part the bottom of the base from the rest of the blank.
Turn a jam chuck on the remaining piece of the blank remaining in the chuck.
Install the base opening onto the jam chuck for a snug fit.
Turn the bottom of the base.
The Finish
There are lots of ways to finish something as simple as this box. It’s not a heavy-use item so it doesn’t need anything super durable. Feel free to apply nothing more than wax and call it done. Also, consider finishing the box right on the lathe. Once the insides are turned and sanded, there’s no reason you can’t just apply the finish right there, as long as you don’t mind giving it some time to dry before moving on to the next step.
For my box, I’m using two coats of satin wipe-on poly. That should offer a little protection, a little sheen, and both coats can be applied in a single day. I finish the box off by adding some wax to the mortise and tenon.

The post 263 – Turned Box appeared first on The Wood Whisperer.
May 10, 2016
Jason’s Coin Display Case
About 10 years ago, my Dad and I started this project before I left to go to college. One thing led to another and it was just never finished. My Dad held on to the wood all this time and recently gave it to me. I changed our original design a bit but was able to use most of the original wood. I am giving it to him as a gift and a huge thank you for getting me started in a hobby that I love and plan to make a matching case for myself in the near future.
The case is made from red oak, finished in shellac, and measures about 15” wide, 24” tall, and only about an inch deep. The door is made using half lap joinery and the case features mitered corners. I used Marc’s mirror frame project as inspiration for construction and design of the door.
The post Jason’s Coin Display Case appeared first on The Wood Whisperer.
May 9, 2016
Do Your Projects Always Go Smoothly?
We all know mistakes are part of the learning process. I even wrote this article to highlight that point. But I’m sure many new woodworkers are wondering if they will always make major mistakes or if the process eventually go more smoothly.
I’m firmly in the “My projects sometimes have small errors, but nothing major” camp. At this point in my woodworking, I have the patience and experience to prevent nearly all major foul-ups. But small errors are just a way of life for me and nearly every project contains at least a few. Could be something as simple as tearout or something a little more menacing like a cut not being square. But these problems are all fixable and solvable with typical woodworking tricks.
So what about you? Are you a woodworking Jedi or is every project a lesson in humility?
The post Do Your Projects Always Go Smoothly? appeared first on The Wood Whisperer.
May 4, 2016
Bogdan’s Marimba
I make musical instruments focusing mostly on concert percussion and drums. As a drummer and a percussionist, I find great pleasure in playing musical instruments and an even greater pleasure in making musical instruments.
The highlight in my portfolio presents a full concert marimba. It is a wonderful instrument with an amazing appearance and sound. As a woodworker, there is a great challenge in making a marimba, combining different materials and methods for assembling the different parts together. The biggest challenge is to make a marimba that is easy to assemble/dissasemble with minimal parts. Wood glue is used only on mortise and tenon joints on the sides of the frame. Every other piece is either hinged or there is a metal bracket holding the pieces together.
The frame is walnut and finished with a water-based varnish. The resonators are made from aluminum tubing and the curved resonators are from welded plastic tubing.
The most valuable component in a marimba is the keyboard. It consists of 61 bars of different width, length and thickness. The wood is a very precious honduras rosewood. Every bar is tuned to the exact pitch. The bars are polished to a glossy finish with no varnish.
More picture on the building process are available on my youtube channel.
The post Bogdan’s Marimba appeared first on The Wood Whisperer.
May 2, 2016
Arbortech, Brusso and QALO Giveaway
Every month we like to give back to our audience with great tool giveaways! This month we have prizes from Arbortech, Brusso Hardware and QALO Rings! See all of the products in action below and support these amazing companies! Click here for a consolidated list of all the past winners and prizes
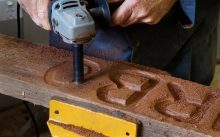 Arbortech Turbo Shaft is designed to complement the Arbortech TURBO range or as a stand-alone tool, the TURBO Shaft provides detailed freehand carving to perfectly combine efficiency and control. The TURBO Shaft fits most standard angle grinders and is fitted with replaceable carbide teeth for excellent performance and durability, even when working with the hardest timber. The adjustable depth gauge makes it quick and easy to set the desired cutting depth. This is the perfect tool for deep narrow profiles, detailed sculpting, letter work, template work and much more. (approximate retail value:$119.00)
– Due to region & giveaway restrictions this prize only open to USA, Canada and Puerto Rico.
See the Turbo Shaft in action!
 Brusso Hardware Prize Bundle – Brusso Hardware is the premier manufacturer of American made brass and stainless steel hardware for fine boxes, cabinetry, furniture, and woodworking. And they have given us an amazing bundle for you to try out a large selection of their premium products! Prize includes: a Brusso Mug, 1 Screw Wax, 1 JB-102 Stop Hinge, 1 JB-102S Stainless Stop hinge, 2 CB-302 Butt Hinges, 1 TJ-102 Install Template, 1 HD-680 Quadrant Hinge, 1 TJ-680 Install Template, 1 SR-638 Side Rail Hinge, 1 TJ-SR638 Install Template, 1 JB-423 Box Feet, 2 JB-280 Lid Stay, 1 JB-818, 1 L-37 Offset Pivot Hinge and 1 TJ-L37 Install Template (approximate retail value: $595.15)
– Due to region & giveaway restrictions this prize only open to USA, Canada and Puerto Rico.
See how the Brusso TJ-L37 Offset Pivot Hinge Template works!
 QALO Ring Bundle – QALO “Quality” rings are so much more than rubber rings. They are Silicone Rings made from medical grade silicone and provide a safe, functional alternative to the traditional metal wedding band. At QALO, we are in pursuit of the best life has to offer. This is reflected in the quality of our work, the quality of our relationships, and the quality of our play. Our Quality rings are stamped with the “Hammer and Pick” icon symbolizing the hard work and craftsmanship that goes into producing a high-quality product. (approximate retail value $50.00)
– Due to region & giveaway restrictions this prize only open to USA, Canada and Puerto Rico.
Here’s how to enter!
Arbortech, Brusso and QALO Giveaway
Frequently Asked Questions
The post Arbortech, Brusso and QALO Giveaway appeared first on The Wood Whisperer.
April 29, 2016
262 – A Quick & Dirty 2lb Cut of Shellac
*Note* – This is a clip from a 2008 video. If you notice I look approximately 25% sexier, that would be why.
If you ever research mixing shellac, you were probably overwhelmed with information about precise measurements, including weights and volumes. More fun ensues when you want to learn how to go from one dilution to another. If you aren’t familiar with shellac dilutions, here’s the quick primer. A certain amount of shellac flakes are dissolved in alcohol to achieve a particular dilution known as a “pound cut” (abbreviated lb cut). The most common cuts you’ll come across are 3 lb, 2 lb and 1 lb. Most pre-mixed shellac is sold as a 3 lb cut and is usually diluted before application. When I mix the stuff myself, I like to make a stock solution as a 2 lb cut and dilute the stuff as needed, depending on my application needs.
 To make a 2 lb cut, I don’t rely on scales and graduated cylinders. Instead, I ballpark it with a quick & dirty recipe. By the way, this isn’t a new concept. I probably read about this years ago in a woodworking magazine. Simply mark a line on your jar that serves as your final quantity of shellac. Be sure to leave enough room for shaking and mixing. About half-way down from the first line mark another line. This is your shellac flake line. Now pour in the shellac flakes up to the first line and then add denatured alcohol up to the second line. Congratulations, you now have an approximate 2 lb cut of shellac.
Remember, the lb cut of shellac is just a number. What really matters is how it applies to the surface. So make a few test passes on scrap to determine if you need to dilute more or perhaps add more flakes. Don’t overthink it.
The post 262 – A Quick & Dirty 2lb Cut of Shellac appeared first on The Wood Whisperer.
A Quick & Dirty 2lb Cut of Shellac
*Note* – This is a clip from a 2008 video. If you notice I look approximately 25% sexier, that would be why.
If you ever research mixing shellac, you were probably overwhelmed with information about precise measurements, including weights and volumes. More fun ensues when you want to learn how to go from one dilution to another. If you aren’t familiar with shellac dilutions, here’s the quick primer. A certain amount of shellac flakes are dissolved in alcohol to achieve a particular dilution known as a “pound cut” (abbreviated lb cut). The most common cuts you’ll come across are 3 lb, 2 lb and 1 lb. Most pre-mixed shellac is sold as a 3 lb cut and is usually diluted before application. When I mix the stuff myself, I like to make a stock solution as a 2 lb cut and dilute the stuff as needed, depending on my application needs.
To make a 2 lb cut, I don’t rely on scales and graduated cylinders. Instead, I ballpark it with a quick & dirty recipe. By the way, this isn’t a new concept. I probably read about this years ago in a woodworking magazine. Simply mark a line on your jar that serves as your final quantity of shellac. Be sure to leave enough room for shaking and mixing. About half-way down from the first line mark another line. This is your shellac flake line. Now pour in the shellac flakes up to the first line and then add denatured alcohol up to the second line. Congratulations, you now have an approximate 2 lb cut of shellac.
Remember, the lb cut of shellac is just a number. What really matters is how it applies to the surface. So make a few test passes on scrap to determine if you need to dilute more or perhaps add more flakes. Don’t overthink it.
The post A Quick & Dirty 2lb Cut of Shellac appeared first on The Wood Whisperer.


