
Marc Spagnuolo's Blog, page 61
September 16, 2016
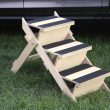
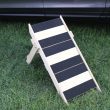
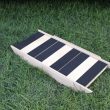
269 – Pet Steps
Welcome to the Honda Ridgeline Saturday Project series produced in partnership with Honda. Each project is designed to be approachable using basic tools and materials. And to show you how versatile the all-new 2017 Honda Ridgeline can be, we’ll build each project right in the bed of the truck!
Sometimes our pets need a little help getting to high places like the family bed or the inside of a vehicle. This easy-to-build set of Pet Steps can also serve as a ramp and even stores flat when not in use. Made with simple materials and basic tools, anyone can knock this project out in a weekend. The inspiration for this design came from various sources on the web and was brought to life by my buddy Scott Seganti.
Download the Plans
SketchUp File (Imperial)
SketchUp File (Metric)
PDF File (Imperial)
PDF File (Metric)
Materials
3/4″ Plywood (1/2 sheet)
3/8″ Dowel Rod
(2) 1 1/2″L x 3/8″ diameter carriage bolts with washers (4) and lock nuts (2)
1. Cut the Parts

Break down the plywood according to the cut diagram in the PDF plans. Notice that if you break the sheet in half first, the cuts become more manageable and you can reserve the other half of the plywood for a future project.
2. The Stringers & Legs

The stringers are the most critical part of the project. They have a 50 degree angle cut at the bottom and a 40 degree angle cut at the top. The legs also have a 40 degree angle cut at the bottom. Read the plan carefully and lay out all of the holes on the inside faces of the stringers. Remember, the stringers will be mirror images of one another from here on out.
3. Treads & Risers

Drill the 3/8″ holes into the ends of the treads and risers. Glue the tread cleats to the underside of the front edge of the treads. Give the treads and risers a nice roundover on all edges. Cut some 3/8″ dowel stock into 1 1/4″ (just a hair longer, actually) pieces. Glue these into the treads and risers.
4. Assemble

With one stringer lying down flat, drop in the treads and risers into their respective holes. Attaching the second stretcher is a little trickier as you’ll have to manage to get numerous dowels and holes to line up properly. Once there, clamp the assembly together and lay it down flat. The two short stretchers are then screwed into the back of the stringers to hold everything together. The third stretcher is a little longer and serves as a stop for the legs. So you’ll want to use the legs as reference when attaching the third stretcher. The legs also receive a stretcher.
Apply your finish of choice to the project and then add some adhesive-backed grip tape to the treads for additional safety.
The post 269 – Pet Steps appeared first on The Wood Whisperer.


September 14, 2016
Neal’s Slab Dining Table
When we cleared the land to build our house 6 years ago, there happened to be a single cherry tree about where our dining room was to be situated. To commemorate the tree, we had it sawed up into slabs and let it air dry for several years. Because we did not have enough cherry, I combined it with walnut to make a live-edge slab top with breadboard ends roughly 7′ by 4′.
One of the most interesting aspects in the top is the joinery between the walnut and cherry pieces. I wanted to keep the natural shape of the cherry pieces, so I had to mate curving pieces together. I did this by first roughing the cherry pieces to near final shape. Then, I attached a piece of MDF that significantly overhung the edge of the cherry piece. Using a router with a straight bit and a guide bushing, I then plunged into the MDF and made a “positive” and “negative” template in one go by guiding the bit along the cherry.
At this point, I found a problem with the approach—the negative and positive templates did not match perfectly, especially along the curves where the inner-diameter and the outer-diameter radius of the curves were different by the thickness of the router bit! My solution was wood filler (Bondo)! Per a great suggestion I read in the forums, I put down plastic wrap, applied a thick layer of filler, covered it with the plastic wrap, and then pushed the positive and negative templates together. The plastic wrap prevents the positive and negative templates from sticking and the result was a prefect match. I could then route the walnut using the modified negative template.
With more talent I might have been able to cut the template using my bandsaw, resulting in a thinner kerf and less error on the curves. But Marc makes smooth curves look pretty easy and I have some more practice before I get to that level! All my prototypes looked pretty poor…
The finish is about 7 layers of wiping varnish.
Thanks to Marc for all the great advice. I could not have done this without watching a lot of videos on the site.
The post Neal’s Slab Dining Table appeared first on The Wood Whisperer.
September 11, 2016
Do You Worry About Wood Movement?
One of the first rude awakenings a woodworker receives is the fact that wood moves. Perhaps you’re new to the craft and you just said, “WOOD MOVES?!” Well, it does. But how much is highly variable depending on wood species, how the board is cut, moisture and humidity conditions, as well as the size of the board. This leads to a lot of different opinions about how much movement you need to take into account when building furniture and accessories. So now we want to hear your opinion. Do you worry about wood movement?
Looking for more resources on wood movement? Check out this video: Woodworking Not So Common Sense and this video: Does Wood Really Move?
The post Do You Worry About Wood Movement? appeared first on The Wood Whisperer.
September 10, 2016
Friday Live – Forums Dead?, Scrap Wood, Back to Basics with Reclaimed Wood
This week we’ll discuss if woodworking forums are dead or dying? We’ll also take a look at my scrap wood collection and we’ll talk about whether reclaimed wood is a good material for “back to basics” projects.
1:00 – Kids in Bed
3:20 – Did Honda give you the truck?
4:00 – Are woodworking forums dead?
7:21 – Grandfather Clock Update
9:50 – Sharing shop space
13:45 – Why are you moving away from your dream shop?
15:28 – How are you going to move your tools? Here’s a video I did on a past shop move.
17:14 – My wood collection
21:20 – Do you still play WoW and have you played Legion.
22:35 – Do you still do commissions?
23:22 – The time of the live broadcast
24:57 – WFC project update
27:20 – Do you believe in a god?
28:50 – Licensing for selling furniture
29:58 – 10 year anniversary
30:18 – What is the Wood Whisperer Guild?
31:55 – My workbench vises
33:00 – Do you have any woodworking friends in Russia?
34:15 – What’s the story with your bench mat? Check out BenchMat.com!
35:00 – Have you used your new Narex tools yet?
35:27 – Do you know when you’re leaving Phoenix?
35:40 – Do you have any purple QALO rings left? For a limited time, enter to win one!
36:20 – Reclaimed wood for back to basics projects?
37:40 – Is there a reason you’re doing the live videos?
40:15 – Baby safe topcoat for crib?
41:30 – Tommy Mac’s new shop
42:20 – Frank Klausz vs Norm
The post Friday Live – Forums Dead?, Scrap Wood, Back to Basics with Reclaimed Wood appeared first on The Wood Whisperer.
September 8, 2016
Al’s Bookshelf Chair
After making two of Marc’s blanket chests for my granddaughters (great project, by the way—highly recommended!), I was casting about for something to make for my 10 year old grandson who is a total bookworm. My wife suggested a bookshelf chair. Having never heard of such, I did an internet search and got a few pictures as inspiration. As I was working out the dimensions (had to fit through his bedroom door, etc.), I found a replacement cushion for an outdoor patio chair and used that for the dimensions of the seat—then built the rest around that.
This project is made from 8/4 red oak for the uprights, with 3/4 inch oak dowels through the base and seating area, and oak plywood (1/2 inch) trimmed in red oak. The top shelves are made from red oak and purpleheart. Originally, I had planned on adding another shelf, but decided that it would be too unwieldy. I routed my grandson’s name into the back section and, since this is the 21st century, I added a charging station to the right of the chair (3 AC outlets and 2 USB ports). The chair back is angled 8 degrees to make reading while sitting more comfortable. Finish is Watco Danish oil (Natural) x 2 followed by 3 coats of Minwax wiping varnish.
Now that it’s finished, I have to move one blanket chest and this chair 2000 miles west to the Seattle area. A big thanks to Marc for all the great instruction and inspiration he provides!
The post Al’s Bookshelf Chair appeared first on The Wood Whisperer.
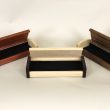
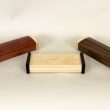
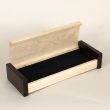
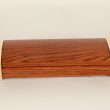
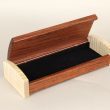
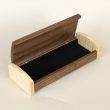
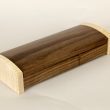
268 – Scrapwood Jewelry Boxes
Scrapwood. It’s something woodworkers accumulate as a natural part of the woodworking process. Even though the pieces are hard to incorporate into larger projects, there’s still a LOT of value in them and it’s a good idea to come up with small projects that can make good use of the stuff. That’s exactly what I had in mind when I created these small elegant jewelry boxes. And while the project appears simple, you’ll see that it does require attention to detail and precision. Even small projects deserve your best effort! So let’s dig in!
Looking for a source for 5mm Barrel Hinges? Try these!
Want a chance to win a free QALO Ring? Enter here! Or you can go to QALO’s website and pick up your very own Ava series ring.
The Plans
SketchUp File (Imperial)
SketchUp File (Metric)
PDF Plan & Cut List (Imperial)
PDF Plan & Cut List (Metric)
Gallery

The post 268 – Scrapwood Jewelry Boxes appeared first on The Wood Whisperer.
September 6, 2016
Arbortech Turbo Bundle Giveaway
Every month we like to give back to our audience with great tool giveaways (we’re like a sawdust covered Santa!) This month we have an awesome prize bundle from Arbortech! See all of the products in action below and support these amazing companies! Click here for a consolidated list of all the past winners and prizes.
 The Arbortech Turbo Plane is a universal freehand wood shaping tungsten carbide toothed blade that can be used in a number of ways to create different profiles and finishes. This blade differs significantly from other Arbortech blades in that it is specifically designed to be laid flat with a rotary planing action. It has no cutting edge on the outer perimeter, which makes it safer and easier to use than other freehand blades. The Arbortech Mini TURBO Kit is a revolutionary tool for woodworking and sculpting that allows you to make previously impossible cuts and shapes. The Mini Turbo can be used either directly on the Arbortech Mini Grinder or fitted to any standard 4″ or 4-1/2″ angle grinder by using the supplied extension. This is an ideal tool to be used freehand or with guides and templates for accuracy. It is the perfect kit for medium size sculpting projects, from start to finish. To ensure a sharp cutting edge, carbide cutters can be loosened with the provided tool and rotated to a new edge for superior performance. Kit includes four mini sanding pads: 40-grit, 60-grit, 80-grit, and 120-grit. Designed to complement the Arbortech TURBO range or as a stand-alone tool, the TURBO Shaft provides detailed freehand carving to perfectly combine efficiency and control. The TURBO Shaft fits most standard angle grinders and is fitted with replaceable carbide teeth for excellent performance and durability, even when working with the hardest timber. The adjustable depth gauge makes it quick and easy to set the desired cutting depth. This is the perfect tool for deep narrow profiles, detailed sculpting, letter work, template work and much more.
Enter Now!
Arbortech Turbo Bundle Giveaway
The post Arbortech Turbo Bundle Giveaway appeared first on The Wood Whisperer.
September 2, 2016
267 – 4-In-A-Row Game
Welcome to the Honda Ridgeline Saturday Project series produced in partnership with Honda. Each project is designed to be approachable using basic tools and materials. And to show you how versatile the all-new 2017 Honda Ridgeline can be, we’ll build each project right in the bed of the truck!
This 4-In-A-Row Game is fun for the whole family and can be made with basic materials and tools. If you’re not familiar with this classic game, the goal is to achieve four discs in a row while blocking your competitor from doing the same. The fact that it’s oversized makes it that much more fun.
The design was inspired by a tutorial I found on Home Depot’s website.
Download the Plans
SketchUp File (Imperial)
SketchUp File (Metric)
PDF File (Imperial)
PDF File (Metric)
Materials
1- 4’x8’ sheet of 1/2″ plywood
1 – 4’x8′ sheet of 1/4″ plywood
4 – 1 1/2″, 3/8″ diameter bolts with nuts and washers
1. Cut the Parts
 Using a circular saw and a chop saw, cut out all of the parts listed in the cut list. This is one project where you should be able to get away with cutting all of this stuff ahead of time, something I normally don’t recommend doing.
2. Main Panel Holes and Disks
 Clamp the two main panels together and use the diagram in the PDF to lay out the hole locations. Construct a shop-made trammel arm with a router and a straight bit and use it to cut the 42 holes. Adjust the trammel arm as needed to make the game discs as well in the 1/2″ plywood. As an alternative, you could use hole saws to make the panels (4″ hole saw) and the discs (5″ hole saw).
3. Assemble Main Panel and Release
 The various panel dividers are sandwiched between the two main panels. You can use glue alone, glue and screws, or glue and brad nails to make the final connections.
4. Assemble Release Mechanism
 Using the details in the PDF as a guide, attach the various components of the release mechanism. Remember, some parts are fixed and some are intended to move, so be careful where you add your glue and where you drive your screws/nails. When attaching the small cross-pieces to the release rail, you might be tempted to use a clamp to hold the long rail pieces in place. But be careful not to clamp too tight since the rails needs to slide back and forth. I didn’t show it in the video, but you might consider putting a few pieces of paper or business cards under the long strips when you apply the clamps. This will give the release rail some breathing room.
5. Assemble Legs and Base
 The legs are attached directly to the main game panel with screws. The legs then interface with the base pieces using 1 1/2″ long, 3/8″ diameter bolts. The reason I went with bolts here is to allow the game to disassemble for easier storage. Also, you might decide to raise the height of the game as your children get taller, and the detachable legs should make that a little easier.
 This game was an immediate hit my son Mateo and I’m sure the kids in your family will enjoy it too. If you’re going to store it outside, make sure you apply a good outdoor finish. And to keep the disks from binding, be sure to sand them down on both faces and the edges, especially if you plan to apply a thick film finish. Have fun making your 4-In-A-Row Game and be sure to send in your pictures after you make it.
The post 267 – 4-In-A-Row Game appeared first on The Wood Whisperer.
Friday Live 9/2/16 – Powermatic CNC, Countersink Bits, Grandfather Clock, QSWO
This week, we’re talking about TWW Mugs, Powermatic’s new CNC offerings, countersink bits, Grandfather Clock update, and quartersawn white oak.
2:14 – What project did you learn the most from?
3:00 –
3:50 – TWW Shellac Mug
4:55 – Powermatic CNC machines
8:19 – Countersink Bits. Amana bit shown in the video.
14:48 – Grandfather Clock update
18:45 – Quartersawn White Oak
22:10 – Truffle Shuffle
22:45 – How do you sign your work?
24:38 – Thoughts on teak?
25:49 – Do you wax your tools?
26:40 – Building vs buying tools
The post Friday Live 9/2/16 – Powermatic CNC, Countersink Bits, Grandfather Clock, QSWO appeared first on The Wood Whisperer.


