
Marc Spagnuolo's Blog, page 53
March 31, 2017
Bloxygen & Brushless Motors – Friday Live!
This week we’re discussing the benefits of using Bloxygen as well as whether brushless motors are worth the investment. Of course we have tons of Q&A too. Here’s the rundown:
0:01 – Autographed Marc Photos
1:05 – Patreon Goal Update
2:30 – New Facebook Group – https://www.facebook.com/groups/twwcommunity
3:41 – Maui’s Hook Video
7:00 – Bloxygen Finish Preserver Demo
8:32 – Carter bandsaw blades from Alex Snodgrass
10:25 – What kind of gas is Bloxygen?
12:28 – Can you use Bloxygen on any solvent based wood finish?
13:11 – How is Millie?
13:45 – What is the best way to let a large amount of wood acclimate?
15:51 – How much time would you give yourself to visit the booths at AWFS?
18:08 – Can you wet sand danish oil?
20:31 – Can I vent my dust collector outside?
22:54 – What’s a good all around grit for a drum sander?
23:20 – When is the Wood Talk Anniversary Show?
24:26 – What’s the best wood for drawers?
26:27 – Is it better to buy a lower quality set of chisels for $100 or wait and buy a more premium set?
28:08 – What are your thoughts on resawing without a fence or with a pivot fence? What about feed rate?
30:08 – Is the brushless motor worth an extra $100 in a sander?
33:24 – Did you insure your furniture when you moved? How did you pack everything up?
34:35 – Any tips and suggestions for unpacking a new 15″ Powermatic bandsaw?
35:13 – Could you explain the difference between set and TPI?
36:48 – Do you ever see or hear from David Marks?
39:22 – Do you have videos for tips on how to resaw on the bandsaw?
39:47 – Will you update your bandsaw video with Alex’s information?
40:55 – Have you ever tried welding bandsaw blades back together?
42:04 – What diamond stones do you recommend for a newbie sharpener?
42:35 – Could you explain the reasons why you buy pre-mixed wipe on poly instead of mixing it yourself?
44:50 – Patreon & Super Chat Supporter Shout Outs
46:48 – Mark got his Nintendo Switch
46:55 – Nicole is back on Ladies of L33t
50:05 – Guild project winner
The post Bloxygen & Brushless Motors – Friday Live! appeared first on The Wood Whisperer.


March 30, 2017
Make a Kid Size Maui’s Hook From a 2×4
Recently, my son has been obsessed with the Disney movie Moana. One of the primary characters is the demigod Maui who wields a magical hook. The hook has a very distinct look and is adorned with special carvings.
 Using a single 2×4, I made a kid-sized version of the hook. I started by making a template by free-handing the shape and cutting it out at the bandsaw. You can simply DOWNLOAD MY TEMPLATE if you like the shape I came up with. Print the template with no scaling and then cut and tape the pages together. Use some spray adhesive to attach the paper to some 1/4″ plywood or MDF and then proceed with the cutting.
Cut down the 2×4 into pieces that cover the hook shape as shown in the video and then glue the pieces together into a panel. Cut out the shape, fare the curves, and then use a rasp or power carving tools to give the hook its final shape. The etchings were drawn on with a pencil and then burned in using a Razertip Wood Burning Tool. I referenced images from the movie for the etches but I wasn’t going for perfection and ad-libbed quite a bit.
Keep in mind that you don’t need to use everything I used in the video. A jigsaw can be used instead of the bandsaw. All of the sculpting can be done using nothing more than a rasp and hand planes. And if you’re intimidated by the sculpting, you can always cut the shape out of 3/4″ plywood, round over all of the edges, and give that to the kid and let them use their imagination. Here are some helpful links to the specific tools I used for the build:
Download the Template
Milwaukee Grinder
Holey Galahad Grinding Disc
Makita Die Grinder
Ball Nose Burr
Large Fine Rasp
Small Fine Rasp
Razertip Wood Burning Tool
The post Make a Kid Size Maui’s Hook From a 2×4 appeared first on The Wood Whisperer.
Keith’s Game Board TAKE TWO!!!
This is my second “run” at a game board. My first was a project for a neighbor. This one is an upgrade with more exotic woods and features, and the end product is for my own personal use.
The embellishment I am most excited about on this project is the addition of built-in drawers for storing the checker and marble game pieces. I added suede flocking to the cavities for the game pieces which I think give it a more professional finish. Special inlays were added to the edges of the drawers as well as the four corners of the game board. I also added visual/tactile features to the drawers so that players could tell which drawers contain checker pieces vs marbles when the drawers were closed.
I used Rare Earth magnets on the back edges of the drawers and inside of the drawer cavities so that the mechanics of removing and inserting the drawers had a very “crisp/snug” feel. I added a subtle curve to the front edge of each drawer as a design element to offset all of the “squareness” of the overall project (i.e., square perimeter of the board, square inlays). This seemed to improve the visual appeal of the finished work.
The precision of my work on this project benefited greatly from recent purchases of some new equipment, including a drum sander, chisels, and a low-angle block plan. Unfortunately, as my addiction grows for sophisticated tools, I realize I must continue to hold down a day job to afford them! Although the game board itself is done, I plan to supplement this project by making chess pieces, as well as a table for displaying the board when not in use. It actually has turned out to be a nice piece of furniture which I am proud to display in my home.
I encountered several traumatic moments (aka, learning experiences) throughout this project build, including severe burn marks introduced by my drum sander, and a bad finish coat application that required a complete re-sand and re-coat of finish. All were correctable, although I feel fortunate that my wife agreed to continue to let me live with her after witnessing several of my meltdowns. Please feel free to offer your insights and suggestions…all are welcome.
Materials, Cost, Labor:
Game Board Base: Cherry (checker board side) | Ash (marble game side)
Inlay woods for checker board: Paduk and Maple
Checker board pieces: Paduk and Maple
Seal coat: Shellac (clear)
Finish coat: Polyurethane (GF High Performance – Flat sheen)
Paint for marble holes: Enamel model paint (Testors brand)
Total material cost: Approx. $268
Hours spent: A bunch!
The post Keith’s Game Board TAKE TWO!!! appeared first on The Wood Whisperer.
March 24, 2017
Micro Bevels – Friday Live!
Today we’re talking about sharpening micro bevels as well as a bunch of Q&A topics. Here’s the rundown:
0:24 – Marc admits waffles are great.
1:04 – Patreon update
2:43 – Wood Whisperer Thread Taps – http://wwthreadtaps.com
3:20 – Friday Live Guild project giveaway
3:55 – Woodworkers Fighting Cancer bottle opener
4:40 – Fantastic piece of walnut
5:14 – Goby Walnut T-shirt/Marc’s a large
6:10 – Finish test update: Rubio Monocoat addition
9:35 – Nicole’s potty mouth
10:27 – What is the process for correctly setting a micro bevel on my chisels/irons?/Is there a difference between honing and lapping?
19:12 – How do you keep your hand planes when they’re not in active use? Camellia Oil or Jojoba Oil
20:49 – What tools should I prioritize first?/How do I resist buying tools I don’t immediately need?
26:00 – Should I ask people to buy me tools as gifts or is money a better option?
27:06 – What are the Spagnuolo’s favorite board games?
28:05 – Do you still use your Dylos air quality monitor in your shop?
31:00 – Why would I need/want a scraper plane?
32:10 – Are there any hard or fast rules on what speeds to run router bits? – Rockler Article
33:39 – Are you going to the Atlanta Woodworking Show?
34:48 – Would you ever consider a video showing real time for certain operations in your shop?
36:11 – What is the mat on your bench? BenchMat.com
36:38 – Have you ever had issues with the keyless chuck in your drill press?
37:02 – What do you do with the sawdust in your dust collector?
38:03 – Have you ever used the Festool domino XL for breadboard ends? – https://www.youtube.com/watch?v=b_NTknCCtGE
39:30 – Do your bluetooth ear muffs have a headphone line in jack?
40:01 – Guild Project Winner
40:35 – New Patreon supporters.
The post Micro Bevels – Friday Live! appeared first on The Wood Whisperer.
March 23, 2017
Kevan’s Rudis Sword
The Rudis sword that my friend John and I designed has a few symbolic elements:
– Pommel & Hilt: Both are made of maple burl wood. As you may know, burl is a wood that has taken some trauma along the way, but that leads to the beauty of the knotted-rope-like grain. Both ends are unfinished since the work of honor and purpose is never done.
– Handle: Made of American Holly, it looks like ivory. American Holly is not an easy wood to find, so are men who have restored their honor and purpose. It is made to look like a backbone, because that’s what it takes.
– Blade: It is made of Bethlehem olive wood symbolic of Him whose power we need to draw upon. Olive oil is only rendered after great pressure is applied to the olives, then it bleeds the oil. Olive oil was used anciently as fuel; in anointing Kings to show they were called of God to lead; in anointings to heal the sick; and to help flavor to permeate food. The olive branch has long been a symbol of peace.
John, a good friend of mine, is a Marine who served three tours to Iraq. He came home and (his words) “I got caught up in all the ‘learned helplessness’ of the more disabled vet I was, the more cash I got each month from the government0. After a year or so I found that I had lost the fire in the belly I had as a soldier, and more importantly I lost my purpose. I was shackled by many of these well-intentioned programs; what I needed was to be free again, earning my honor again… I found no person or program could give me my honor back, I had to earn that myself.”
John has since started a non-profit called, Merito (latin for “merit”), that focuses on helping returning soldiers who are in a similar situation as his, to restore honor and purpose. More soldiers are taking their own lives now than at any other time. Merito is aimed and helping to fix that.
He chose the symbol of his organization, the Rudis Sword. A Rudis is a wooden sword, with an ivory handle—a gift to a gladiator as proof of his achieved freedom. It signifies his ascent from being a slave to becoming a freeman. The memorable past battles of a Gladiator are carved into the blade of the sword. A stipulation disclosed in the show is that a gladiator must always have the Rudis on his person or risk receding into slavery.
All these attributes epitomize the soldier who has gone through John’s Merito program. And this Rudis sword will be their graduation token.
The post Kevan’s Rudis Sword appeared first on The Wood Whisperer.
March 17, 2017
Poly Is Not The Enemy! – Friday Live!
Please help support the show on Patreon. We’ll love you long time!
Today I show you some early results from the Wiping Varnish Shootout I’m working on, which leads me into getting on my soapbox about oil-based finishes and misleading marketing language. Of course we have your questions as well. Here’s the rundown:
0:50 – What happened to Nicole last week?
4:31 – Wood Finish Comparison
9:05 – If you don’t stir satin finish, will it look glossy?
9:47 – Should I spend more on quality clamps, or buy more cheap clamps?
12:40 – Dried finish cure comparison.
18:20 – How does varnish compare to shellac?
19:40 – Common misunderstandings of finish types.
21:55 – What kind of sandpaper do you use and how do you tell something is good quality?
23:14 – Will you be able to talk about monetized videos vs sponsorships?
24:20 – First bandsaw purchase: Laguna 14BX or an 18?
25:18 – Will multiple layers of satin finish cloud the surface of the material?
26:42 – Is there a book that demystifies all these finishes?
28:08 – How would you properly pore fill walnut?
28:52 – How much would it cost to go fishing with Marc?
31:30 – Have you played around with baking thermo curing woods?
32:06 – What speed are you jig saw cuts sped up to?
32:43 – What kind of smoker do you have?
33:28 – Have you noticed any differences between woodworking in Phoenix and Denver?
34:05 – What advice do you have for a novice woodworker starting a woodworking business?
40:24 – Is a jobsite or contractor a better saw for a 14 year old?
42:24 – What’s your favorite plywood brand?
43:40 – Patreon Supporter Thanks
The post Poly Is Not The Enemy! – Friday Live! appeared first on The Wood Whisperer.
March 16, 2017
Tim’s Gaming Table
This was a large 8 person Gaming table that I designed with the client to be able to be used as a regular solid surface table. The table “leafs” flip over to reveal a microsuede surface for card playing, and the leafs can be table out and the neoprene lower lighted gaming surface is show for role playing games and board games you want to leave set up for a long time while the leafs can cover it. There are 8 trays that pull out for when playing certain games so players have places in front of them to hold their notebooks or cards or game pieces. The entire table was made from Red Oak, it has LED color changeable lighting for the lower game surface, it has 6 outlets mounted on the underside of the table for plugs for phones or laptops.
The post Tim’s Gaming Table appeared first on The Wood Whisperer.
Braces, Top, Wedges & Finishing – Knock Down Trestle Table Pt. 2
Looking for Part 1? Go here. — Support TWW on Patreon!
Download the Plans
SketchUp Plan
PDF Plan and Cut List V2
SketchUp Plan (Metric)
PDF Plan and Cut List V2 (Metric)
Purchase a Lumber Kit for this project
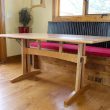
Braces
 This table is perfectly sturdy without adding additional braces (or cleats) in the middle. But they do offer additional stability and will also assist in keeping the top flat. Furthermore, they add some extra visual interest that you won’t see on many trestle tables. They are sized by dry-fitting the parts and getting the exact measurements from the base itself. The braces themselves are tapered and drilled just like the outer braces.
I used the Domino to create the mortises for these parts but the plans assume you don’t have the Domino and feature traditional mortise and tenon joints. You could also substitute two dowels at each joint. However you join them, consider only gluing the vertical post into the brace, and skipping the glue where the vertical piece meets the rail. Someone suggested this to me online and I thought it was a great idea simply because it allows the table to be taken apart and transported easily. And these braces don’t need glue to do their job.
Wedges
 The wedges start as blanks of dimension 8″ L x 2 1/4″W x 5/8″ T. A taper is then cut from one corner to a 3/8″ mark at the other corner. From there the wedges can be fit and trimmed to your liking. I like having bothe wedged fitting within the width of the legs but with a staggered appearance. To get that effect, you can do what I did in the video or trim you wedges to the dimensions listed in the plan.
The Top
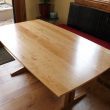
 The top dimension is 68″L x 38″ W. While you generally want to size your top based on traditional proportion appropriate for the table itself, my design is more about custom-fitting a table for the space. So if 68″ x 38″ sounds a little odd, that would be why. I’m also using 5/4 stock for my top because I’d like to have a finished thickness of 1″. You could certainly use 4/4 for this and end up with a 3/4″ to 7/8″ top.
I had to use eight boards to get the width I needed, so arranging the grain is something of a futile exercise. I simply cut my boards around flaws and oriented in a way that looked decent to my eye. Once glued up, gentle curves are cut on all sides using a jigsaw. You can use thin pieces of scrap stock to draw the curves or use a purpose-built drawing bow.
The Finish
 I’m using Minwax Wipe-On Poly for the finish. While many people don’t like the look of polyurethane, if applied with care and in thin layers, it can actually look really nice. I’m using a satin formulation and after the final coat cures, I employ a buffing process that utilizes 400 grit Platin (these are incredibly expensive but can be used more than once) abrasives and a mineral oil/mineral spirits mixture.
Wood Whisperer Thread Taps
 To attach the top to the base I’ll be using classic connector bolts and Wood Whisperer Thread Taps. The holes are tapped to a depth of about 5/8″-3/4″. The bolts are then driven in to secure everything in place. There’s still time to pre-order your taps. Pre-order ends March 24th.
Gallery
Here’s the final table in place in the kitchen. So far, the family absolutely loves it!
The post Braces, Top, Wedges & Finishing – Knock Down Trestle Table Pt. 2 appeared first on The Wood Whisperer.
March 10, 2017
Legs, Through M&T, & Dimpling – Knock Down Trestle Table Pt. 1
Download the Plans
SketchUp Plan
PDF Plan and Cut List
SketchUp Plan (Metric)
PDF Plan and Cut List (Metric)
Purchase a Lumber Kit for this project
Justification
The kitchen in our new home has a cool little dining area with a built-in bench. Unfortunately, the space isn’t large enough to accommodate the Gaming Dining Table and the little freebie table we have their now just doesn’t work well. So this project is my attempt to design a table that would suit the needs of the space and our family. The table is a trestle design which keeps the legs out of the way and gives us plenty of overhang. The joinery is all mortise and tenon including some cool double wedged mortise and tenon joints. I even added extra supports in the middle of the table that will not only support the top but should also help keep the table top flat over time. Because of the joinery we employed, the table can be disassembled into lightweight and easy to move components.
Materials
We partnered with Bell Forest Products to provide wood kits specifically for this project! Check them out! The primary wood is cherry. The top is constructed from 5/4 lumber but you could certainly use 4/4 if that’s all you have access to. The base is made from 8/4 cherry and the walnut accents are also from 8/4 stock, with the exception of the wedges which can be cut from 4/4 stock or 8/4 off-cuts.
Tools
This is one of those projects where I show a number of different joinery methods and tools. You’ll see the Domino as well as router-cut through mortises and router-cut loose mortise and tenons. My goal isn’t to confuse you, but instead show you that there’s always another way to get the job done. And if you’re a fan of the Domino, the lesson on through mortises shows you that the Domino simply can’t do everything. So keeping those joinery skills sharp is essential to your success. Of course we’ll make use of the standard array of shop tools including the table saw, band saw, jointer, planer, miter saw, and even and old favorite: the die grinder.
The Legs & Easy Through Mortise & Tenons
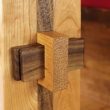
 The table legs are a glue-up of two pieces of cherry separated by a slightly thicker piece of walnut. The walnut strip sits proud for visual effect and also allows us to create the easiest through mortise ever. Before gluing the cherry and walnut together, we can cut the walnut strip to remove a section that corresponds to the size of our mortise. When we glue everything together, we can use a spacer and some clamps to make sure the mortise is exactly the size we want and exactly consistent between our two legs.
The legs, feet and supports all receive mortises for the loose tenons we’ll cut later. These are cut using a router, an edge guide, a 1/2″ spiral bit, and an extra piece of stock to help keep things balanced. The legs are then tapered on each side to offer a more bottom-heavy look to the table. The legs and supports are also tapered.
Dimpling

I thought long and hard about the walnut accent strip in the legs. I was already enjoying the look of the raised strip but thought I had an opportunity to do something even more unique. In the past I have done a dimpling texture process to create unique accents, such as the time I dimpled the drawer recess on the Krenov-Inspired Display Stand. The reception to that detail was hit or miss but in my mind that’s what trying new things is all about. So I decided to give it a shot on a much bigger scale on our Trestle Table. I’m glad I did, I think the texturing offers a subtle yet striking detail once you notice it.
Preparing for Movement
The table top is just one giant solid wood panel so we have to allow for seasonal expansion and contraction across the width at the point of connection with the base. So the two outer supports need be drilled in a specific way to allow the connector bolts we’ll use later to move back and forth slightly. I start by drilling 3/4″ holes (about 1/2″ deep) with a forstner bit. For the two inner holes, I simply drill a through hole using a 1/4″ (or slightly larger) bit. The interior holes won’t see a lot of movement. For the two outer holes, I drill two holes side by side to create a slot since that’s where the lion share of the movement will occur.
Loose Tenons
 One of the best parts of loose tenon construction is that you can make your own tenon stock and get the fit absolutely perfect. I usually make mine from longer sticks and then cut them down in the final step. Keep in mind that because of the near-perfect fit, it’s not a bad idea to cut some grooves in the face of the tenon to allow air and glue to escape. With the tenons made, the legs can be glued together with the feet and outer supports.
The Rail Tenon
The rail tenons are a little complicated because they themselves contain a mortise. The process starts with making the tenon at the table saw and checking the fit against the mortise in the leg. Once the fit is established, a mortise is cut into the tenon itself using a router and a bearing-guided pattern bit. While we could spend a bunch of time devising some sort of jig for this, I simply use some scrap 1/4 plywood that serves as a guide for the bit. The rest of the work is done with a chisel.

After cutting my tenon I realized I made a slight mistake. I used a dado stack I don’t normally use and forgot to account for the fact that that particular stack cuts some pretty deep lines with its outer blades. Normally this wouldn’t be an issue but in the case of an exposed tenon, it’s certainly not ideal So there are a couple of reasonable options outside of remaking the entire part. One option is to use a hand plane to clean up the tenon cheeks until the grooves are gone. The key would be to only remove the material that lives outside of the mortise. This would actually change the shape of the tenon and might not look as good as it could look. The second option is to do something a little more drastic and carry through the dimpling pattern onto the tenon itself. If the dimples are cut deep enough, we could remove the lines and also add a potentially cool looking additional feature. As you’ll see in the video, I wasn’t quite so sure this was the right way to go. But writing this in the future, I can tell you that I’m perfectly happy with this choice and it turned out great (in my opinion).
In the next video, we’ll tackle the construction of the inner braces, the top, the wedges, and the finish.
The post Legs, Through M&T, & Dimpling – Knock Down Trestle Table Pt. 1 appeared first on The Wood Whisperer.
Friday Live! Walnut & Routing Direction
Today we discuss the properties of walnut lumber and proper routing direction. Of course we also have tons of Q&A. Here’s the breakdown:
2:54 – Is there anything I should look out for when working with walnut?
8:00 – What bluetooth hearing protection are you using these days? 3M Worktunes with Bluetooth
9:30 – How do uphill and downhill cuts work on a router?
13:12 – Can you explain grain direction when jointing a board?
15:32 – Are you going to WIA this year?
16:10 – Can I get by without a jointer in my shop?
18:50 – Have you picked up the new Zelda?
19:44 – Should I get the Supermax 19-38 or Jet 16-32 drum sander?
21:15 – Any updates on the taps?
23:14 – How can I sand a chamfer without rounding the edges?
26:46 – What’s the acceptable amount of the shank to be extended above the collet on a router bit?
30:13 – Where are you getting your wood in Denver?
31:46 – What’s the best way to avoid planer snipe?
33:45 – Can the metric taps only be bought in a set?
34:15 – When can we expect the dining room chair in the guild?
35:40 – Could you recommend paints for baby toys?
37:20 – Patreon Thanks
39:34 – NoMona/Silence the Whisperer Campaign
The post Friday Live! Walnut & Routing Direction appeared first on The Wood Whisperer.


