
Marc Spagnuolo's Blog, page 14
May 13, 2022
M.Power Triple Diamond Sharpening Station Review
M.Power recently released their Triple Diamond Sharpening Station that features three diamond stones and three leather covers for stropping. It’s a capable system but could it possibly be a one-stop shop for woodworkers? Watch the review to find out.
If you like what you see, consider purchasing the sharpening station through our Amazon link.
The post M.Power Triple Diamond Sharpening Station Review appeared first on The Wood Whisperer.


May 10, 2022
Moving Again?! Yup!
If you can believe it, we’re moving again! This time, we’re headed to Missouri for two reasons: more family and more land. The video explains the situation pretty well but if you want to hear a little more detail on the reasons this move came about, check out this episode of Wood Talk.
I plan to document this move in a series of vlog videos so if you want to keep up with the latest, stay tuned. I’m looking forward to taking you on the journey with me.
If you want to take a stroll down memory lane and see some of the content related to past moves, check out the Marc’s Shop section of the site.
The post Moving Again?! Yup! appeared first on The Wood Whisperer.
April 29, 2022
Craft Cart – The Kids Love It!
If you have kids and you have a kitchen table, it’s very likely that table will be used for craft projects…… constantly. We’re often making a mad dash to clean the table just to make room for dinner. The craft cart we had previously was light, flimsy, and really couldn’t hold much at all. The craft cart I designed is a simple collection of cubbies, featuring storage containers that can be easily removed, filled, and replaced. You can pick up those storage bins here:
Glad Storage Baskets (You’ll want four of each size unless you change the configuration).
The build is pretty straightforward and you can make it from 3/4″ plywood and some 3/4″ thick solid material for the top (if you want to dress it up a bit).
Download the FREE plans below:TWW Craft CartTWW Craft Cart (Metric)The post Craft Cart – The Kids Love It! appeared first on The Wood Whisperer.
April 15, 2022
7 Must-Have Table Saw Upgrades
(Disclaimer: None of these products were sent to me for free. Everything was purchased with my own money and nothing included in this list is a paid promotion)
Even the best table saw can do with a few upgrades. Not just to improve functionality, but also performance and safety. When I bought my new table saw, I decided it would be a good opportunity to document the upgrades in hopes that you might also find them useful.
Overarm Dust CollectionSome table saw blade guards offer dust collection and it can be tricky to get suction to that location. The hose needs to be routed up and out of the way while also being removable for times when the guard isn’t in play. My solution was to run a separate dust extractor hose along a simple frame made from galvanized strut. I found 10′ lengths for about $22 as well as the associated hardware at my local Home Depot. One piece did the trick, cut into 8″, 12″, and 32″ lengths. To secure the hose when not in use, I added a 1 1/2″ U-Bolt to the structure. This setup allows me to continue using the stock blade guard while having effective dust collection and the means to get the hose out of my way when not needed.
Aluminum Extrusion FenceMost Biesemeyer style fences come with faces made from laminated MDF or UHMW plastic. Every point of attachment along the fence body typically results in a dip in the registration surface. While this isn’t a huge deal on long rips, it can be problematic when referencing small parts and joinery cuts. Furthermore, a simple fence face offers very little in the way of functionality. I decided to replace the inside face of my fence with a length of aluminum extrusion. The fence is not only dead flat, it features t-slots that can be used for countless jigs, fences and add-ons.
Attaching the extrusion has to be handled on a brand by brand basis but if you own a Sawstop PCS you can use the hardware listed below.
48” Aluminum Extrusion1/4-20 Oval Nuts3/8” Socket Cap Bolts (It appears the ones I purchases are now sold out. Try these instead. Note that what you’re looking for are 1/4-20 threads and a 3/8″ length)Sacrificial/Auxiliary FencesTo get the most out of a table saw, you’ll need to make some sacrificial/auxiliary fences. These fences can be clamped to the primary fence for things like rabbets with a dado stack and raising panels. If you happen to have an aluminum extrusion fence, it’s incredibly easy to attach and remove any kind of fence you could possibly need. Using hardware that engages with the t-slots you can get a good secure attachment without having clunky clamps in the way.
The hardware I use for this includes:
1/4-20 Oval Nuts3/4″ Flat Head Cap ScrewsAccessory BasketEventually I plan to build a cabinet that goes under the extension wing of the table saw and that should offer a great deal of storage for accessories. Until then, I can get a lot of service out of a simple basket screwed to the side of the extension wing. If you buy the one I did, you’ll have two to work with so consider where else you might need something like this: Under Desk Cable Management Tray
Hidden Rail DrawerIf you think about it, the hollow rail used on every cabinet saw is a total waste of space. Imagine if you could actually use that space for something handy like pencils or small tape measures? Well, that’s what Myer’s Woodshop did and I thought it was a great idea. I’m not sure who actually came up with this idea first, but Myer’s Woodshop was the one that made me aware of it. You can print your own drawer using the 3D Print File or you can purchase one that’s pre-made. Note that these are specifically for the SawStop saw and if you have another brand, you might have to do a little more digging or come up with your own solution. It shouldn’t be too hard to make a simple little drawer from 1/4″ plywood.
Zero Clearance InsertsOne of the very FIRST things you should do to improve any table saw is to upgrade to a zero-clearance insert. Most factory inserts provide a wide gap for the blade that can accommodate not only 90 degree cuts but also bevels from 0-90. But if you want cleaner results and less chance of off-cuts getting wedged between the blade and insert, you really want to close that gap. You can usually find pre-made zero-clearance inserts for just about every saw on the market or you can make your own. I chose to buy into a zero clearance system of sorts made by a company called Colliflower. Instead of buying a new full insert for every common operation at the saw, Colliflower offers a simple plate that accepts smaller/cheaper inserts. The little inserts slide along a dovetail track and provide the needed zero clearance for any operation. In the long run, this should end up being cheaper than traditional zero clearance inserts. And becuase the cost of each insert is so low (about $3.50 currently), I won’t hesitate to utilize them for one-off oddball cuts, which means I’ll get better results and safer cuts at times when I normally might just settle for the factory insert.
Colliflower Zero Clearance Plate4-Pack of Replaceable Inserts4-Pack of Dado InsertsStock GuidesEver wish you had a second set of hands, either to hold down large workpieces near the blade or to help apply pressure toward the fence? Yeah, me too! Thankfully, there are a few products on the market that help with situations like this. Years ago I used a product called Board Buddies. I sold the set with my old table saw and have since discovered the Jessem Clear Cut TS Stock Guides. While they perform the exact same function as Board Buddies, they are easier to adjust and more refined. Any time I’m cutting dados and grooves in large panels, I’m going to use these stock guides to make sure the material stays in contact with the table and the fence during the entire length of the cut.
Board Buddies (a less expensive alternative to Jessem)Board Buddy TrackJessem Clear-Cut TS Stock Guides (track included)To attach the Jessem track to my saw, I used a 1/4-20 tap which required pre-drilling with a 13/64″ bit.
While my list stops here, this is by no means meant to be exhaustive. There are lots of other ways to upgrade your table saw and perhaps I’ll do more in the future. Hopefully this inspires you to add a few extras to the workhorse of the woodshop: the table saw!
The post 7 Must-Have Table Saw Upgrades appeared first on The Wood Whisperer.
April 1, 2022
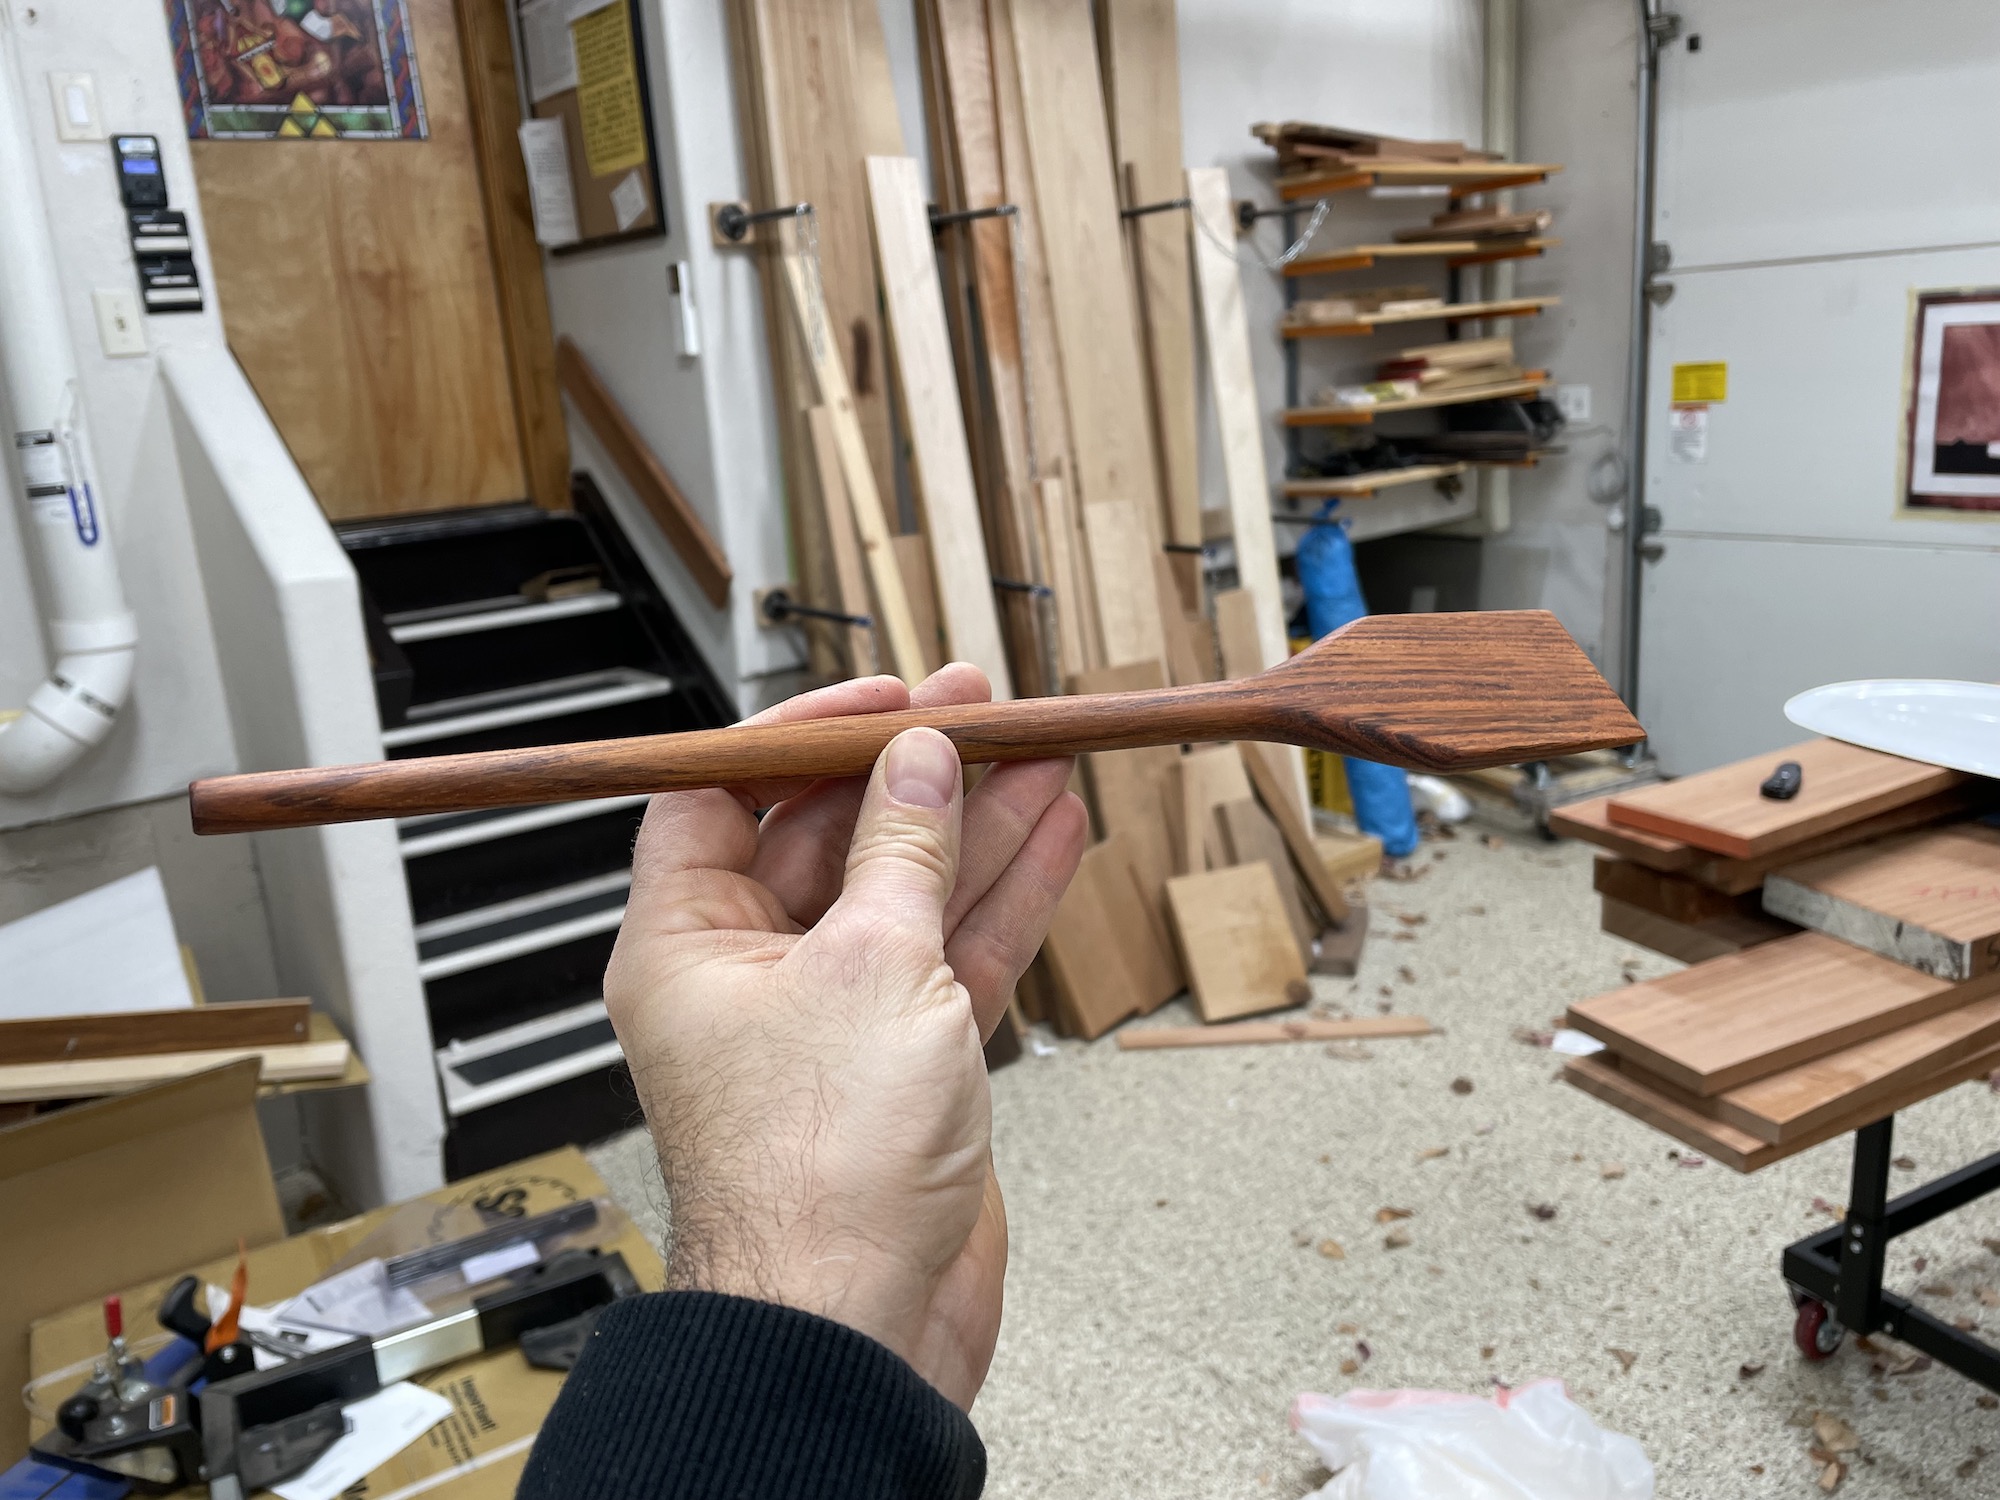
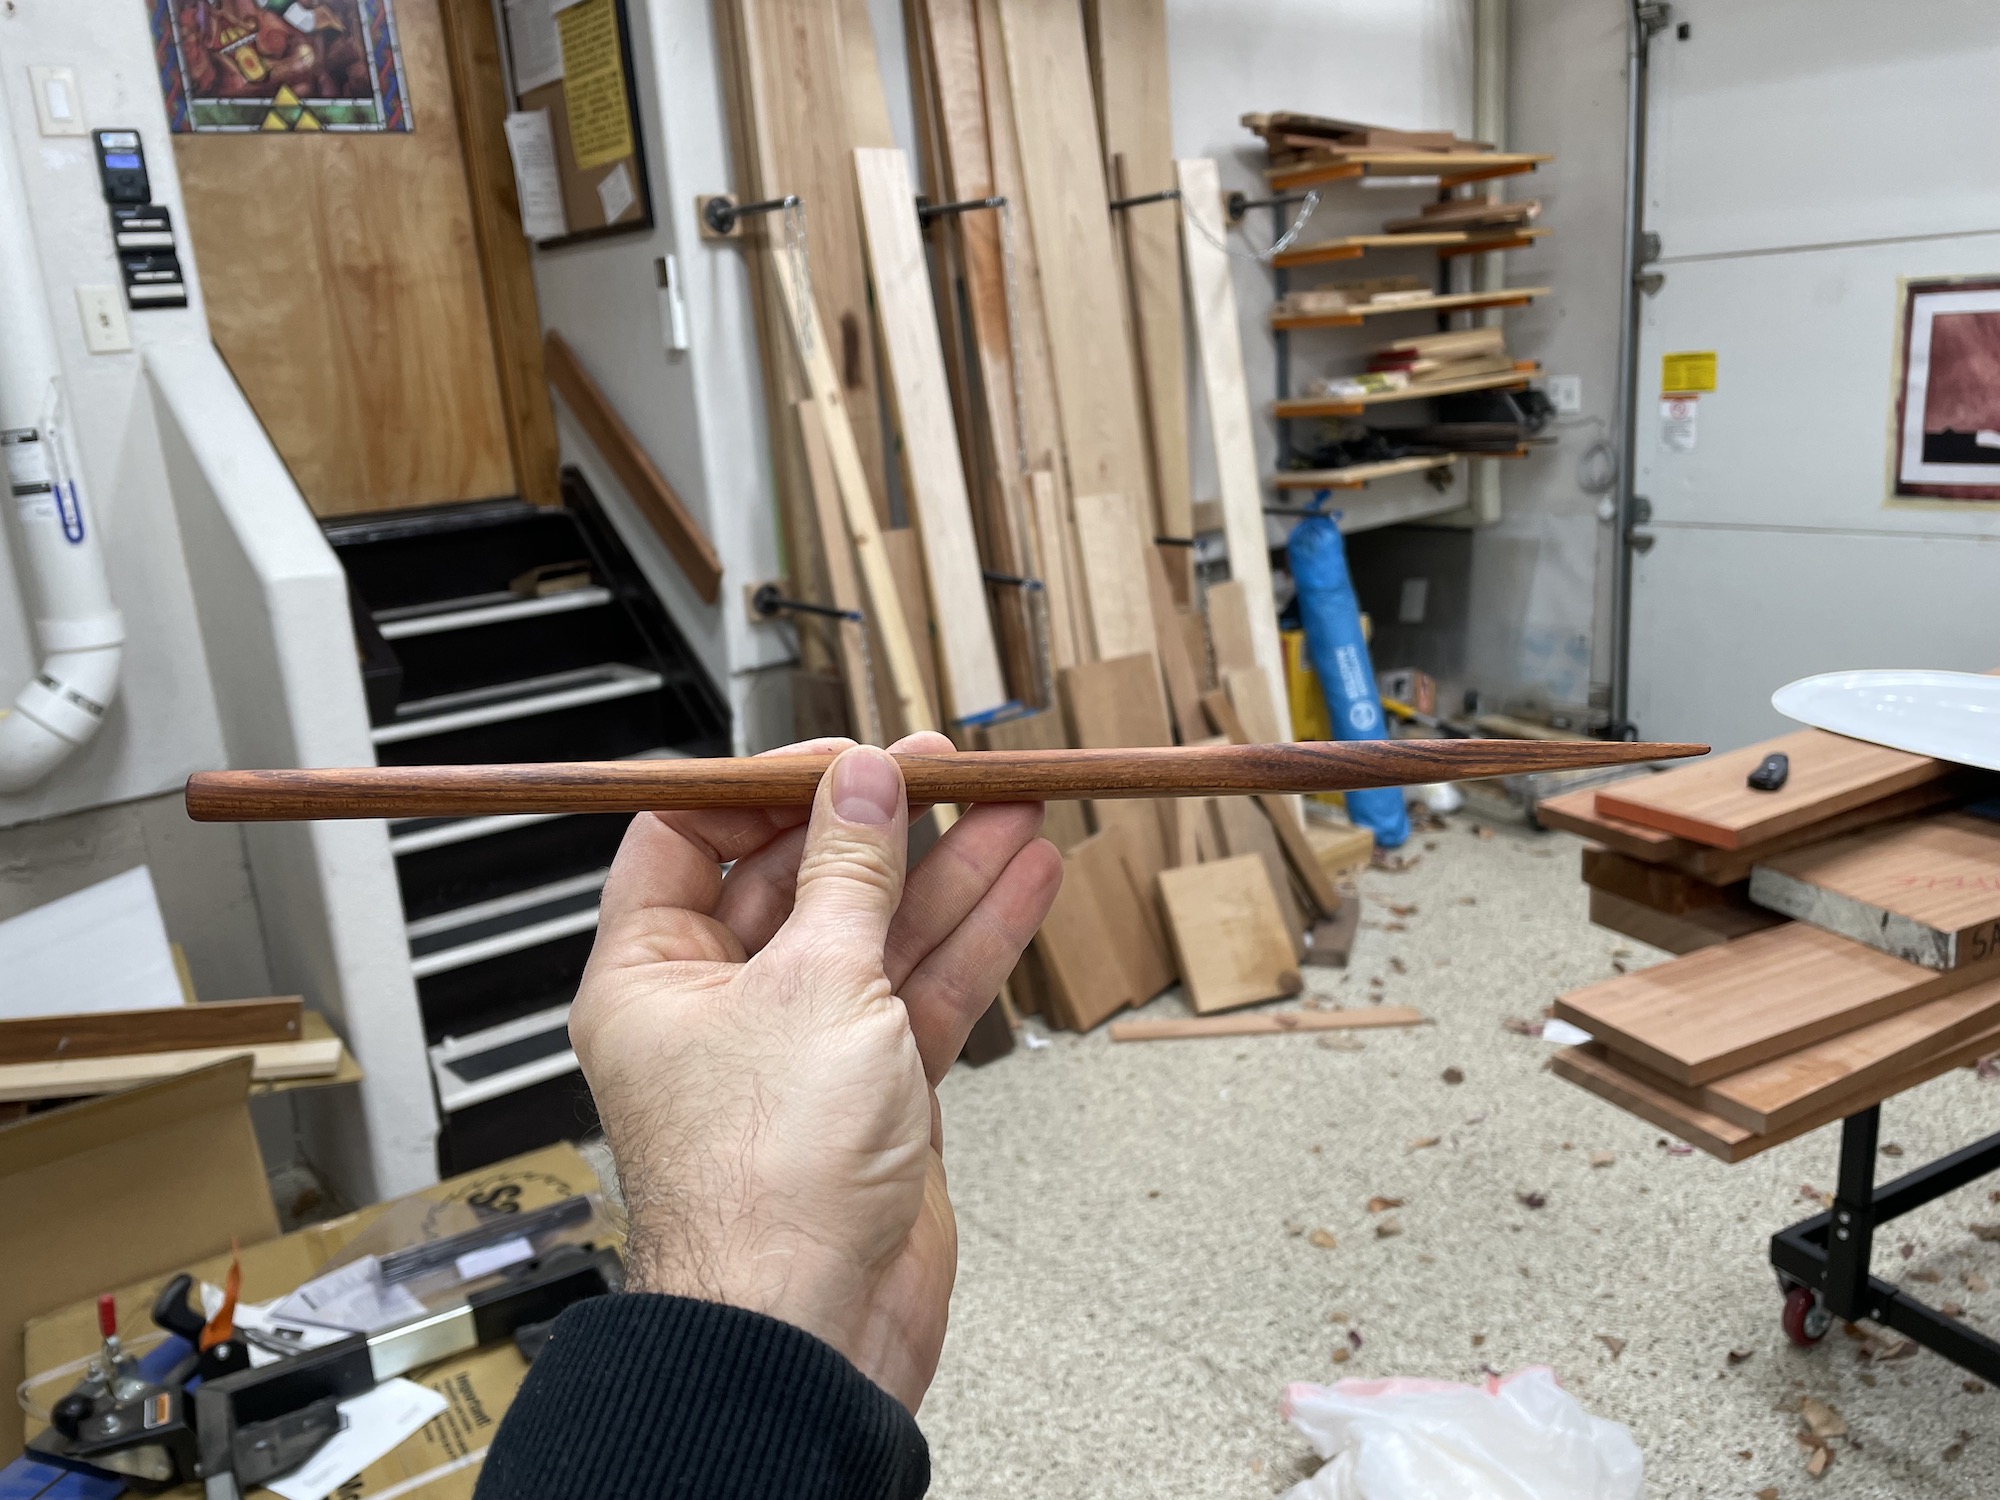
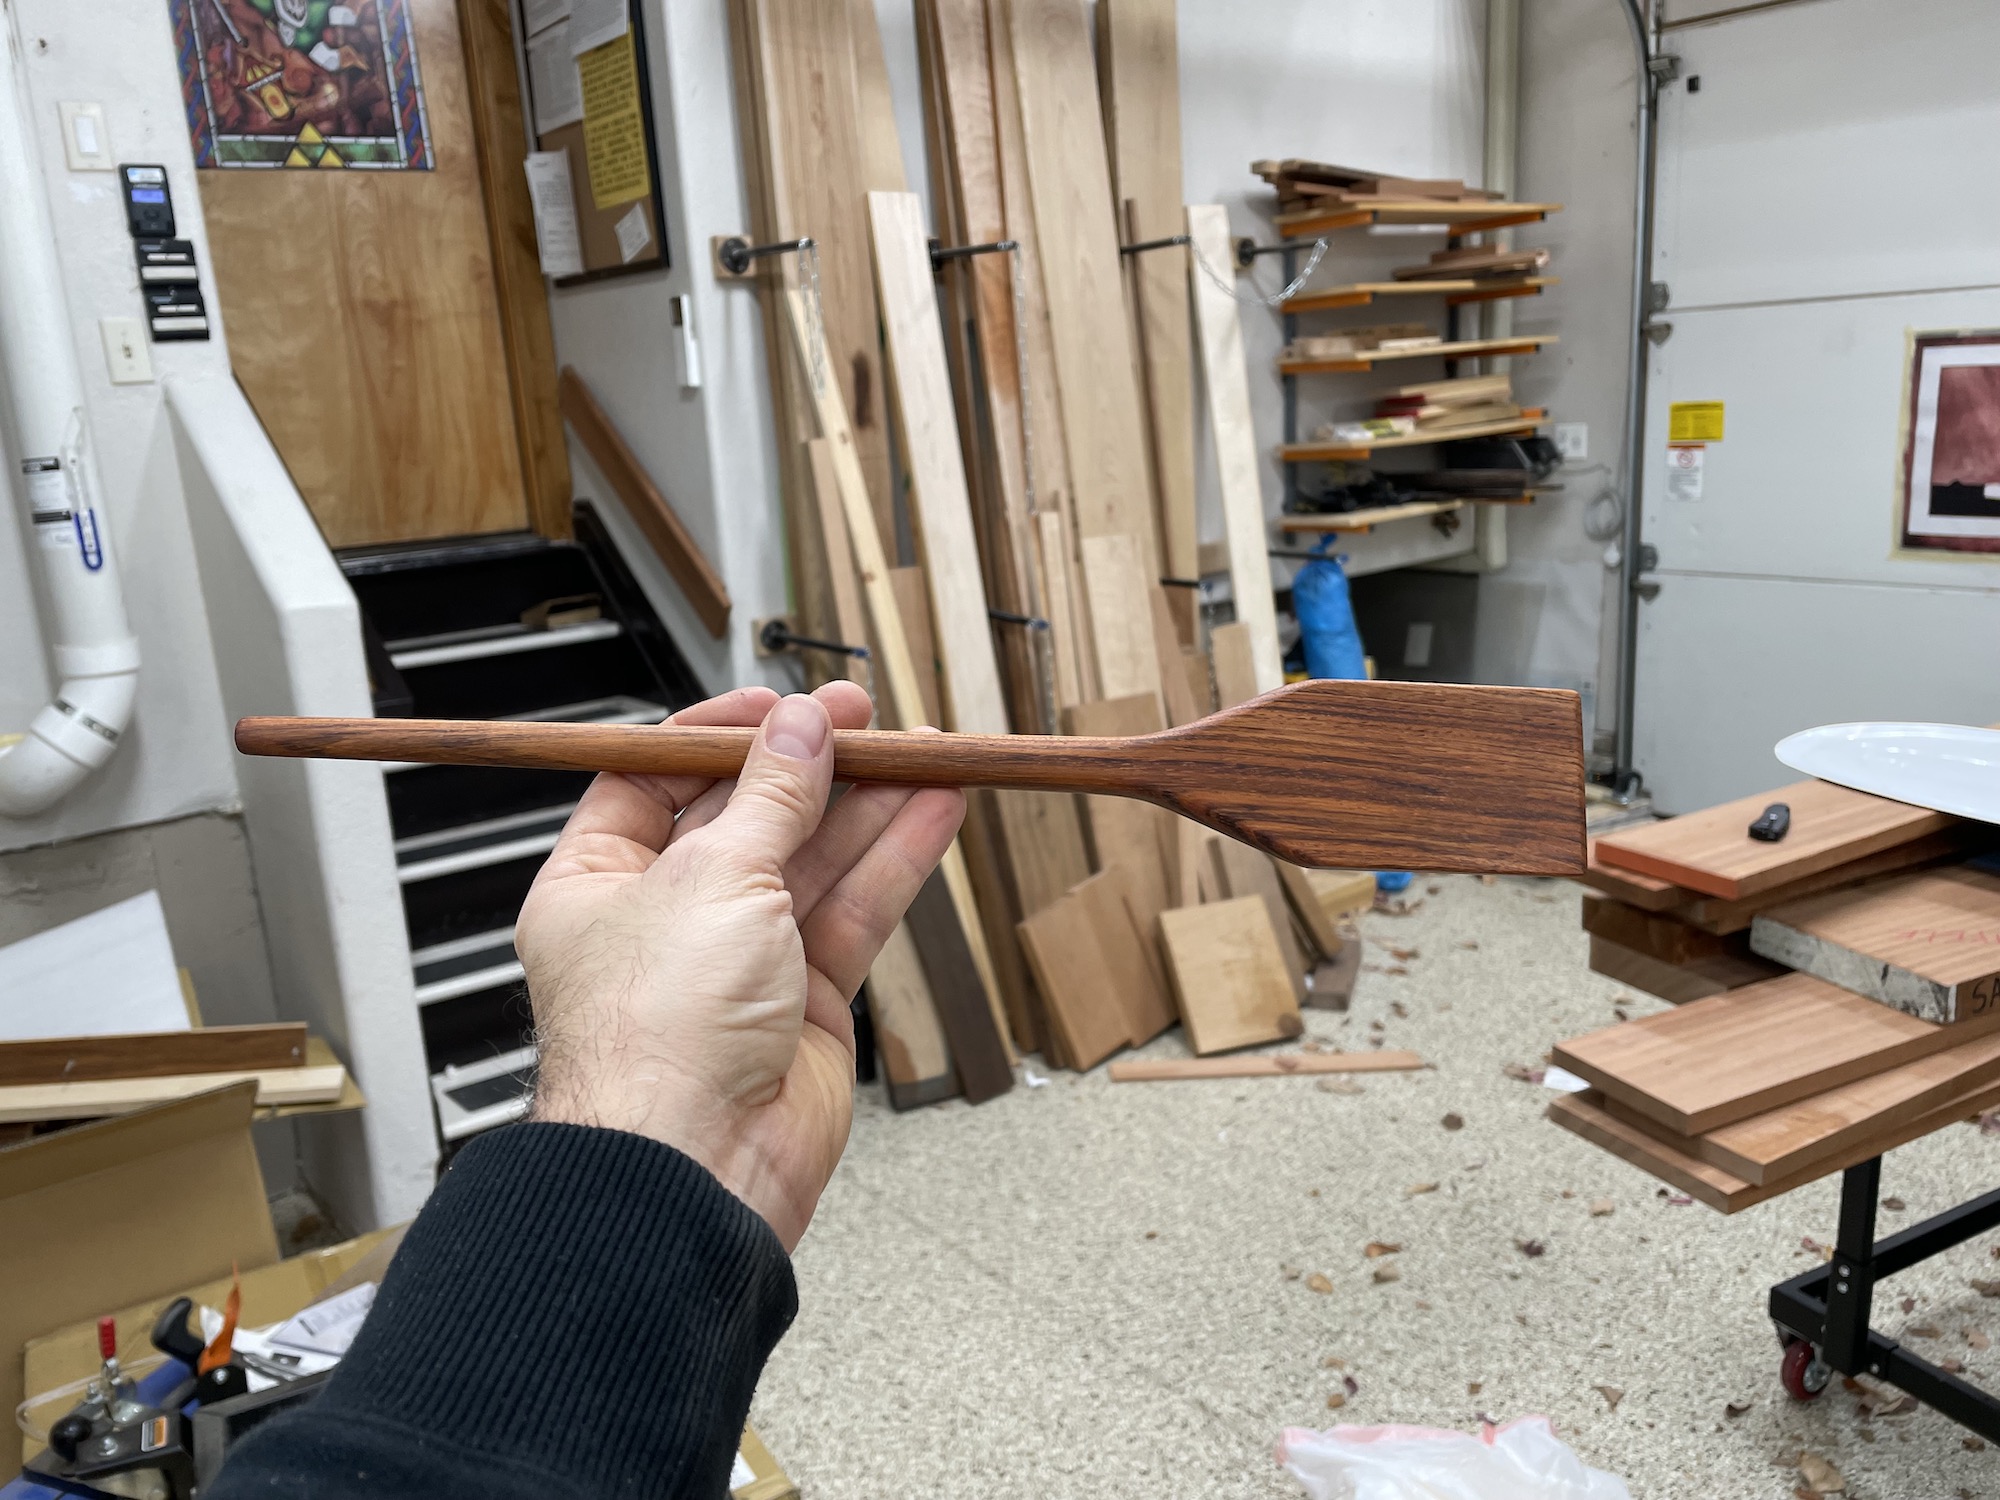
This Spatula Cost Me $33,000!
I’m a big fan of eating food. I also happen to enjoy making food. So I like to keep an eye out for interesting kitchen utensils that are all natural and won’t damage my cast iron seasoning. Recently while walking through a kitchen supply store I came across a unique-looking spatula. The shape was reminiscent of a paint brush, but the sharp tip and thick body meant the utensil could be used for normal cooking as well as scraping pans. Instead of buying theirs for $25, I came back to the shop to make my own.
Little did I know that making a $25 spatula would require $33k in woodworking tools!
By the way, if you’d like to see this thing up close, check out the pics below. If you’re a cast iron user, this is a particular nice tool to have in the kitchen.
The post This Spatula Cost Me $33,000! appeared first on The Wood Whisperer.
March 25, 2022
A Sweet Bandsaw Upgrade | Laguna DriftMaster Review
Disclosure: I have no relationship with Laguna and I purchased this product with my own money that I earned by mowing lawns and shoveling snow.
If you spend enough time around bandsaws you’ll quickly notice a theme: most of them have really bad fences. The budget-friendly saws often come with a cheap aluminum fence and a flimsy locking mechanism. Perhaps worse yet, premium bandsaws often come with fences that are nothing more than a chunk of cast iron and offer little in the way of functionality. But it’s hard to blame these companies since I don’t think my use-case represents the majority. That said, there are companies out there such as Laguna and Powermatic that are now including quality fences with their tools and that’s awesome to see. Not every company has gotten on board, however, and if you want to do precision work at your bandsaw it might be worth looking into an after-market fence system such as the Laguna Driftmaster.
I had the DriftMaster on my first “big boy” bandsaw I purchased in 2005-ish. The saw was a MiniMax MM16 and it was one of those that came with the cast iron slab fence. I was getting into cutting my own veneer at the time and the DriftMaster was the only fence on the market that offered an adjustment mechanism that would allow for precise fence movements, which can really speed up the veneer-cutting process. The fence also featured easy drift adjustments, as the name implies. If you aren’t familiar, “drift” is what we call it when a bandsaw blade doesn’t cut straight. If you calibrate the angle of the fence to match the angle of the blade, you can usually get nice straight cuts. Just as an FYI, there are many in the woodworking community that now feel bandsaw drift is something that can be adjusted out with proper calibration. See our video with Alex Snodgrass to see how it’s done. Fast forward about 15 years and I now find myself yearning for the creature comforts of a nice long 2-position fence, precise micro-adjustment, and drift adjustment should I ever need it. I recently purchased a sweet Italian-made SCM 440P bandsaw, and unfortunately it came with one of those chonky cast iron slabs. For the price of this saw, it really should come with a tiny jovial shop assistant that can move the fence for you, but I digress.
InstallationI found the installation of the DriftMaster Fence System to be a little frustrating. The manual is largely inadequate, featuring minimal explanations and grainy black and white images that look like prints of photocopies of the original scanned Polaroids. OK, maybe it wasn’t that bad but it’s 2022 and the technology to construct a better manual is accessible to any company that cares enough to utilize it. Speaking of technology, most of us are walking around with 4K video cameras in our pockets. Is it too much to ask for a quick installation video?!
After a little Google-fu, I found an old blog post showing the installation on a MiniMax saw. While not all of the info was relevant to my installation, I did find the pictures and explanations helpful.
Calibration was also a little tricky as it’s a very hit or miss process. The adjustments are made by tapping on various parts of the fence and it feels impossible to determine the downstream effects of those adjustments. For instance, you can tap on the front bracket to help square the fence to the table near the blade. But you quickly notice that this also affects the height of the fence and it’s now rubbing on the table on the near side while rising up on the far side. Then you also notice that while you made it square near the blade, it’s now out of square when you push the fence away from the blade. So you adjust the rear bracket and the the whole debacle repeats. It’s finicky to say the least and if you’re a perfectionist when it comes to tool calibration, I think you’ll find this thing pretty frustrating. But if you take your time and embrace the trial and error methodology, you’ll eventually get there.
Does it Work?Absolutely! In spite of my gripes with installation and calibration, the fence performs as well as I remember. I was slicing off consistent strips of veneer in no time and have since used it for not only veneer, but cutting small parts and busting through big resaws. The ability to accurately dial in the fence position transforms the bandsaw from a rough cutting tool into a precision powerhouse, at least in my opinion. Overall, I’m happy I made the upgrade.
Straight TalkOK let’s get real for a second. This fence is NOT a necessity. I haven’t had one for over 15 years and my work hasn’t suffered in the slightest. So don’t let my praise of this fence fool you into thinking this is purchase of necessity. It’s a luxury. This fence is all about incremental increases in accuracy, efficiency, precision, and fun. Because yes, I sometimes purchase things because I believe they’ll make my time in the shop even more fun than it already is. As is often the case with my reviews, I can’t tell you if this purchase is worth it for you. I can only say that the product works as advertised and once you slog through the installation and calibration, you’ll probably be happy with the end result.
The post A Sweet Bandsaw Upgrade | Laguna DriftMaster Review appeared first on The Wood Whisperer.
March 11, 2022
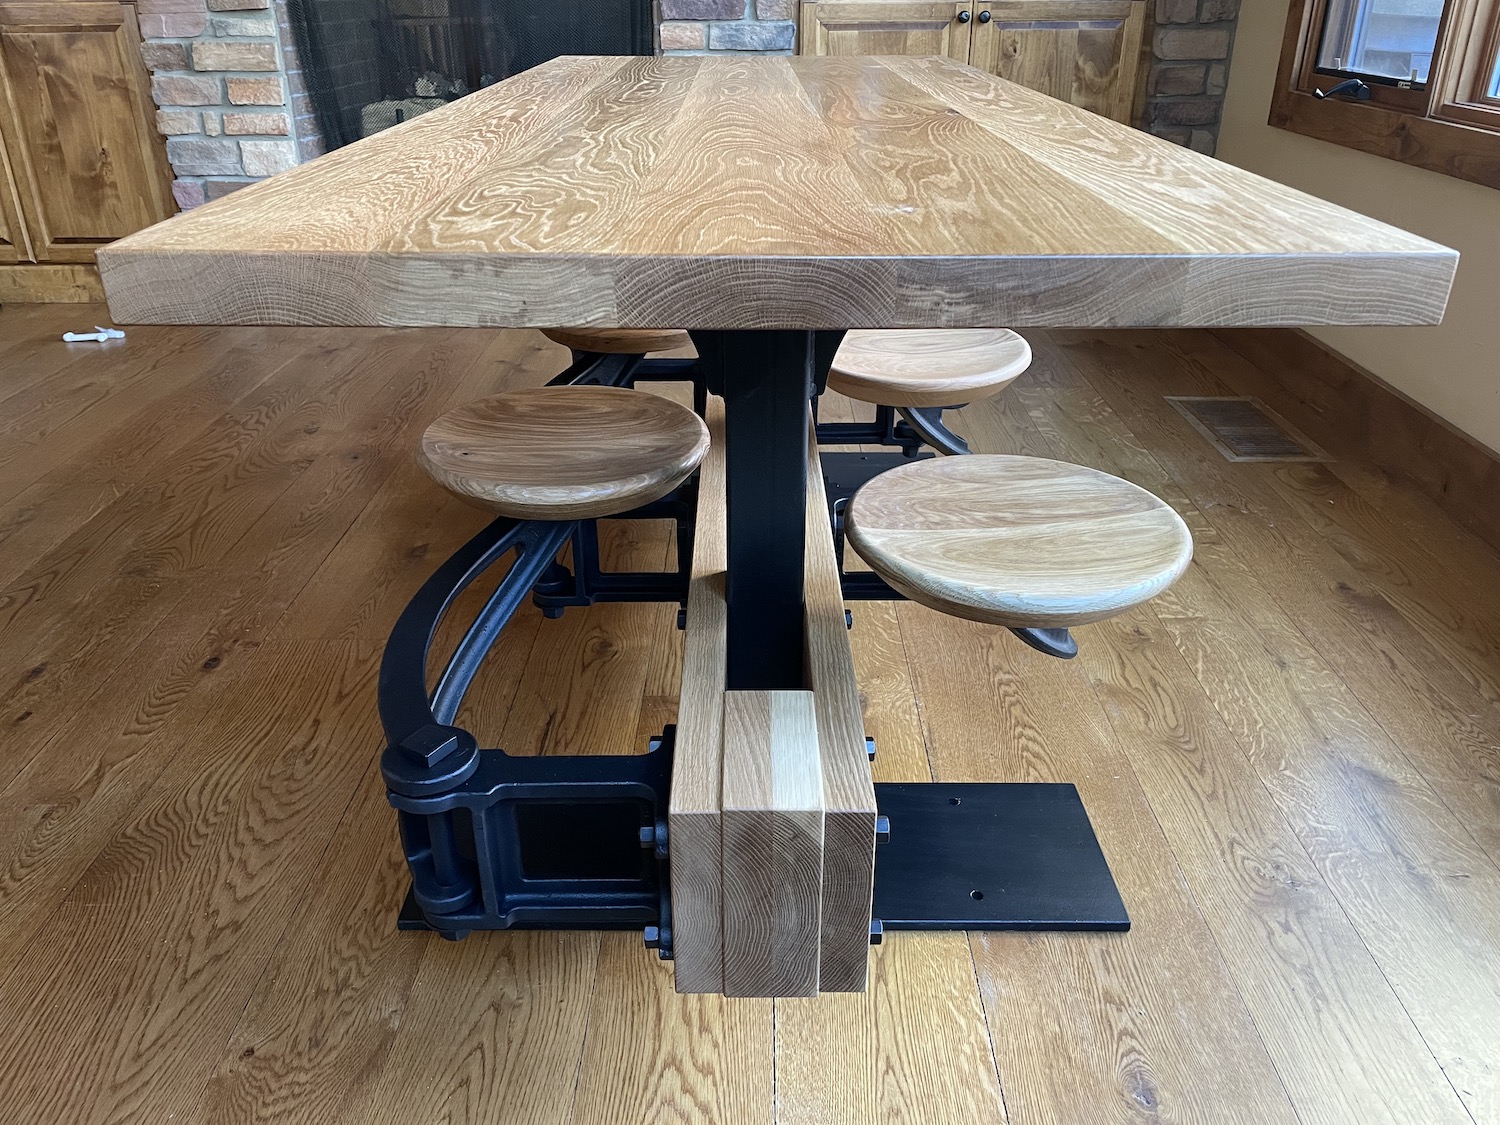
How to Build the Best Alternative to a Traditional Dining Table
This video was sponsored by the fine folks at Get Back Inc.
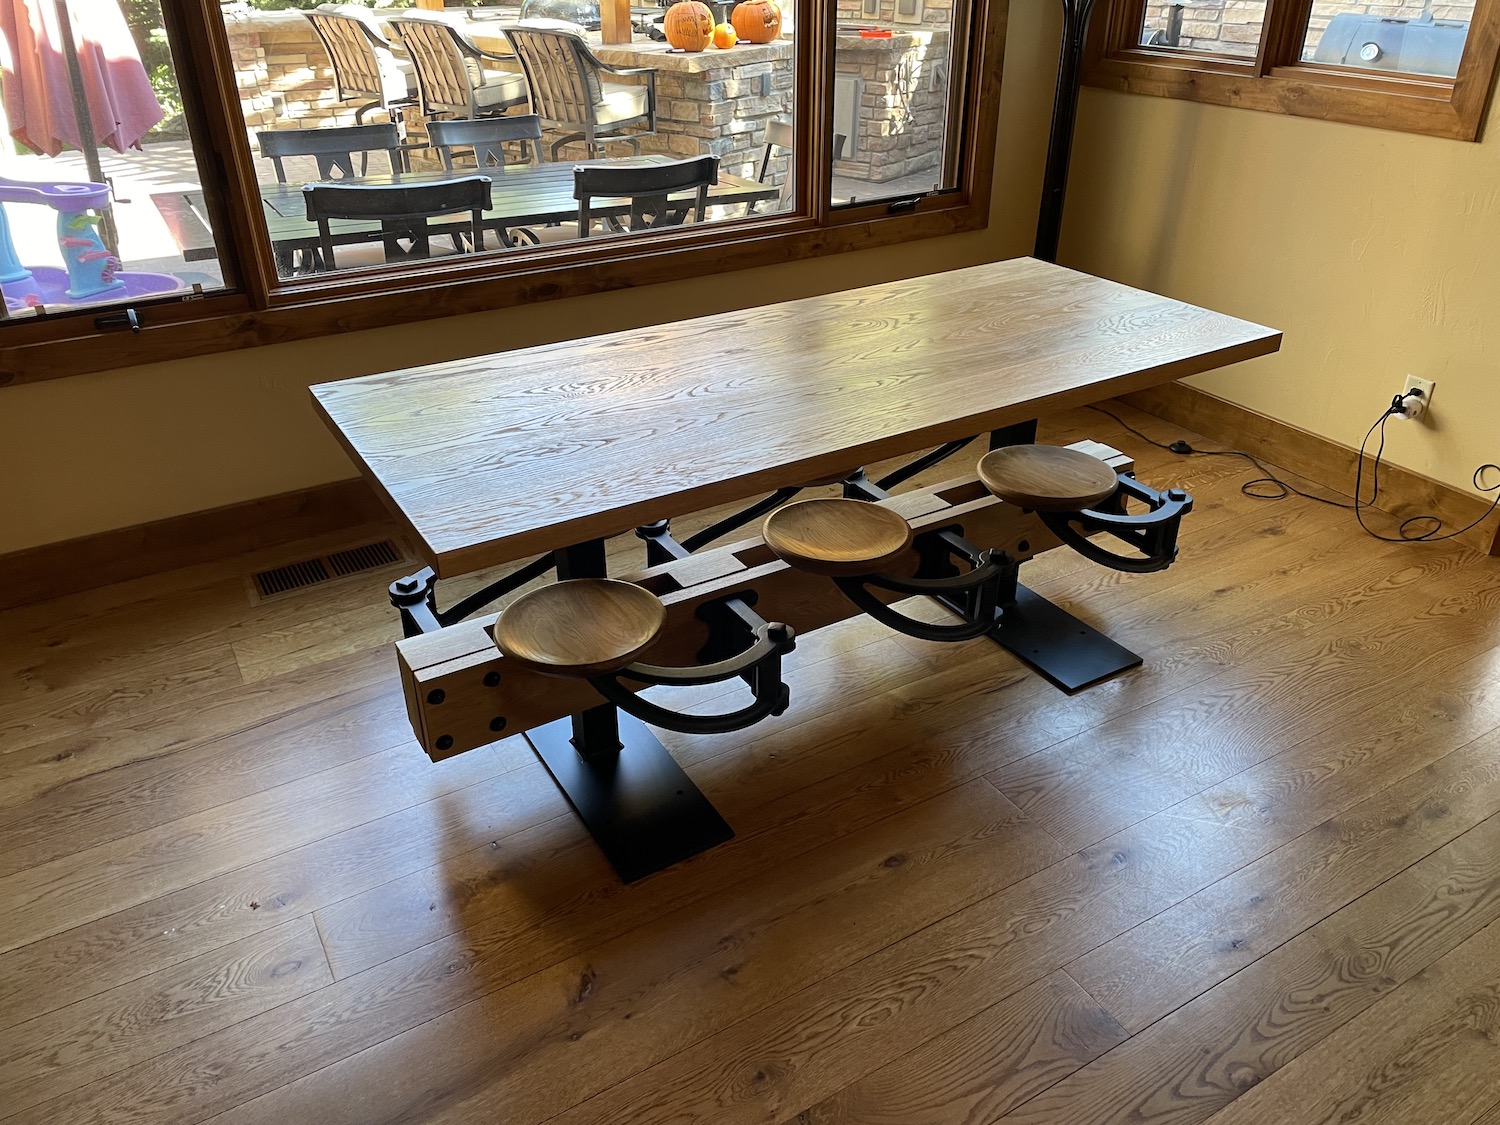
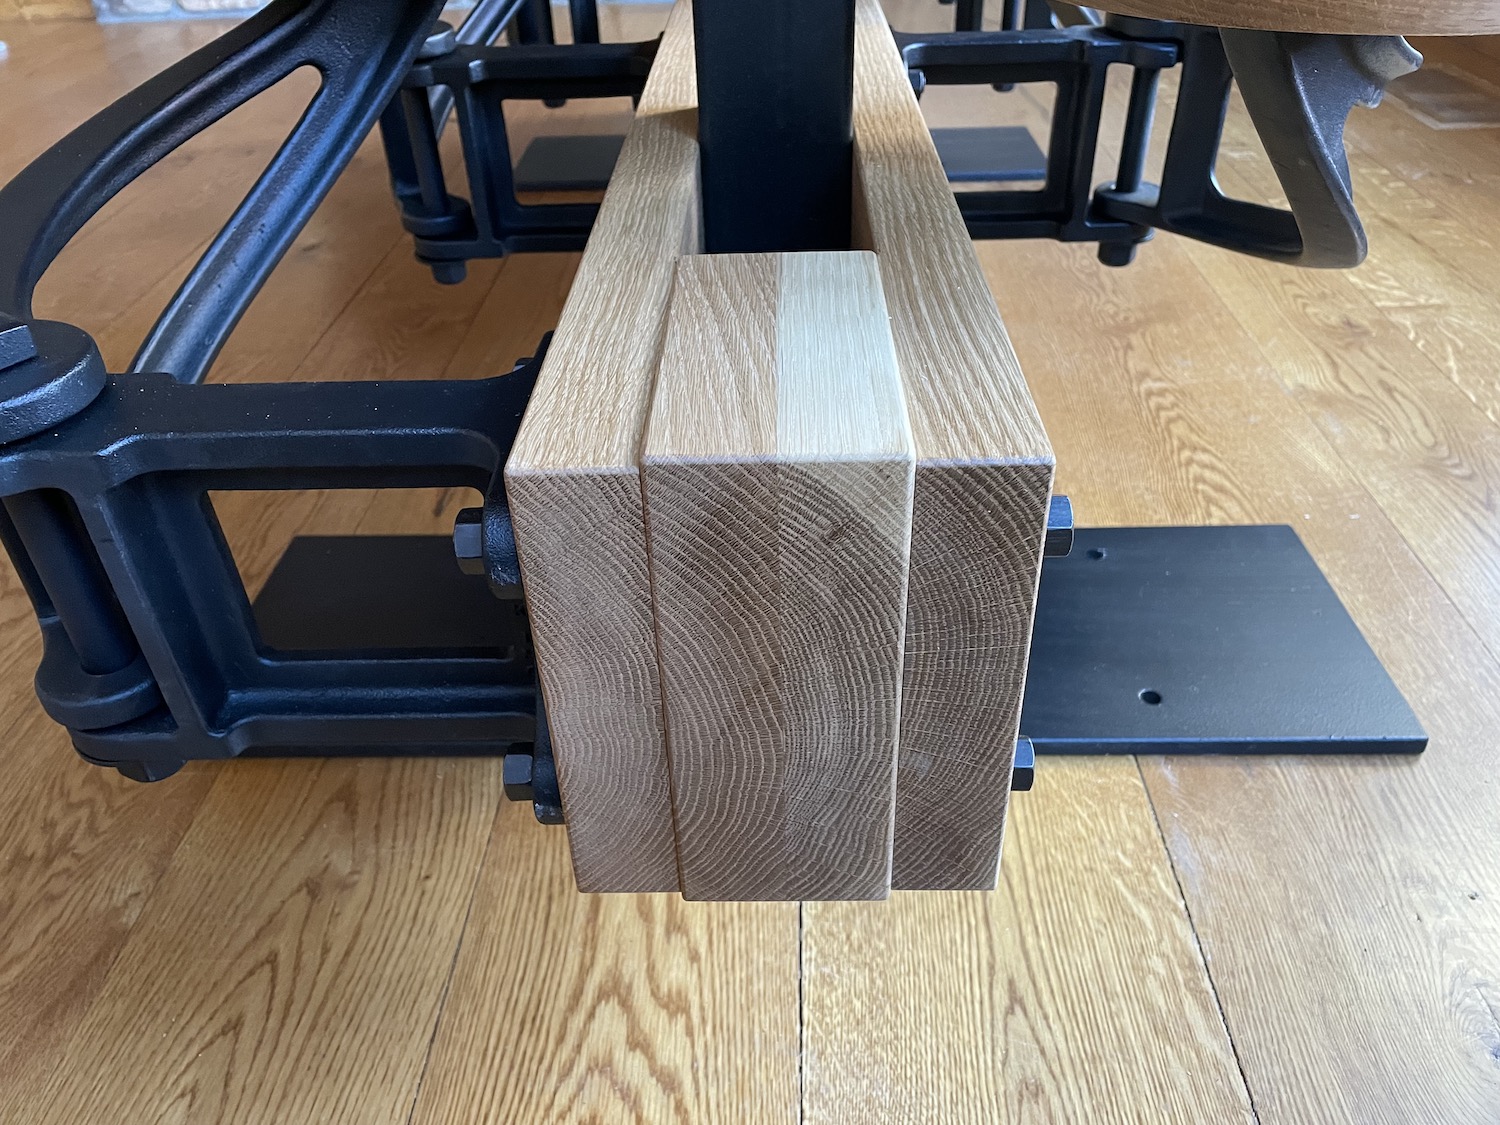
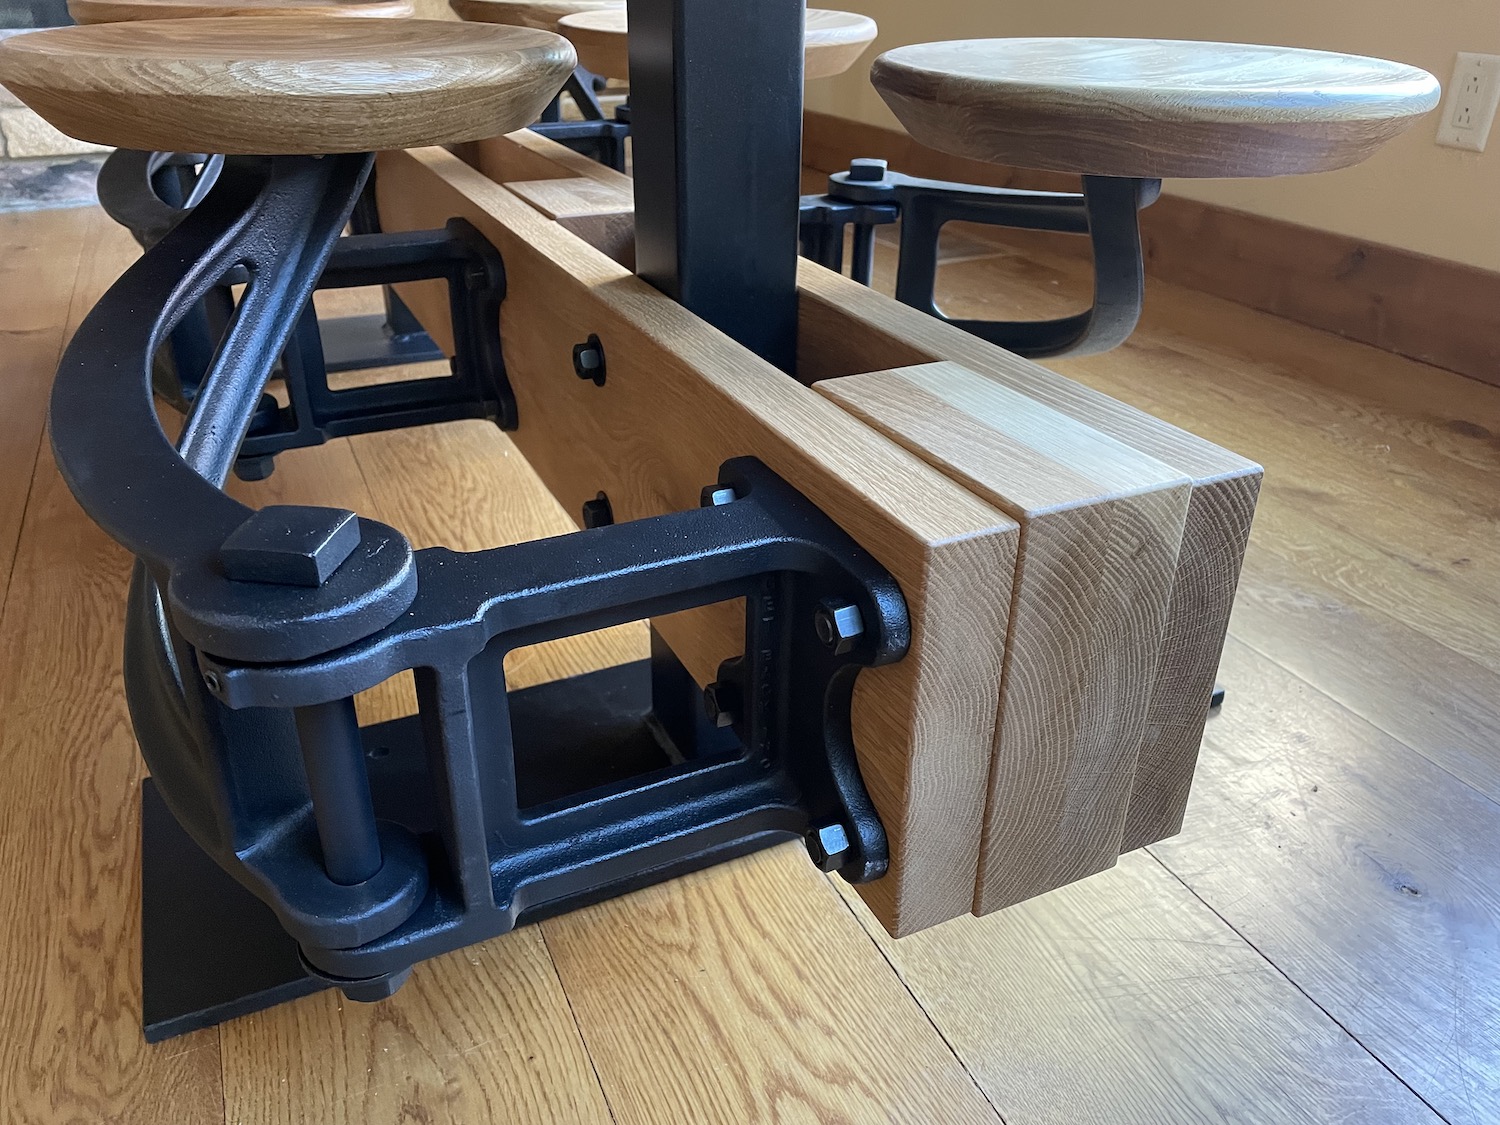
Dining tables have gotten boring. I’ve built quite a few tables over the years and the formula is always the same: a table with four legs and some chairs around it. I think it’s time for the dining table to receive a solid upgrade and wouldn’t it be nice if the “chairs” were actually part of the structure? Today I’m going to show you How to Build the Best Alternative to a Traditional Dining Table using a Swing-Out Seat Table Hardware Kit from Get Back Inc.
This is a great DIY woodworking project for anyone looking to make their own custom-built kitchen/dining table or even an outdoor picnic/patio table. It’s the perfect project for weekend warriors and advanced craftsman alike because this kit includes all of the hardware you’ll need, plus an easy-to-use, step-by-step guide. So If you want to create a great looking, durable, and versatile table for all your friends and family to enjoy, this is it! My family and I have been using our table for over 6 months and every time we have friends over, conversation always turns to the the Get Back Swing-Out Seat Table. The seats are comfortable, sturdy and when not in use they tuck away giving the table a surprisingly small footprint given the impressive scale of the hardware.
Best of all, IT WILL last a lifetime, with 100% Satisfaction Guarantee. Check it out at GetBackInc.com.


The post How to Build the Best Alternative to a Traditional Dining Table appeared first on The Wood Whisperer.
March 4, 2022
After 20 years of Powermatic, I Bought a Sawstop! | First Impressions
If you follow me on social media, this will come as no surprise: I bought a SawStop! This comes after 20 years of using Powermatic table saws, exclusively. After losing Powermatic as a sponsor, it was time to re-evaluate my table saw situation. I’ve always been intrigued by SawStop technology but due to my sponsorship, having one in my shop wasn’t in the cards. So let me be perfectly clear about something. I still hold the opinion that a SawStop is not necessary if one is diligent about table saw safety. And I also still hold the opinion that Powematic makes some of the best table saws available. These two opinions are not mutually exclusive.
So as you can imagine, this review offers only on single perspective from a long-time user of Powermatic saws. Everything I look at on this Sawstop will be viewed through a Powermatic lens. Will it perform as well as my PM2000? Is it as heavy duty? Did I lose anything with this change? Will I ultimately regret it or did Sawstop knock it out of the park? Time will tell. But for now, this video gives you my first impressions.
The post After 20 years of Powermatic, I Bought a Sawstop! | First Impressions appeared first on The Wood Whisperer.
February 25, 2022
A Miter Gauge that Does One Angle?! – Woodpeckers Exact-90 Review
Woodpeckers recently released a brave entry into the market: a miter gauge that does only one angle! It’s called the Exact-90 Miter Gauge and it currently retails for $329.99. You might want to check out my previous Ultimate Miter Gauge Review to see where the Exact-90 fits into the landscape but suffice it to say that I didn’t include it in the big review because it would have done terribly. No matter how good it is, it only does one angle and it does it for a LOT of money. Because of that, I assumed this review was going to be cut and dry as I just couldn’t see the value proposition. But as I spent more time with the gauge I realized that Woodpeckers made a few significant advancements with this product that make it more than just a simple one-trick pony. Here are a few of the highlights:
Unique miter bar design that requires no calibration and worked great in my miter slot.Miter bar is extremely long and features two washers to help support wide panel cuts.A Flop-Stop add-on that also helps support wide panels by keeping the fence level when it’s no longer on the table surface.A micro-adjustable stop.A simple calibration system for adjusting the 90 degree angle, should it require adjustment.A telescoping fence that rivals some of the longest on the market and features a sacrificial fence.As for the negatives, there’s really only one: the price. This miter gauge does exactly what they say it does and the panel-cutting functionality means it can do things most other miter gauges can’t do without significant modification.
I have to admit, this product is hard to pin down. It’s not really a miter gauge as it only does a single angle. It’s not really a panel sled because, well, there’s no sled. It seems to reside in some weird hybrid space where it hopes to present the best of both worlds and for some woodworkers, it just might succeed. But for others, the single angle will be a tough pill to swallow and while it does a surprisingly good job with panels, it’s not going to be quite as good as a classic cross-cut sled where you have a little more capacity and greater stability (as well as a much larger footprint). In the end, this is a decision I can’t make for anyone else, but hopefully I’ve given you enough information to make the right call for yourself.
The post A Miter Gauge that Does One Angle?! – Woodpeckers Exact-90 Review appeared first on The Wood Whisperer.
February 11, 2022
Filament Rack | For 3D Printing Filament Spools
Nicole has really gotten into 3D printing and she is now applying that knowledge to a STEM program at the kids’ school. Pretty awesome. But at home, the hobby has resulted in gaggles of filament spools all over the basement. Most people keep filament in totes and that’s a great idea for long-term storage, especially in higher humidity areas as filament likes to be dry. Thankfully, in our Denver climate, the basement is dry as a bone and we can leave our filament out with no adverse effects. For us, a rack is the perfect solution for storing the most-used filaments in the collection.
The project is made from 3/4″ thick stock and while I used a Domino to connect the cradle pieces to the sides, you can use biscuits, pocket screws, or dowels as a substitute. Please feel free to download the FREE plan below.
TWW Filament Rack PlanTWW Filament Rack Plan (Metric)The post Filament Rack | For 3D Printing Filament Spools appeared first on The Wood Whisperer.


