
Simon B. Jones's Blog: Slings and arrows, page 3
December 23, 2014
Shackleton's forgotten men - The Ross Sea Party - Part One
I thought I should post something suitably wintery for the last post of 2014, which is a double bill. So turn up the heating, make a cup of tea and enjoy this less well known story of polar endurance.
The tale of Sir Ernest Shackleton's remarkable journey of survival following the wreck of his ship Endurance has assumed legendary status and is celebrated as a triumph over adversity. Less well known however is the story of the men who Shackleton sent to the Ross Sea, on the far side of the Antarctic continent. The Ross Sea Party were charged with laying supply depots along the last 365 miles of the route of Shackleton's doomed Imperial Trans-Antarctic Expedition. This effort was crucial to the success of the whole enterprise, since the men of Shackleton's party, making landfall from the Weddell Sea and proceeding via the South Pole, would not be able to carry sufficient supplies to make it all the way across.
The 28 men of the expedition set out from Hobart on Christmas Eve 1914 aboard the SY Aurora, which Shackleton had purchased from fellow Antarctic explorer Douglas Mawson.
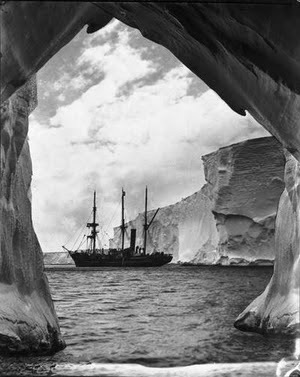 SY Aurora photographed by Frank Hurley in 1913
The Aurora, under the command of Aeneas Mackintosh, made her way to Ross Island and anchored off Cape Evans, from where Scott had launched his fatal attempt on the Pole. Here Scott's hut would provide a base for the shore party of 12 men. Across the ice at Hut Point; the closest point of Ross Island to the main land at the head of McMurdo Sound, a second hut built by Scott on his earlier 1902 expedition provided a base from which expeditions inland could set out.
The 35 year old Mackintosh was no stranger to polar exploration. He had sailed with Shackleton before on his unsuccessful 1909 expedition, on which Shackleton had reached 88 degrees south before turning back. He had earned a reputation for fortitude, not least after losing an eye in a shipboard accident, as well as for being something of a risk taker.
Mackintosh, believing wrongly that Shackleton could be setting out to make the crossing already, immediately set to the task of establishing depots. Supplies were transferred to Hut Point and from there three sledging expeditions set out in January 1915 with the objective of establishing two depots, which would provide the bare minimum of supplies required by Shackleton.
The operation was beset by difficulties. One party were thwarted by the breakdown of their motorised sledge, whilst the other two parties led by Mackintosh and experienced polar explorer Ernest Joyce made their way across the Great Ice Barrier to lay depots at 79 and 80 degrees south. Some of the supplies had to be abandoned along the way, whilst the inexperienced crews struggled in heavy snow and suffered from frost bite.
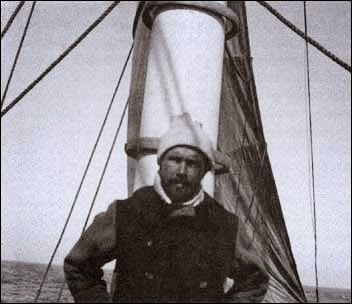 Aeneas Mackintosh - commander of the Ross Sea Party
Joyce and Mackintosh had quarrelled over the details of the expedition. Joyce was the most experienced of the party, having served with both Scott and Shackleton. He attempted to claim that he had been given authority over land operations by Shackleton and advised against pushing the dogs too hard. He would later write an account in which he was highly critical of Mackintosh's leadership.
The return trip was particularly miserable and of the ten dogs that had set out all perished from exhaustion as they struggled through the deep snow. Blizzards confined the men to their tents at times and with rations running short they were forced to raid the depots they had established. This despondent entry from Mackintosh's diary for 25th February sums up the hardships of the journey.
Outside is a scene of chaos. The snow, whirling along with the wind, obliterates everything. The dogs are completely buried, and only a mound with a ski sticking up indicates where the sledge is. We long to be off, but the howl of the wind shows how impossible it is. The sleeping-bags are damp and sticky, so are our clothes. Fortunately, the temperature is fairly high and they do not freeze. One of the dogs gave a bark and Joyce went out to investigate. He found that Major, feeling hungry, had dragged his way to Joyce's ski and eaten off the leather binding. Another dog has eaten all his harness, canvas, rope, leather, brass, and rivets. I am afraid the dogs will not pull through; they all look thin and these blizzards do not improve matters. . . . We have a week's provisions and one hundred and sixty miles to travel. It appears that we will have to get another week's provisions from the depot, but don't wish it. Will see what luck to-morrow.
On March 25th 1915 the exhausted and frost bitten Mackintosh and his companions made it back to Hut Point and the safety of Scott's hut. Here they and the other men of the sledging parties would remain until mid June, when the sea ice was once more thick enough for them to make the journey across the ice and rejoin their companions at Cape Evans. They supplemented their meagre rations with seal meat and kept warm by burning seal blubber. The thick smoke from the blubber fire and lamps ensured that the men's skin was soon blackened with a thick layer of oily grime. When at last Mackintosh made it back to Cape Evans he was in for a shock, for the Aurora was gone.
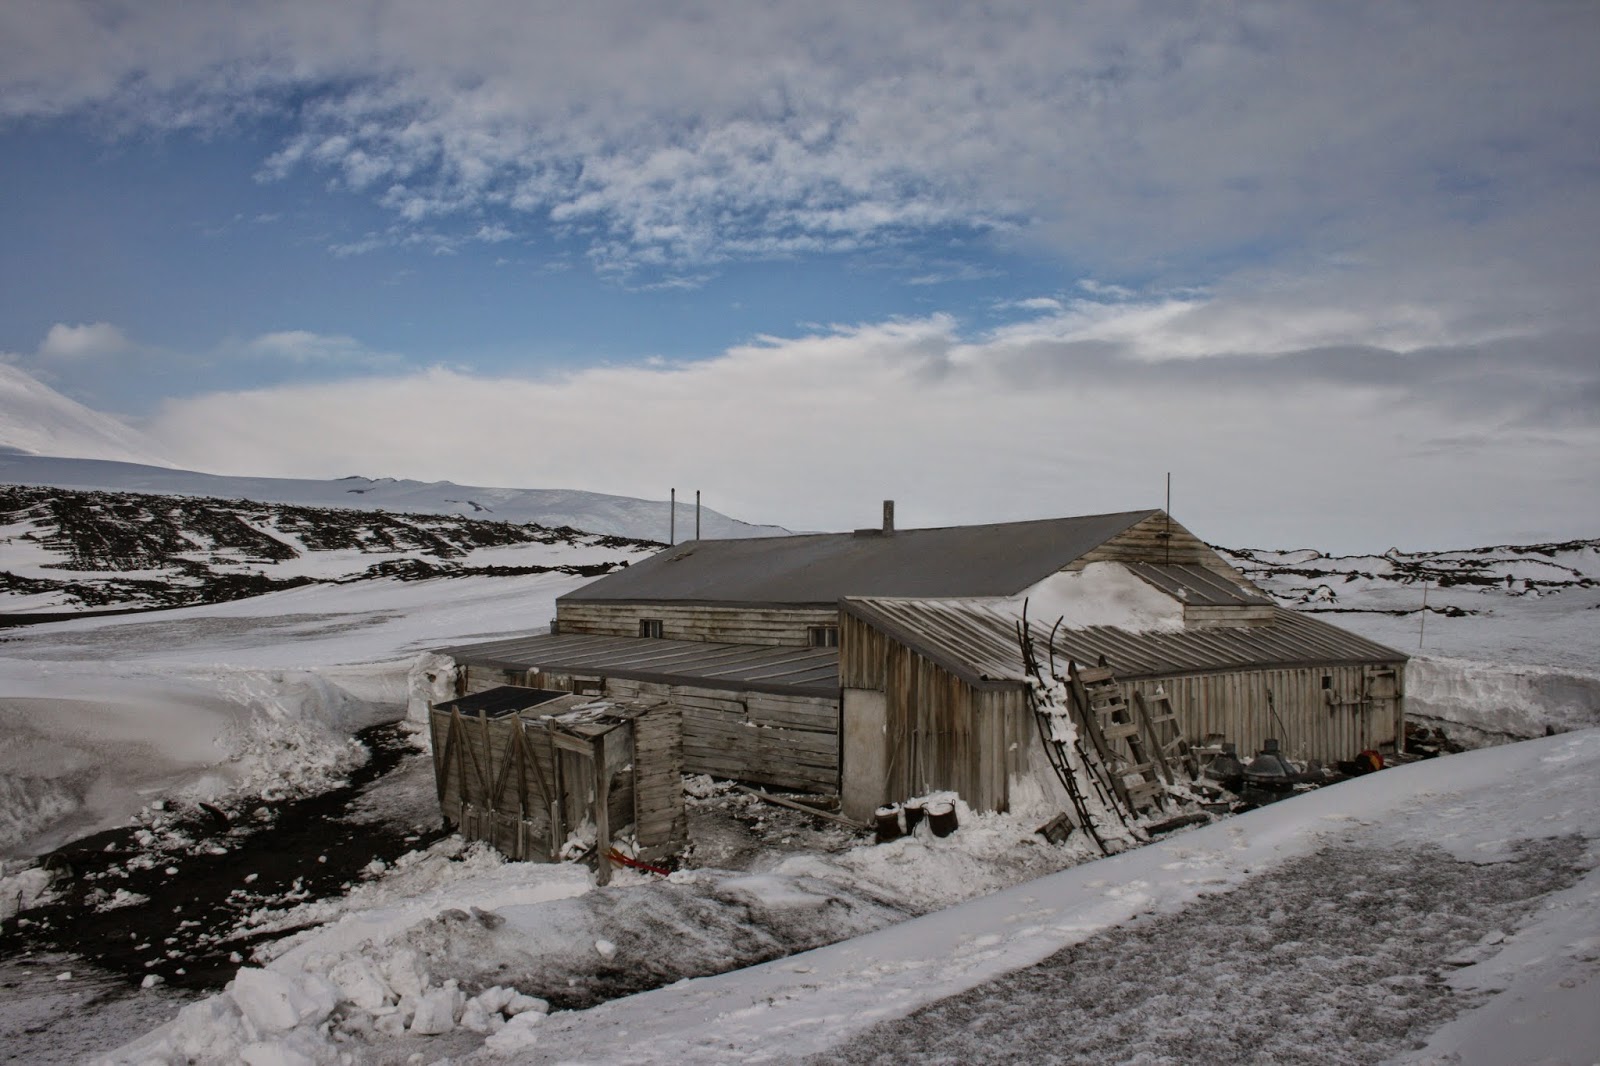
 Scott's hut at Cape Evans In Mackintosh's absence the Aurora had been under the command of First Officer Joseph Stenhouse. After exploring various possible anchorages around McMurdo Sound, the Aurora had been anchored to the shore off Cape Evans and became encased in the sea ice. Cape Evans was an exposed anchorage but Shackleton had advised against anchoring further inshore due to the risk of the ship becoming trapped in the ice as Scott's ship Discovery had been. The crew took what they thought to be adequate precautions, cementing anchors into the ground and securing the ship with 'enough hawsers to hold a battleship.'
On 6th May a blizzard blew up and the forces of nature made a mockery of their preparations. With a sound like gunfire the shore hawsers snapped and a large ice flow broke away from the shore, carrying the entrapped ship with it. Ten of the shore party were left stranded in Scott's hut, with two of their number and much of their supplies including all their spare clothing still on the ship. It was not until the blizzard abated the next day that they realised the ship had gone.
Aboard the Aurora there was consternation. With the crew thinking themselves settled in for the winter, the engines had been partially dismantled for maintenance. These were now hurriedly pressed back into service but the ship was unable to break free of the ice flow in which she was trapped. So began the Aurora's long drift. Held fast in the ice, she drifted north with the floes, whilst Stenhouse and his men could only hope for the best and prepare for the worst. There was every chance that the ship could share the fate of Endurance on the far side of the continent and be crushed in the ice. Sledges and supplies were prepared in case the crew had to abandon ship and make for landfall on the Antarctic coast. They had plentiful supplies of food, supplemented by hunting seals and penguins on the ice, but fresh water had to be collected by gathering snow. Stenhouse toyed with the idea of an expedition to an iceberg he could see in the distance but gave up the scheme. Throughout he kept his men busy and kept their morale up. From his log it is clear that the fate of the men left behind was always on his mind. Stenhouse's hope was that the ship would be freed from the ice and that he would be able to head back to Cape Evans.
 SY Aurora photographed by Frank Hurley in 1913
As the ship drifted further this became an increasingly forlorn hope. The movement of the ice was a cause for both hope and fear. This entry from Stenhouse's log for 22nd July 1915 shows how the situation changed constantly.
Ship in bad position in newly frozen lane, with bow and stern jammed against heavy floes; heavy strain with much creaking and groaning. 8 a.m.—Called all hands to stations for sledges, and made final preparations for abandoning ship. Allotted special duties to several hands to facilitate quickness in getting clear should ship be crushed. Am afraid the ship's back will be broken if the pressure continues, but cannot relieve her. 2 p.m.—Ship lying easier. Poured Sulphuric acid on the ice astern in hopes of rotting crack and relieving pressure on stern-post, but unsuccessfully. Very heavy pressure on and around ship (taking strain fore and aft and on starboard quarter). Ship, jumping and straining and listing badly. 10 p.m.—Ship has crushed her way into new ice on starboard side and slewed aslant lane with stern-post clear of land-ice. 12 p.m.—Ship is in safer position; lanes opening in every direction.
The polar winter wore on, with the ship battered by the grinding ice floes and blizzards. The rudder was completely destroyed by the ice and the mizzen mast was carried away by the wind. By September the return of the sun and warmer temperatures once more gave cause for hope that the ship would be freed from the ice. Stenhouse's entry for 22nd September finds him in a better mood. He notes that the Aurora has drifted 705 miles from Cape Evans and looks on the bright side that the experience will serve the cause of human knowledge about the movement of the polar ice. As winter turned to summer, open water was often sighted in the distance but the ship remained trapped. The wireless aerials occasionally picked up snatches of weather reports from the radio station at Macquarie Island over 800 miles away but they were unable to make contact. Christmas came and went and as the sun began to dip below the horizon again, the crew of the Aurora faced the grim possibility of another winter trapped in the ice.
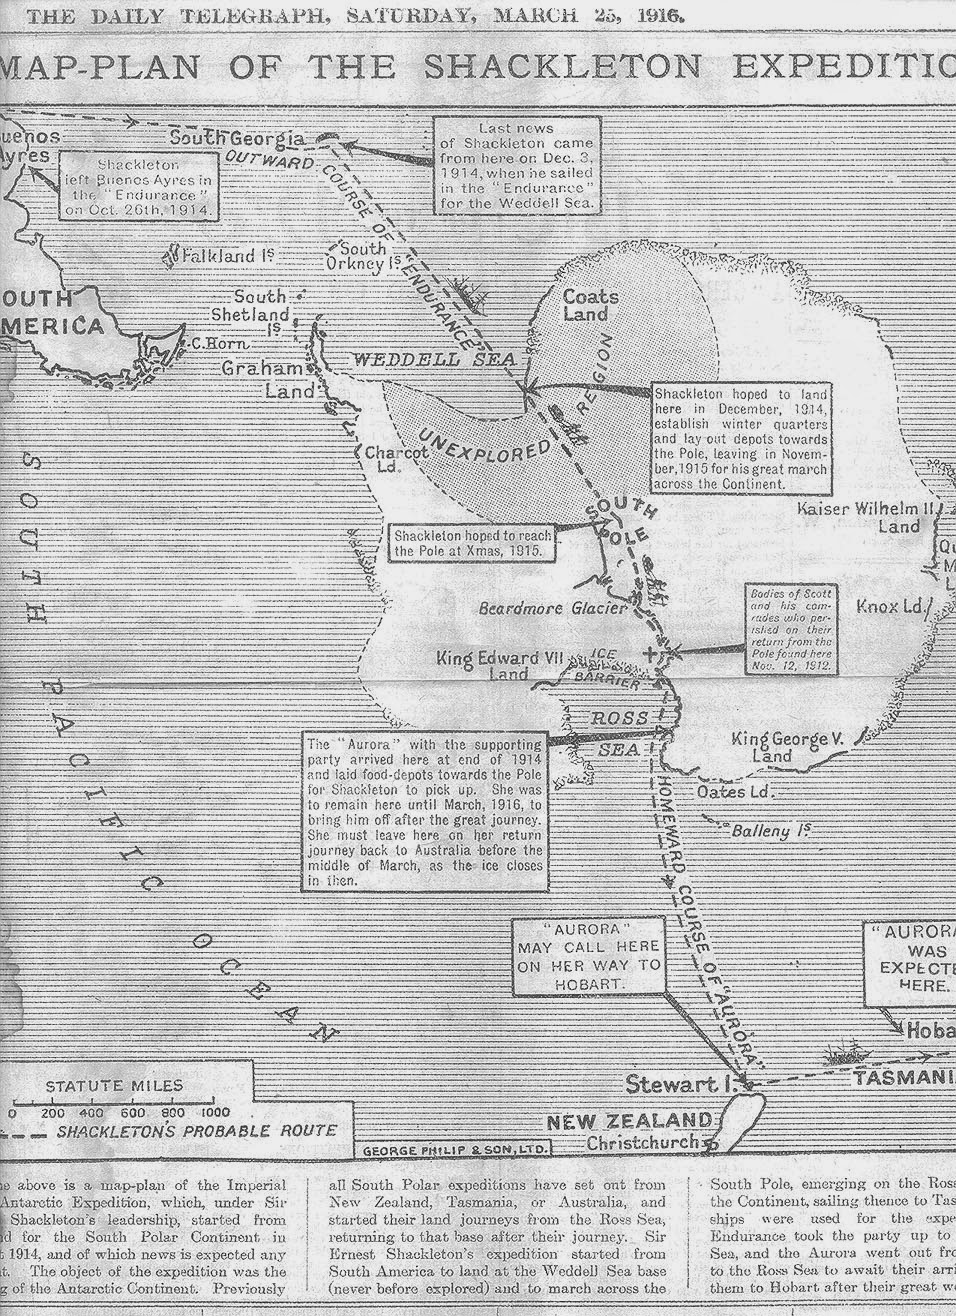
 This map from the Daily Telegraph from 1916 ponders the whereabouts of Shackleton and the Ross Sea Party
Meanwhile at Cape Evans, the ten members of the shore party were making the best of it and remained committed to carrying out the task allotted to them. Throughout September supplies were moved across the ice from Cape Evans to Hut Point with the intention of setting out to lay depots at 81, 82 and 83 degrees south, the last being at the foot of the Beardmore Glacier, which Shackleton's party were expected to descend on their journey from the Pole. On 9th October 9 men set out dragging between them three sledges loaded with 2000lbs of supplies and equipment, which they intended to drag to the base depot at Minna Bluff. It was hard going and Joyce prevailed upon Mackintosh to divide the loads and press on in two teams. Between October and December the men of the Ross Sea Party made three journeys between Hut Point and Minna Bluff, a return journey of 140 miles. They succeeded in depositing almost 3000lbs of stores ready to establish the depots further to the south. Little did they know it but all of their efforts were already in vain. On 27th October 1915, with Endurance holed and sinking, Shackleton had finally given the order to abandon ship and the Imperial Trans-Antarctic Expedition was over. For those charged with ensuring his success on the far side of the continent and those aboard the Aurora, the mission went on.
To be continued.
A merry Christmas and a happy New Year to all my readers.
The tale of Sir Ernest Shackleton's remarkable journey of survival following the wreck of his ship Endurance has assumed legendary status and is celebrated as a triumph over adversity. Less well known however is the story of the men who Shackleton sent to the Ross Sea, on the far side of the Antarctic continent. The Ross Sea Party were charged with laying supply depots along the last 365 miles of the route of Shackleton's doomed Imperial Trans-Antarctic Expedition. This effort was crucial to the success of the whole enterprise, since the men of Shackleton's party, making landfall from the Weddell Sea and proceeding via the South Pole, would not be able to carry sufficient supplies to make it all the way across.
The 28 men of the expedition set out from Hobart on Christmas Eve 1914 aboard the SY Aurora, which Shackleton had purchased from fellow Antarctic explorer Douglas Mawson.
 SY Aurora photographed by Frank Hurley in 1913
The Aurora, under the command of Aeneas Mackintosh, made her way to Ross Island and anchored off Cape Evans, from where Scott had launched his fatal attempt on the Pole. Here Scott's hut would provide a base for the shore party of 12 men. Across the ice at Hut Point; the closest point of Ross Island to the main land at the head of McMurdo Sound, a second hut built by Scott on his earlier 1902 expedition provided a base from which expeditions inland could set out.
The 35 year old Mackintosh was no stranger to polar exploration. He had sailed with Shackleton before on his unsuccessful 1909 expedition, on which Shackleton had reached 88 degrees south before turning back. He had earned a reputation for fortitude, not least after losing an eye in a shipboard accident, as well as for being something of a risk taker.
Mackintosh, believing wrongly that Shackleton could be setting out to make the crossing already, immediately set to the task of establishing depots. Supplies were transferred to Hut Point and from there three sledging expeditions set out in January 1915 with the objective of establishing two depots, which would provide the bare minimum of supplies required by Shackleton.
The operation was beset by difficulties. One party were thwarted by the breakdown of their motorised sledge, whilst the other two parties led by Mackintosh and experienced polar explorer Ernest Joyce made their way across the Great Ice Barrier to lay depots at 79 and 80 degrees south. Some of the supplies had to be abandoned along the way, whilst the inexperienced crews struggled in heavy snow and suffered from frost bite.
 Aeneas Mackintosh - commander of the Ross Sea Party
Joyce and Mackintosh had quarrelled over the details of the expedition. Joyce was the most experienced of the party, having served with both Scott and Shackleton. He attempted to claim that he had been given authority over land operations by Shackleton and advised against pushing the dogs too hard. He would later write an account in which he was highly critical of Mackintosh's leadership.
The return trip was particularly miserable and of the ten dogs that had set out all perished from exhaustion as they struggled through the deep snow. Blizzards confined the men to their tents at times and with rations running short they were forced to raid the depots they had established. This despondent entry from Mackintosh's diary for 25th February sums up the hardships of the journey.
Outside is a scene of chaos. The snow, whirling along with the wind, obliterates everything. The dogs are completely buried, and only a mound with a ski sticking up indicates where the sledge is. We long to be off, but the howl of the wind shows how impossible it is. The sleeping-bags are damp and sticky, so are our clothes. Fortunately, the temperature is fairly high and they do not freeze. One of the dogs gave a bark and Joyce went out to investigate. He found that Major, feeling hungry, had dragged his way to Joyce's ski and eaten off the leather binding. Another dog has eaten all his harness, canvas, rope, leather, brass, and rivets. I am afraid the dogs will not pull through; they all look thin and these blizzards do not improve matters. . . . We have a week's provisions and one hundred and sixty miles to travel. It appears that we will have to get another week's provisions from the depot, but don't wish it. Will see what luck to-morrow.
On March 25th 1915 the exhausted and frost bitten Mackintosh and his companions made it back to Hut Point and the safety of Scott's hut. Here they and the other men of the sledging parties would remain until mid June, when the sea ice was once more thick enough for them to make the journey across the ice and rejoin their companions at Cape Evans. They supplemented their meagre rations with seal meat and kept warm by burning seal blubber. The thick smoke from the blubber fire and lamps ensured that the men's skin was soon blackened with a thick layer of oily grime. When at last Mackintosh made it back to Cape Evans he was in for a shock, for the Aurora was gone.
 Scott's hut at Cape Evans In Mackintosh's absence the Aurora had been under the command of First Officer Joseph Stenhouse. After exploring various possible anchorages around McMurdo Sound, the Aurora had been anchored to the shore off Cape Evans and became encased in the sea ice. Cape Evans was an exposed anchorage but Shackleton had advised against anchoring further inshore due to the risk of the ship becoming trapped in the ice as Scott's ship Discovery had been. The crew took what they thought to be adequate precautions, cementing anchors into the ground and securing the ship with 'enough hawsers to hold a battleship.'
On 6th May a blizzard blew up and the forces of nature made a mockery of their preparations. With a sound like gunfire the shore hawsers snapped and a large ice flow broke away from the shore, carrying the entrapped ship with it. Ten of the shore party were left stranded in Scott's hut, with two of their number and much of their supplies including all their spare clothing still on the ship. It was not until the blizzard abated the next day that they realised the ship had gone.
Aboard the Aurora there was consternation. With the crew thinking themselves settled in for the winter, the engines had been partially dismantled for maintenance. These were now hurriedly pressed back into service but the ship was unable to break free of the ice flow in which she was trapped. So began the Aurora's long drift. Held fast in the ice, she drifted north with the floes, whilst Stenhouse and his men could only hope for the best and prepare for the worst. There was every chance that the ship could share the fate of Endurance on the far side of the continent and be crushed in the ice. Sledges and supplies were prepared in case the crew had to abandon ship and make for landfall on the Antarctic coast. They had plentiful supplies of food, supplemented by hunting seals and penguins on the ice, but fresh water had to be collected by gathering snow. Stenhouse toyed with the idea of an expedition to an iceberg he could see in the distance but gave up the scheme. Throughout he kept his men busy and kept their morale up. From his log it is clear that the fate of the men left behind was always on his mind. Stenhouse's hope was that the ship would be freed from the ice and that he would be able to head back to Cape Evans.
 SY Aurora photographed by Frank Hurley in 1913
As the ship drifted further this became an increasingly forlorn hope. The movement of the ice was a cause for both hope and fear. This entry from Stenhouse's log for 22nd July 1915 shows how the situation changed constantly.
Ship in bad position in newly frozen lane, with bow and stern jammed against heavy floes; heavy strain with much creaking and groaning. 8 a.m.—Called all hands to stations for sledges, and made final preparations for abandoning ship. Allotted special duties to several hands to facilitate quickness in getting clear should ship be crushed. Am afraid the ship's back will be broken if the pressure continues, but cannot relieve her. 2 p.m.—Ship lying easier. Poured Sulphuric acid on the ice astern in hopes of rotting crack and relieving pressure on stern-post, but unsuccessfully. Very heavy pressure on and around ship (taking strain fore and aft and on starboard quarter). Ship, jumping and straining and listing badly. 10 p.m.—Ship has crushed her way into new ice on starboard side and slewed aslant lane with stern-post clear of land-ice. 12 p.m.—Ship is in safer position; lanes opening in every direction.
The polar winter wore on, with the ship battered by the grinding ice floes and blizzards. The rudder was completely destroyed by the ice and the mizzen mast was carried away by the wind. By September the return of the sun and warmer temperatures once more gave cause for hope that the ship would be freed from the ice. Stenhouse's entry for 22nd September finds him in a better mood. He notes that the Aurora has drifted 705 miles from Cape Evans and looks on the bright side that the experience will serve the cause of human knowledge about the movement of the polar ice. As winter turned to summer, open water was often sighted in the distance but the ship remained trapped. The wireless aerials occasionally picked up snatches of weather reports from the radio station at Macquarie Island over 800 miles away but they were unable to make contact. Christmas came and went and as the sun began to dip below the horizon again, the crew of the Aurora faced the grim possibility of another winter trapped in the ice.
 This map from the Daily Telegraph from 1916 ponders the whereabouts of Shackleton and the Ross Sea Party
Meanwhile at Cape Evans, the ten members of the shore party were making the best of it and remained committed to carrying out the task allotted to them. Throughout September supplies were moved across the ice from Cape Evans to Hut Point with the intention of setting out to lay depots at 81, 82 and 83 degrees south, the last being at the foot of the Beardmore Glacier, which Shackleton's party were expected to descend on their journey from the Pole. On 9th October 9 men set out dragging between them three sledges loaded with 2000lbs of supplies and equipment, which they intended to drag to the base depot at Minna Bluff. It was hard going and Joyce prevailed upon Mackintosh to divide the loads and press on in two teams. Between October and December the men of the Ross Sea Party made three journeys between Hut Point and Minna Bluff, a return journey of 140 miles. They succeeded in depositing almost 3000lbs of stores ready to establish the depots further to the south. Little did they know it but all of their efforts were already in vain. On 27th October 1915, with Endurance holed and sinking, Shackleton had finally given the order to abandon ship and the Imperial Trans-Antarctic Expedition was over. For those charged with ensuring his success on the far side of the continent and those aboard the Aurora, the mission went on.
To be continued.
A merry Christmas and a happy New Year to all my readers.


December 2, 2014
Dreamers and Schemers - the search for longitude
The final plate of Hogarth's A Rake's Progress from 1735 depicts a madhouse, in which the protagonist has finally found himself after squandering his riches and losing his mind. In the background of the scene is a detail I had not noticed before, until my attention was drawn to it at the excellent Ships Clocks and Stars exhibition currently running at the Maritime Museum. On the back wall of the scene, a deranged inmate is puzzling over solutions to the great challenge of the age; how to accurately determine longitude at sea.
 A Rake's Progress - 8th plate 1735 Such is the way in which the search for longitude was viewed by satirists such as Hogarth; as a fools quest. The vast sums in prize money promised by the Board of Longitude, formed in 1714, were a veritable pot of gold that tempted dreamers and schemers to devise solutions to the problem. In the coffee houses of London schemes for solving the longitude challenge were a popular topic of conversation and the more outlandish proponents were fair game for lampooning.
No man was a more popular target for derision than William Whiston. Far from being a crackpot, Whiston succeeded to the Cambridge professorship of no less a luminary than Isaac Newton in 1702. Nevertheless he did hold unorthodox religious beliefs and was fascinated by miracles and prophecies. He caused alarm in 1736 by claiming that a comet was about to hit the earth. His other enduring fascination was with the problem of longitude and he was behind a number of proposals to the board.
Whiston's first proposal was as straightforward as it was impractical. Along with mathematician Humphrey Ditton, Whiston proposed using a system of anchored rocket ships around the globe. These ships, at positions of known longitude, would send up rockets at regular intervals. Ship's captains, observing the explosion of the rocket, would calculate their position based upon the time it took for the sound of the rocket to reach them. The admiralty, it need hardly be said, were unimpressed. Where were the funds and the thousands of men required to crew these ships to be found, they demanded. And how long would it be before they mutinied out of sheer boredom?
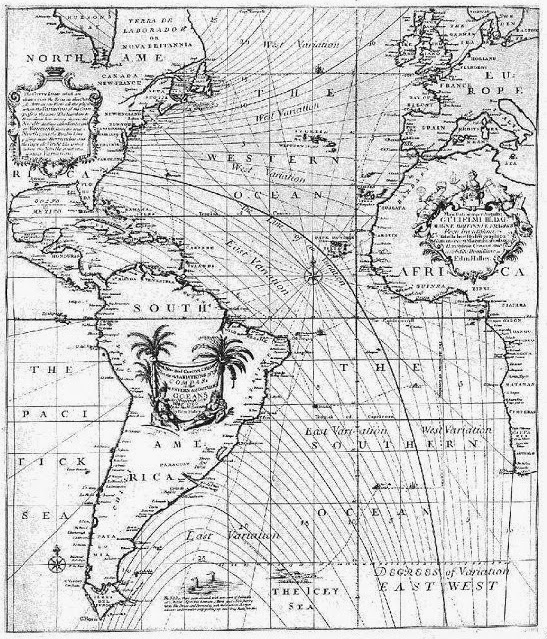
 Halley's chart of magnetic variation
Unperturbed, Whiston next proposed using magnetism to find longitude. By producing charts showing the lines of magnetic variation across the globe, it would be possible for ship's captains to compare true north, established through solar observation, with the magnetic north determined by their compasses and then refer to the chart to find their longitude. Indeed these lines of magnetic variation had already been charted in the Atlantic by Edmund Halley during his command of HMS Paramour in 1698-99 on the first ever purely scientific naval mission. Whiston received approval from the board of longitude to produce a chart of magnetic variation for southern England in 1719. Unfortunately for Whiston this idea too was ultimately doomed, for the variation in the earth's magnetic field would render any charts produced obsolete within a matter of years, requiring the entire painstaking process to begin again. The board eventually paid him £500 for his trouble.
In 1730 Whiston brought forth another proposal, this time based upon observing the regular motion of the moons of Jupiter. By noting the local time of an eclipse of one of the four moons as it passed behind or in front of the planet and comparing it to a table of the known times based on Greenwich, it would be possible to determine longitude. Once again there was nothing wrong with the theory, Galileo himself had suggested the use of Jupiter's moons as a celestial timepiece and it works perfectly well on land. The practicality however of observing the moons of Jupiter from the deck of a ship in anything other than perfect conditions, once again condemned the idea to the dustbin of longitude history. Whiston was not unaware of the difficulties and suggested using up to 7 telescopes in combination to ensure that the observer could keep Jupiter in their sights.
Whiston's unorthodox religious views eventually caused him to fall from establishment favour and he spent the rest of his life engaging in increasingly outlandish theological speculation. He died in 1752.
 Whiston brandishes another cunning plan Ultimately the solution to the longitude problem boiled down to two methods; lunar distance and marine chronometers. The lunar distance method, couched as it was in mathematics and astronomy, was more attractive to the gentleman scientists of the Royal Society, who struggled to overcome their disappointment that 'Harrison's blasted watch', as third astronomer royal James Bradley described it, could provide a complete solution. In 1761 the Royal Society dispatched astronomer Neville Maskelyne to the island of St Helena to observe the transit of Venus. During the voyage Maskelyne was keen to try out the ideas of one Tobias Mayer. Mayer was a remarkable individual. Having come from poor and humble beginnings, he was entirely self taught and published his first mathematical work when he was just eighteen, subsequently obtaining work as a mapmaker. By the 1750's Mayer was the director of Gottingen observatory and had turned his mind to the issue of longitude. Mayer focussed on the lunar distance method, which allowed longitude to be determined by observing the angle between the moon and a chosen star, typically Regulus. By comparing the observed angle with tables compiled from Mayer's exacting observations, the mariner would be able to establish their precise local time and thereby their longitude. Mayer sent his tables to the Board of Longitude in 1755. They were assessed by Bradley, who had succeeded the great Edmund Halley in 1742, and were found to be most accurate. Bradley continued to build on Mayer's work, compiling further tables based on Greenwich. He was assisted in this work by Charles Mason, best known for his later partnership with Jeremiah Dixon in establishing the line that bears their names.
 Mr Irwin's marine chair undergoes testing So off sailed Maskelyne aboard the Prince Henry bound for St Helena, putting Mayer's methods to practical use and becoming in the process an advocate of the lunar distance method. Two years later he was dispatched to Barbados aboard HMS Princess Louisa. He took with him Harrison's final chronometer H4, the culmination of 30 years of work, the accuracy of which would be compared directly with the lunar distance method. Maskelyne also took with him Mr Christopher Irwin's marine chair for testing. This gimballed chair was designed to allow astronomical observations to be made more easily from the pitching and rolling deck of a ship. Maskelyne found the chair to be completely useless. On arrival, Maskelyne would determine the longitude of Bridgetown using Jupiter's satellites and see which of the rival methods came closest. Harrison's chronometer was found to be accurate to within 10 miles, whereas the lunar distance calculations were only within 30. Maskelyne, who succeeded to the post of astronomer royal upon his return, has been somewhat vilified by posterity for his opposition to Harrison's clocks. Whilst Harrison is celebrated today as the man who solved the longitude problem, in reality the high cost of producing accurate marine chronometers ensured that both methods would continue to be employed for finding longitude at sea. Maskelyne oversaw the completion of the first Nautical Almanac containing lunar tables for determining longitude in 1766.
 Mr Harrison poses proudly with his chronometers Both Harrison and Mayer were ultimately awarded prizes by the Board of Longitude, although Harrison would require the intervention of the king to receive his £9,000 reward and Mayer's award of the same amount would be paid to his widow after his death aged just 39. Ships, Clocks and Stars is on at the Royal Maritime Museum, Greenwich until 5th January. Go see it if you have the chance. The highlight is undoubtedly the sight of all four of Harrison's beautiful chronometers together in the same place but as I found out, there was more than one dog in the hunt. The RMG longitude blog http://blogs.rmg.co.uk/longitude/ You may also enjoy - The Hourglass Sea http://slingsandarrowsblog.blogspot.co.uk/2014/04/the-hourglass-sea.html?utm_source=bp_recent&utm-medium=gadget&utm_campaign=bp_recent
 A Rake's Progress - 8th plate 1735 Such is the way in which the search for longitude was viewed by satirists such as Hogarth; as a fools quest. The vast sums in prize money promised by the Board of Longitude, formed in 1714, were a veritable pot of gold that tempted dreamers and schemers to devise solutions to the problem. In the coffee houses of London schemes for solving the longitude challenge were a popular topic of conversation and the more outlandish proponents were fair game for lampooning.
No man was a more popular target for derision than William Whiston. Far from being a crackpot, Whiston succeeded to the Cambridge professorship of no less a luminary than Isaac Newton in 1702. Nevertheless he did hold unorthodox religious beliefs and was fascinated by miracles and prophecies. He caused alarm in 1736 by claiming that a comet was about to hit the earth. His other enduring fascination was with the problem of longitude and he was behind a number of proposals to the board.
Whiston's first proposal was as straightforward as it was impractical. Along with mathematician Humphrey Ditton, Whiston proposed using a system of anchored rocket ships around the globe. These ships, at positions of known longitude, would send up rockets at regular intervals. Ship's captains, observing the explosion of the rocket, would calculate their position based upon the time it took for the sound of the rocket to reach them. The admiralty, it need hardly be said, were unimpressed. Where were the funds and the thousands of men required to crew these ships to be found, they demanded. And how long would it be before they mutinied out of sheer boredom?
 Halley's chart of magnetic variation
Unperturbed, Whiston next proposed using magnetism to find longitude. By producing charts showing the lines of magnetic variation across the globe, it would be possible for ship's captains to compare true north, established through solar observation, with the magnetic north determined by their compasses and then refer to the chart to find their longitude. Indeed these lines of magnetic variation had already been charted in the Atlantic by Edmund Halley during his command of HMS Paramour in 1698-99 on the first ever purely scientific naval mission. Whiston received approval from the board of longitude to produce a chart of magnetic variation for southern England in 1719. Unfortunately for Whiston this idea too was ultimately doomed, for the variation in the earth's magnetic field would render any charts produced obsolete within a matter of years, requiring the entire painstaking process to begin again. The board eventually paid him £500 for his trouble.
In 1730 Whiston brought forth another proposal, this time based upon observing the regular motion of the moons of Jupiter. By noting the local time of an eclipse of one of the four moons as it passed behind or in front of the planet and comparing it to a table of the known times based on Greenwich, it would be possible to determine longitude. Once again there was nothing wrong with the theory, Galileo himself had suggested the use of Jupiter's moons as a celestial timepiece and it works perfectly well on land. The practicality however of observing the moons of Jupiter from the deck of a ship in anything other than perfect conditions, once again condemned the idea to the dustbin of longitude history. Whiston was not unaware of the difficulties and suggested using up to 7 telescopes in combination to ensure that the observer could keep Jupiter in their sights.
Whiston's unorthodox religious views eventually caused him to fall from establishment favour and he spent the rest of his life engaging in increasingly outlandish theological speculation. He died in 1752.
 Whiston brandishes another cunning plan Ultimately the solution to the longitude problem boiled down to two methods; lunar distance and marine chronometers. The lunar distance method, couched as it was in mathematics and astronomy, was more attractive to the gentleman scientists of the Royal Society, who struggled to overcome their disappointment that 'Harrison's blasted watch', as third astronomer royal James Bradley described it, could provide a complete solution. In 1761 the Royal Society dispatched astronomer Neville Maskelyne to the island of St Helena to observe the transit of Venus. During the voyage Maskelyne was keen to try out the ideas of one Tobias Mayer. Mayer was a remarkable individual. Having come from poor and humble beginnings, he was entirely self taught and published his first mathematical work when he was just eighteen, subsequently obtaining work as a mapmaker. By the 1750's Mayer was the director of Gottingen observatory and had turned his mind to the issue of longitude. Mayer focussed on the lunar distance method, which allowed longitude to be determined by observing the angle between the moon and a chosen star, typically Regulus. By comparing the observed angle with tables compiled from Mayer's exacting observations, the mariner would be able to establish their precise local time and thereby their longitude. Mayer sent his tables to the Board of Longitude in 1755. They were assessed by Bradley, who had succeeded the great Edmund Halley in 1742, and were found to be most accurate. Bradley continued to build on Mayer's work, compiling further tables based on Greenwich. He was assisted in this work by Charles Mason, best known for his later partnership with Jeremiah Dixon in establishing the line that bears their names.
 Mr Irwin's marine chair undergoes testing So off sailed Maskelyne aboard the Prince Henry bound for St Helena, putting Mayer's methods to practical use and becoming in the process an advocate of the lunar distance method. Two years later he was dispatched to Barbados aboard HMS Princess Louisa. He took with him Harrison's final chronometer H4, the culmination of 30 years of work, the accuracy of which would be compared directly with the lunar distance method. Maskelyne also took with him Mr Christopher Irwin's marine chair for testing. This gimballed chair was designed to allow astronomical observations to be made more easily from the pitching and rolling deck of a ship. Maskelyne found the chair to be completely useless. On arrival, Maskelyne would determine the longitude of Bridgetown using Jupiter's satellites and see which of the rival methods came closest. Harrison's chronometer was found to be accurate to within 10 miles, whereas the lunar distance calculations were only within 30. Maskelyne, who succeeded to the post of astronomer royal upon his return, has been somewhat vilified by posterity for his opposition to Harrison's clocks. Whilst Harrison is celebrated today as the man who solved the longitude problem, in reality the high cost of producing accurate marine chronometers ensured that both methods would continue to be employed for finding longitude at sea. Maskelyne oversaw the completion of the first Nautical Almanac containing lunar tables for determining longitude in 1766.
 Mr Harrison poses proudly with his chronometers Both Harrison and Mayer were ultimately awarded prizes by the Board of Longitude, although Harrison would require the intervention of the king to receive his £9,000 reward and Mayer's award of the same amount would be paid to his widow after his death aged just 39. Ships, Clocks and Stars is on at the Royal Maritime Museum, Greenwich until 5th January. Go see it if you have the chance. The highlight is undoubtedly the sight of all four of Harrison's beautiful chronometers together in the same place but as I found out, there was more than one dog in the hunt. The RMG longitude blog http://blogs.rmg.co.uk/longitude/ You may also enjoy - The Hourglass Sea http://slingsandarrowsblog.blogspot.co.uk/2014/04/the-hourglass-sea.html?utm_source=bp_recent&utm-medium=gadget&utm_campaign=bp_recent
November 3, 2014
Born in the Purple - Constantine VII Part One
Let's get back to Byzantium. It's been a while.
This post follows on from my Enemies at the Gate series which ended with the troubled reign of Leo VI, known as 'the Wise'. That emperor’s controversial fourth marriage had at last secured the succession with the birth of his longed-for son, at the cost to his dignity of exclusion from the sacrament. The boy Constantine was known to posterity as Porphyrogenitus ‘born in the purple’ to underline the legitimacy of his father’s marriage and his own birth. For the first three decades of his reign, Constantine would be a marginalised spectator on the side lines and a bit part player in his own story. He was only four years old at the time of his father Leo’s death and so the throne was taken by his dissolute uncle Alexander.
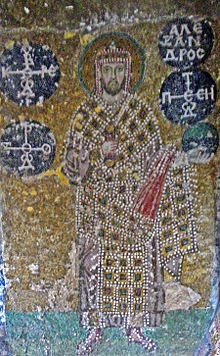 The brief reign of Alexander, depicted right in a mosaic from the Hagia Sofia, would prove an unmitigated disaster. Such had been his resentment of his late brother that the new emperor would overturn every one of Leo VI’s policies with little thought for the consequences. His most damaging action was to insultingly dismiss an embassy from the Bulgars, breaking off peaceful relations. He also restored his late brother’s implacable opponent Patriarch Nicholas, who began plotting once more to overthrow the ruling dynasty. Alexander died from a stroke after just thirteen months, most of which he spent in debauchery and idle pursuits.
All of this left the young emperor Constantine Porphyrogenitus in a precarious position. On his death bed his uncle had appointed the Patriarch as regent in a final effort to spite his brother’s memory. Nicholas had lost the patriarchate over his opposition to Leo VI’s fourth marriage. Finding himself now as regent for the royal offspring of that union, his first action was to try to supplant Constantine, who he regarded as illegitimate.
Soon Nicholas was conspiring with Constantine Ducas, the son of that Andronicus with whom he had been accused of colluding against Leo. Just a few days after the young emperor’s coronation in the summer of 913, Ducas entered the city with a small force with the intention of seizing control of the palace. His plot had been discovered however and his party was set upon by a mob in the streets outside the hippodrome. The rebels managed to advance as far as the palace gate where a loyal force raised from the fleet engaged them in battle. Ducas lost his head in the fighting. With this first gambit having failed, the Patriarch attempted to distance himself from the plot by unleashing a bloody purge of Ducas’ supporters in the army.
 Patriarch Nicholas as depicted by Nikolai Pavlovic 1917 The Patriarch’s assumption of the regency was marked by bitterness and spite. He had humiliated his predecessor Euphemius, having him publically stripped of his robes and beaten. He had flung the admiral Himerius into prison as punishment for his defeat by the Muslim convert turned privateer admiral Leo of Tripoli and had completely excluded the empress Zoe from the council of regency.
Meanwhile, the second of Alexander’s blunders had come home to roost for Symeon of Bulgaria had marched upon the capital. The Bulgars laid siege to Constantinople and as tradition dictated they laid waste to the lands outside the Theodosian Walls but could make little impression upon them. The Patriarch went out to meet with Symeon and with his desire to retain his Episcopal jurisdiction over the Bulgarian church overriding all other considerations, he found himself putty in the Bulgar ruler’s hands. Nicholas agreed to the resumption of tribute and also promised that Constantine would marry Symeon’s daughter. Well pleased with the bargain that would make him the emperor’s father in law, Symeon marched away.
The Patriarch however had gone too far in taking such action and found himself outmanoeuvred. The empress Zoe, who he had banished to a convent, swept back into power and Nicholas found his activities restricted to the ecclesiastical sphere. Zoe, known as Carbonopsina ‘the black-eyed’ was a legendary beauty and was used to asserting her will. Throwing aside her habit, Zoe took a firm grip on affairs of state. Nicholas’ agreement with Symeon was repudiated. The empress would have no barbarian princess marrying Constantine. Un-phased, the Bulgar Tsar prepared for war.
 The forces of the caliphate had taken advantage of the empire’s preoccupation to overrun the buffer zone of Armenia, intervening in an Armenian civil war and subjugating the entire country to Abbasid rule. Zoe threw her weight behind Ashot II, depicted right, the exiled claimant to the Armenian crown and provided him with a large army with which to take back his land. Ashot was successful in his campaign, driving out the Arab troops and their allies and establishing himself as king of Armenia, earning himself the nom de guerre of Yerkat‘the iron’ in the process. A retaliatory raid by the forces of the caliph into Anatolia launched from Tarsus was also defeated and following this a treaty of peace was concluded with the caliph on reasonable terms. Zoe could congratulate herself on the success of her foreign policy.
The Bulgars remained the greatest threat however and soon Symeon was on the move once more, harassing the empire’s Thracian territories and seizing the city of Adrianople, which he abandoned upon payment of a large ransom. With peace secured in the east, troops were available for a campaign against the Bulgars. A grand strategy was devised to defeat Symeon through encirclement. The governor of Cherson was instructed to gather a force from amongst the fearsome Pechenegs who had settled down beside the Dnieper in the lands from which they had driven the Magyars. With these mercenary recruits, doubtless eager at the prospect of loot, he was to march to the Danube where he would rendezvous with the imperial fleet. Meanwhile another force under the command of Leo Phocas, the latest scion of that house to rise to the supreme command of the Byzantine armies, having replaced the late Constantine Ducas as Domestic of the Scholai, would march northward from the capital. The Bulgars would be caught between the two forces and crushed. Like many an overcomplicated plan, it all went wrong. The Pechenegs turned up on the Danube as planned but the fleet commander Romanus Lecapenus, for reasons which are unclear, failed to transport them across the river and they returned home. Meanwhile, unaware of the unravelling of the Byzantine strategy, Phocas marched on to confront the Bulgar army alone. Battle was joined in the late summer of 917 at Achelous on the Black Sea coast. The Byzantine sources claim that all was going well until Phocas lost control of his horse which galloped riderless through the army and started a panic as men feared their commander was dead. This is a story which crops up too often in tales of Byzantine defeat to be true every time but whatever the reason, the pursuit of the retreating Bulgars became disorderly. Symeon rallied his army and they counterattacked, putting the Byzantine forces to rout and slaughter. Phocas lived to fight another day, so must have found another horse from somewhere.
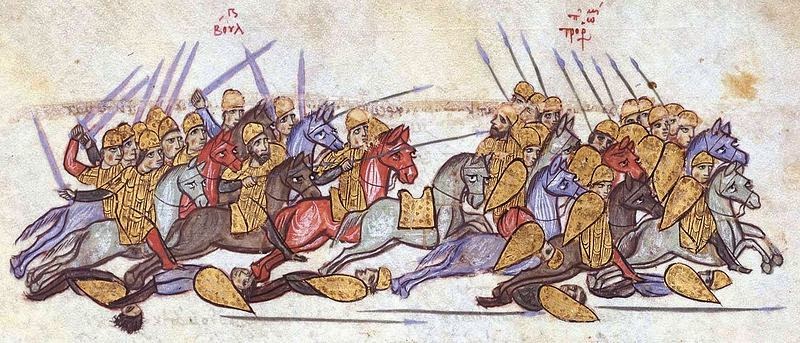 Rout at Achelous - Madrid Skylitzes Symeon advanced in pursuit of the retreating Byzantine army and gave them another mauling although by all accounts Leo’s men fought bravely. The son of Constantine Ducas is said to have died a hero’s death in this engagement, restoring his family honour.
 Despite his somewhat patchy military record, it seems that Phocas had caught the empress’ eye and was being sized up as potential husband material. For those who mistrusted the Anatolian landed aristocracy, amongst which the Phocas clan was at present pre-eminent, this was not a desirable situation. Theodore, the tutor of young Constantine Porphyrogenitus, feared for his pupil’s life if Phocas were to ascend the throne and so sent an appeal to Romanus Lecapenus who, despite his recent disgrace, still commanded the Byzantine fleet.
Romanus was now presented with a remarkable opportunity to turn around his fortunes. From having only narrowly escaped a sentence of blinding for his part in the Achelous fiasco he was now in a position to present himself as the protector of Constantine. Zoe’s response was to order the fleet disbanded but the her instruction was disobeyed and those she sent to enforce it were arrested. With her authority in tatters she once more found herself completely sidelined by Nicholas who reassumed the regency. The Patriarch however was no longer in control of the situation which had descended into a power struggle between Leo Phocas and Romanus Lecapenus.
By the spring of 919 Romanus felt secure enough in his support to enter the palace of the Bucoleon and seize control of the reins of empire. He married his daughter Helen to the thirteen year old Constantine and assumed the title ofBasileopater ‘father of the emperor’. Phocas rose in revolt but his army refused to follow him and instead he was handed over to his enemies and blinded. As for empress Zoe, she soon found herself accused of attempting to poison Romanus and was forced back into her hated habit and dispatched once more into the seclusion of a convent; out of sight and out of mind.
To undermine the empress’ position as far as possible her marriage to Leo VI was condemned in the strongest terms by the church and fourth marriages were henceforth outlawed. The legitimacy of Constantine was however upheld, for after all, the authority of Romanus as Basileopaterwas dependent upon it and so Nicholas was denied a complete victory.
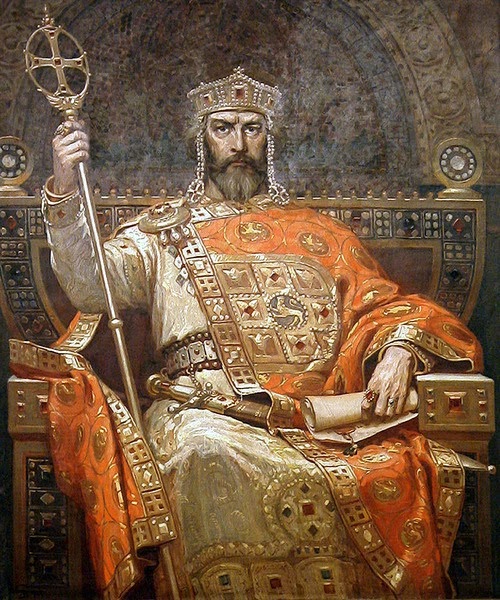 A 20th Century reimagining of Tsar Symeon
 Under Romanus, who was granted the title of Caesar by a compliant Constantine a year after his usurpation and crowned co-emperor just a few months later, the empire would enjoy a resurgence in its fortunes. His tenure as emperor began auspiciously and appropriately with a naval victory that saw the final demise of Leo of Tripoli, removing a persistent thorn from the side of the empire. Romanus followed this up by securing peace with Symeon, who in 924 had once more advanced to the walls of the capital. A summit was held between the two rulers on a jetty constructed on the shore at Blachernae for the purpose, with Romanus arriving by ship. The emperor gave the Bulgar Tsar a tongue lashing. Magnificent in the imperial regalia, Romanus castigated Symeon for making war on his fellow Christians and warned him to look to the salvation of his soul. The emperor told the Tsar that if it was treasure that he wanted then he could have all that he desired but implored him in God’s name to keep the peace. Feeling very small, Symeon consented and departed forthwith and never raised his hand against the empire again. Such at any rate is how the Byzantines would have us see this encounter. A more cynical observer could point out that, under the guise of his tirade, Romanus had offered tribute in exchange for peace and Symeon had consented. Nevertheless the peace held as Symeon became embroiled in conflict with the Slavic states on his western border, whose restlessness had doubtless been encouraged through Byzantine intrigue.
 The capture of Melitene - Madrid Skylitzes This freed up the forces of the empire to turn against the caliphate once more. Romanus had appointed his Armenian countryman John Curcuas as Domestic of the Scholai and employed him in rooting out his opponents. In 926 Curcuas was sent at the head of a large force between fifty and eighty thousand strong to menace the petty kingdoms and cities of the frontier territories into switching their allegiance from the caliph to the emperor, demanding tribute and then following this up with armed invasion. The cities of Melitene and Samosata on the upper Euphrates were put to the sack before Curcuas turned his armies towards the kingdoms to the south and east of Ashot’s Armenia, sacking the Arab stronghold of Dvin.
Romanus meanwhile continued to strengthen his grip on power by establishing his family as a ruling dynasty. He had appointed his eldest son Christopher as co-emperor alongside himself and the increasingly marginalised Constantine and would elevate his two younger sons to the purple in due course. His youngest son, who had been gelded with a view to a career in the church; a not uncommon practice, would be installed as Patriarch. All the while the bookish Constantine, isolated and withdrawn, seemed all but forgotten. When a terrible famine accompanied by biblical swarms of locusts swept down upon the empire it was Romanus who arranged relief and shelter for the poor. When the worst was past it was Romanus who forced the aristocracy who had snapped up lands from the destitute peasantry at knock down prices to hand it back with compensation, earning the gratitude of his people. When Curcuas once more successfully besieged and annexed Melitene in 934 it was Romanus who basked in the glory of victory.
 Igor sets out to attack Constantinople - Ratziwill chronicle War on the frontier settled into tit for tat raiding with the highly capable Abbasid governor of Amida, Sayf ad Daula, proving a worthy rival to Curcuas. The spring of 941 found both fleet and army engaged in campaigns against the Arabs when once more over the horizon there appeared a Rus fleet descending upon the capital.
 Following the death of Oleg, Igor the son of Rurik had come into his inheritance as Prince of Kiev. Keen to demonstrate to his followers that he was made of the same uncompromising Viking stuff as his father, he embarked upon a new expedition to Constantinople. The Russian Primary Chronicle relates that Igor sailed into the Black Sea with an improbable armada of ten thousand ships. Only fifteen serviceable ships were available to the emperor but these proved sufficient to deter the Rus armada from an assault on Constantinople itself. An attack by the Protovestiarios Theodore with Greek fire destroyed many of the Rus ships with large numbers of their crews drowning as they leapt overboard to escape the flames. Turning away from the capital which remained inviolate behind its walls, Igor landed on the Bithynian coast of Asia Minor and set about doing what Vikings did best. According to their own chronicle, which was no doubt based on Byzantine sources, the Rus; waged war along the Pontus as far as Heraclea and Paphlagonia, and laid waste the entire region of Nicomedia, burning everything along the gulf. Of the people they captured, some they butchered, others they set up as targets and shot at, some they seized upon, and after binding their hands behind their backs, they drove iron nails through their heads. Many sacred churches they gave to the flames, while they burned many monasteries and villages, and took no little booty on both sides of the sea.
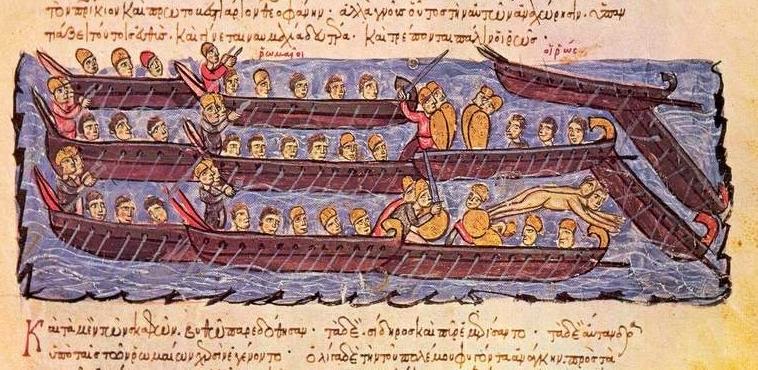 Fighting the Rus - Madrid Skylitzes
When Curcuas arrived at the head of his troops both sides acknowledge that the fighting was hard but eventually the Rus were driven back to their ships. By now the Byzantine fleet had arrived and the Rus were chased from the shores of the empire with heavy losses. Undeterred, Igor began raising fresh forces but accepted the offer of a renewed treaty from the emperor rather than face another dose of Greek fire. It was probably at this point that the trading concessions ascribed to Oleg in 911 were in fact obtained.
Curcuas meanwhile had returned to the east and had swept all before him in an invasion of Mesopotamia which saw the former imperial frontier strongholds of Amida and Dara sacked and plundered, if not permanently regained. Laying siege to the city of Edessa in 944, Curcuas agreed to spare the city when the largely Christian populace offered to hand over the sacred relic known as the Mandylion. This was a cloth bearing a portrait believed to be an actual likeness of Christ, obtained when the Edessan ruler Abgar had sent a delegation to Jesus, asking him to come to Edessa and heal the king. Much miraculous legend had subsequently sprung up around the Mandylion, which had been lost for centuries and recovered just in time to save the city from a Persian attack. Now it was borne back to Constantinople in triumph accompanied by scenes of pious exultation.
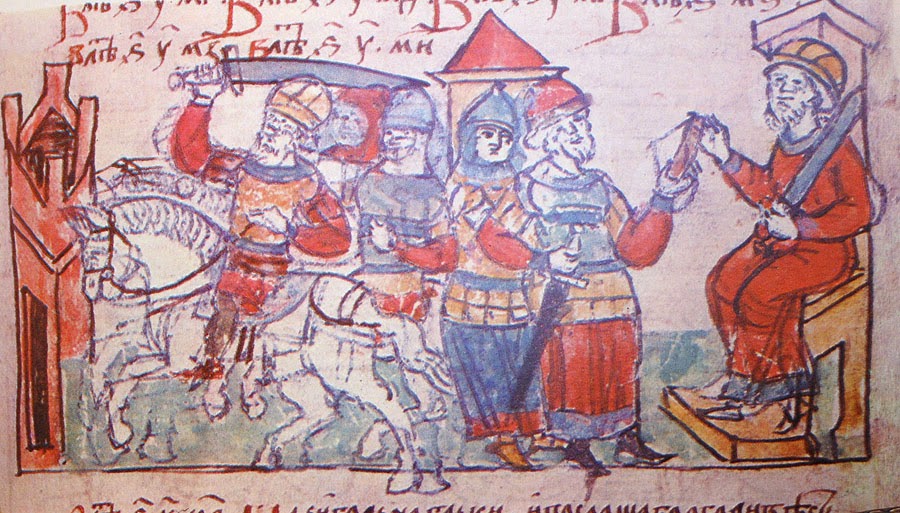
 Abgar with the Mandylion from an icon at St Catherines, Sinai In this charged atmosphere the aging Romanus began to ponder the fate of his soul. His eldest son Christopher had died ten years earlier and his younger sons Stephen and Constantine now expected to succeed to the empire in turn, pushing the hapless Porphyrogenitusaside. Romanus now declared that Constantine Porphyrogenitus would succeed him as senior emperor. Man of the moment John Curcuas was to marry his daughter to Porphyrogenitus’ son and thereafter serve as protector to the legitimate regime. Alarmed at the prospect of the imperial gravy train grinding to a halt, Romanus’ sons mobilised their supporters in an attempt to thwart their father. Poor Curcuas found himself out-manoeuvred. Not only was the wedding off but he was replaced as Domestic by Stephen’s nominee, the splendidly named Pantherius. Romanus found himself forcibly side-lined by his sons and was shipped off to an island monastery, protesting feebly.
Stephen and Constantine expected the Porphyrogenitus to continue in his passive acceptance of their usurpation, lending legitimacy to the rule of the Lecapeni but playing no active role in affairs of state. They reckoned however without the influence of their sister, the empress Helena, who urged her retiring husband to find his backbone. By now the emperor was in his late thirties and if he was ever going to assert his rights, now was the time. Once he had been stirred into action by his wife, Porphyrogenitus found a willing champion in the form of Bardas Phocas, brother of Romanus’ blinded rival Leo. Within months of their seizure of power, disaster overtook the regime of Stephen and Constantine. Mobs rioted in the streets in protest at their treatment both of their father and of Porphyrogenitus. Meanwhile their man Patherius proved to be a paper tiger. Brought to battle by Sayf ad Daula whilst raiding near Aleppo, his forces suffered a major defeat and he withdrew from Syria. Marching west in support of the Lecapeni he then suffered a further defeat at the hands of Bardas Phocas. The game was up and Stephen and Constantine soon shared the fate of their father, exiled to separate monasteries to contemplate their misdeeds.
 The Edessenes surrender the Mandylion - Madrid Skylitzes A story which no doubt grew up in later years is told in the Byzantine sources of how Stephen had looked blankly at the Mandylion when it arrived in Constantinople, unable to see any image upon it. Constantine Porphyrogenitus however had immediately identified the features of Christ and pointed them out to the embarrassment of the young Lecapenus. It thus seemed that heaven decreed that the Porphyrogenitus had been born to rule, but after a lifetime on the side lines, was he up to the challenge?
You may also enjoy Enemies at the Gate
http://slingsandarrowsblog.blogspot.co.uk/2013/05/enemies-at-gate-part-two-reign-of.html
and Rise of the Rus
http://slingsandarrowsblog.blogspot.co.uk/2014/04/rise-of-rus.html?utm_source=bp_recent&utm-medium=gadget&utm_campaign=bp_recent
October 1, 2014
Black Spartans - the rise of the Zulu Nation
And now for something completely different. I have recently been watching the '80's miniseries Shaka Zulu. It is an enjoyable romp and a bold piece of television for the time, in which whole hour long episodes pass without the 'stars' Edward Fox and Robert Powell making an appearance and instead centre stage being given to the cast of African newcomers to tell the story of Shaka's remarkable rise to power.
 The Zulu war machine As I watched, I mused that the story of the rise of the Zulus had many coincidental parallels in classical history. On the plains of Southern Africa in the late 18th and early 19th Centuries there occurred something akin to the hoplite revolution of ancient Greece, where ideas on organisation, weapons and tactics evolved in similar way, albeit with different causes and consequences. The man who drove this revolution forward more than any other was Shaka, who was born in approximately 1787 in not entirely promising circumstances. He was a bastard, albeit of noble parentage. His father was the Zulu prince Sengzangakhona. At the time the Zulu were a relatively small and insignificant tribe, just one of a hundred Nguni chiefdoms scattered across the plains between the Drakensburg Mountains and the Indian Ocean.
Each tribe lived a pastoral existence. Settlements were centred around the kraal of the chief, with the beehive shaped huts of the people radiating outwards in concentric circles. Wealth and status was measured above all in cattle, the tending of which was the responsibility of men folk, particularly the young boys, whilst the raising of crops was the preserve of the women. The Nguni male was also a hunter and a warrior. Wars were fought between tribes on a strictly limited basis, generally over control of pasture or to settle some insult. Fighting largely took place over long range with the throwing of spears and consisted of more posturing than actual combat. The womenfolk of the tribes would come to watch from a distance. Occasionally one side might charge the other to drive them from the field. The defeated enemy was not generally pursued. If a tribe was driven from their lands they simply moved on. Shaka would change all of this.
Shaka's path to the leadership of his people would not be easy however. His mother Nandi was the daughter of the chief of the neighbouring Langeni tribe. Her illicit dalliance with Sengzangakhona was regretted by the Zulu prince, who at first attempted to deny Nandi's pregnancy. He instead claimed that the woman was fantasizing and that she was suffering from a swelling of the stomach caused by the iShaka beetle. When the boy was born, Nandi's ironic choice of name was a tongue in cheek riposte to his father's protestations. Sengzangakhona was eventually forced to acknowledge his paternal responsibilities and took Nandi as his third wife. The reconciliation was short-lived however and Shaka and his mother were driven out into a life of exile.
 A portrait of Shaka by Nathaniel Isaacs The rejection of his father and the humiliation of his mother lit the fire of a lifelong resentment in young Shaka. Relentless bullying at the hands of the youths of the Mthethwa people, amongst whom Nandi took refuge in the home of her aunt, served to stoke this resentment into a dark rage. In the opening years of the Nineteenth Century the Mthethwa were one of two large rival power groups amongst the Nguni. Under the leadership of their paramount chief Dingiswayo, the foundations of the military system that Shaka would create were being put into place. When Shaka took his place amongst the young warriors of the Mthethwa, he would find the perfect outlet for his inner fury.
Despite his commitment to the organisation of his forces, Dingiswayo remained traditional in his views on weapons and tactics. Dingiswayo was a relatively conciliatory overlord, who believed in the age old concepts of limited warfare. Shaka on the other hand, believed in total war, with the objectives being the annihilation and complete subjugation of the enemy. Shaka rose through the ranks to become a prominent commander of Dingiswayo's forces.When Shaka's father died in 1816 Dingiswayo backed Shaka's bid for power in which he overcame his brother Sigujana and took over the rule of the Zulus as a vassal of Dingiswayo.
Two years later Shaka would betray his benefactor when Dingiswayo led his warriors against the rival tribal confederation of the Ndwandwe. Shaka failed to arrive in time to support Dingiswayo and the Mthethwa chief was captured and murdered by his rival Zwide. In the aftermath of his death, none save Shaka had the strength to take control of Dingiswayo's fragmented kingdom.
Shaka continued the expansion of his territories and reorganised and re-equipped his fighting men in accordance with his own ideas. Under Dingiswayo, Shaka had championed changes to the traditional weapons to make them more suitable for close infantry tactics and hand to hand fighting. The traditional long-shafted assegai, useful only as a missile weapon, was shortened and given a larger blade to make it easier to wield at close quarters. The small cowhide shield carried mainly to deflect missile weapons, was enlarged to offer effective protection when closing with the enemy. Shaka's warriors also still carried a throwing spear, to be discharged at the enemy in a volley like Roman pila, prior to a charge. To make their charge more effective, Shaka banned his troops from wearing sandals and legend has it, made them toughen their feet by trampling thorn bushes barefoot.
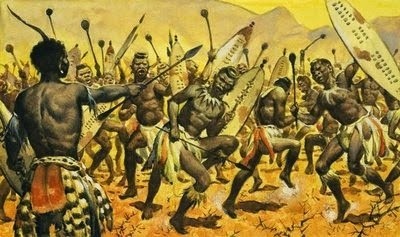 Toughening the feet by trampling thorn bushes Shaka's reforms extended to battlefield tactics, deploying his troops into a centre, wings and reserve that would have been familiar to any ancient general, although they were deployed in a novel crescent formation. The wings, termed the horns of the bull, had the primary objective of outflanking and encircling the enemy, driving them onto the spears of the troops of the centre, termed the chest. The oldest warriors, like the triarii of the Roman Republic, formed the reserve, thrown into the fight when the young blades tired or where resistance was strongest.
Shaka took his revolution beyond the battlefield and endeavoured to build a militarised society with a distinct resemblance to the Lycurgan reforms that created the Spartan system. The young men of Shaka's kingdom were organised for military training in a fashion that bore resemblance to the Spartan agoge. Divided into age-based groups known as intanga, boys began to learn military skills from as young as six, initially accompanying the older warriors on campaign in the capacity of porters and herders. Later as they reached manhood they would join their own regiment or ibutho, where young, unmarried men lived together communally and devoted themselves to warlike pursuits. Young females were also arranged into groups known as amabutho, which would in time provide brides for the young warriors, once they had sufficiently proved their fighting prowess and were permitted to marry enmasse.
Zwide of the Ndwandwe could not let Shaka's rise go unchallenged and led an invasion of Zulu territory. Shaka drew him deep into his own lands and then met him in battle at the Mhlathuze River where the combination of superior Zulu weapons and tactics and Shaka's own leadership delivered a decisive victory. After smashing the Ndwandwe, Shaka faced no significant challenge as he continued to mop up the peoples of the region and unite them under his kingship. He found however, as other great consolidators from Attila the Hun to Genghis Khan had done, that once he had united the fractious tribes, he required further military adventures in order to sustain the system he had created. His impi were sent out ever further on campaigns of subjugation. Many tribes chose to flee and a mass migration northward was triggered which in turn caused further conflict as new arrivals sought land. Amongst those who led his people north was Mzilikazi, a one-time protégé of Shaka. He would recreate the Zulu military system amongst his own people, the Matabele who would later clash with the colonial ambitions of CJ Rhodes.
 Francis Farewell Shaka's continued expansion soon brought his impi close to the frontiers of Britain's new colonial possessions in the Cape. It was concern at Shaka's intentions that led the Cape governor in 1824 to dispatch the expedition of Francis Farewell, dashingly played by Edward Fox in Shaka Zulu, to make contact with Shaka and attempt to establish peaceful relations with the Zulu king. Farewell built a good relationship with Shaka and established a trading post at Port Natal on territory gifted him by the Zulu ruler. Shaka for his part was fascinated by the westerners and even created a new settlement in order to be closer to Farewell's colony. Accompanying Farewell was Henry Fynn, later Cape governor, whose diary provided much detail on the court and character of Shaka. Eighteen months later another expedition led by Lt James King was sent to find Farewell. King was accompanied by Nathaniel Isaacs who later wrote a colourful account Travels and Adventures in East Africa.
Despite good relations with the white traders at Port Natal, Shaka was becoming a brutal tyrant. The death of his mother Nandi in 1828 unhinged him and he demanded extravagant displays of mourning from his subjects. The growing of crops and the consumption of milk was banned, enforced on pain of death. Famine and starvation were the predictable outcome and faced with the meltdown of their king, his brothers and bodyguard took action and Shaka was assassinated. He was succeeded by his half-brother Dingane who would later clash with the Voortrekkers as they brought their wagons north in search of a new homeland away from British domination.
Under Shaka, the Zulus had become the masters of a united and militarised kingdom that was now on a collision course with the white colonists. But that's another movie.
 Dingane in an 1847 illustration
You may also enjoy: http://slingsandarrowsblog.blogspot.co.uk/2013/08/who-were-saadian-dynasty.html
 All images used in this blog are in the public domain or are my own photographs
 The Zulu war machine As I watched, I mused that the story of the rise of the Zulus had many coincidental parallels in classical history. On the plains of Southern Africa in the late 18th and early 19th Centuries there occurred something akin to the hoplite revolution of ancient Greece, where ideas on organisation, weapons and tactics evolved in similar way, albeit with different causes and consequences. The man who drove this revolution forward more than any other was Shaka, who was born in approximately 1787 in not entirely promising circumstances. He was a bastard, albeit of noble parentage. His father was the Zulu prince Sengzangakhona. At the time the Zulu were a relatively small and insignificant tribe, just one of a hundred Nguni chiefdoms scattered across the plains between the Drakensburg Mountains and the Indian Ocean.
 Each tribe lived a pastoral existence. Settlements were centred around the kraal of the chief, with the beehive shaped huts of the people radiating outwards in concentric circles. Wealth and status was measured above all in cattle, the tending of which was the responsibility of men folk, particularly the young boys, whilst the raising of crops was the preserve of the women. The Nguni male was also a hunter and a warrior. Wars were fought between tribes on a strictly limited basis, generally over control of pasture or to settle some insult. Fighting largely took place over long range with the throwing of spears and consisted of more posturing than actual combat. The womenfolk of the tribes would come to watch from a distance. Occasionally one side might charge the other to drive them from the field. The defeated enemy was not generally pursued. If a tribe was driven from their lands they simply moved on. Shaka would change all of this.
Shaka's path to the leadership of his people would not be easy however. His mother Nandi was the daughter of the chief of the neighbouring Langeni tribe. Her illicit dalliance with Sengzangakhona was regretted by the Zulu prince, who at first attempted to deny Nandi's pregnancy. He instead claimed that the woman was fantasizing and that she was suffering from a swelling of the stomach caused by the iShaka beetle. When the boy was born, Nandi's ironic choice of name was a tongue in cheek riposte to his father's protestations. Sengzangakhona was eventually forced to acknowledge his paternal responsibilities and took Nandi as his third wife. The reconciliation was short-lived however and Shaka and his mother were driven out into a life of exile.
 A portrait of Shaka by Nathaniel Isaacs The rejection of his father and the humiliation of his mother lit the fire of a lifelong resentment in young Shaka. Relentless bullying at the hands of the youths of the Mthethwa people, amongst whom Nandi took refuge in the home of her aunt, served to stoke this resentment into a dark rage. In the opening years of the Nineteenth Century the Mthethwa were one of two large rival power groups amongst the Nguni. Under the leadership of their paramount chief Dingiswayo, the foundations of the military system that Shaka would create were being put into place. When Shaka took his place amongst the young warriors of the Mthethwa, he would find the perfect outlet for his inner fury.
Despite his commitment to the organisation of his forces, Dingiswayo remained traditional in his views on weapons and tactics. Dingiswayo was a relatively conciliatory overlord, who believed in the age old concepts of limited warfare. Shaka on the other hand, believed in total war, with the objectives being the annihilation and complete subjugation of the enemy. Shaka rose through the ranks to become a prominent commander of Dingiswayo's forces.When Shaka's father died in 1816 Dingiswayo backed Shaka's bid for power in which he overcame his brother Sigujana and took over the rule of the Zulus as a vassal of Dingiswayo.
Two years later Shaka would betray his benefactor when Dingiswayo led his warriors against the rival tribal confederation of the Ndwandwe. Shaka failed to arrive in time to support Dingiswayo and the Mthethwa chief was captured and murdered by his rival Zwide. In the aftermath of his death, none save Shaka had the strength to take control of Dingiswayo's fragmented kingdom.
Shaka continued the expansion of his territories and reorganised and re-equipped his fighting men in accordance with his own ideas. Under Dingiswayo, Shaka had championed changes to the traditional weapons to make them more suitable for close infantry tactics and hand to hand fighting. The traditional long-shafted assegai, useful only as a missile weapon, was shortened and given a larger blade to make it easier to wield at close quarters. The small cowhide shield carried mainly to deflect missile weapons, was enlarged to offer effective protection when closing with the enemy. Shaka's warriors also still carried a throwing spear, to be discharged at the enemy in a volley like Roman pila, prior to a charge. To make their charge more effective, Shaka banned his troops from wearing sandals and legend has it, made them toughen their feet by trampling thorn bushes barefoot.
 Toughening the feet by trampling thorn bushes Shaka's reforms extended to battlefield tactics, deploying his troops into a centre, wings and reserve that would have been familiar to any ancient general, although they were deployed in a novel crescent formation. The wings, termed the horns of the bull, had the primary objective of outflanking and encircling the enemy, driving them onto the spears of the troops of the centre, termed the chest. The oldest warriors, like the triarii of the Roman Republic, formed the reserve, thrown into the fight when the young blades tired or where resistance was strongest.
Shaka took his revolution beyond the battlefield and endeavoured to build a militarised society with a distinct resemblance to the Lycurgan reforms that created the Spartan system. The young men of Shaka's kingdom were organised for military training in a fashion that bore resemblance to the Spartan agoge. Divided into age-based groups known as intanga, boys began to learn military skills from as young as six, initially accompanying the older warriors on campaign in the capacity of porters and herders. Later as they reached manhood they would join their own regiment or ibutho, where young, unmarried men lived together communally and devoted themselves to warlike pursuits. Young females were also arranged into groups known as amabutho, which would in time provide brides for the young warriors, once they had sufficiently proved their fighting prowess and were permitted to marry enmasse.
Zwide of the Ndwandwe could not let Shaka's rise go unchallenged and led an invasion of Zulu territory. Shaka drew him deep into his own lands and then met him in battle at the Mhlathuze River where the combination of superior Zulu weapons and tactics and Shaka's own leadership delivered a decisive victory. After smashing the Ndwandwe, Shaka faced no significant challenge as he continued to mop up the peoples of the region and unite them under his kingship. He found however, as other great consolidators from Attila the Hun to Genghis Khan had done, that once he had united the fractious tribes, he required further military adventures in order to sustain the system he had created. His impi were sent out ever further on campaigns of subjugation. Many tribes chose to flee and a mass migration northward was triggered which in turn caused further conflict as new arrivals sought land. Amongst those who led his people north was Mzilikazi, a one-time protégé of Shaka. He would recreate the Zulu military system amongst his own people, the Matabele who would later clash with the colonial ambitions of CJ Rhodes.
 Francis Farewell Shaka's continued expansion soon brought his impi close to the frontiers of Britain's new colonial possessions in the Cape. It was concern at Shaka's intentions that led the Cape governor in 1824 to dispatch the expedition of Francis Farewell, dashingly played by Edward Fox in Shaka Zulu, to make contact with Shaka and attempt to establish peaceful relations with the Zulu king. Farewell built a good relationship with Shaka and established a trading post at Port Natal on territory gifted him by the Zulu ruler. Shaka for his part was fascinated by the westerners and even created a new settlement in order to be closer to Farewell's colony. Accompanying Farewell was Henry Fynn, later Cape governor, whose diary provided much detail on the court and character of Shaka. Eighteen months later another expedition led by Lt James King was sent to find Farewell. King was accompanied by Nathaniel Isaacs who later wrote a colourful account Travels and Adventures in East Africa.
Despite good relations with the white traders at Port Natal, Shaka was becoming a brutal tyrant. The death of his mother Nandi in 1828 unhinged him and he demanded extravagant displays of mourning from his subjects. The growing of crops and the consumption of milk was banned, enforced on pain of death. Famine and starvation were the predictable outcome and faced with the meltdown of their king, his brothers and bodyguard took action and Shaka was assassinated. He was succeeded by his half-brother Dingane who would later clash with the Voortrekkers as they brought their wagons north in search of a new homeland away from British domination.
Under Shaka, the Zulus had become the masters of a united and militarised kingdom that was now on a collision course with the white colonists. But that's another movie.
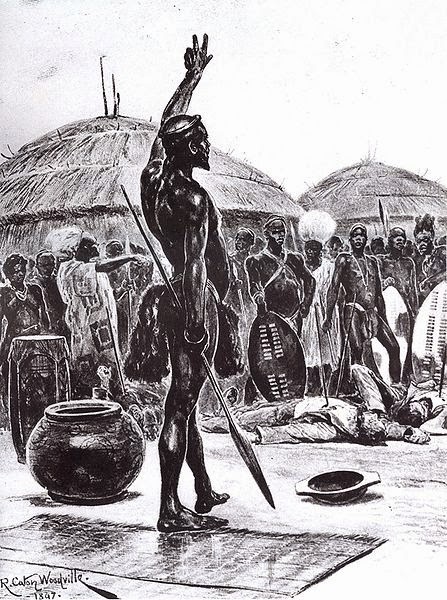 Dingane in an 1847 illustration
You may also enjoy: http://slingsandarrowsblog.blogspot.co.uk/2013/08/who-were-saadian-dynasty.html
August 31, 2014
Avro Heroes - Andrew Mynarski VC and 'The Great Zura'
Following on directly from the last post on Avro Canada, inspired by the visit of Vera the Canadian Lancaster to these shores, here is a post about two flying heroes connected to the Avro story.
 Vera the Canadian Lancaster
Last weekend I got my chance to see the two Lancasters flying for myself at the Little Gransden Airshow in Cambridgeshire. What a sight! Before the appearance of the Lancasters a brief memorial service was held for those who gave their lives in the air during the Second World War. Three Lancaster veterans who were present received the heartfelt applause of the crowd. After the traditional words of remembrance, the crowd stood for a minute's silence in contemplation of the bravery of those who flew and those who did not make it home. As the silence drew on, the hum of engines steadily grew louder until, perfectly on cue as the sound of lone piper signalled the end of the silence, the two Lancasters appeared over the tree tops.
 Vera and Thumper in formation The crowd remained hushed as the Lancasters made four passes over the airfield. The loudest sound we made was the snapping and whirring of cameras as everyone took in the glorious sound of eight Rolls Royce Merlin engines and the sight of the two aircraft flying together. It was a sight that everyone appreciated and one that we may not see again in our lifetimes. As the two aircraft finally headed away to their next appointment, I looked around me to see that almost everyone had a tear in their eye. Everyone there felt part of something special.
During the minute's silence, I had thought about the bravery of Pilot Officer Andrew Mynarski, who was posthumously awarded the Victoria Cross for his actions of the night of 12th June 1944. The Canadian Lancaster affectionately known as Vera is more properly known as the Mynarski Memorial Lancaster in his honour and is painted in the markings of the aircraft in which he lost his life. Mynarski was the mid-upper gunner aboard a Canadian built Lancaster Mark X, KB726-VR-A, serving as part of 419 'Moose' Squadron. During a raid on Cambrai, the 13th mission for the crew, the Lancaster was hit by fire from a JU88 night fighter and was swiftly engulfed in flames.
 Vera the Canadian Lancaster
Mynarski's Victoria Cross citation reads:
Pilot Officer Mynarski was the mid-upper gunner of a Lancaster aircraft, detailed to attack a target at Cambrai in France, on the night of 12th June, 1944. The aircraft was attacked from below and astern by an enemy fighter and ultimately came down in flames. As an immediate result of the attack, both port engines failed. Fire broke out between the mid-upper turret and the rear turret, as well as in the port wing. The flames soon became fierce and the captain ordered the crew to abandon the aircraft. Pilot Officer Mynarski left his turret and went towards the escape hatch. He then saw that the rear gunner was still in his turret and apparently unable to leave it. The turret was, in fact, immovable, since the hydraulic gear had been put out of action when the port engines failed, and the manual gear had been broken by the gunner in his attempts to escape. Without hesitation, Pilot Officer Mynarski made his way through the flames in an endeavour to reach the rear turret and release the gunner. Whilst so doing, his parachute and his clothing up the waist were set on fire. All his efforts to move the turret and free the rear gunner were in vain. Eventually the rear gunner clearly indicated to him that there was nothing more he could do and that he should try to save his own life. Pilot Officer Mynarski reluctantly went back through the flames to the escape hatch. There, as a last gesture to the trapped gunner, he turned towards him, stood to attention in his flaming clothing, and saluted, before he jumped out of the aircraft. Pilot Officer Mynarski's descent was seen by French people on the ground. Both his parachute and his clothing were on fire. He was found eventually by the French, but was so severely burnt that he died from his injuries. The rear gunner had a miraculous escape when the aircraft crashed. He subsequently testified that had Pilot Officer Mynarski not attempted to save his comrade's life, he could have left the aircraft in safety and would, doubtless, have escaped death. Pilot Officer Mynarski must have been fully aware that in trying to free the rear gunner he was almost certain to lose his own life. Despite this, with outstanding courage and complete disregard for his own safety, he went to the rescue. Willingly accepting the danger, Pilot Officer Mynarski lost his life by a most conspicuous act of heroism which called for valour of the highest order.
It was a privilege to pay tribute to his bravery by watching the Lancaster that still flies in his honour.
 Andrew Mynarski VC
In my previous post on the eventful history of Avro Canada, I mentioned their star test pilot Janusz Zurakowski, who flew the famous Arrow. Zurakowski was a veteran of the Second World War and had served in the defence of Poland and the Battle of Britain. At the outbreak of war Zurakowski was a serving officer in the Polish air force as a flying instructor in Deblin. Flying an obsolete PZL-P7 armed with 2 WW1 Vickers machine guns fired from the cockpit, he was involved in actions against German Dorniers and succeeded in possibly downing one of them.
After the fall of Poland, Zurakowski escaped to Romania and then made his way via Syria to France and then to Britain where he joined the RAF, 234 Squadron. Flying a Spitfire, Zurakowski got his first of three kills on 15th August 1940 when he downed an ME110 which he was chasing at treetop level. On another occasion he downed an ME109 which had gone into a vertical dive to evade him, pursuing the enemy aircraft in a blind dive with his cockpit windshield frozen and opening fire at point blank range.
 The PZL-P7 as flown by Zurakowski in the defence of Poland
Zurakovski was moved to a training role following the Battle of Britain and ended the war as the leader of 306 'Polish' Squadron. Unable to return to Poland, Zurakowski remained in Britain and enrolled as a test pilot with the Fleet Air Arm. In 1947 he became chief test pilot for the Gloster Meteor, undertaking over a thousand flights in the aircraft. In 1951 he demonstrated the new ground attack variant of the Meteor at the Farnborough air show, where he wowed the crowds by performing an entirely new aerobatic manoeuvre, the 'Zurabatic Cartwheel'. His feats earned him the nickname, the Great Zura.
 Zurakowski in a Meteor 1951
Zurakowski moved to Canada in 1952 where he became chief test pilot for Avro Canada. In December of that year he took a Mark 4 CF-100 through the sound barrier in a vertical dive. Two years later he was forced to eject from an out of control CF-100 and broke his leg on landing. Nevertheless he was soon back in the cockpit. In 1955 he took the aircraft to Farnborough and once more amazed the crowds to the extent that the Belgian air force decided to buy fifty of the fighters, snubbing the British and Americans.
Zurakowski was the main test pilot on the Arrow programme and took the third prototype to Mach 1.89 in September 1957. He retired from flying the following year. When Avro Canada closed down in 1959, Zurakowski opened a small tourist resort and settled down to a much quieter life. He died in 2004 aged 89.
 Avro Arrow
Footage of the Zurabatic Cartwheel at approx. 2 mins 30 secs.
http://www.britishpathe.com/video/highlights-of-farnborough-1951
This site is in Polish but has some great photographs
http://www.zwoje-scrolls.com/zwoje18/text10.htm
More on Zurakowski
http://www.avroarrow.org/AvroArrow/JanZurakowski.html
 Vera the Canadian Lancaster
Last weekend I got my chance to see the two Lancasters flying for myself at the Little Gransden Airshow in Cambridgeshire. What a sight! Before the appearance of the Lancasters a brief memorial service was held for those who gave their lives in the air during the Second World War. Three Lancaster veterans who were present received the heartfelt applause of the crowd. After the traditional words of remembrance, the crowd stood for a minute's silence in contemplation of the bravery of those who flew and those who did not make it home. As the silence drew on, the hum of engines steadily grew louder until, perfectly on cue as the sound of lone piper signalled the end of the silence, the two Lancasters appeared over the tree tops.
 Vera and Thumper in formation The crowd remained hushed as the Lancasters made four passes over the airfield. The loudest sound we made was the snapping and whirring of cameras as everyone took in the glorious sound of eight Rolls Royce Merlin engines and the sight of the two aircraft flying together. It was a sight that everyone appreciated and one that we may not see again in our lifetimes. As the two aircraft finally headed away to their next appointment, I looked around me to see that almost everyone had a tear in their eye. Everyone there felt part of something special.
During the minute's silence, I had thought about the bravery of Pilot Officer Andrew Mynarski, who was posthumously awarded the Victoria Cross for his actions of the night of 12th June 1944. The Canadian Lancaster affectionately known as Vera is more properly known as the Mynarski Memorial Lancaster in his honour and is painted in the markings of the aircraft in which he lost his life. Mynarski was the mid-upper gunner aboard a Canadian built Lancaster Mark X, KB726-VR-A, serving as part of 419 'Moose' Squadron. During a raid on Cambrai, the 13th mission for the crew, the Lancaster was hit by fire from a JU88 night fighter and was swiftly engulfed in flames.
 Vera the Canadian Lancaster
Mynarski's Victoria Cross citation reads:
Pilot Officer Mynarski was the mid-upper gunner of a Lancaster aircraft, detailed to attack a target at Cambrai in France, on the night of 12th June, 1944. The aircraft was attacked from below and astern by an enemy fighter and ultimately came down in flames. As an immediate result of the attack, both port engines failed. Fire broke out between the mid-upper turret and the rear turret, as well as in the port wing. The flames soon became fierce and the captain ordered the crew to abandon the aircraft. Pilot Officer Mynarski left his turret and went towards the escape hatch. He then saw that the rear gunner was still in his turret and apparently unable to leave it. The turret was, in fact, immovable, since the hydraulic gear had been put out of action when the port engines failed, and the manual gear had been broken by the gunner in his attempts to escape. Without hesitation, Pilot Officer Mynarski made his way through the flames in an endeavour to reach the rear turret and release the gunner. Whilst so doing, his parachute and his clothing up the waist were set on fire. All his efforts to move the turret and free the rear gunner were in vain. Eventually the rear gunner clearly indicated to him that there was nothing more he could do and that he should try to save his own life. Pilot Officer Mynarski reluctantly went back through the flames to the escape hatch. There, as a last gesture to the trapped gunner, he turned towards him, stood to attention in his flaming clothing, and saluted, before he jumped out of the aircraft. Pilot Officer Mynarski's descent was seen by French people on the ground. Both his parachute and his clothing were on fire. He was found eventually by the French, but was so severely burnt that he died from his injuries. The rear gunner had a miraculous escape when the aircraft crashed. He subsequently testified that had Pilot Officer Mynarski not attempted to save his comrade's life, he could have left the aircraft in safety and would, doubtless, have escaped death. Pilot Officer Mynarski must have been fully aware that in trying to free the rear gunner he was almost certain to lose his own life. Despite this, with outstanding courage and complete disregard for his own safety, he went to the rescue. Willingly accepting the danger, Pilot Officer Mynarski lost his life by a most conspicuous act of heroism which called for valour of the highest order.
It was a privilege to pay tribute to his bravery by watching the Lancaster that still flies in his honour.
 Andrew Mynarski VC
 In my previous post on the eventful history of Avro Canada, I mentioned their star test pilot Janusz Zurakowski, who flew the famous Arrow. Zurakowski was a veteran of the Second World War and had served in the defence of Poland and the Battle of Britain. At the outbreak of war Zurakowski was a serving officer in the Polish air force as a flying instructor in Deblin. Flying an obsolete PZL-P7 armed with 2 WW1 Vickers machine guns fired from the cockpit, he was involved in actions against German Dorniers and succeeded in possibly downing one of them.
After the fall of Poland, Zurakowski escaped to Romania and then made his way via Syria to France and then to Britain where he joined the RAF, 234 Squadron. Flying a Spitfire, Zurakowski got his first of three kills on 15th August 1940 when he downed an ME110 which he was chasing at treetop level. On another occasion he downed an ME109 which had gone into a vertical dive to evade him, pursuing the enemy aircraft in a blind dive with his cockpit windshield frozen and opening fire at point blank range.
 The PZL-P7 as flown by Zurakowski in the defence of Poland
Zurakovski was moved to a training role following the Battle of Britain and ended the war as the leader of 306 'Polish' Squadron. Unable to return to Poland, Zurakowski remained in Britain and enrolled as a test pilot with the Fleet Air Arm. In 1947 he became chief test pilot for the Gloster Meteor, undertaking over a thousand flights in the aircraft. In 1951 he demonstrated the new ground attack variant of the Meteor at the Farnborough air show, where he wowed the crowds by performing an entirely new aerobatic manoeuvre, the 'Zurabatic Cartwheel'. His feats earned him the nickname, the Great Zura.
 Zurakowski in a Meteor 1951
Zurakowski moved to Canada in 1952 where he became chief test pilot for Avro Canada. In December of that year he took a Mark 4 CF-100 through the sound barrier in a vertical dive. Two years later he was forced to eject from an out of control CF-100 and broke his leg on landing. Nevertheless he was soon back in the cockpit. In 1955 he took the aircraft to Farnborough and once more amazed the crowds to the extent that the Belgian air force decided to buy fifty of the fighters, snubbing the British and Americans.
Zurakowski was the main test pilot on the Arrow programme and took the third prototype to Mach 1.89 in September 1957. He retired from flying the following year. When Avro Canada closed down in 1959, Zurakowski opened a small tourist resort and settled down to a much quieter life. He died in 2004 aged 89.
Footage of the Zurabatic Cartwheel at approx. 2 mins 30 secs.
http://www.britishpathe.com/video/highlights-of-farnborough-1951
This site is in Polish but has some great photographs
http://www.zwoje-scrolls.com/zwoje18/text10.htm
More on Zurakowski
http://www.avroarrow.org/AvroArrow/JanZurakowski.html
August 20, 2014
The Rise and Fall of Avro Canada
This summer British aviation fans are being treated to the rare sight of the last two airworthy Lancasters flying together. This has been made possible by the arrival of Vera, a Canadian built Lancaster Mark X now owned by the Canadian Warplane Heritage Museum.
During the Second World War, the threat to British factories posed by enemy bombing prompted the establishment of 'shadow factories' for aircraft production in Canada. Here, safe from the threat of bombs, aircraft could be built under licence, sticking scrupulously to the same specifications as their British built counterparts, ensuring that there would be no difficulties with spares once on front line duty.
 Lancaster Mark X The largest of these 'shadow factories' was Victory Aircraft in Malton Ontario, set up in 1941. The factory was initially intended to build the twin engined Avro Anson, a somewhat obsolete aircraft used predominantly for training bomber crews and deployed in large numbers by the Canadians in an anti U boat role. In 1942 however the decision was taken to commence production of the new Lancaster. Between 1943 and 1945 the factory turned out 430 Lancasters as well as producing over 3000 Avro Ansons, employing almost ten thousand workers at its height. Vera rolled off the production line at Victory Aircraft in July 1945, too late to play an active role in WW2. She nevertheless enjoyed a career with the RCAF as a maritime patrol aircraft, serving until 1963.
With the war over, it was questionable whether Canada needed to maintain its wartime aircraft industry. Wartime Munitions minister and arch moderniser CB Howe, known during the war as the Minister of Everything, championed the industrialisation of the Canadian economy and was keen to develop a home grown aviation industry. Howe oversaw the sale of Victory Aircraft to the British Hawker Siddeley group whereafter it became Avro Canada.
 C102 Jetliner The first project for the new company was to be the world's first commercial jet airliner. The C102 Jetliner first flew in August 1949, having been beaten into the air by the De Havilland Comet by just 13 days. Initial interest in the plane from TWA aviation mogul Howard Hughes seemed to promise a bright future for the Jetliner but the outbreak of the Korean War put an end to development efforts. Avro Canada was instead put back on a military footing and the Jetliner project was cancelled in 1951.
Efforts instead now focused on the CF100 Canuck. This was a twin engined all-weather interceptor whose primary role was to take on Soviet nuclear bombers in the event of the Cold War turning hot. Between 1950 and 1955 692 aircraft were built. The prototype Mark 4 variant broke the sound barrier in a vertical dive in the hands of Battle of Britain veteran turned Avro test pilot Janusz Zurakowski. Some Canucks continued to serve in a training role with the RCAF until 1981.
 CF100 Canuck
The Canuck was rapidly rendered obsolete by the appearance of jet powered bombers and a replacement was required. This was to be the CF105 Arrow. The Arrow was designed to meet a demanding list of specifications set down by the RCAF which no existing or planned aircraft anywhere in the world could meet. The Arrow would be required to reach Mach 1.5 in level flight, reach an altitude of 70,000 feet and perform 2G turns at supersonic speed. Avro's charismatic president Crawford Gordon committed the company to meeting the requirements and doing so with an all-Canadian designed and built aircraft. The Arrow would be powered by the new Iraquois engine built by Avro's engine subsidiary Orenda. It was an incredibly ambitious approach. The airforce were suitably convinced however and $236 million of Canadian taxpayers' money was stumped up for the development of the aircraft and the delivery of 35 operational Arrows.
Despite setbacks, the first cutting edge aircraft rolled out on 4th October 1957 and an intensive programme of testing commenced. Due to complications with the engine development, the Iraquois engine would not be fitted in an Arrow until the sixth prototype. The Arrow achieved close to Mach 2 using the stand in Pratt and Whitney engine. With the lighter, more powerful Iraquois it was expected to break all records for speed and altitude. Sadly, it would never get the chance and the all Canadian Arrow would never fly.
 CF105 Arrow
The Arrow programme would fall victim to a combination of events. The ousting in 1957 of the Canadian liberal government by their conservative rivals, who were determined to cut military spending did not bode well for Avro and the spiralling costs of the engine programme did not endear them to the new administration. The death blow however came on the very same day that the first Arrow rolled out of the hanger. For this was the day that Sputnik was launched.
Sputnik changed everything. All at once the world had entered a rocket age and what use now was an overpriced jet interceptor designed to shoot down bombers? Under the 1957 NORAD defence agreement the US committed to supplying Canada with the new Bomarc surface to air missile, itself an untested and ultimately unreliable design. Whilst the government dithered over its defence options the Arrow programme continued for another year but in February 1959 the plug was pulled on the Arrow. It was a catastrophic blow for the Canadian aviation industry and wider economy and spelled the end of Avro Canada. By this time Avro Canada employed almost 15,000 people on production of the Arrow, all of whom were immediately laid off. Perhaps as many again working for subcontracted companies also lost their jobs as a result of the cancellation of the Arrow programme. The lack of prospects resulted in a brain drain of Canada's best and brightest to the US. Many of the top engineers at Avro left the country for good and found roles in the US aerospace industry. Several members of the Arrow design team went on to work on the US Space Programme.
Despite interest from Britain and the US in purchasing the six completed Arrows, on the orders of the Canadian government they were cut up in an act of short sighted vandalism and all related material was destroyed. The Arrow had been a source of immense national pride in Canadian technological achievement. Now it seemed the Canadian government wished to obliterate its memory altogether.
 Artist's impression of the Avrocar in action
The Arrow was not the most advanced of Avro Canada's projects. Tucked away in an old building on the Malton site was the Special Projects Group headed up by maverick engineer John 'Jack' Frost. With funding from the US army and air force, Frost and his team developed the flying saucer-like Avrocar. It was intended to serve as a kind of flying jeep, hovering on a cushion of air, capable of flying over the landscape at 300mph or soaring to a height of 10,000 feet. In the event, problems with stability restricted it to a modest 35mph at no more than 3 feet off the ground. The project was cancelled in 1961 and Avro Canada closed its doors shortly after. They had dared to dream, but reality can be cruel to dreamers.
Vera the Canadian Lancaster
http://www.warplane.com/vintage-aircraft-collection/aircraft-history.aspx?aircraftId=4
Lancaster Mark X
http://www.lancaster-archive.com/lanc_postwar-canada.htm
Documentaries on Avro Canada
http://wn.com/avro_canada
August 5, 2014
Trumpeting Death - Elephants in Battle
They were the tanks of the ancient world. The war elephant was a formidable weapon in the arsenal of many ancient armies. They were capable, when properly handled, of causing devastation to the ranks of an opposing force, terrifying men and horses and trampling all resistance under foot. There seem to be as many examples however, of elephants becoming a liability on the battlefield as there do of them playing a decisive role in victory. In some cases elephants have indeed played a decisive role in the defeat of the side that deployed them in the first place. The Roman historian Livy described elephants as a genus anceps; an untrustworthy species, as if the elephants themselves harboured treacherous designs, rather than simply becoming terrorised in the midst of battle and running amok when they were overcome by fear and pain.
We first meet elephants in western historical accounts during the conquests of Alexander the Great. Elephants were deployed by the Persians at Gaugamela but seem to have had little impact on the battle. When Alexander reached India however, war elephants in their hundreds were arrayed against him. At the battle of Hydaspes in 327 BC against the rebellious Indian potentate Porus, Alexander's troops were able, by presenting the Indian battle elephants with a wall of spears and showering them with arrows and javelins, to drive them back upon their own side.
 Raphia 217 BC
During the interminable wars of the successors following Alexander's death, war elephants made their way westwards with the army of Seleucus, who had obtained five hundred of the beasts from the Indian conqueror Chandragupta in return for ceding a swath of Alexander's conquests beyond the Indus. These would prove useful in the pivotal battle of Ipsus in 301 BC, helping to seal the fate of the Antigonid cause and establish the Seleucids as rulers of the east.
The Seleucids of Asia and the Ptolemies of Egypt would clash repeatedly in Syria and Palestine. At the Battle of Raphia in 217 BC the armies of Antiochus III and Ptolemy IV fought each other in what is the only known clash of African and Indian elephants. The Egyptians had the better of the battle with the 102 Asian war elephants of Antiochus seeing off Ptolemy's 73 Asian elephants. For a long time it was assumed that Ptolemy's force of elephants were north African forest elephants, a smaller, now extinct species native to northern Africa. Mitochondrial DNA research however, published in January of this year showed that the elephant population in Eretrea from where the Ptolemaic armies sourced their pachyderms, are descended from African savanna elephants. This begs the question as to why the larger African elephants were bested in battle. Perhaps the Asian elephants were better trained or better handled on the day?
The Romans first encountered elephants in the armies of Pyrrhus of Epirus during his invasion of Italy in 280 BC. Pyrrhus had just twenty battle elephants but they made quite an impression on the Romans who had never seen such terrifying beasts before. Nevertheless with typical ingenuity the Romans attempted to thwart the war elephants of Pyrrhus, albeit with limited success. At the Battle of Asculum the Romans came up with an ingenious counter to Pyrrhus’ elephants, adapting carts into mobile fortresses, filled with troops armed with missile weapons and protected by wicker screens. The carts were fitted with catapults which threw burning missiles at the elephants. This innovation ultimately proved to be of limited use as the troops mounted in turrets atop the elephants were still able to pick off the troops in the carts, which were then reduced to matchsticks by the enraged beasts.
Pyrrhus' victories over the Romans turned out to be, well, Pyrrhic and his Italian campaign ended in failure.
 Elephants had their limitations as Pyrrhus found when he returned to Greece and attempted to the roll over the defences of Sparta with his elephants. A line of carts buried up to the axles and defended by the determined populace was sufficient to drive Pyrrhus off. He met his end in 272 BC in street fighting in Argos when he was felled by an old woman who hurled a roof tile at him. Ironically his troops were prevented from entering the city as quickly as they would have liked when one of his war elephants became stuck in the city gate.
The Romans most famously encountered elephants fighting against the Carthaginians. During the brief Roman invasion of Africa in 255 BC the forces of Marcus Attilius Regullus were comprehensively routed when the Carthaginian elephants sewed panic in the Roman ranks.
The beasts used as war elephants by the Carthaginians were most probably north African forest elephants. They were known to be more tractable than the African savannah elephant but still big enough to cause devastation in the ranks of the enemy when unleashed in a thundering, trumpeting charge.
Elephants required a great deal of care and fodder to keep them going but were well worth the trouble if they could be used successfully. In order to put them in a suitably foul mood the elephants were fed figs and given alcohol before battle. The figs caused diarrhoea which made the animals irritable and the alcohol fuelled their irritability and made them aggressive. All that then remained was to point them at the enemy and let them take out their drunken annoyance at the state of their bowels on the hapless enemy soldiers who were barged and trampled underfoot. Of course once in this state of mind, elephants had little concern for whether it was the enemy they were flattening or their own side, and if they could be driven off with missile weapons, they could just as easily turn and run amok amongst their own troops. Against this eventuality the Carthaginian mahouts carried a metal spike and a hammer and could if necessary drive the spike through the top of their elephant’s skull in order to kill it to prevent casualties by ‘friendly’ trampling.
Hannibal most famously deployed elephants against Rome. Having achieved the remarkable feat of getting a force of war elephants over the Alps, of which fifteen out of thirty survived to make it into Italy, he deployed them with great success at the Battle of the Trebia where they crashed through the allied infantry on the Roman wings. In the following months however, all but one of Hannibal's elephants succumbed to disease, highlighting the difficulty of keeping them fed and healthy on campaign.
 Hannibal crossing the Rhone
Hannibal's last battle against the Romans at Zama in 202 BC demonstrated once again the dangers of elephants being turned back against their own side. Hannibal's opponent Scipio formed up his army in the usual triplex acies formation although as a counter to Hannibal’s eighty war elephants which were waiting to wreak havoc in his ranks, he abandoned the quincunx deployment and instead placed his maniples directly behind each other, leaving wide lanes through which the charging beasts could pass harmlessly. Veliteswere stationed ready to shower the elephants with pila and the opening Carthaginian attack came to little as the elephants naturally chose the path of least resistance and lumbered straight into a lethal storm of missiles. As the elephants nearest the flanks were driven back by volleys of pila they turned and stampeded back towards their own cavalry, causing panic and disorder. Immediately seizing the opportunity, Scipio's ally, the Numidian king Massinissa launched an attack on the cavalry opposing him and the Roman cavalry on the other wing followed suit. The result was a rout of the cavalry on both wings of Hannibal’s army, leaving his infantry to be carved up by the Romans in a long and bloody fight.
The use of elephants against them by their most terrible enemies Pyrrhus and Hannibal resulted in a deep mistrust and dislike of the beasts by the Romans. The Roman mob took particular delight in seeing elephants humiliated and slaughtered in the amphitheatre. Despite their reservations they did make some use of elephants themselves, most notably using a force of elephants loaned to them by Massanissa to shatter the Macedonian flank at Pydna in 168 BC.
Rome's ambivalent relationship with the elephant is perfectly illustrated by this incident related by Pliny the Elder in which Pompey, as part of his triumphal celebrations of 55 BC, attempted to stage a re-enactment of the battle of Zama. On this occasion the fickle Roman mob, instead of delighting in the suffering of the elephants, took pity on them. It is interesting that Pliny, understanding that elephants were highly intelligent animals, actually credits them with appealing to the sympathy of the crowd.
Twenty elephants fought in the Circus against men armed with javelins. The battle waged by one elephant was remarkable. When its feet had been pierced through, it crawled on its knees against its human opponents, snatched their shields, and threw them in the air. The spectators experienced pleasure when the shields, as they fell to the ground, made a loop, as if thrown by design, not by the rage of the huge animal. The elephants attempted to break out from the iron barricades which surrounded them, and this caused anxiety among the people. But when the elephants had lost hope of escape, they sought the compassion of the crowd and supplicated it with an indescribable gesture and bewailed their fate with a kind of lamentation. In contradiction to Pompey’s plan the wounded elephants were pitied by the people when they stopped fighting and walked around and stretched their trunks toward heaven. In fact, there was so much grief among the people that they forgot the generosity lavished in their honour by Pompey and, bursting into tears, all arose together and invoked curses on Pompey for which he soon paid the penalty.
 Elephants in the arena
Like the Romans, when the armies of Islam set out to conquer the Sassanid Persian Empire, they were confronted for the first time by battle elephants and daunted by these terrifying beasts. At the Battle of the Bridges in 634 AD the Persian elephant corps played a decisive role in driving back the Arab forces. Arriving on the banks of the lower Euphrates, the Muslims found themselves faced with a Persian army complete with war elephants drawn up on the opposite bank. Undeterred, they charged across the river into withering Persian arrow fire but their horses baulked at the unfamiliar scent of the elephants and they were driven back. The Muslims continued fighting on foot against the advancing beasts but when their commander was trampled to death they lost heart and were routed with heavy losses as they fled back across the river. So ended the first Muslim invasion of the Persian Empire.
Two years later when the Persians and Muslims clashed once more at Qadisiyyah,the Persians began with the same tactics which had won the day at the Battle of the Bridges, driving forward with their battle elephants supported by archers. The Arabs however had learned from their previous defeat and had developed tactics for dealing with the elephants. As before the Arabs’ horses took fright but the infantry stood firm. Fighting with spears they stabbed at the elephants’ eyes and drove them back, whilst swordsmen risked a trampling by getting in close and cutting through the straps that held the howdahs in place upon the elephants’ backs to send the archers mounted atop them tumbling to the ground. The elephant corps sat out the second day of the battle, which was fought to a stalemate, repairing their gear.
The third day of battle was the fiercest yet and the Persians, having repaired their equipment once more, sent their elephants into battle. Just as before the Arabs were able to stand their ground, closing in fearlessly and urging each other on into ever bolder feats; hacking off trunks and jabbing spears into the elephants’ eyes, cutting the howdahs loose and once more creating havoc by sending the poor enraged beasts running amok. The battle started to swing the Arabs’ way but the fighting prowess of the Persians prevented them from gaining a decisive upper hand and once more the armies parted with the outcome of the battle still hanging in the balance. On the final day of the battle, with the elephant corps finished as a fighting force, the Arabs carried the day when the Persian commander Rustam was slain.
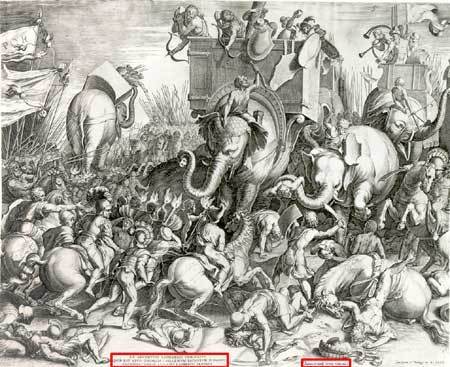 Zama 202 BC Porus, Pyrrhus, Hannibal and Rustam had all found that battle elephants were highly effective against enemies who had not faced them before but that once their opponents got over the initial 'shock and awe factor' they would devise tactics to counter elephants. They were consistently able to terrify the mounts of the opposing cavalry, but disciplined infantry protected by missile troops could hold their ground and potentially drive the elephants back upon their own side with disastrous consequences. They were to be deployed, in modern health and safety parlance, at the users own risk.
DNA evidence for Ptolemaic war elephants
http://www.sciencedaily.com/releases/2014/01/140109180312.htm
Elephants and the Romans
http://www.concentric-literature.url.tw/issues/Animals/1.pdf
Like a good battle - check out The Battles are the Best Bits
http://www.amazon.com/The-Battles-Best-Bits-ebook/dp/B008GT05IY/ref=sr_1_2?ie=UTF8&qid=1362998006&sr=8-2&keywords=the+battles+are+the+best+bits

July 23, 2014
Fall of Empires
Slings and Arrows Blog has been somewhat less prolific of late. The reason for this is not due, I assure you Dear Reader, to any loss of historical passion on my part but rather I have been busy adding the finishing touches to my first work of fiction, Fall of Empires.
 Can love survive the Fall of Empires?
Anna and Theo have been promised to each other since they were children. They thought that they would always be together, but the tides of war will sweep them apart. Whilst Theo finds himself at the centre of events in the epic struggle between the empires of Byzantium and Persia, treachery results in Anna being condemned to the life of a concubine in a far-off land. Can they ever be reunited?
Fall of Empires is a fast-paced historical fiction tale which takes place against the backdrop of the last war between Byzantium and Persia. It follows the fortunes of its two young protagonists as their home city of Antioch falls to the forces of the King of Persia commanded by the charismatic general Shahrbaraz. Along with the emperor Heraclius, Shahrbaraz is one of the key historical figures in the story which is a blend of fact and fiction. The war itself was an epic affair and provides many great set pieces for the action in Fall of Empires. Here is the historical version of events. The Persian War of 602 - 627
The catastrophic twenty five year conflict between Persia and Byzantium, during which Fall of Empires is set, was sparked by the murder of the emperor Maurice in 602 AD. The ruinous conduct of his predecessor Tiberius II had forced Maurice to operate his armies on a shoestring budget with ultimately disastrous consequences. The army in the Balkans mutinied and marched on Constantinople with the renegade centurion Phocas at their head, demanding the abdication of Maurice. For the defence of the city Maurice had looked to the Blues and Greens. The chariot racing factions were common to all the major cities of the empire and incorporated a hard core of supporters who were relied upon as an urban militia if the city was threatened. At other times however they could be beyond the control of the authorities and mob violence ensued with supporters of both factions taking to the streets. Both factions were fickle in the extreme. They were unwavering only in their hatred of each other and they loved nothing better than a good riot. As the rebel army had approached the city and the Blues had dutifully manned the walls, the Greens had decided instead to throw their lot in with Phocas and the city was taken. Maurice was forced to watch as his sons were beheaded one by one in front of him before being dispatched in turn and his body flung into the sea.
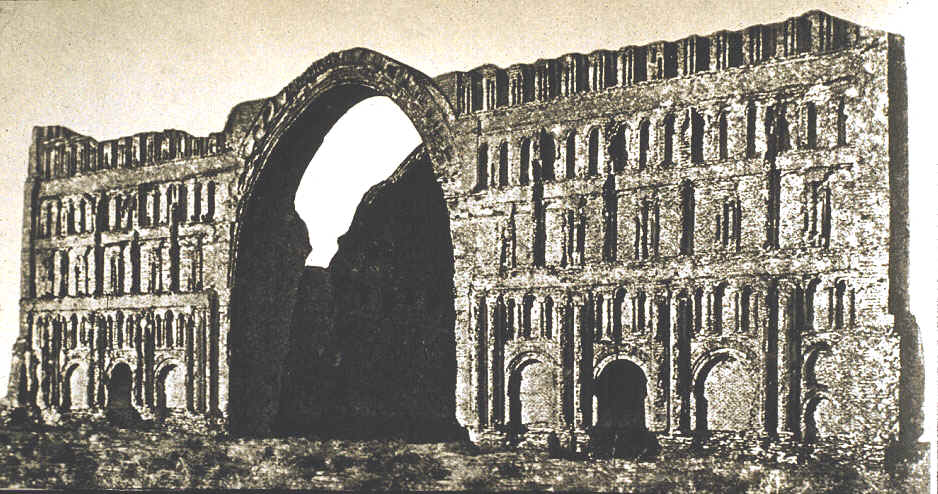 Ruins of Khusrow's palace at Ctesiphon
When news of Maurice’s murder reached the court of the Persian king Khusrow II it was met with predictable outrage. Khusrow owed Maurice nothing less than his throne, having been driven from Persia by the rebellion of the general Bahram Chobin who had then claimed the crown. With Maurice’s support, Khusrow had regained his throne but the manner in which he had done so and the high price that he had paid in territorial concessions had made him deeply unpopular. Nevertheless his personal sense of honour and the genuine gratitude and affection which he felt towards his benefactor Maurice had prevented him from seeking to regain the surrendered territories or breaching the peace with Byzantium whilst the emperor lived. Refusing to see the ambassadors sent from Constantinople, the King of Persia declared war upon the usurper Phocas and advanced at the head of his forces with the city of Dara as his first objective. At his side was a man who claimed to be a surviving son of Maurice named Theodosius but who was most likely an imposter as the real Theodosius is thought to have perished along with his siblings. It was hoped that his presence would tempt Byzantine forces to rebel against Phocas on behalf of the legitimate heir and the commander of the Edessa garrison did just this.
Dara fell in 604 and for the next six years Persian generals moved at will through Byzantine controlled Mesopotamia and Armenia capturing the key cities which protected the frontier whilst Phocas seemed intent on alienating his own subjects to such an extent that many would welcome the invaders as liberators.
The murder of Maurice and his family had been just the beginning of the reign of terror which Phocas unleashed upon his unfortunate subjects. All those who had been close supporters of Maurice or whose loyalty was suspect were arrested, tortured and executed. The new emperor had also for reasons unknown embarked upon a widespread persecution of the Jews who made up a significant proportion of the population of the eastern provinces and who now looked to Khusrow for their protection. Despite his best efforts, Phocas could not purge everyone who might oppose his rule. In 608 Heraclius the Elder, Exarch of Carthage, began to raise a rebellion against Phocas. The exarch dispatched a fleet towards Constantinople under the command of his son Heraclius the future emperor. He also dispatched a land army commanded by his nephew Nicetas which marched along the North African coast to capture Alexandria. In 610 with Egypt safely in rebel hands, Heraclius the younger sailed into the harbour of Constantinople known as the Golden Horn at the head of a mighty fleet. He arrived to scenes of rioting as the factions abandoned Phocas. Phocas was arrested and rowed out to Heraclius’ flagship where victor and vanquished confronted each other before the usurper was executed. On the very same day Heraclius was both crowned and married in the church of St Sofia.
 Heraclius emperor of ByzantiumMeanwhile the war with Persia continued. Refusing to receive Heraclius’ ambassadors or to acknowledge him as a rightful emperor, Khusrow declared that the legitimate Byzantine succession had died with Maurice. The pretender Theodosius was now forgotten and the generals Shahin and Shahrbaraz were ordered to drive the Greeks into the sea, with the former heading north into Cappadocia and the latter west into Syria. These regions, as Khusrow well knew, were ripe for the taking. The Byzantine forces which remained on the eastern frontier were ill equipped and demoralised and the civilian population felt little loyalty towards the regime in Constantinople.
 Shahrbaraz swept through Syria in 611 whilst Shahin captured the Cappadocian city of Caesarea where he was besieged by Priscus. Rather than endure a siege, Shahin simply put the city to the torch and managed to break out and escape southwards unhindered.
Along with Nicetas and his brother Theodore, Heraclius then took command of the Byzantine forces in Syria in 613 but they were no match for the combined forces of the two Persian generals and their army was crushed in a battle fought close to Antioch. Following this defeat, the eastern provinces of the Byzantine Empire were left virtually defenceless. Antioch fell in the aftermath of the battle with the Blues and Greens offering fierce resistance.
The fall of Jerusalem in the following year was a great calamity for Christendom and there were many who saw God’s wrath and the coming of the end of days in these shocking events. The recovery of both the city and the true cross became key objectives for Heraclius. Following the uprising, Shahrbaraz had sacked the city, enslaved the populace, burned down the church of the Holy Sepulchre and taken away the precious relic of the True Cross which was sent to Ctesiphon for safe keeping.
Meanwhile Shahin once more struck deep into Anatolia, capturing Sardis in 616 and raiding all the way to the eastern shore of the Bosphorus within sight of Constantinople itself. By 619 resistance in Egypt had crumbled and Alexandria fell to Shahrbaraz. Its defender Nicetas fled by ship, bringing what treasure and holy relics he could with him.
Money was in short supply and Heraclius was forced to turn to the church in search of capital. In this he had a willing ally in Patriarch Sergius who was prepared to countenance the stripping of silver plate from Constantinople’s churches and its melting down into hard currency. In 623 Heraclius sought to secure a peace agreement with the Avars. These efforts almost ended in disaster but for the discovery just in time of an Avar plot to capture Heraclius. The emperor was forced to flee back to Constantinople with a rampaging barbarian horde hot on his heels ‘with his crown under his arm’. In spite of this perfidy Heraclius persisted with peace efforts and succeeded in securing a truce.
The year 624 saw Heraclius once again take command of his troops and then lead them on a bold expedition into Persian controlled Armenia. With the majority of his forces far away occupying Byzantine territory, Khusrow himself was in command in the town of Ganzak which protected the northern approaches to the Persian heartland. With Heraclius’ forces bearing down on him, the Persian king lost his nerve, abandoned the town and fled southwards. Close to Ganzak was the site of the Persian’s most sacred fire temple. Heraclius now presided over the vengeful destruction of this temple in direct retribution for the fate of the Holy Sepulchre in Jerusalem.
 Seventh Century Byzantine icon depicting the triumph of Heraclius over Khusrow
Early in 625 three Persian armies advanced towards Heraclius’ army intent on its destruction. Heraclius knew that if the Persians joined forces he would be hopelessly outnumbered and so began a game of cat and mouse through the mountain passes and valleys of Armenia with the emperor always one step ahead of the pursuing Persians. Coming across favourable ground, Heraclius chose to turn and fight was able to take on two of the Persian armies piecemeal, destroying one and killing its commander and badly mauling the second under the command of Shahin in two engagements.
Following his victories Heraclius set off back towards his own territory with the army of Shahrbaraz in pursuit. Heraclius was able to dish out further humiliation upon the Persians by launching a daring night attack on Shahrbaraz’s camp. The Persian general was forced to flee, leaving his baggage in the hands of Heraclius.
Shahrbaraz caught up with Heraclius on the Saros River in Cilicia and enticed the Byzantine cavalry into crossing the river before springing a trap. Disaster was only averted by a piece of conspicuous gallantry from the emperor himself who spurred his horse onto the bridge at the head of his counterattacking troops. His bold actions that day are related by the Byzantine monk Theophanes the Confessor, who wrote his chronicle some two centuries later.
Theophanes relates how Heraclius, mounted upon his valiant warhorse Dorkon, charged across the bridge where a giant of a man stood barring his path. Heraclius knocked the man into the river and continued his charge unchecked, causing panic amongst the Persians who, we are told, jumped into the river like frogs. Reaching the far end of the bridge with just a few companions, the emperor laid about him fearlessly with his sword, ignoring the swarms of arrows which were loosed his direction. Shahrbaraz could only look on in admiration and praised the boldness of Heraclius, who fought on despite receiving several wounds. Under such inspirational leadership the Byzantines carried the day and the Persians withdrew. Shahrbaraz is said to have exclaimed to a Greek collaborator named Kosmas; ‘Look at your emperor, he spurns their blows like an anvil!’
In 626 the feared alliance between the Persians and the Avars finally materialised. The year began well when a Persian army under Shahin was met and defeated in a battle fought in a driving hailstorm by forces under the command of Heraclius’ brother Theodore. Following this defeat Shahin took his own life rather than face the wrath of Khusrow who is said to have had his corpse flayed. Shahrbaraz meanwhile now proceeded with his army towards Constantinople, to which a great horde of Avars led by their khan in person was now laying siege. The emperor had elected to remain with his army from where he could continue to threaten an invasion of Persia and so the defence of the city was left to the Master of Soldiers Bonos, ably supported by Patriarch Sergius.
From the Asian side of the Bosphorus there was little that Shahrbaraz could do to threaten the city directly and so it fell to the Avars to make the first attempt against it, storming the Theodosian Walls using siege towers from the landward side. Much as they are dismissed as barbarians, the Avars are credited with introducing two key military innovations to the west in the form of the stirrup, which was adopted by both Roman and Persian heavy cavalry, and the trebuchet. Tens of thousands of Avar warriors swarmed against the walls but were beaten back by the twelve thousand defenders made up of those troops whom Heraclius could spare from his army bolstered by the Blues and Greens who were united against a common foe. In spite of repeated Avar attacks the defences were not breached and the attackers slowly ran out of steam whilst the defenders drew courage from the knowledge that they fought under the protection of the Virgin Mary, whose image was carried daily around the walls by the Patriarch Sergius.
 This icon in the possession of the Russian Orthodox Church is claimed to date from the siege of 626
The Avars and Persians now hatched a new plan. Whilst the Avars once more launched an attack against the walls at Blacharnae, an amphibious force would cross the Bosphorus under cover of darkness with rafts to pick up elite Persian troops and ferry them across to the other side where they could join in the attack. Meanwhile, an allied Slavic force would launch an attack in dugout boats across the Golden Horn in an attempt to storm the Sea Walls and keep the defenders occupied. The Byzantines however were forewarned, having captured the Persian ambassadors attempting to cross the straits back to their own lines and tortured the details of the plot out of them before beheading them and catapulting their heads at the enemy. The assault was doomed to failure and the Byzantine fleet which was lying in wait made short work of the flimsy craft which the Avars had assembled as they tried to cross the straits.
With their dastardly plans foiled, the Avars torched their siege machines along with anything else which would burn on their side of the Theodosian Walls and tramped away. Shahrbaraz stayed put but his failure to make much of an impression on the enemy capital had not impressed Khusrow, who felt that perhaps his general was not trying as hard as he might and that perhaps his loyalty was suspect. Khusrow therefore decided to remove Shahrbaraz with unexpected consequences. In another crucial interception of enemy communications, the messenger carrying Khusrow’s secret orders for Shahrbaraz’s second in command to arrest and execute Shahrbaraz fell into Byzantine hands. Heraclius can hardly have been able to believe his luck on receipt of this message and promptly forwarded it on to Shahrbaraz with his compliments in the hope of precipitating a revolt against Khusrow. Shahrbaraz was most grateful for this piece of intelligence but uncertain of the loyalty of his men. He therefore doctored the contents of the letter so that it ordered not only his own death but those of four hundred other Persian officers as well before revealing its contents to his outraged soldiers. This had the desired effect and neutralised a large proportion of the forces available to the Persian king. Whilst not resorting to open rebellion, Shahrbaraz and his army would make no further move against Constantinople. Nor would they lift a finger to assist Khusrow in the event of a Byzantine invasion of Persian territory. Shahrbaraz moved his forces into Syria to sit out the rest of the war and await developments, thereby swinging the balance of power dramatically towards Byzantium.
 A traction trebuchet in action depicted in the Madrid Skylitzes
Heraclius waited out the summer of 627 in Armenia before launching his invasion into Mesopotamia as the cooler weather arrived. The Byzantine advance was slow and deliberate, looting, burning and destroying as it went, underlining the inability of the Persian king to protect his subjects. As before, Heraclius’ every move was dogged by a Persian army commanded by a general named Rhazates.
Keen to bring Rhazates to battle before further Persian troops could arrive, Heraclius elected to turn and fight upon reaching the ruins of ancient Nineveh, where the broad plain lent itself to a cavalry battle. Details of the battle are frustratingly scant but it seems likely that the Persians were outnumbered. There is an account of a Savaran champion challenging the emperor himself to single combat. We are told that Heraclius struck off his opponent’s head with a single stroke. The emperor then fought a further two victorious duels, being slightly wounded in the last.
Following the duels the Persians attacked; forming their cavalry into three wedges in the hope of driving through the Byzantine formation. Heraclius’ heavy cavalry were a match for their Savaran rivals however and their lines held. The Persians now found themselves enveloped as the Byzantines attacked the flanks and rear of their formations. The fighting went hard and the battle continued until darkness fell, by which time the Persian force had been all but annihilated and the survivors withdrew into the nearby hills. Amongst the Persian dead were Rhazates and most of his officers.
Victory at Nineveh spelled the end of effective Persian resistance. The road to Ctesiphon now lay open and Heraclius resumed his steady and destructive advance, laying waste to everything in his path and taking particular pleasure in burning Khusrow’s palace at Dastagard to the ground. The soldiers feasted on gazelle and ostrich from the royal hunting park. For Khusrow the game was up and he soon fell victim to a palace conspiracy orchestrated by Shahrbaraz. Khusrow was confined to a prison known as the House of Oblivion. The king is said to have been left to starve surrounded by treasures piled up around him. He was succeeded by his son Kavad. When he heard of these developments, Heraclius immediately called off his advance on Ctesiphon and began the long march home. Peace terms were soon agreed, with Shahrbaraz playing an instrumental role in the negotiations. Prisoners taken by both sides were released and the Byzantine territories in Syria, Palestine and Egypt were returned as were the holy relics looted from Jerusalem.
 A later Persian depiction of the murder of Khusrow
The relationship between Shahrbaraz and Heraclius grew closer over the course of their negotiations to the extent that a marriage alliance was agreed between the daughter of Shahrbaraz and Heraclius’ eldest son Heraclius Constantine. The Persian general, whose wife was a Christian, may even have embraced Christianity himself. When the short-lived Kavad who had already killed off most of his male relatives died and was succeeded by his infant son Ardashir, Shahrbaraz made his move and seized power. It seemed that an era of far more friendly relations between the two empires had dawned. This was not to be however and Shahrbaraz was soon assassinated by conservative elements at the Persian court and his body was dragged through the streets of Ctesiphon. The death of Shahrbaraz saw the end of strong and effective Persian kingship. Within a decade of his death, the Persian empire was no more, swept aside by the Arab conquests.
Heraclius died in 641. Death when it came to Heraclius must have been a merciful relief after years of painful and debilitating illness during which he had seen all of his life’s achievements undone by the advent of Islam and the onslaught of the Arab conquests which overwhelmed those lands he had fought so hard to regain. He nevertheless deserves to be remembered as one of the greatest of Byzantine emperors who had pulled the empire back from the brink of disaster and but for his intervention it is questionable whether the empire would have survived at all.
So that's the history. In writing Fall of Empires I have sought to feature many of the key moments described above and bring this incredible period to life.
Fall of Empires is available now on Amazon Kindle
http://www.amazon.com/Fall-Empires-Simon-B-Jones-ebook/dp/B00M0MOR2I/ref=sr_1_1?s=digital-text&ie=UTF8&qid=1406103586&sr=1-1

June 19, 2014
Anatomy of an Empire
As Iraq slides into turmoil once more to the dismay of the West, this particular post, which I hadn't written with the specific intention of drawing a parallel with the present, nevertheless serves as a reminder that this volatile region has been a seat of conflict from the earliest days of Islam. The Arab conquests resulted in a vast territory coming under the rule of the caliphs. One family, the Umayyads, would seek to make the caliphate their own but they would not go unchallenged. It took a remarkable partnership to forge a dynasty and an empire. Whilst the Umayyad Caliphs chose to base themselves in Syria where they enjoyed their strongest support, it soon became apparent that a strong controlling hand was needed in Iraq in order both to maintain and project the power of the caliphs over their territories. This is primarily the story of two men, Caliph Abd al Malik and his governor of Iraq Al Hajjaj, who reunited the fragmented lands of Islam and then launched the second great expansive phase of the Arab conquests.
In 685 AD the thirty nine year old Abd al Malik succeeded his father Marwan as Umayyad Caliph. Few rulers have inherited such a challenging and unpromising situation. At the time the young Muslim world was riven by strife. Abd al Malik’s father Marwan had established himself as caliph in Damascus only after a bloody struggle between rival Syrian tribal factions and his rule had not been recognised beyond this traditional Umayyad powerbase. The principle of hereditary succession was far from universally accepted and many contended that the caliph as successor of Mohammed and political and spiritual leader of Islam should be chosen for his demonstrated piety and meritorious conduct as much as for any claim based on bloodline. The Umayyads were an old and illustrious family but in Islamic terms they lacked pedigree.
 At Siffin in 657 Ali clashed with Muawiya - founder of the Umayyad Dynasty
In Iraq especially the veneration in which the fourth caliph Ali, his martyred son Husayn and their descendants were held by many ensured that there would be repeated uprisings launched in the name of the family of the Prophet. Belief in their unassailable right to lead the Muslims, condemnation of those who had usurped that right and sorrow at their unjust killings would become the cornerstone of faith for what would evolve into the Shi’ite branch of Islam.
In the old country meanwhile, those families in Mecca and Medina who felt sidelined in the affairs of the Muslim world by a Syrian based Umayyad dynasty had recognised a rival claimant to the caliphate by the name of Abd Allah ibn Zubayr. Marwan had succeeded in wresting control of Egypt from ibn Zubayr but the rest of the Muslim lands were ranged implacably against the Umayyads. Efforts to dislodge ibn Zubayr from Mecca had failed and by 687 the two key cities of Iraq, Kufa and Basra were also under his control.
Such then was the challenge that faced Abd al Malik. From these unpromising beginnings he would forcibly unite the caliphate under his rule and would prove to be a remarkable ruler. It was Abd al Malik who truly secured the future of the Umayyad Caliphate as a hereditary dynasty.
His need to secure his frontiers in order to focus on his internal problems obliged the new caliph to agree to the continuing payment of tribute to Byzantium. He nevertheless did not entirely cease the campaigns against imperial territory and continued efforts to conquer North Africa. Abd al Malik could not afford to commit large forces to this campaign but honour demanded that some effort was made. The territory had been nominally conquered all the way to the Atlantic by the adventurous Uqba ibn Nafi, who had theatrically ridden his horse into the surf to mark the limit of his conquests. The Berbers had revolted however and Uqba had lost his head. The outpost of Kairouan which Uqba had founded in the Tunisian interior had been abandoned. In 688 the caliph sent a small expeditionary force to reoccupy the settlement. In a swift campaign the Berber leader Kusayla had been defeated and killed and the death of Uqba avenged. In the beleaguered Byzantine city of Carthage this was seen as an ominous development. The exarch decided to attempt to peg the Arab advance back again and dispatched his still formidable fleet eastwards along the Libyan coast to seize the key stronghold of Barqa. With his lines of communication threatened, the Arab commander had no choice but to lead his force back into Libya and attempt to retake Barqa but the Byzantine defenders hung on for a rare victory. The Arab expeditionary force was finished as a fighting unit and with more serious troubles closer to home, Abd al Malik could not afford to send more troops westward. The Byzantines in Carthage had ensured that they would survive for a few more years but by their actions they had altered the Arab perception of the threat that their presence posed. From being seen as an irrelevance that could be bypassed, they now presented a danger and this perhaps inadvertently hastened their eventual demise.
 19th century depiction of the Dome of the Rock At the commencement of his reign Abd al Malik had begun the construction of the Dome of the Rock in Jerusalem. This served to send a message to those in the old country who opposed the Umayyads. By emphasising the holiness of the Temple Mount in Jerusalem, as the scene of both Abraham’s willingness to sacrifice Isaac and of the Prophet’s ascent to heaven during his ‘night journey’ Abd al Malik challenged the primacy of Mecca as the focal point for Muslim devotion and created a rival religious site that lay within his own territories. In its construction the Dome of the Rock mirrored Byzantine design and building methods and its interior decoration was likely completed by mosaicists who had mastered their craft working on imperial projects, although the chosen imagery did not depict any human or animal forms in keeping with Islamic thought. The world’s first great Islamic building was completed in 691/2, ironically just as the motivation for its construction became a moot point.
In 691 a triumphant Abd al Malik entered Kufa, having also captured Basra and vanquished the brother of ibn Zubayr. A year later his forces captured Mecca and slew his rival for the caliphate, finally reuniting the lands of Islam under a single ruler. No sooner had Abd al Malik succeeded in reuniting the lands of the caliphate then a new challenge came from the Byzantine empire. When Justinian II rejected the caliph’s tribute and mounted an invasion of Armenia, Abd al Malik rose to the provocation and launched an invasion of Cilicia. Battle was joined at Sebastopolis in 692 and the Muslims advanced with copies of the defunct peace treaty attached to their spears. They were victorious when twenty thousand Slavic troops deserted the imperial cause and joined them. In the aftermath of this military disaster Justinian’s imprisonment of his commander Leontius sparked a revolt against him and led to his overthrow and exile.
With peace restored, Abd al Malik set about reordering his empire which was a melting pot of seething discontent. Conflict between those who had taken part in the original conquest of new territories and those who had arrived later wanting a slice of the spoils was at the heart of the problem. The original conquerors had established themselves as ruling elites, lording it over the native populations and later arrivals, taking the lion’s share of land and spending the revenues of the territories as they saw fit. They resented the interference of central government in their affairs and valued their independence. Meanwhile those who saw themselves as disenfranchised looked to the descendants of Ali as their champions rather than the Umayyad rulers in Syria and were a continual threat to stability. Abd al Malik’s approach was to reduce the influence of local elites by taking a strong grip on the reins of power. He appointed trusted family members as governors and gave the provinces far less freedom of action than they had enjoyed previously. Surplus tax revenues were to be forwarded to Damascus with no excuses. The caliph rather than the local elites would decide how money was to be spent in the provinces.
 Dirham issued in the name of al Hajjaj
To the most volatile region of his empire, the caliph sent his number one enforcer in 694. Al Hajjaj ibn Yusuf had fought in the campaign to re-conquer Iraq and had commanded the final successful assault on Mecca as well as fighting at Sebastopolis. He was a man possessed of utter ruthlessness as his willingness to wage war on the holy city demonstrated and also complete loyalty to the Umayyad cause. He would show himself to be an astute administrator and a military visionary who masterminded the second great territorial expansion of Islam in the reigns of Abd al Malik and his son Al Walid. Arriving in Kufa, al Hajjaj summoned the populace to the city’s mosque and subjected them to a harangue which left them in no doubt that he would take draconian measures against anyone who stepped out of line.
‘Oh People of Kufa,’ he told them. ‘Certain am I that I see heads ripe for cutting and verily I am the man to do it.’ Moving on to Basra he repeated his message, declaring, ‘And he whose conscience burdens his head, I will remove the weight of his burden, and he whose life has drawn too long, I shall shorten what remains of it.’ The new governor certainly had a way with words. Raising a force from both cities he led them out on a campaign of extermination against the Kharijite rebels who had refused to acknowledge Umayyad rule.
Under Abd al Malik the lands of Islam would become a more homogeneous entity, with Arabic as the official language of administration. Coinage was also standardised across his empire, with local variations being replaced by the silver dirham and the gold dinar, coins of standard weight and design. Al Hajjaj is credited with championing these developments. Taking heed, Abd al Malik grasped the important role that currency could play in conveying a message to his subjects and modelled his coins on the Byzantine example. Abd al Malik’s coins carried the image of the caliph upon them, proclaiming to every family who received the payment known as the ata, which was paid in exchange for past or present military service, that this munificence flowed from the caliph in Damascus. Later the images on the coins would be replaced by verses from the Koran. The Umayyad Caliphate was beginning to take on the form and appearance of a permanent imperial ruling dynasty.
 Gold Dinar of Abd al Malik
Abd al Malik and Al Hajjaj now turned their thoughts to territorial expansion, understanding that the best way to keep unruly elements amongst their subjects in line was to engage them in military campaigns far from home. Large armies were dispatched to both east and west. Beyond Iraq the lands of the caliphate extended to the borderlands of the old Persian empire. The province of Khurasan in north-eastern Iran, with its administrative capital in the city of Merv, was Islam’s wild frontier. To the east in the rugged and unforgiving highlands of what is now Afghanistan, the local rulers had rejected the overtures of the Muslims and remained defiantly un-subdued. A force dubbed the ‘Army of Destruction’ was sent into Afghanistan to defeat the fiercely independent inhabitants and soon found themselves on the back foot, fighting an implacable enemy who knew the terrain and made them pay for every forward step they took. Soon the Army of Destruction had been all but destroyed itself with the ragged survivors staggering back to civilisation half starved.
To the west in Ifriqiya there was greater success for in 698 the city of Carthage finally fell to the Muslims. Overwhelmed by the arrival of an Arab army of forty thousand before its walls, the city swiftly capitulated with little resistance and the Byzantine fleet sailed away unmolested. The taking of Carthage had been an easy victory for the Arabs but the Berbers once again were to prove to be the tougher opposition in Ifriqiya. Soon the Arabs were fighting a new insurrection led by a wild haired sorceress named Kahina, who instructed her followers to destroy every vestige of Roman civilisation that remained in order to render the territory valueless and therefore of no interest to the conquerors. As in the east it was proving to be the hardy mountain dwellers who provided the greatest resistance to the Arab conquest; willing to fight to the death in defence of their cherished independence and way of life. This time however the invaders were not driven out and the rebellion was eventually crushed.
In the east the need remained to avenge the fate of the Army of Destruction. A new force was therefore raised in Kufa and Basra with the additional intention of removing large numbers of malcontents from Iraq and dispatching them to the distant frontier where they could not make trouble. This new army was somewhat disparagingly known as the Peacock Army, in reference to the finery of its distinguished leaders who set out to win the glory to which they felt that their wealth entitled them.
By 701 the leaders of the Afghan expedition had concluded that they were on a hiding to nothing and instead chose to rebel against Al Hajjaj who had sent them there. Marching back to Iraq they defeated the local forces and successfully occupied Kufa whilst Al Hajjaj hung on in Basra and awaited reinforcements from the caliph. Once troops arrived from Syria Al Hajjaj inflicted a string of defeats on the Peacock Army and drove them back into Kufa where he besieged them. Unable to agree amongst themselves just what they were fighting for, the rebels were soon hopelessly divided and many deserted. Finally, abandoned by their leaders, they surrendered on the promise of an amnesty and Kufa was brought back into the fold. Despite this clemency towards the defenders of Kufa, Al Hajjaj executed around eleven thousand rebel prisoners as a grim lesson to other would be troublemakers. The governor garrisoned his force of Syrian troops, whose loyalty to the ruling regime in Damascus was assured, between Kufa and Basra from where they could respond swiftly to any unrest in either city. The privileges of the existing population were further eroded with the payment known as the ata being restricted only to those loyally serving in the army of the current ruler rather than being paid out to anyone who could claim descent from a participant in the original conquest. By these heavy handed means the most volatile region of the Arab world was tamed once more.
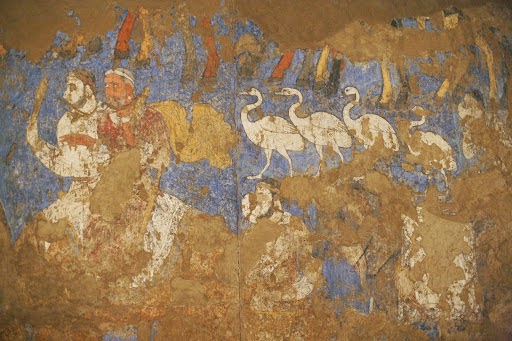 7th Century relief from Samarkand In 705 the Caliph Abd al Malik died and was succeeded by his son Al Walid in a peaceful and unchallenged transition of power which was testament to the achievements of his reign. Al Walid must have grown up somewhat in awe of Al Hajjaj and he gave the governor complete freedom of action in the eastern theatre. Al Hajjaj embarked on a bold programme of conquest, dispatching trusted and capable generals eastward to expand the frontiers of Islam. In Merv the arrival of Qutayba ibn Muslim galvanised the Arab forces. He called upon them to forget their intertribal squabbling and unite in the cause of jihad. Beyond the river Oxus to the north lay Soghdia. It was land of opportunity where petty kingdoms ruled over by merchant princes from the safety of fortress cities engaged in the lucrative caravan trade; bringing goods from China to the markets of Persia. The Soghdians were used to paying tribute to the Turks who controlled the caravan trade that passed through their lands and both raided and traded with the settled peoples as it suited them. The Arabs would have to defeat both if they wished to impose themselves on this land. It would be a campaign of setbacks and compromises. Local rulers accepted Arab overlordship only when faced with overwhelming force and the imminent destruction of their cities and then reneged on their tribute as soon as Qutayba was obliged to commit his forces elsewhere. The Turks meanwhile resented the Muslims’ attempts to muscle in on their territory and harassed Qutayba’s forces. The Soghdian potentates were happy to ally themselves with Arab against Turk or Turk against Arab or against each other as the situation demanded in order to safeguard their cities and commercial interests and Islam received only a lukewarm reception in the cities which were subjugated. Nevertheless steady progress was made. By 709 the city of Bukhara had been taken by force and garrisoned and a mosque constructed, which the locals were offered cash incentives to attend. Three years later Samarkand, the greatest city of Soghdia, suffered a similar fate, although in both cases the ruling dynasties remained in place as vassals of the Arabs. There was success too in the Afghan highlands where the ruler who had defied the Army of Destruction agreed to pay tribute. Qutayba then advanced north-eastwards to the headwaters of the Jazartes; the river which had marked the limit of Alexander’s conquests in this part of the world and which now marked the limit of Chinese influence. From here envoys were sent to the Tang court in China to establish peaceful relations.
 The conquest of Sind In 710 al Hajjaj sent another of his protégés, Mohammed ibn Qasim, the governor of Shiraz, to cross the fearsome desert of southern Iran and reach the Indus. Having captured the key city of Daybul; a nest of pirates whose activities had prompted the invasion, ibn Qasim went on to inflict a crushing defeat on the ruler of Sind, bringing much of what is now Pakistan into the territory of the caliphate. He sent the head of the ruler of Sind, who had been slain in battle upon his great white war elephant, to al Hajjaj as a gift.
A year later, with the armies of Islam having once more conquered the North African coast and reoccupied Tangier under Musa ibn Nusayr, an opportunity presented itself for Berber convert Tariq ibn Ziyad to take the Muslim conquest in a whole new direction. Having come to an agreement with the ruler of the small former Byzantine enclave of Ceuta to provide him with ships, Tariq crossed the straits which still bear his name; Gibraltar being derived from the Arabic Jebel al-Tariq or Tariq’s Rock, to land on the southern coast of Spain. Intervening in the Visigothic civil war which was raging at the time, Tariq soon turned the situation to his advantage and annihilated the armies of the Visigothic king Rodrigo. Following the rout of Rodrigo’s army, centrally organised resistance in Spain crumbled as the individual cities all looked to their own defences. This allowed them to be picked off piecemeal, making the task much easier for Tariq’s limited forces. The large Jewish population of the Spanish cities, who had endured vicious persecution under the Visigoths, welcomed the Muslims as liberators and eased their progress. Cordoba fell after a siege of three months whilst Toledo was abandoned to the enemy by the fleeing inhabitants. Reinforcements led by Musa landed in the following year and the subjugation of Al Andalus, as the Arabs would call their Spanish territories, continued at pace. Over the next five years the remnants of Visigothic resistance would be driven back into the north west corner of the Iberian Peninsula and here they were able to hold the line in what would survive as the Kingdom of Asturias. Al Walid now presided over an empire that stretched from the Pyrenees to the Indus.
 A medieval depiction of Tariq The deaths of both al Hajjaj the Caliph al Walid within a year of each other brought great upheaval. The accession of his al Walid’s brother Suleiman in 715 brought about a changing of the guard in the provinces as the new caliph looked to reward his closest supporters. Those who had achieved great deeds in advancing the cause of Islam to new lands were treated with monstrous ingratitude and brutality. Musa and Tariq, the conquerors of Ifriqiya and Al Andalus, were recalled to Damascus not to a heroes’ welcome but to disgrace and imprisonment. Mohammed ibn Qasim the victor of the Sind campaign was also imprisoned and tortured to death. It seemed that the new caliph feared that these conquerors would attempt to turn the lands they had subdued into their own personal fiefdoms and so they paid the price for their success. In Merv, Qutayba ibn Muslim also feared the worst but unlike his contemporaries he resolved not to meekly submit to the will of the caliph but instead attempted to lead his army back westward in revolt. His troops however were unwilling to take up arms against the Commander of the Faithful for the sake of their general and instead they angrily turned upon him and the conqueror of Transoxania was murdered by his own men. These events brought to a close the second great explosive phase of the Arab conquests. There was after all little incentive for the newly appointed governors to exert themselves in further conquests in view of the fate of their predecessors. A remarkable era was over.
 Dramatisation of al Hajjaj's address to the people of Basra
https://www.youtube.com/watch?v=sQiehZ8F5gQ
You may also enjoy: Justinian II - Mad, Bad and Dangerous
http://slingsandarrowsblog.blogspot.co.uk/2013/02/justinian-ii-mad-bad-and-dangerous.html
I was lazy for this article and reused material from my own book The Battles are the Best Bits, but if you liked it please check out the book. http://www.amazon.com/The-Battles-Best-Bits-ebook/dp/B008GT05IY
May 13, 2014
The Queen of Cities
It was the greatest city in the world and its people knew it.
From its founding by Constantine the Great in 330 AD as a new Rome in the East, through the monumental military efforts in the reign of the emperor Justinian in the Sixth Century to recover the Western Empire, to the desperate struggle of the fighting emperor Heraclius to hold back the tide of the Arab conquests, the rulers of Constantinople had unfailingly seen themselves as the inheritors and continuators of the Roman Empire. They had striven continually to assert their God-given right to rule as the pre-eminent sovereigns on earth even as their once great empire shrank and crumbled.
 16th Century icon depicting the final siege of Constantinople Constantinople nevertheless remained a city of marvels, a bastion of Christianity and a time capsule of a lost Roman civilisation which inspired wonder and envy in all those visitors who beheld it. Defiantly it had stood firm against the burgeoning Steppe nations pressing southwards from beyond the Danube frontier: Huns, Avars and Slavs had been turned back in despair by the mighty Theodosian Walls that protected the city on its landward side. The forces of the Umayyad Caliphs had been vanquished by the terror weapon of Greek fire and their great invasion fleets had burned in the waters of the Bosporus as they had sought to assail the city from the sea.
 It was to its superb location and defences that Constantinople arguably owed its survival into the Eighth Century AD. Constructed on the site of the ancient Greek city of Byzantium, Constantine’s new Rome occupied a horn-shaped promontory jutting out from the western shore of the Bosphorus. Protected on one side by the waters of the Propontis and on the other by the great natural harbour of the Golden Horn, the city presented an insurmountable challenge to any would-be besieger.
Approaching from the west, the visitor to imperial Constantinople would be immediately struck by the scale of the walls. Originally constructed in the Fifth Century under the auspices of the somewhat feeble Eastern Roman Emperor Theodosius II, the land walls of Constantinople would stand un-breached for a millennium. Not until the advent of gunpowder would they fail the city. Even the terrible Attila had turned away in despair at the sight of the walls that protected the capital of the Roman East.
 The Theodosian Walls The walls stretched for four miles across the neck of the peninsula from shore to shore, anchored by the massive defences of the Blachernae Palace beside the Golden Horn and meeting the sea walls at the formidable Tower on the Propontis. From these two points the Sea Walls surrounded the rest of the city. The land walls comprised three lines of defence. A moat sixty feet wide divided by a series of dams to maintain the water level across the undulating landscape was the first obstacle facing any would be attacker. Beyond this the outer wall rose thirty feet high and featured no less than 96 towers. Sixty feet behind the outer wall rose a second higher wall, forty feet in height and bristling with another 96 larger towers which were positioned in between the outer towers so as to provide a clear field of fire for the artillery stationed atop them. They were the last word in defensive engineering.
 Five principle gates led through the walls. On great occasions of state the southernmost of these was the gate of choice for making a grand entrance. The Golden Gate was constructed from white marble. Like the other gates of the city it was flanked by massive square defensive towers which were topped off by figures of winged Victory. Its ornate doors were covered with golden bosses and atop the gate was an ostentatious monumental quadriga drawn by elephants.
Passing through the Golden Gate the visitor would proceed along the main thoroughfare of Constantinople known as the Mese. This long colonnaded street led eastwards through the heart of the city towards the eastern tip of the peninsula, occasionally opening out into increasingly grand public spaces with triumphal columns rising up out of their centres and plundered sculpture from throughout the ancient world gracing the plinths around which the populace would mooch and mingle. Running parallel to the Mese, the Aqueduct of Valens brought fresh water into the city on bounding arches, remaining in use well into Ottoman times. At the end of the Mese stood the Milion. This was a golden milestone displaying distances to all the great cities of the empire. It stood within an elegant tetrapylon; a square structure consisting of four arches topped by a vaulted roof. Beyond the Milion was the public square of the Augustaion, where a seventy metre high column sheathed in bronze rose above the city. It was surmounted by a great equestrian statue of the emperor Justinian, holding a globe in his hand and wearing a crown of peacock feathers.
 The Augustaion and Hagia Sofia
 North of the Augustaion stood Justinian’s finest construction and greatest legacy, the church of Hagia Sofia. Built upon the smoking ruins of its predecessor, burned down in the destructive riots unleashed by the Constantinopolitan mob in 532, the new Hagia Sofia was intended as a signature project of unparalleled magnificence. Justinian sourced his building materials from throughout the empire. Marbles of different hues were brought from Egypt, Syria and Greece and the most talented architects, craftsmen and mosaicists of the day were employed to create the most sumptuous interior possible, calculated to inspire awe in all who beheld it. The Emperor himself upon seeing the finished interior with typical modesty uttered the words ‘Solomon I have surpassed thee!’
The Hagia Sofia pushed the envelope not only aesthetically but also architecturally by being the first structure to employ pendentives; inverted triangular sections of masonry which solved the problem of placing a circular dome on top of a square building, allowing the weight of the dome to be translated downward to the supporting piers at each corner and providing a far more elegant solution which would spawn many imitators but few equals. It remains one of the world’s great buildings.
 An impressionist view of Hagia Sofia interior
 Retracing their steps from the Augustaion back onto the street the visitor could continue eastwards, with plumes of steam rising from the Baths of Zeuxippos to their right, towards the great gate of the Chalke which led through into the grounds of the imperial palace. Looking to their north-east they would see the top of the great red brick basilica topped by a rotunda known as the Magnaura which served as a senate house and imperial audience hall. Passing through the Chalke, if they were sufficiently privileged, the visitor would perhaps glance up to see a great painted icon of Christ which looked down from above the archway. As the iconoclastic controversy had raged in the Eighth and Ninth Centuries the icon had been taken down, replaced, destroyed and finally remade.
Beyond the Chalke were the barracks of the elite regiments of Imperial guards; the Scholae and the Excubitors, literally; ‘those who do not sleep’ charged with the emperor’s protection, their commissions purchased at great expense by their families. Heading southwards towards the palace, a series of halls and courtyards provided spaces in which the great and the good could gather to await the emperor’s pleasure. Most noteworthy were the Augusteus, which was used during imperial coronations and the Triklinos of the Nineteen Couches; an oblong hall with nine apses along each side which was used for ceremonial banquets. It featured, as the name suggests, nineteen ornate dining couches.
Passing through the hall the visitor then reached the palace complex of Daphne. This was the original imperial residence constructed in the time of Constantine. The emperor’s bedchamber was housed within an ornate octagonal tower atop the imperial apartments. In the grounds of the palace stood the chapel of St Stephen, which was built to house the relic of that first Christian martyr’s right arm.
The imperial palace complex grew over the centuries as successive dynasties added to the site, constructing newer and grander buildings on a series of terraces that led down to the sea. Justinian’s successor, his nephew Justin II, created a new throne room known as the Chrysotriklinos. This domed, octagonal structure leant itself to the pageantry of the Byzantine court. Its shaped allowed for a series of chambers to be curtained off from public view, allowing members of the imperial family and other notaries to make an entrance from all points of the compass. In the eastern apse a throne was positioned beneath a mosaic of Christ.
 Surviving mosaic detail from the imperial palace
 By the Ninth Century the older parts of the palace were becoming run down and fell out of regular use. The emperor Theophilus created a new palace down by the sea called the Boukoleon, built into the sea walls and served by its own private harbour. Theophilus loved pomp and ostentation more than most Byzantine emperors and was most concerned with outdoing his opposite number the Abbasid Caliph. Throughout the palace splendid decor was the order of the day. Although the imperial family no longer lived in the old palace, its buildings remained in use for occasions of state, providing an important symbol of continuity with the past. Following reports from a delegation to the Abbasid court, describing the automata in the Caliph’s throne room, Theophilus commissioned his own. They included a golden organ which played to itself and was set up in the Chrysotriklinos and a golden plane tree filled with gilded bronze and silver birds which moved and ‘sang.’ The golden tree was set up beside the so called ‘Throne of Solomon’ in the Magnaura upon which more birds were arraigned. Here foreign delegations were received. A concealed lifting mechanism allowed the throne to be lifted into the air, so that the emperor looked down from on high upon any suppliants who came before him. It was guarded by a pair of gilded lions who moved and ‘roared’ at the emperor’s command. The emperor’s toys were melted down by his good for nothing successor Michael III ‘the sot’ in his endless search of gold to squander on idle pleasures, but they were not forgotten and by the reign of Constantine VII in the Tenth Century replacements had been crafted. Constantine too had a great love of imperial pageantry. His principle contribution to posterity is his De Ceremoniis; a painstaking blow by blow account of Byzantine court ceremonial, as dull as it is informative.
The existence of the automata are attested by the western diplomat Liutprand of Cremona who visited Constantinople twice on official missions for the Italian ruler Berengar II and the Holy Roman Emperor Otto I. In his memoirs Luitprand, at pains to stress that he was unimpressed by these geegaws, writes: In front of the emperor’s throne was set up a tree of gilded bronze, its branches filled with birds, likewise made of bronze gilded over, and these emitted cries appropriate to their species. Now the emperor’s throne was made in such a cunning manner that at one moment it was down on the ground, while at another it rose higher and was to be seen up in the air. This throne was of immense size and was, as it were, guarded by lions, made either of bronze or wood covered with gold, which struck the ground with their tails and roared with open mouth and quivering tongue. From the Daphne Palace a tunnel led to the imperial lodge of Kathisma which overlooked the great sporting caldron of the Hippodrome. With the demise of gladiatorial combat as the Roman Empire under Constantine embraced Christianity, the sport of chariot racing was left as the principle source of public entertainment for the Roman masses. In Constantine’s new capital the construction of the new hippodrome was a signature project. Constructed on the site of an earlier structure created in the reign of Septimius Severus, Constantine’s hippodrome was 450 metres long and had seating for some 30,000 spectators. It was a structure intended to impress and provided the setting for imperial pageantry as well as popular entertainment.
 The ruins of the Hippodrome
Artistic treasures from around the Roman Empire had been plundered for the beautification of Constantinople and no monument of the pagan past had been considered sacred by the new Christian Emperor. The Hippodrome’s central spina; a raised structure around which the chariots would race, featured at its centre the serpent column; a victory monument looted from the ancient sanctuary of Delphi. The column depicted three serpents intertwined who balanced upon their heads a votive tripod dedicated to Apollo in celebration of the Greek victory at Plataea in 479 BC. More ancient still was the obelisk of pink Aswan granite brought from Karnak on the orders of Constantine’s successor Constantius II and eventually erected on the spina in 390 AD under the emperor Theodosius I. This monument was already eighteen centuries old when it was brought to Constantinople and its inscriptions told of the Syrian victories of Tuthmosis III.
When Constantinople fell to the forces of the Fourth Crusade in 1204 the city was systematically looted. The ancient monuments of the hippodrome were stolen or melted down, most famously the four horses from above the carceres which were taken away to Venice. The palace complex was ransacked and Hagia Sofia was desecrated with horses brought into the building to assist in the carrying away of plunder and a drunken prostitute enthroned on the Patriarchal seat. When the Byzantine Emperors returned sixty years later they left the imperial palace in its abandoned state and set themselves up in the palace of Blachernae in the north-western corner of the city. The city would remain a shadow of its former self until its final capture by the Turks in 1454. With the notable exception of the Hagia Sofia, only crumbled vestiges now remain of what was once the Queen of Cities.
 19th Century view of the Theodosian Walls More from Liutprand of Cremonahttp://www.fordham.edu/halsall/source/liudprand1.asp
More on the wallshttp://www.historynet.com/ancient-history-walls-of-constantinople.htm
More on the palacehttp://www.academia.edu/564884/The_Great_Palace_as_Reflected_in_the_De_Cerimoniis Constantinople comes to life with Byzantium 1200http://www.byzantium1200.com/index.html More Byzantine History from Slings and Arrowshttp://slingsandarrowsblog.blogspot.co.uk/search/label/Byzantium
Slings and arrows

Nuggets of history from the author of 'The Battles are the Best Bits'.
...more
- Simon B. Jones's profile
- 22 followers

