
Marisa McClellan's Blog, page 72
December 18, 2015
Holiday Giving: Jan Hagel Cookies

As much as I appreciate a plate of beautifully cut-out cookies, I have limited patience for such things (which is funny, since some years back, I became the keeper of the family cookie cutters. I have at least 75 different ones). I prefer a cookie that can be sliced, dropped, or pressed into a pan and cut into bars.

This cookie belongs to the category of things that can be pressed or poured into a rimmed pan, baked and sliced. Called a Jan Hagel, it’s traditional Dutch Christmas cookie that tastes a bit like an almond shortbread. I do love the flavor, but I also appreciate the fact that it takes no more than 10 minutes to construction and only needs 8 pantry-staple ingredients, two bowls, and a hand mixer.

This cookie entered my cookie lexicon back in the winter of 2007, during the time when I was the newly minted head blogger over at Slashfood (AOL’s long-gone food blog). We had a tradition of posting a Cookie-A-Day during the month of December and so the pressure was on to find new and novel cookies. I enlisted my mom to search through her recipe binder, to see if she had any usable suggestions tucked away.

And she did. She had a Christmas cookie recipe pull-out from a mid-1980s issue of Family Circle. I made four or five of the recipes from that publication and shared them on Slashfood. However, the only recipe that took root in my heart was this one, for the Jan Hagels. I’ve made them just about every year since.

I like to make a fairly thick cookie. I find that you end up with a really flaky top, and a base that tastes and feels like a combination of shortbread and marzipan. If you want a flakier texture throughout, use a larger pan, spread the dough a bit more thinly, and shorten the cooking time.

Make sure to store these in an airtight container, away from other cookies, so that you don’t loose the crispness of the top.
PrintJan Hagel Cookies
Ingredients
8 ounces butter (that's two sticks)1 cup granulated sugar, plus 1 tablespoon for the topping
1 egg, white and yolk separated
1 teaspoon almond extract
2 cups unbleached all-purposed flour
1/2 teaspoon kosher salt
1/2 cup sliced almonds
1/4 teaspoon cinnamon
Instructions
Preheat the oven to 350 degrees F.Combine the butter and 1 cup of sugar in a large bowl, and beat with a hand mixer until light and fluffy. Beat in the egg yolk and almond extract.
Add the flour and salt and beat until the dough comes together.
Press the dough into an even layer in the bottom of a quarter sheet pan. For a thinner, flakier cookie, use a half sheet, but don't press the dough all the way to the edges. There's no need to grease the baking sheet, the dough has enough butter to prevent sticking.
Beat the egg white with your hand mixer (make sure to wash the beater!) until it is light and fluffy, but not to the point of stiff peaks.
Using an off-set spatula, spread the beaten egg white out on top of the cookie dough.
Sprinkle the almond slices evenly over the egg white-painted dough.
Finally, mix the remaining tablespoon of sugar with the cinnamon and sprinkle it evenly over the top of the cookie dough.
Bake the cookies for 30-35 minutes (shorter if you're going the thinner cookie route).
As soon as you take the cookies out of the oven, slice them into diamond shapes, by making overlapping diagonal cuts.
Let the cookies cool completely before you remove them from the pan. Break them into diamond shapes and store in an airtight container. 3.1http://foodinjars.com/2015/12/holiday-giving-jan-hagel-cookies/
Related Posts:
Sponsored Post: Gift Guides from Fillmore Container + Giveaway
Holiday Giving: Oven Toasted Caramel Corn
Salted Rye Cookies from Whole Grains for a New Generation


December 17, 2015
Three Springs Fruit Farm + Food in Jars

As so many good things in life do, it started with a conversation at the Headhouse Square Farmers Market. Ben Wenk from Three Springs Fruit Farm was looking for ways to make their line of preserves more interesting and wondered if I had any ideas. I suggested some recipes that I thought might work for large scale production. And thus, a partnership was born.

Right now, there are just three preserves that are made with Ben’s fruit and my recipes, but hopefully there will be more. There’s the Salted Brown Sugar Peach Jam, the Tart Cherry Jam, and my classic, beloved, much-celebrated Tomato Jam. You can buy them online as a set of three, or if you’re in the mid-Atlantic region, in person at a farmers market.
These preserves don’t mean you should stop making your own. But it does mean that if you run out of tomato jam in March, you can now get your hands on a few jars to tide you over until tomato season returns.
Related Posts:
CSA Cooking: Smoky, Spicy, Skillet Tomato Jam
Preserves in Action: Egg Sandwich with Spinach and Tomato Jam
Preserves in Action: Tomato Jam
December 15, 2015
2015 Gift Guide: DIY Kits and Sets
Third in a series of concise gift guides for the 2015 holiday season. Up today is a collect of kits and sets that will help kickstart your DIY mojo.

A couple years ago, I decided to start knitting. I’d learned when I was a kid, but it had been years since I’d picked up yarn and needles and needed some help finding my footing. I bought myself Kat Goldin’s Knit Camp kit, and dove in.
It was that kit (plus a wide array of helpful video tutorials on YouTube) that helped me build confidence enough to pick out yarn and projects and start making. Here’s hoping that these culinary kits (and one discovery set for kids!) can help do the same for you or someone on your holiday list!
Mori-Nu Make-Your-Own Tofu Kit – This kit allows you to make both silken and molded tofu (and includes everything you’ll need to do so). It’s a fun project to do with kids, particularly if you’re trying to convince them of the deliciousness of tofu. Read about my experience using the kit.
Hobby Hill Farm Fresh Cheese Making Kit – This kit includes enough rennet, citric acid, and cheese salt to make 40 batches of cheese (talk about the gift that keeps on giving!). I took this kit out for a spin back in September, here’s my step-by-step tutorial.
Maureen Abood’s Heavenly Hummus Kit – I’ve made a lot of hummus in my days, but never have I had a more delicious batch exit my food processor than the one I made with this kit.The secret is the pre-peeled chickpeas! Pair this kit with a copy of Maureen‘s book, Rose Water and Orange Blossoms , and you’d have a killer gift.
Ferment’n Kit – I picked this sweet little kit up at Portland Homestead Supply when I was out there last month, and love its form factor and utility. It comes with a ceramic pickle weight and a nifty two-piece plastic airlock that has a very low profile. If there’s someone on your list with a tiny kitchen, this might be the perfect fermentation kit for them.
Cultures for Health Kombucha Starter Kit – Looking to get started making your own kombucha in the new year? Cultures for Health’s Kombucha Starter Kit will set you on the road to scoby greatness!
reCAP Explore Bug Catching Kit – This isn’t a culinary kit, but it is a fun one for kids (and involves a jar!) so I’m squeezing it in. The folks at Mason Jar reCAP have taken their new Flip Cap and added a magnifying lid to it, so that kids can collect and examine things from their natural world.
FARMcurious Starter Kits – There’s so much to choose from over at FARMcurious. There’s the classic Fermenting Set I wrote about recently, the All-Inclusive Set (which includes a jar), or their Ultimate Fermenting Kit. A gift for every level of fermenter!
Masontops – Last up is a trio of fabulous products from the folks at Masontops. Pair their glass fermentation weights with a Pickle Packer and a set of Pickle Pipes, and all your recipient needs to do is add veg, salt, and a jar!
Related Posts:
2015 Gift Guide: Travel Mugs and Drinking Jars
2015 Gift Guide: Kitchen Utensils
December Sponsors: Cuppow, Fillmore Container, EcoJarz, New West KnifeWorks, Fermentools, Mrs. Wages, Hobby Hill Farm, & Mason Jar Lifestyle
December 14, 2015
Giveaway: Old Blue Raw Honey
A giveaway of west coast honey from Old Blue Raw Honey. All the pictures in the post are by Camille Storch.

This week’s giveaway comes to us from Old Blue Raw Honey. Old Blue is a family business, owned and operated by Henry and Camille Storch (you might know Camille from her lovely blog, Wayward Spark. She’s also written a couple of honey-based guest posts for me in the past).

Henry is a beekeeper and farrier, transporting his bees to different locations up and down the west coast as needs and the seasons demand. In his free time, he collects seed from native plants and interesting garden varieties, and he plays Legos with his kids. He also documents his days with the bees on Instagram.
Camille handles marketing, customer service, and order fulfillment for Old Blue Raw Honey, and is the writer and photographer behind all the Old Blue blog posts. In her free time, she cans seasonal produce (with honey!), and runs the trails around their home in Philomath, Oregon. Her Instagram account is also glorious.

One of the things that makes Old Blue Raw Honey so special is that they offer a wide array of unusual, small-batch varietal honeys from their hives only. They honey is never heated over natural hive temperatures (under 100°F), and is minimally filtered, so it includes pollen, small wax particles, and once in a while, a small bee bit.

Old Blue Raw Honey is available online, at select shops, and on occasion, directly from Camille and Henry at events in Oregon. If you’re looking for a good gift for someone who loves interesting honey, getting them a sampler set from Old Blue would be a very smart thing to do.
Happily, it’s the sample set that I get to share today. Henry and Camille have generously offered up three of their Blackberry, Clary Sage, Coriander Honey Sampler Boxes for today’s giveaway. The honeys are packaged in 8 ounce, BPA-free plastic squeeze bottles and I promise, it will take everything you’ve got to keep from dispensing the honey straight onto your tongue.
Here’s how to enter.
Leave a comment on this post and tell me how you like to use honey. Do you spoon it into tea? Drizzle it on cornbread? Dollop a little on a sliver of cheese?
Comments will close at 11:59 pm eastern time on Saturday, December 19, 2015. A winner will be chosen at random and will be posted to the blog on Sunday, December 20, 2015.
Giveaway open to United States residents only. Void where prohibited.
One comment per person, please. Entries must be left via the comment form on the blog at the bottom of this post.
Disclosure: Old Blue Raw Honey is providing the honey for this giveaway at no cost to me. They have not paid for placement (though about a year and a half ago, Camille did give me a little bottle of honey). I’m writing this post because their honey is delicious and I want to share its goodness.
Related Posts:
Winter Squash Risotto with Leeks and Greens + Lagostina Risotto Pot Giveaway
Giveaway: The Mason Tap Kit
Giveaway: The Classic Fermenting Set from FARMcurious
December 13, 2015
Links: Mincemeat, Glögg, and a Winner
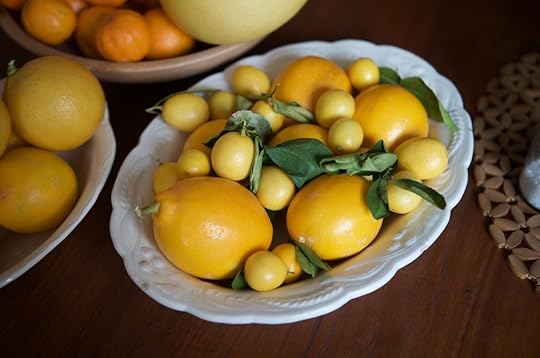
Friends, feast your eyes on all that citrus! An unexpected box arrived on my doorstep late last week and it turned out it was filled with exotic, unsprayed citrus from Autumn (her book, Beyond Canning, will be out in February. Make sure to put it on your wish lists. I’ve seen an advance copy and it’s fab). I have a long list of baking, cooking, and making to do this week, and top on it is doing something worthy with this bounty. Now, links!
Apple cranberry mincemeat.
Slow cooker apple butter.
Gingerbread applesauce.
Lingonberry mandarin marmalade.
Kimchi butter.
Fermented cauliflower with chiles.
A smoked salt tutorial.
Peanut butter and jelly snack bars.
Meyer lemon and cottage cheese sugar cookies.
Johanna Kindvall’s fabulous glögg.

The winner of last week’s Mason Tap Giveaway is #39/Erin. If you haven’t entered yet, make sure to put your name in the hat for my Lagostina Risotto Pot giveaway.
Related Posts:
Links: Cranberries, Mason Jar Cozies, and a Winner
Links: Cranberries, Marinated Pumpkin, and Winners
Links: Green Tomatoes, Chocolate, and Winners
December 11, 2015
Winter Squash Risotto with Leeks and Greens + Lagostina Risotto Pot Giveaway

I have a weakness for beautiful cookware (some woman collect jewelry, I surround myself pots and pans). The first time I saw the Lagostina Risotto Pot at my local Williams-Sonoma, I nearly swooned. Gleaming tri-ply stainless steel! A wooden topped lid (that fits tightly and doubles as a trivet)! And a thick, heat diffusing base to prevent hot spots and burning!

To my very great delight, not long after spotting this gorgeous pot for the first time, I got an email asking if I might like one to use for the development of a risotto recipe. I sent a positive response off as quickly as my fingers could type.

Since this lovely piece of cookware arrived, I’ve been making a lot of risotto. It’s one of my favorite things to make and eat on chilly days. I love the ceremony of near-constant cooking (though to be truthful, I often put the spoon down for a moment or two so that I can do a little clean-up while I cook) and the comfort that comes when you cozy up to a bowlful.

Whenever I make risotto, my primary goal is to cram as much vegetable content into the pot. Risotto can be a heavy dish, and so making sure that it’s packed with fresh produce (in this case, aromatics, greens, and roasted squash) helps lighten it and make it a more regular dinnertime occurrence.

When I make this for me (if I’m making if for Scott, I use roasted carrots in place of squash), I peel and chop all the squash and stir it into the rice. However, if I have friends coming by, I like to reserve some of the roasted squash to serve on top. It brings a little visual and textural interest to the plate and makes it feel like something you might be served as the neighborhood Italian place.

What’s nice about this piece of cookware is that truly, it’s good for so much more than risotto. The wide base and low profile mean that it’s a great shape for any dish you want to simmer and reduce. It does good work with small batches of jam and I love using to make Marcella’s tomato sauce.
The Lagostina Risotto pot can be found at Williams-Sonoma, Bed, Bath, and Beyond, and other specialty shops, and retails for $199.95. For more information about Lagostina, check out their social accounts and visit their website.
Facebook | Twitter | Instagram | Pinterest
Thanks to the kind folks at Lagostina, I have one of their glorious Risotto Pots to give away to you guys. Here’s how to enter.
Leave a comment on this post and tell me what kind of risotto you’d make in this pot.
Comments will close at 11:59 pm eastern time on Saturday, December 19, 2015. A winner will be chosen at random and will be posted to the blog on Sunday, December 20, 2015.
Giveaway open to United States residents only. Void where prohibited.
One comment per person, please. Entries must be left via the comment form on the blog at the bottom of this post.
Disclosure: Lagostina sent me this risotto pot to use and write about. No additional compensation was provided. All opinions expressed are entirely my own.
PrintWinter Squash Risotto with Leeks and Greens
Yield: Serves 3-4 as a main dish, more as a side
Ingredients
1 pound winter squash (butternut, acorn, hubbard are all good)1 tablespoon olive oil for drizzling
1/2 teaspoon kosher salt
fresh thyme for sprinkling
1 tablespoon olive oil
1 large yellow onion, minced
2 large leeks, cleaned and chopped
6 cups chopped greens (a mix of kale, spinach, and chard is good)
1 tablespoon butter
1 1/2 cups carnaroli rice
1/2 cup white wine
8 cups chicken or veg stock, warmed
1/2 cup grated parmesan cheese
2 tablespoons heavy cream
salt and pepper to taste
Instructions
Preheat the oven to 425 degrees F. Cut the squash into wedges, slices, or cubes and arrange them on a rimmed baking sheet. Drizzle them with olive oil, sprinkle them with salt, and arrange some fresh thyme leaves around the squash. Roast for 25-40 minutes, until the squash is tender.While the squash cooks, place your risotto pot on the stove. Heat 1 tablespoon of olive oil over medium high heat. Add the chopped onion and sliced leeks and cook, stirring regularly, until the wilt and brown a little.
Add the greens and stir them into the onions and leeks. Cook until tender.
Add the butter and the rice and stir to combine. Cook for 1-2 minutes, until all the rice grains are glistening and separated.
Pour in the white wine and stir to combine until it's been absorbed.
Once the wine has absorbed, add just enough stock to cover the rice and veg, and stir until it's been incorporated.
Continue adding the stock and stirring, until all the stock as been absorbed.
When you've incorporated all the stock, remove the pot from the heat. Stir in the parmesan cheese and heavy cream. Taste and add some salt and pepper to taste.
Cut about half the squash away from the peels and into chunks. Stir it into the finished risotto. Reserve about half the roasted squash to use as a garnish. Serve hot. 3.1http://foodinjars.com/2015/12/winter-squash-risotto-with-leeks-and-greens-lagostina-risotto-pot/
Related Posts:
Giveaway: The Mason Tap Kit
Giveaway: The Classic Fermenting Set from FARMcurious
Giveaway: Yogotherm from Hobby Hill Farm Fresh
December 10, 2015
Maple Bourbon Apple Butter + OXO On Illuminating Digital Immersion Blender
Looking for an easy, five-ingredient apple butter for holiday giving? Look no further than this small batch Maple Bourbon Apple Butter!

My family got our first immersion blender when I was in middle school. I can’t remember where it came from, though if I was forced to guess, I’d bet that it was a gift from my grandmother. While she didn’t cook much herself, she garnered a great deal of pleasure from buying culinary appliances and giving them to others (probably in the hopes that they’d prepare something for her with it).

My sister and I claimed that immersion blender as our own, using to make jam and yogurt smoothies for breakfast and after school snacks of skim milk and chocolate SlimFast (it was the nineties, after all). Since then, there’s rarely been a time when I didn’t have an immersion blender in my kitchen.

These days, I pull out my immersion blender on a near-daily basis and use it for soups, purees, fruit butters, jams, gravies, salad dressings, and mason jar mayonnaise. When I heard that OXO was bring an new immersion blender to market, I was excited to check it out because I knew that my current immersion blender was nearing the end of its lifespan and OXO products are always so thoughtfully designed.

Guys, the OXO On Illuminating Digital Immersion Blender is even better than I had hoped. The blender head is made of sturdy nylon, which means you don’t have to worry about scratching your bowls or cookware with metal. The shaft is coated in silicone, so that you can knock the drips of the blender without dinging the edges of your pan (I have a few pots that are pockmarked from repeated immersion blender banging). The blending end removes from the motor with the press of a button. The motor end has heft and the DC motor produces a lot of power.

No matter what speed you’re on, the blender starts slowly to prevent splashes and then ramps up to whichever of the six speeds you’ve set it at. The speeds are controlled digitally and you can set them using the dial on the top of the blender. The cord comes with a useful clip on the end, so that you can wrap it around the handle and secure it in place. The wide power button is easy to press and hold. Oh, and lets not forget about the headlight, which illuminates whatever you’re blending. On my dark stovetop, this is so useful.

For its maiden voyage in my kitchen, I used this lovely OXO immersion blender to make a batch of Maple Bourbon Apple Butter. Wanting to really test it, I cored and chopped five pounds of apples, but left the peels on (unlike this recent butter, where I peeled). In my experience, not all immersion blenders can break down even long-cooked apple peels, but this one handled it like it was nothing.

No matter how large or small the batch size, I use a two-blend process when I make apple butter. I cook the fruit down into a soft sauce, puree the heck out of it, cook it down until it thickens and darkens, and then work it with the immersion blender again.
The reason for the second puree is two-fold. First, the peels aren’t always quite soften enough to disappear during that first round of blending. Second, most fruit butters clump a bit while you’re cooking them down, and I prefer a super smooth butter. Pureeing just before the butter goes into the jar ensures that silky texture.

As the fruit was cooking down, I spent a little time pondering flavorings. I have plenty of spiced apple butters on my shelves, and wanted to opt for something different here. I know that the combination maple, bourbon, and orange zest isn’t a particularly novel one, but combined the richness of the long-cooked apples, was just the thing I was craving. My plan is to keep two of the jars for myself, and tuck the remaining two into gift baskets for people I know will appreciate it.
The OXO On Digital Illuminating Immersion Blender isn’t the only small kitchen appliance that OXO has brought to market lately. There’s also an illuminating hand mixer, a pair of motorized toasters, and a line of coffee makers and water kettles (several times lately, I’ve found myself at Williams-Sonoma, petting the 9-cup coffee maker). I look forward to seeing what OXO creates next!
Disclosure: OXO sent me this OXO On Illuminating Digital Immersion Blender to try and write about. No additional compensation was provided. All opinions expressed are entirely my own.
PrintMaple Bourbon Apple Butter
Yield: 4 half pint jars
Ingredients
5 pounds apples, cored and chopped1/2 cup water
1/4 cup maple syrup
2 tablespoons bourbon
1/2 teaspoon orange zest
Instructions
Place the apples in a pot with a tight-fitting lid. Add the water and set the pot on the stove over medium-high heat. When you hear the water simmering, reduce the heat to medium-low and cook covered, for 45 to 60 minutes.Remove the pot from the heat and let it cool for a few minutes. Using an immersion blender, puree the cooked apples (peels and all) into as smooth a sauce as you can manage.
Set the oven to 300 degrees F and place the uncovered pot in.
Bake the applesauce for 2-3 hours, stirring once every 45 minutes or so. The apple butter is finished cooking when it has gone several shades darker, seems quite thick, and smells a bit caramelized.
Remove the pan from the oven and let it cool for a few minutes.
If the butter has reduced in volume to the point where you can't effectively use an immersion blender, transfer it to a smaller pot.
Add the maple syrup, bourbon, and orange zest and stir to combine.
Using the immersion blender, puree a second time. Work the blender head around to ensure that you get maximum blending coverage, and that you also work the orange zest into the mix.
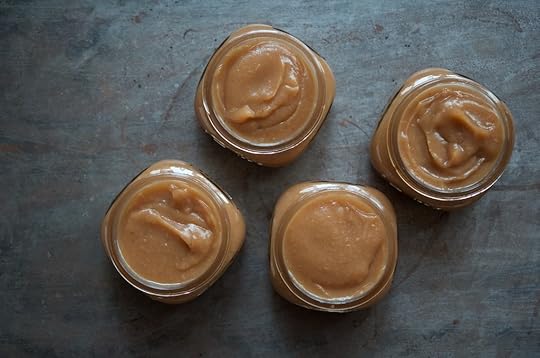
Funnel the finished butter into clean, hot half pint jars.
Wipe the rims, apply the lids and rings, and process in a boiling water bath canner for 15 minutes.
When the time is up, remove the lid from the pot and slide it off the hot burner. Let the jars cool gradually in the water to help prevent the product from siphoning.
Finally, remove the jars from the canner and set them on a folded kitchen towel to cool.
Sealed jars can be stored at room temperature and will keep for a couple of years. Any unsealed jars should be refrigerated and used promptly.3.1http://foodinjars.com/2015/12/maple-bourbon-apple-butter-oxo-on-illuminating-digital-immersion-blender/
Related Posts:
Urban Preserving: Small Batch Vanilla Rhubarb Jam
Urban Preserving: Pear Vanilla Drizzle
Urban Preserving: Strawberry Kiwi Jam
December 9, 2015
2015 Gift Guide: Travel Mugs and Drinking Jars
Second in a series of concise gift guides for the 2015 holiday season. On the docket for today? Things that transform jars into travel mugs and water bottles, as well as one actual travel mug.

For a brief time in the mid-2000s, I worked a horrible admin job at a local university (this was the situation that convinced me that it was time to go to grad school). In order to save money, I packed both my breakfast and lunch up in a trio of mason jars nearly every single day. Coffee was stashed in a regular mouth pint. A breakfast smoothie was contained in a pint & half jar (which was a rare bird indeed back then, well before Ball reintroduced that size). And most days, I brought soup for lunch in a wide mouth pint jar.
I tell you all this to say, I have done my time in the mason jar traveling circus and these are some of the best toppers, drink lids, and other accessories out there.
iLid Drink Topper – A one-piece lid with a slider that can cover or reveal the drink opening. It’s not leakproof, but if you hate fussing with two pieces, it’s the way to go.
Joco Cup – I know. There’s no jar here. However, if you are looking to give someone a travel mug this holiday season and they think that mason jars are entirely too uncivilized, this is the one I recommend. It’s made of glass and silicone, is quite sturdy, and feels nice in the hand.
Cuppow Glass Travel Mug – This is the complete mason jar mug system. You get a wide mouth mason jar, a Cuppow topper, and a coozie made from recycled soda bottles. I use mine all the time and love the little loop on the coozie.
EcoJarz Pop-Top and Denim Holster – I’ve paired two of EcoJarz products together for the perfect smoothie toting combo. The Pop-Top lid seals tight and the cute denim sleeve keeps your jar from clanking around your backpack or lunch bag.
Mason Bar Company Bamboo Tumbler Lid – A bamboo lid that screws directly onto a jar and has a hole just the right size for a glass straw. It’s the most stylish jar sipping set-up I know.
reCAP Mason Jar POUR – Most people use these pour lids for salad dressings and maple syrup. However, they just happen to also make a good drink lid, particularly if your goal is quick access to water.
Related Posts:
2015 Gift Guide: Kitchen Utensils
December Sponsors: Cuppow, Fillmore Container, EcoJarz, New West KnifeWorks, Fermentools, Mrs. Wages, Hobby Hill Farm, & Mason Jar Lifestyle
November Sponsors: Cuppow, Fillmore Container, Fermentools, Mrs. Wages, Hobby Hill Farm, & Mason Jar Lifestyle
December 8, 2015
Cookbooks: Food Gift Love by Maggie Battista

With the holiday gifting season upon us, there is no better time than now to share a few pages from Maggie Battista‘s lovely new book, Food Gift Love. Maggie is the founder and owner of Eat Boutique, and this book has the same beauty and generosity of spirit for which her work has long been known.

Maggie and I have been friends for a long time now. She opened up her home for a celebratory potluck when my first book came out, and has often fed me and put me up in her cozy guest room when my travels have taken me to the Boston area.
A cornerstone of our friendship is the time we’ve spent talking about making, writing, and being businesspeople (she’s better at it than I am). Even when this book was just a wee spark of an idea, I remember thinking that it was going to be a grand addition to my bookshelf. Little did I know just how gorgeous and useful it would be!

Food Gift Love is far more than just a cookbook. It is the guide to gifting that so many of us have often needed. There is advice on how to stock your pantry for easy gift making. Suggestions abound for simple items that will allow you to present your gifts beautifully (as someone who has long hated to bother with fussy wrappings, I’ve found this guidance infinitely helpful, because it has helped me elevate my game while managing to avoid the fuss). And, Maggie offers plenty of help in choosing just the right food gift.

As a canner, I often fall into the trap of thinking that ever food gift I give needs to be a pickle or preserve of some kind. Even just a quick flip through this book helps rid me of that notion. Not everyone wants a jar of jam, but I am certain that I know half a dozen people who might like the Vinegar Sauce that’s pictured above, or the Jam-Swirled Marshmallows in the picture below (and what a brilliant way to show off your homemade spread in a new way!).

Other things you’ll find in this book include a handful of infused sea salts (orange-fennel! vanilla! saffron!), extracts and infused oils, chocolate-dipped spoons, pizza rolls (I’ve had these straight from Maggie’s oven – ridiculous!), a lovely selection of fruit preserves, limoncello, and rompopo (a Latin-style eggnog that is beloved in Maggie’s family).

Just one more thing! If you’re in the Boston area, make sure to get yourself over the Eat Boutique Market. It’s popping up at 267 Western Ave, North Allston, MA (near the Harvard Business School), Wedneday through Sunday, with the last day being December 20. Having been to an earlier incarnation of Maggie’s holiday market, I can promise that it is well worth the trip!
Related Posts:
Cookbooks: The Hands On Home & Ferment Your Vegetables
Cookbooks: Wild Drinks and Cocktails by Emily Han
Cookbooks: My Pantry, Brew Better Beer, Homemade Vegan Pantry
December 7, 2015
Giveaway: The Mason Tap Kit

One of the things that started my preoccupation with canning jars, lo those many years ago, was their versatility. You could store just about anything in them, they could be a drinking glass or an inexpensive travel mug, and they allowed you to forgo specialty kitchenware for a more one-size-fits-all alternative.

However, back in those early days, even I was forced to admit that there were some things that a mason jar didn’t do well. Top of that list was pour. Sure, you could shake up a salad dressing in a pint jar and take it with you to a potluck, but when it came time to dispense that vinaigrette, you knew a mess was in store. Same went for batches of simple syrup or infused olive oil.

Enter the Mason Tap. There is nothing better when it comes to dispensing and drizzling from jar to plate, cup or bowl. I have one on a small jar of fancy olive oil and another on my meyer lemon infused vinegar. My mom uses one on her dish soap and my sister keeps one on her homemade vinaigrette. It’s also a great item for avid home cocktail makers, as it puts your infused spirits within easy reach.

Thanks to the lovely folks at W&P Designs (makers of the Mason Tap and the Mason Shaker), I have one of these Mason Tap Kits to give away this week. Here’s how to enter.
Leave a comment on this post and tell me how you’d use the Mason Tap Kit! If you’re stumped for ideas, there are plenty in their book, Infuse.
Comments will close at 11:59 pm eastern time on Saturday, December 12, 2015. A winner will be chosen at random and will be posted to the blog on Sunday, December 13, 2015.
Giveaway open to United States and Canadian residents. Void where prohibited.
One comment per person, please. Entries must be left via the comment form on the blog at the bottom of this post.
Disclosure: The folks at W&P Designs provided the kit you see pictured above for review and photography purposes as well as a second one for review, both at no cost to me. However, no additional funds were exchanged and the opinions expressed here are entirely my own.
Related Posts:
Giveaway: Mason Tap, Coffee Sock, and BNTO from Cuppow
Giveaway: The Classic Fermenting Set from FARMcurious
Giveaway: Yogotherm from Hobby Hill Farm Fresh


