
Marisa McClellan's Blog, page 136
June 4, 2013
Upcoming Classes: Philly! Chestnut Hill! Phoenixville!
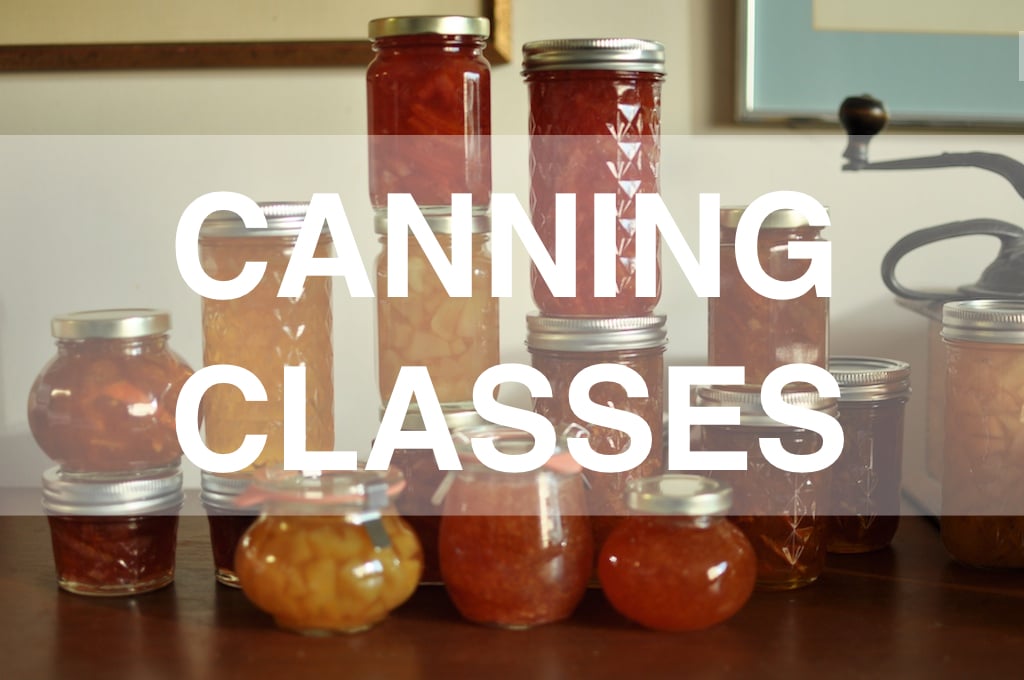
Strawberries are ripe, cherries are starting, and peaches aren’t far away! Take a class and brush up on your preservation skills! Here’s where I’ll be in June!
June 4 (that’s tonight!) – Jam making and canning demonstration, along with a book signing at Art in the Age in Old City, Philadelphia from 6 – 8 pm. The event is free and no sign-up is required.
June 15 – Strawberry vanilla jam class at the Morris Arboretum in Chestnut Hill, PA. Class is from 10 am – 12 noon and costs $40/45. Registration page is here.
June 19 - Pickles Two Ways at Cooking Spotlight in Phoenixville, PA. The class is from 6:30 – 9 pm and costs $59. Registration page is here.
June 22 - A pickling class at Greensgrow. We’ll make quick pickled cucumbers, as well as a batch designed and processed for shelf stability. Class is from 12 – 2 pm and costs $35. Registration page is here.
June 24 - A stonefruit jam class featuring Pomona’s Pectin at the Plymouth Meeting Whole Foods Market. Class is from 6:30 – 8: 30 pm and costs $35. Click here to sign up!
Make sure to check out my classes page for the full summer schedule!
Related Posts:
Upcoming Classes: Glenside! Greensgrow! Blooming Glen Farm!
Upcoming Canning Classes and Les Dames Symposium
Canning Demo at Art in the Age


June 3, 2013
Small Batch Black Velvet Apricot Jam Recipe

Slowly but surely, the stonefruit is beginning to appear. Nothing truly local yet, it’s getting ever closer. My little local greengrocer had South Carolina peaches last week, and the week before that, they had a small box of black velvet apricots from California. I call that considerable geographic progress!

I skipped the peaches (I’m holding out for the good stuff from the farmers I know), but succumbed to a single pound of the black velvet apricots. Have you ever tried these tender little guys? They’re a fifty-fifty cross between a purple plum and an apricot and so have a tender, sweet interior and a wine-colored, downy outside.

Because I absolutely cannot resist, I made a tiny batch jam with my eight little black velvets. I pitted them, chopped them, and combined them with four ounces of honey. Like I’ve mentioned in the past, I like to measure my honey by weight so that I don’t lose a single drop to the measuring cup.

I used a ratio of four parts fruit to one part honey for this jam because I wanted to end up with a product that allowed the fruit flavor to shine. Because it was such a small batch, I knew that I’d be able to get it to set with a minimal amount of sweetener and so could get away with the relatively tiny amount of honey (this ratio will not work if you increase the batch size).

Simmered up in my trusty 12-inch stainless steel skillet, this jam took just eight minutes to fully cook (though cooking times will always vary). Because there was so much surface area in the pan and so little depth, the water from the fruit was able to cook out efficiently and cook to a high enough temperature to achieve set. This is the secret of these tiny, low sugar, no additional pectin small batches.

Made from just fruit and honey, my yield was a scant cup of jam. While I often can my small batches so that they’re shelf stable, I couldn’t muster the will to heat up even the tiniest canner in my arsenal for a single half pint of jam. So instead, it went into the fridge and I’ve been dolloping it on any vehicle that will hold still. I love how tart it is and am planning to make a similar batch when the true apricots come into season later in the month.
Print
Small Batch Black Velvet Apricot Jam Recipe
Ingredients
1 pound black velvet apricots4 ounces honey
Instructions
Pit and chop apricots.Place in a measuring cup and add honey.
Stir the apricots and honey together and let them sit until the honey has dissolved into the fruit.
When you're ready to make the jam, scrape the fruit and honey mixture into a large, low skillet.
Bring to a boil and stir near constantly until the jam thickens.
You'll know it's done when you can pull your spatula through the cooking jam and the jam doesn't immediately rush in to fill the space.
Scrape the finished jam into a small, heatproof jar. Once cool, refrigerate and use within 3-4 weeks. Schema/Recipe SEO Data Markup by ZipList Recipe Plugin2.2http://www.foodinjars.com/2013/06/small-batch-black-velvet-apricot-jam-recipe/
Related Posts:
Urban Preserving: Apricot Rosemary Jam
A Thimbleful of Jam
Small Batch Blood Orange Marmalade
Giveaway: Mrs. Wages Pickle Mix Basket

For the last three years, I’ve been lucky enough to work with Mrs. Wages (more about the real Mrs. Wages here), writing recipes and little ditties about seasonal canning for their newsletter. They’re a company based down south that is devoted to creating spice mixes, pectins, vinegars, and other useful canning products. I’ve used a number of their mixes in the past and have always been quite happy with the results.
This summer, I’m teaming up with Mrs. Wages for two separate giveaways (keep your eyes peeled for second basket of goodies in early August). For this first one, we’re featuring the many different pickling mixes and products that Mrs. Wages makes, along with a home canning guide, all tucked into a cute little basket. If you’re interest in entering, here’s what to do…
Leave a comment on this post and share your favorite thing about the start of canning season. Do you look forward to strawberry jam? Homemade pickles? The canning parties you throw with friends?
Comments will close at 11:59 pm on Friday, June 7, 2013. Winner will be chosen at random and will be posted to the blog soon after.
Giveaway open to US residents only (so sorry, further-flung friends).
One comment per person, please. Entries must be left via the comment form on the blog at the bottom of this post.
Disclosure: Mrs. Wages compensates me for the writing I do for their newsletter. They have provided the basket of goodies you see above at no cost to me. However, no additional money changed hands in order to make this post and giveway happen and, as always, my thoughts, opinions and commentary are unadulterated and are all my own.
Related Posts:
Mrs. Wages Gift Basket Giveaway Winner
Mrs. Wages Blueberry Cinnamon Freezer Jam
Mrs. Wages Salsa Mix
June 2, 2013
Links: BPA-free Lids, Lilac Honey, and a Dry Herb Jar Winner

The last four days have been an absolute whirlwind. The highlights including a fig dinner* on Thursday night that was the best meal I’ve had in months (I may need to get out more), the chance to see many lovely friends and acquaintances at Eat, Write, Retreat, and a trip to a lovely old estate on the Delaware River to witness the marriage of a friend.
One question I get asked a lot at my canning classes is, “What’s the difference between jam and jelly?” Tracy from Sugarcrafter has written a terrific post for Foodie Fanatic that defines the difference between the various preserves.
I don’t know why Ball isn’t shouting this from the rooftops, but their newer lids are now BPA-free. This is great news!
The lilac season is over in my area, but I’m keeping this lilac honey in mind for next year.
Gorgeous homemade hot sauce.
As someone who deeply believes in the power of the small batch, I really loved the piece that Emma Christensen wrote about why she brews in 1-gallon batches.
A useful post that offers a number of tips for (freezer) preserving spring greens.
Good news for home canners! Canned peaches are just as nutritious as fresh.
Love this entirely DIY carbonated water set-up on Wonderland Kitchen.
Culinaria Eugenius offers the low-down on elderflowers and elderberries.

 Many thanks to everyone who took the time to enter this week’s Dry Herb Jar giveaway, sponsored by Ball! The lucky winner is commenter #114, which is Elizabeth G. She said, “I keep my spices in the container they come in. My spices would look so cute in these!”
Elizabeth, I hope your spices look just as cute as you were hoping! Congratulations!
*In the interest of full disclosure, I was a guest at the fig dinner, which was hosted by California Figs.
Related Posts:
May 31, 2013
A Visit to Driscoll’s Berries

Last month, I went on a really great (if far too brief) trip to California. I’ve been intending to write about it since returning home, but there’s been a cavalcade of events (a book deadline, a visit from my sister’s family, the departure of my intern, a week-long vacation, the return of canning classes, and 34th birthday celebration).
You see, my sojourn in Northern CA was a gathering of bloggers, hosted by Driscoll’s. We were invited to learn more about how Driscoll’s develops, grows, packages, and sells their strawberries, raspberries, blueberries, and blackberries.

Going into the trip, I knew very little about the ins and outs of berry growing beyond the fact that I liked to visit my local farms during the season and pick their fruit. Thanks to Driscoll’s and this trip (which was essentially a one-day crash course on the ins and outs of berry farming), I have a far deeper understanding of breeding, developing, growing, marketing, and shipping processes required to bring that clamshell of berries to my local market.

When you buy a box of berries at the grocery store, know that your fruit was at least five to seven years in the making. You see, Driscoll’s works with number of farmers to grow the berries. All those growers start with seedlings that Driscoll’s breeds, propagates and raises, to ensure that the berries they sell meet their very high standards of texture and flavor.

It takes five years of growing before a seedling is ready to be shipping to the grower (one plant is raised into 100, those 100 are grown into 5,000, those 5,000 become 200,000 and so on. For five years). Before that, there were many seasons of growing, tasting, and testing before a variety was selected to be propagated. It definitely not a matter of picking up some seeds and planting a field.

We spent much of our time on the trip talking about strawberries, as those were the berries that were currently in season in Watsonville while we were there (this was in early April). We visited the test fields where Driscoll’s develops their new varieties and got to pick and taste berries directly from the ground (it was amazing).

One thing that surprised me to learn while we were in the fields was that each strawberry cultivar has a relatively short lifespan. That’s because they’re constantly tweaking the plants in order to make them just a bit more delicious (all this work is basic breeding science. They don’t engage in any genetic engineering).

One thing I heard over and over again during the time I spent with the Driscoll’s folks was the importance of delight (in fact, Driscoll’s mission statement starts with, “Our Mission is to continually delight our Berry Consumers…”).
At first, I was a little taken aback, because I’d never before been exposed to a company that is so clear about putting pleasure and flavor ahead of profits. But truly, Driscoll’s does (they made it very clear that if berries are subpar, they are not sold).

One thing I found particularly interesting was the fact that strawberries are only touched once before we bring them home to our kitchens. They are packed into the clamshells in the fields by the pickers, so the handling is incredibly minimal. The growers are all independent, but do work closely with Driscoll’s, to ensure that standards are being met in regards to cleanliness, ripeness, and general berry quality.

Here’s another thing I learned while on this trip. You can actually track exactly where your berries are coming from. All clamshells are labeled with code stickers and if you go to mydriscolls.com, you can punch in that code, see a picture of the farmer who grew your berries and learn where the farm is located. I’ve been doing it with every box of berries I bought since returning from this trip.

I’ve long been someone who believes that the most important thing to do is to support your local farmers (and depending on where you live, there’s a good chance that the Driscoll’s berries in your market are local). And during the summer months, I buy mountains of fruit from the farmers in Pennsylvania, New Jersey, and Delaware.
However, being in the recipe writing business means that I often need berries in January. Having been on this trip, I feel so much better about buying off-season berries from Driscoll’s, because I know they’re working hard to produce the best, most flavorful and safest berries around.
Many thanks to Driscoll’s for inviting me to learn more about their berries and for giving me the opportunity to meet a collection of other fabulous bloggers and writers.
Disclosure: This trip to California was paid for by Driscoll’s. However, my opinions are entirely my own.
Related Posts:
Small Batch Strawberry Rhubarb Jam with Rose Flower Water
Canning Demo at Art in the Age

All month long, some of my jars of preserves have been on display at the Art in the Age store in Old City as part of their The Return of Spring exhibition. The show is coming down soon, but on Tuesday, while my books and jars are still there, I’m going to be stopping by the shop to do an evening canning demo.
If you’re in the area, I’d love for you to swing by (festivities start at 6 pm). I’ll be making a small batch of strawberry vanilla jam, talking about preserving, answering questions, and signing cookbooks. Art in the Age can be found at 116 N. 3rd Street, Philadelphia.
Related Posts:
“The Return of Spring” at Art in the Age
Giveaway: Eat Boutique Breakfast Gift Box
This Weekend at the United States Botanical Garden
May 29, 2013
Giveaway: Ball Dry Herb Jars

The week Scott and I got married (nearly four years ago now!), my dad cut a giant hole in my kitchen wall and inserted floor-to-ceiling spice rack into a few inches of unused space. This had long been the wedding present plan, though looking back on it covering the apartment with drywall dust a few days before the big day wasn’t one of my better laid plans.
Still, I’ll never regret the mess, because I LOVE this spice shelf. Not only did it give me a bounty of additional storage space, the shelves are perfectly spaced to hold the canning jars that house my herbs and spices. Truly, it was one of the best presents I’ve ever received.

For the longest time, I thought I was the only one using slightly past their prime mason jars for this purpose, but in recent years, I’ve discovered that I’m very far from alone. And this spring, Ball finally recognized the fact that many of us use their jars in this way and released a product designed expressly for spice storage.
Meet the Dry Herbs Jars . They are four ounce jars fitted with sturdy, locking shaker lids. I’m liking these herb jars for several reasons. I appreciate how large the holes are in the shaker lid (they’re akin to the ones you find on Parmesan cheese canisters) because they allow chunky things like kosher salt and red chili flakes through.

I appreciate the slight rim on the edge of the lid, which means they stack with a sense of security. And finally (though this has nothing directly to do with their utility as a spice jar), I love the look of the smooth-sided four ounce jar. Would that they’d kick those quilted quarter-pints to the curb and sell these by the dozen!

Thanks to our friends at Ball, I have a box of these Dry Herbs Jars to give away (each box contains four shaker topped jars).
Leave a comment on this post and share how you store your herbs and spices.
Comments will close at 11:59 pm on Sunday, June 2, 2013. Winner will be chosen at random and will be posted to the blog soon after.
Giveaway open to US residents only (so sorry, further-flung friends).
One comment per person, please. Entries must be left via the comment form on the blog at the bottom of this post.
In addition to the giveaway, I’ve created a Pinterest board for photos of herb and spice storage. If you’d like to pin to the board, mention that in your comment and I’ll invite you to participate. It’s simply for fun, no additional entries to the giveaway will occur if you participate.
Disclosure: Ball has provided two sets of these Dry Herb Jars, one for photography purposes and one for giveaway, at no cost to me. However, I am unswayed by this gift and my opinions remain my own.
Related Posts:
National Can-It-Forward Day + Giveaway
Home Canning Discovery Kit Giveaway
Giveaway: Cooking With Flowers + Dandelion Jam Recipe
May 24, 2013
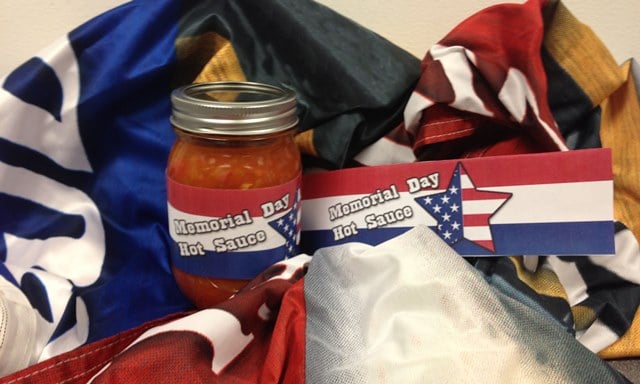
Guest Post: Habenero Hot Sauce from Scott Lindenhurst
Scott Lindenhurst is the creator of Sauce Authority and is avid hot sauce aficionado. For nearly a year now, he’s willing tasted every hot sauce, pepper oil, and barbecue sauce he’s been able to get his hands on in order to share his findings with his growing audience of chili heads. Today, he’s stopped by to tell us a little more about his journey to the fire-y side of canning and preserving and share a recipe.
I first realized that I had a hot sauce addiction when it became apparent that my life (and my meals) had been consumed with the thought, “I can add hot sauce to this?” From chicken, burgers and pork, to pasta, French fries and soup, nothing was safe. Between the taste-testing and the brewing up my own concoction, the Lindenhurst house has not been the same since.
I started Sauce Authority in the Fall of 2012 to give my hot sauce obsession a home. I live, breathe and sleep hot sauce – much to my wife’s frequent dismay. I grab every chance to try new hot sauces. And while I can’t get enough of taste-testing and reviewing sauces, more recently I have dabbled in making my own sauce. The most recent batch will have its debut at a party over the Memorial Day weekend.
One thing that I’m doing that made my sauce appropriate for a guest post on Food in Jars is that I’m putting the sauce in a jar, rather than the standard bottles that most hot sauces typically come in. The jar makes it look more of a salsa-type sauce, but make no mistake. It is a seriously hot sauce through and through.
Here is a step-by-step look at how I prepared this hot sauce for Memorial Day weekend:
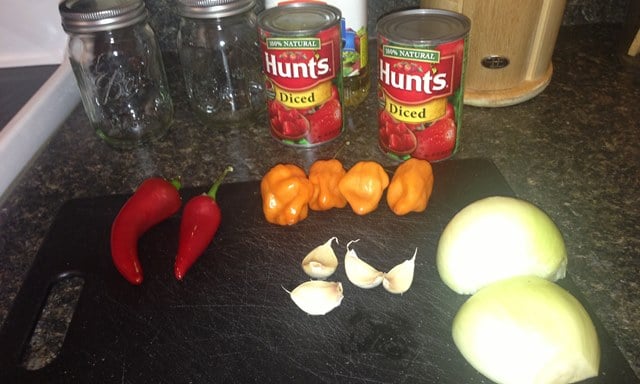
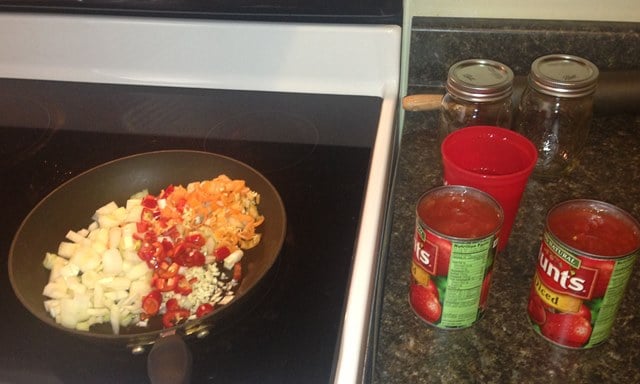
I first started by laying out all of the ingredients. As you can see, there are the empty jars, Hunt’s diced tomatoes, red chile peppers, habanero peppers, minced garlic, vegetable oil and onions. Additional ingredients that were not in this picture include chili powder, salt, sugar and white distilled vinegar.
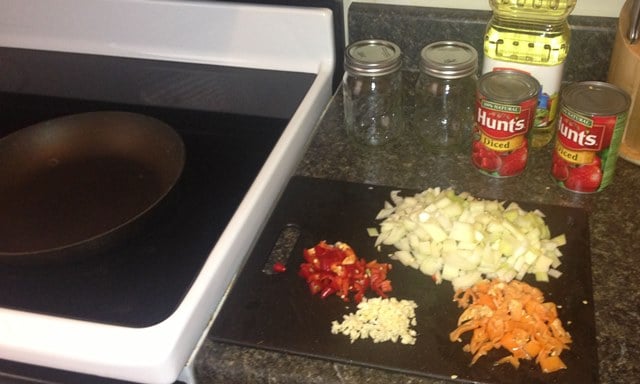
All the different peppers, garlic and onions are sliced and diced and ready for the frying pan.
I poured the vegetable oil into the frying pan and then added to the peppers, garlic and onions. Cook them over medium-high heat until the onions begin to brown.
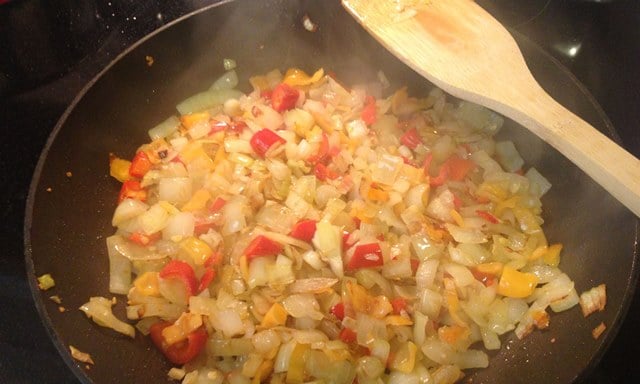
Don’t overdo it though, you don’t want to burn the tips of the peppers.
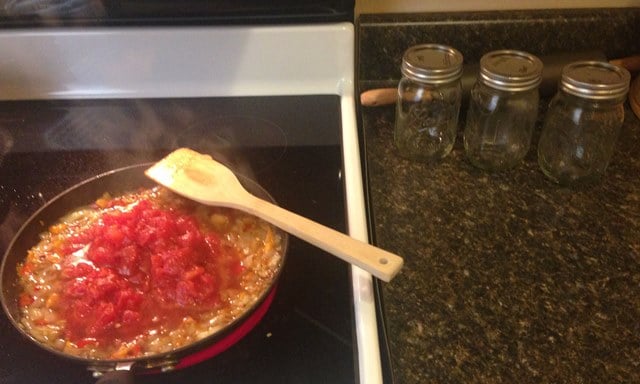
Once the onions have started to brown, you add the diced tomatoes, vinegar, sugar, chili powder, and salt.
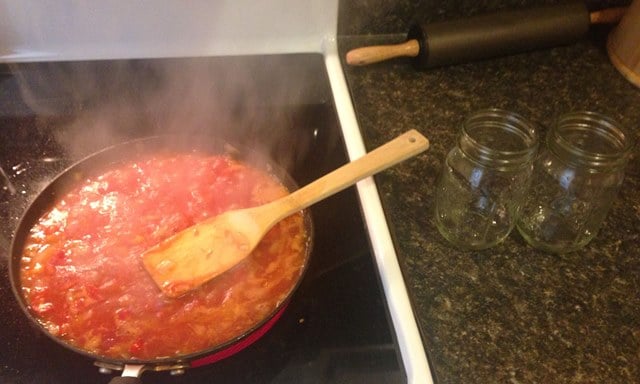
Once the diced tomatoes begin to soften and the vinegar has reduced a bit, you remove the pan from the heat.
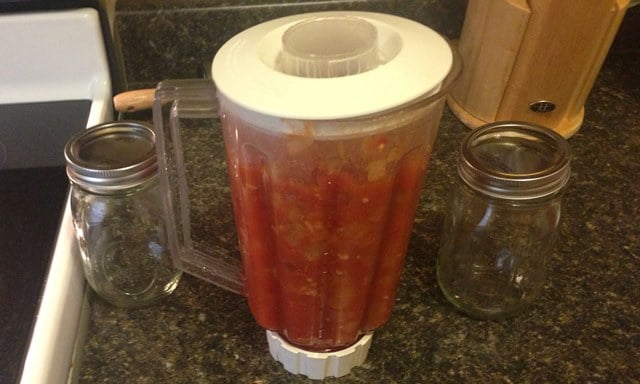
Once the vegetables have had a chance to cool down a little, they get poured into a blender or food processor. Puree the sauce until it’s as smooth as you can get it.
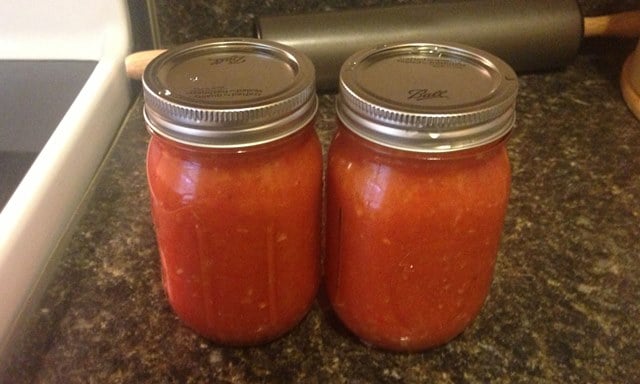
Once the sauce is quite smooth, I strained it through a sieve to remove any chunky bits that remained and then funneled it into the waiting pint jars.
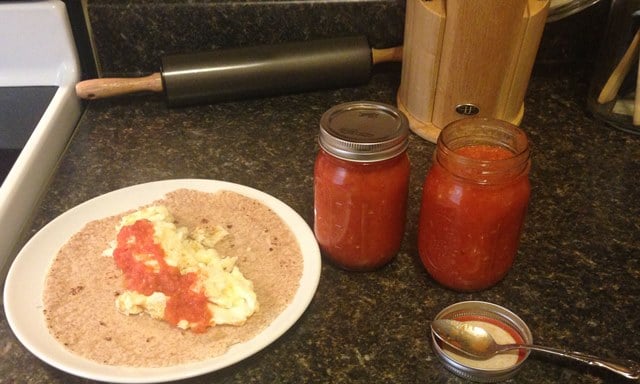
After all that work, I had to take it for an immediate test run. Even though the flavors hadn’t had time to rest and marry, it was still amazingly flavorful and spicy. By the time Memorial Day arrives, the sauce will be ready!
Visit Scott’s website for more hot sauce recipes.
Print
Guest Post: Habenero Hot Sauce from Scott Lindenhurst
Ingredients
2 tablespoons vegetable oil1 onion
6 peppers (I used 4 habanero and 2 chili)
3-5 cloves of garlic
29 oz can diced tomatoes
1 cup of white vinegar
1 teaspoon chili powder
1 teaspoon salt
Instructions
Finely chop the onions, peppers, and garlic. Take care when chopping the hot peppers so as not to burn your fingers (disposable gloves are recommended).Place a large skillet over medium-high heat and add vegetable oil.
Heat the oil until it shimmers and then add the onions, peppers, and garlic. Cook vegetables, stirring regularly, until the onions begin to brown, about 8 to 10 minutes.
When onions are ready, add tomatoes, vinegar, chili powder, and salt. Stir to combine and cook until tomatoes soften and the liquid has reduced.
Remove pan from heat and let the sauce cool for a few minutes.
Carefully transfer the sauce into a blender or food processor and puree.
Pour sauce through a sieve to remove any remaining chunks and funnel into the waiting jars.
Let jars cool and refrigerate. Schema/Recipe SEO Data Markup by ZipList Recipe Plugin2.2http://www.foodinjars.com/2013/05/guest-post-habenero-hot-sauce-from-scott-lindenhurst/
Related Posts:
May 21, 2013
Links: Rhubarb, Granola, Pickles, and a Kootsac Winner

The busyness of the canning season has me firmly in its grasp now. I feel like I barely got a chance to catch my breath after turning the book in and now I’m racing around the Northeast teaching classes. I think I finally need to come to grips with the fact that my life doesn’t really slow down anymore. Ah well.
The internet is alive with rhubarb recipes these days. Here are the ones that have looked particularly appealing…
Autumn’s cold processed Rhubarb Shrub.
A Rhubarb Raspberry Pie, baked in a barbecue on Wayward Spark.
Rhubarb Moonshine Smash!
A tiny batch of Rhubarb and Ginger Jam.
Combine gin and rhubarb syrup for a Rhubarb Fizz.
Deena makes Rhubarb Tartlets. I love the word tartlet.
Raspberry Rhubarb Ginger Jam. I’ve not combined raspberries and rhubarb in my canning career, but judging from these two recipes that have paired them up, I do believe it’s time.

And other tasty links featuring granola, pickles and homemade soy milk.
Easy homemade granola bars with just five ingredients.
Banana granola. I’ve used fruit butters to bind my granolas, but never mashed banana. A version of this one is in my very immediate future.
Pickled butternut squash. I have a version of this condiment in my cookbook. You’ll be surprised by how tasty pickled winter squash can be.
A tiny batch of pickled ramps.
Spicy carrot, radish and red onion pickle. This is a good one for all those radishes that are around this time of year.
Homemade soy milk. Sounds pretty darn accessible.
Linda Ziedrich has teamed up with Fillmore Container to giveaway some smooth-sided half pint jars and a copy of Linda’s wonderful book, The Joy of Jams, Jellies, and Other Sweet Preserves
 . You have until June 3 to enter, so click over to Linda’s site and leave a comment!

 The winner in the Kootsac bulk bag giveaway is commenter #205, which is Sara from Three Clever Sisters.
She says, “I love Kootsac bags and bought a few when you last profiled them on your site. I think my kids have made off with them, but I loved using them for grains and polenta.”
Congratulations, Sara!
Related Posts:
Small Batch Strawberry Rhubarb Jam with Rose Flower Water
Giveaway: Kootsac Reusable Bulk Bags
Links: Strawberries, Rhubarb, and a Cooking With Flowers Winner
May 16, 2013
A Giant Potato Pancake for Eat, Write, Retreat’s Amazing Apps Culinary Challenge

Last year, I went to a bunch of food writer/blogger conferences in order to see beloved people, make some new friends, and help promote my book. In contrast, 2013 has shaped up to be a quieter year (which is fine by me). I’m skipping the bulk of the gatherings in order to spend a little more time at home and save my pennies for next summer’s book push. In fact, the only conference I’m participating in is Eat, Write, Retreat, which is landing in Philly in just a couple of weekends.

Part of the fun of Eat, Write, Retreat is that organizers start building the conference community well before everyone arrives at the DoubleTree. One of the ways that they’ve done this is by inviting everyone who registered before April 15 to participate in the Amazing Apps Culinary Challenge. Now, I’m not typically someone who gets excited about challenges and contests, but this one is a little different.

While there are prizes to be awarded at the conference, I actually felt like I won the moment the box arrived, thanks to all the OXO goodies (as well as a gorgeous assortment of potatoes) that it contained. Potatoes, graters, and ricers, oh my! What’s more, I’ve been needing something to shift me out of the cooking rut I’ve been in recently. Inventing an appetizing little dish featuring potatoes and using some of those new tools was just the boost I needed.

I grabbed the two large, russet potatoes from the basket (approximately 1 3/4 pounds) and got to work. I peeled then and shredded them on the coarse OXO grater that was in the box.
Any time I’m shredding just a pound or two of potatoes, I opt for a hand or box grater. It’s so much easier to clean than my food processor. Then, I bundled up the shreds in a tea towel and squeezed as much water out of them as possible. If you’ve ever made a latke, you know the drill.

Then I whisked together two eggs, 1/4 cup grated Parmesan cheese, two tablespoons minced green onions, one tablespoon chopped dill, and several turns of a pepper grinder. While whisking, I also heated three tablespoons of olive oil in a 12-inch cast iron skillet and heated my oven to 425 degrees F.
I added the potatoes to the batter and stirred until they were well combined. Then I spread the potato batter out in the hot skillet. It was quite thick, so I used my spatula to tease it out into an even layer. Do take care not to make a perfectly smooth surface, as it will brown better with a few crags and nooks.

Once in the skillet, I cooked it over high heat on the stove top for about five minutes, until a peek at the bottom of the pancake told me it was just starting to brown. Then slide the skillet into the oven.
The trick with a giant potato pancake like this one is that you want to bake it first, until the interior is cooked, and then you turn on the broiler to get a really nice, crunchy top. Mine took approximately ten minutes of baking and another four of broiling before I was satisfied with the color and texture.

Now comes the appetizer part. This potato pancake can actually go a couple of different ways in that department. For a cocktail party, you could slice it into slivers and top it with a number of delicious tidbits. The potato pancake is just as good at room temperature as it is hot, so works quite nicely on a table of finger foods.
In the picture, I’ve dolloped each wedge with a little bit of mascarpone cheese and then added something tasty on top (from top to bottom, you have last summer’s apricot jam, a grape tomato half, and a sprig of dill). Little strips of smoked salmon or trout would also be fantastic.

For a more perfectly plated appetizer, here’s another serving option. Cut the potato pancake into quarters. Top with some baby greens (I used mache) and a perfectly fried egg. The texture of the crunchy potato layer with the delicate leaves and runny egg is seriously great (I ate that plate right up as soon as I was finished with the photos).
It’s a good starter for fancy brunches or a farm to table-style dinner. It’s high in Vitamin C. And it’s also great for those folks who can’t manage a pasta course, due to wheat or gluten allergies. For those who have a jar in their pantry, a dab of tomato jam would not go amiss here.
How would you turn a giant potato pancake into an appetizer?
Print
A Giant Potato Pancake for Eat, Write, Retreat’s Amazing Apps Challenge
Ingredients
2 large Russet potatoes3 tablespoons olive oil
2 eggs
1/4 cup grated Parmesan cheese
2 tablespoons minced green onions
1 tablespoon chopped dill
5-6 turns of a pepper grinder
Instructions
Peel potatoes and shred on a coarse grater. Place shreds in a thin tea towel and twist to wring out the liquid.Preheat oven to 425 degrees F. Place a well-seasoned, 12-inch cast iron skillet over high heat and add olive oil.
In a large bowl, whisk together the eggs, Parmesan cheese, green onions, dill, and black pepper. Add potatoes and stir to incorporate.
When the oil is shimmering, add the potato pancake batter. Using a heat-proof spatula, tease it out into a even layer while leaving the top a little bit lumpy.
Cook on the stovetop for 5 to 6 minutes, until the bottom is starting to brown and set.
Transfer skillet to the preheated oven and bake for 8 to 10 minutes.
When the pancake seems cooked through, switch to the broiler and cook until the top is quite brown and crunchy.
Remove pancake from the oven and let cool in the skillet for a few minutes. Once it's no longer piping hot, slide it onto a cutting board, cut into wedges and serve. Schema/Recipe SEO Data Markup by ZipList Recipe Plugin2.2http://www.foodinjars.com/2013/05/a-giant-potato-pancake-for-eat-write-retreats-amazing-apps-culinary-challenge/
Related Posts:
Preserves in Action: Apricot Jam on Ricotta Cheese
Dried Apricot Jam from 250 Home Preserving Favorites
Preserves in Action: Open-Face Turkey Sandwich with Apricot Preserves


