
Matador Network's Blog, page 1427
December 21, 2017
how to make world holiday cocktails
If you are getting sick of eggnog at every holiday party, you are not alone. Expedia created a list of holiday cocktails from around the world with some tips on how to make them. While some, like Ireland’s Irish Cream, satisfy the classicist’s winter season tastes, others, such as Jamaica’s Sorrel Punch, will bring something bright and fruity to your New Year’s party. If you are looking for a new caffeine kick, Chile’s take on the White Russian looks absolutely killer. 
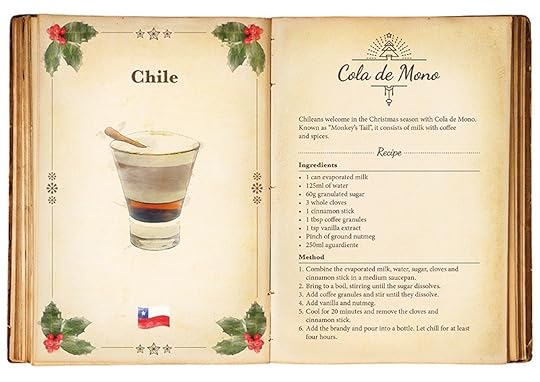
Photo: Expedia
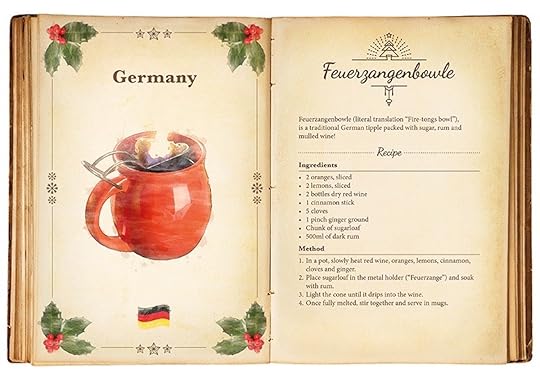
Photo: Expedia

Photo: Expedia
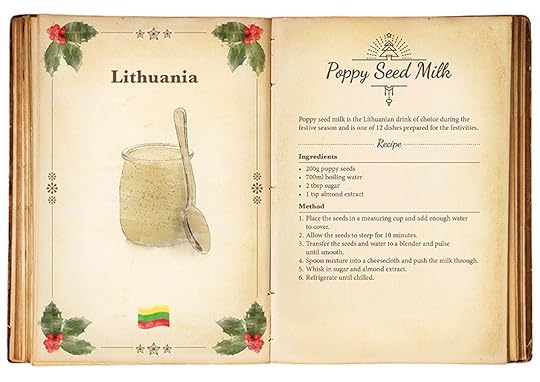
Photo: Expedia
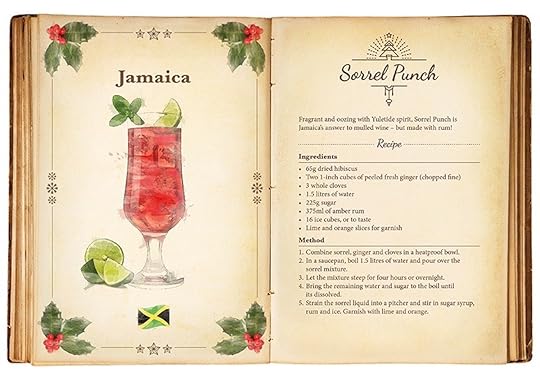
Photo: Expedia

Photo: Expedia

Photo: Expedia
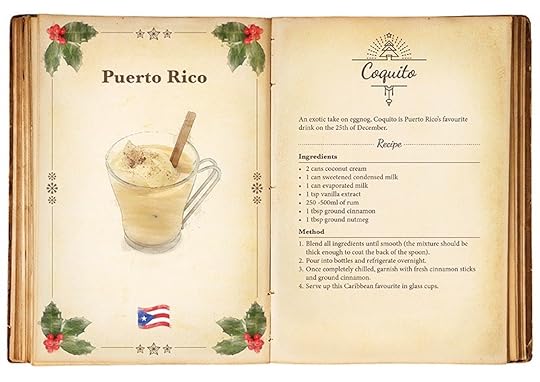
Photo: Expedia
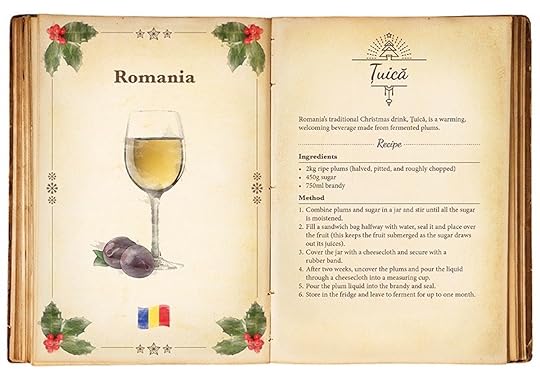
Photo: Expedia

Photo: Expedia

More like this: The most popular holiday foods from around the world (INFOGRAPHIC)


Travel as a vegetarian
I was deep in the hills of Uganda being introduced to my host family when I had my first real desire to eat meat. The look and the smell of the chunks of goat in a brownish, watery gravy in front of me were not in the least appetizing, but I was still tempted to throw my vegetarianism out the window if it would have helped me avoid offending my hosts. I would have been perfectly happy eating the staple food of steamed matoke (plantain), but instead, to commemorate the occasion of a guest in her home, the matriarch had prepared a special meal of goat soup. I stared at the goat chunks for what felt like hours wondering if I could just scarf it down and deal with the consequences later. In the end, I begged for forgiveness and turned down their generous offering.
I have been a vegetarian all my life, and I have traveled to almost 50 countries. While it’s never easy, it is totally possible to be an avid traveler and still stick to your dietary choices. Here’s how:
1. Get over the embarrassment.
If you pride yourself on being an easygoing traveler who is up for anything, that all ends at the dinner table. You will find yourself prolonging the ordering process by ensuring the waitstaff understands your definition of vegetarianism and trying not to get irritated when you are left with no option other than a garden salad. Do your best to be prepared ahead of time by researching online menus when available and by explaining your dietary needs to the group you are traveling with.
2. Do your research.
I rarely ever show up to a country/city without having researched a few vegetarian restaurants. There are some destinations that are easy for vegetarians — Bali and India, for example — and restaurants in most big cities like Hong Kong, London, and New York cater to those with dietary restrictions. Some destinations are more difficult, but websites like Happy Cow make vegetarian travelers’ lives much easier.
I ate many a bowl of vegan ramen in Tokyo and Kyoto by spending some time researching in advance and starring them on Google Maps. If all fails, my hack is to look up an Indian or Mediterranean restaurant in the area; those cuisines generally always have a vegetarian dish on the menu. No, it’s not the most authentic meal if you are in Estonia, but vegetarian travelers gotta eat, too.
3. Learn the right words to communicate in the local language.
Most times, just learning to say “vegetarian” in the local vernacular won’t do it. In many cultures, vegetarianism is still a new concept with varied definitions. When I lived in Moscow, I learned very quickly that it wasn’t enough to say, “I am a vegetarian,” I had to learn to say “I don’t eat meat,” along with the word for “vegetarian.” I would advise travelers to learn the words for “no,” “meat,” “chicken,” and “fish” in the local language. You will likely still end up with fish sauce in your dish if you are somewhere in southeast Asia and then it’s your call if you want to send it back to the kitchen or not.
4. Keep an open mind.
Know that in some cultures, meat is part of their history and their evolution, so it’s important to respect that while still sticking to your guns. For example, the use of ants and insects in food and garnish in Mexican cuisine might make you squeamish, but it was a product of resourcefulness in the midst of poverty that led to incorporating things that were easily available into food. So, before you launch into your diatribe on the carbon footprint of meat and the perils of factory farming, know that the local cuisine has adapted over centuries to cater to its people and its environment, not to you.
5. Know your failsafe.
For me, it is hot sauce. If all else fails, I can douse a bland meal with something spicy and get by. After a lot of bread, cheese, walnuts, and pomegranates (all amazing as they are) in Tbilisi, Georgia, I was craving some deeper and spicier flavors. If you’re like me, carry a small bottle of hot sauce for emergencies.
More like this: How to piss off a vegetarian
how to say merry christmas in Europe
Happy Holidays, everyone! As the Northern Hemisphere enters the darkest and coldest months at the end of the year, it is always good to hear well-wishing from loved ones and strangers. Around this time of year, people across the world are putting in some extra effort to spend time with their family, festooning their homes with treasured knick-knacks, and generally embracing winter as a part of the miracle of living on Earth.
Do you celebrate Christmas? If so: Merry Christmas! I hope you get the chance to eat at least one massive gingerbread cookie and witness your hometown or neighborhood glisten in a fresh blanket of snow. If you plan on traveling to Europe for the holiday season, Jakub Marian has put together a useful map of all the ways you can wish someone who celebrates Christmas, a Merry Christmas. Check it out. 
Photo: Jakub Marian
More like this: Where to find the best Christmas markets in Europe

Find a job and move to Iceland
It’s extremely difficult to visit Iceland and not fall in love with the place. If you’re dreaming of moving here, be sure to do some research before jetting! Moving to Iceland isn’t as easy as you may think, but this step-by-step guide will help you figure out how spend the rest of your days in natural hot springs.
How to get an Icelandic Residence Permit:
1. Figure out which residence permit you’re eligible for.
2. Start getting your documents together.
3. Apply.
4. Wait.
5. When you get your residence permit, rejoice and buy your one-way ticket!
1. Figure out which residence permit you’re eligible for.
There are essentially four ways that one can move to Iceland. They are listed on the Directorate of Immigration website, where you can find a wealth of information pertaining to any part of this process.
First things first — decide on which applicant category you fall into, and then make the appropriate application. You can move to Iceland if you:
1. Have family in Iceland (i.e. a spouse or parent)
2. Have a job
3. Are a university student
4. Are an EU/EEA citizen. Since Europe allows freedom of movement of its citizens, all you’d need to do if you’re from another EU/EEA country is register your residence in Iceland with the National Registrar.
Realistically, it is not easy to move to Iceland if you are from outside the EA/EEU if you don’t fall into any of the above categories. If you’re still hell-bent on moving here, however, focus on contacting potential employers, but keep in mind that jobs must be secured prior to obtaining a residence permit — that means getting a work contract.
The good news is, Iceland’s tourism industry is booming, and so if you want to work in a hotel, guesthouse, or restaurant, there are many opportunities. Your best bet would be to look during the high season (the summer). Another good option for foreigners is farm work — there are many opportunities in the countryside. The following websites are good resources for a job search:
www.storf.is
www.vinna.is
www.alfred.is
www.tvinna.is
Of course, another viable option is to fall in love with and Icelander and get married (you CAN get married in Iceland without a residence permit). But that’s another story.
2. Start getting your documents together.
Whichever category you fall under, there are a number of basic required documents that you must collect before you apply for a residence permit.
Complete the application form.
This means printed, hand-signed, and photocopied when necessary. There are a few different application forms depending on what category you fall into (i.e. fill out the D-207 if you’re applying on the basis of employment in Iceland). The applicatio itself is fairly straightforward, and contains a checklist at the end that you must use to confirm that everything has been included. Find out more on types of residence permit applications here.
You must prove your identity with a valid passport or authentic ID.
A photocopy works just fine, but be sure that your passport does not expire for at least two years. The immigration authorities will reject your application if your passport does not have much time until expiry.
Meet the requirements for support.
In Iceland, the minimum financial requirement is ISK 180,550 per month for an individual (or roughly $1,900 USD), and ISK 270,825 per month ($2,800 USD) if you’re a couple. Keep in mind that if you’re applying as a spouse, marriage law states that their income is sufficient to support you. You’ll be required to prove that you have this support, and there are a couple ways to go about this. The easiest is to show an employment contract (if you’re moving on the basis of a job), pay slips from the last three months from either you or your spouse, or a study grant (if you’re a student).
Have a health insurance policy in Iceland.
You must purchase a short-term, private health insurance policy in order to apply for a residence permit. The plan must cover, at minimum, ISK 2,000,000 (about $20,000 USD). This will keep you covered during the time between arriving to Iceland on a new permit, and when the National Health Insurance scheme automatically kicks in — which is about six months after the start date on your residence card. Sjóvá is an Icelandic insurance company that sells short-term plans.
Have a place of residence in Iceland.
If you’re joining family, you can use their place of residence on your application. If you’re coming on your own as a student or as an employee, you must speak with your employer or residence department to secure a place of residence prior to making your application. Some good websites you can use to browse housing options:
fasteignir.visir.is
leigulistinn.is
Submit a criminal record certificate.
All applicants must submit a criminal record certificate from all the countries they have lived in for the last five years. It goes without saying that this certificate must be clean. This is a required part of the immigration process, and probably the most annoying of them. You’ll need to go to your local police station in your home country to get fingerprinted, submit the fingerprints to the highest appropriate authority, and wait for the results to arrive in the mail. In the US, this means the FBI or an FBI-Approved Channeler. The good news is, the FBI website clearly details the process step-by-step. My recommendation: use an FBI-Approved Channeler — things happen much quicker if you go that route.
Meet the special requirements for the kind of residence permit applied for.
Keep in mind that each residence permit has its own set of specific supporting documents in addition to the basic requirement. A residence permit applied for because of marriage, for instance, requires a certified copy of one’s marriage certificate. If you’re enrolled in university as a student, you must present your letter of acceptance. These specific requirements are also listed on the immigration website.
Important note: If any of your application materials are in a language other than English (or one of the Scandinavian languages), they must be accompanied by a translation completed by an authorized translator. Additionally, it’s a general requirement that supporting documents should be in their original format. A criminal record certificate, for example, needs to be an original (not a copy). Exceptions to this rule are a number of certificates (birth certificate, marriage certificate, etc.) — these may be submitted as confirmed copies. To get a document confirmed if you’re a US citizen, you must submit it to the US Department of State. Further instructions on this process can be found here.
3. Apply.
Applications must be printed, hand-signed, and submitted in person if the applicant is in Iceland. If the applicant is outside Iceland, it can be sent by mail with the payment receipt enclosed. The fee for applying is 6.000 ISK ($60 USD) and the processing time can take up to 90 days.
You can call the Directorate of Immigration to check on the status of your application on Mondays 9:00 – 2:00, Tuesday to Thursday 10:00 – 2:00, or Fridays 9:00 – 12:00. Hot tip: greet them by saying “Góðan Daginn” and they’ll know you’re serious!
4. Wait.
Once you submit your application, it’s time to play the waiting game. Applicants are allowed to be in Iceland while their application is being processed, but will be granted entry as a tourist (with your passport stamped as such). Keep in mind that you are only allowed up to 90 days in the Schengen Area if you are from outside the EU/EEA, and so there’s a chance you’ll have to leave Iceland before your residence permit is granted if it takes longer than 90 days to process.
5. When you get your residence permit, rejoice and buy your one-way ticket!
Your result will arrive in the mail. It will be in Icelandic (Google translate!) and contain a very important number: your kennitala. This is essentially the equivalent of a social security number, and it’s extremely important. At this point, you may buy your plane ticket (if you’re outside Iceland), and when you arrive at Keflavík Airport, present the immigration official at the checkpoint with your kennitala and/or your letter from the Directorate of Immigration. You should already be in the system.
From there, you’re free to enjoy your new life. Sign up for an Icelandic class, meet the locals, and immerse yourself in your new home. But don’t forget — you’ll need to renew your residence permit yearly until you qualify for a permanent residence permit or Icelandic citizenship!
More like this: 10 American habits I lost when I moved to Iceland
6 uncomfortable truths about traveling with a toddler
My two-year-old daughter is my number one traveling companion. Needless to say, she and I have both had to learn a lot about traveling and what it takes. It’s been a challenge and one that is undoubtedly worth it.
Here are the 6 uncomfortable truths about traveling with a toddler.
1. It’s kind of scary.
Travelling with a toddler(s) adds a whole new level of stress and dimensions of fear to travel. Despite the fact that toddlers are usually under 3’ tall, can’t read and have their shoes on the wrong feet, they are fast and sneaky. Going to new places, getting on new forms of public transport, and navigating strangers is unnerving not only to you but also your little one. Also, one of the most difficult elements about traveling with someone so young is that they cannot communicate. If they get ill, have allergies, you name it — you need to learn to read the signs under very unusual circumstances. Personally, I think it makes your toddler and yourself stronger emotionally, physically, and strengthens your bond.
2. You have to travel with a miniature dictator.
“YOU DON’T TELL ME.” Is currently my toddler’s favorite thing to yell when I ask her to do something. That and “NO”. Having a planned itinerary full of activities for the family, you need to be prepared for the truth that your toddler might not be interested in any of those things or change their mind rapidly. Just as this phase in their life has a shelf life, so does the tantrum that will follow if you attempt to overturn their tyrant. Be flexible and be prepared to need refunds, or change reservations or venues completely!
3. Forget packing light.
Babies take a lot of gear, we know, but at least it’s all kind of smallish and portable. Not so much with a toddler. Especially bulky and heavy car seats. Also due to potty training you need at least two extra pairs of pants per day of travel, a blanket, lots of snacks, and those tiny little figurines they absolutely love because they fit perfectly in their hand (they’ll get left somewhere). In fact, you’ll do such a good job packing for the little darling you’ll more than likely forget to pack for yourself.
4. You’re will lose something… and it’s probably valuable.
Pre-toddler, I have to admit I had a tendency to lose things like sunglasses and my wallet, but now with the constant distraction, I lose everything. Chuck travel into the mix and expect to rack up a hefty list: an earring, your phone, at least two pairs of toddler socks, your temper, and your toddler at least once. It’s okay, a lot of that stuff is replaceable and you’ll find your toddler (they are probably doing something gross).
5. They’re going to wet their pants. A lot.
Something about traveling and being in a new place makes my daughter forget that toilets exist. I try to play it cool and be calm but most of the time I feel a twitch developing in my eye as I stare at the puddle of urine around her feet as other toddlers, probably also traveling, are urine free. New routines and environments can disrupt even the most down-pat potty training. Keep in mind there will be a sink where you can rinse them off and no one knows you, so peeing outside is an option.
6. You aren’t cool anymore.
This may sound selfish but after becoming a parent I’ve really wrestled with this. Pre-toddler travel, you felt like a bad ass. I’d show up with a backpack, travel documents, maybe a water bottle, and I was set. You show up for the same trip with your toddler you have at least two backpacks and a tote bag, your toddler, their favorite toy (that you’re going to wind up carrying), and probably a cooler/lunchbox. Those sexy outfits you used to wear out while traveling are now in the back of your drawer behind sturdy leggings and the mom-jeans. Those invitations to weekends hiking in a new place don’t come as often because you’ve got two little legs to bring with you. You’re in a new phase of life. Keep in mind the compensation is great. Now you have the best travel partner and you may not be hitting up all the bars in town, but you will have a wonderful experience and one that you will actually remember.
More like this: 7 reasons to travel with your kids

Where to stay in Mexico City
As one of the largest capital cities in the world, Mexico City has many accommodation options to choose from: hostels, bed & breakfasts, Airbnbs, boutique hotels, etc. There’s something for every taste and every budget.
So, if you’re wondering where to stay on your trip to Mexico City, this guide will make your selection easier. Here are the best recommendations for accommodations in Mexico City.
Where to stay in Mexico City:
1. The best barrios to stay in Mexico City
2. Most interesting hotels in Mexico City
3. Best hotels with pools
4. Best Airbnbs in Mexico City
5. What about staying near the airport?
The best barrios to stay in Mexico City
Which neighborhood should you be staying in? This is important because each one has its own flavor. Here are the four best barrios to stay in the city:
Historic city center
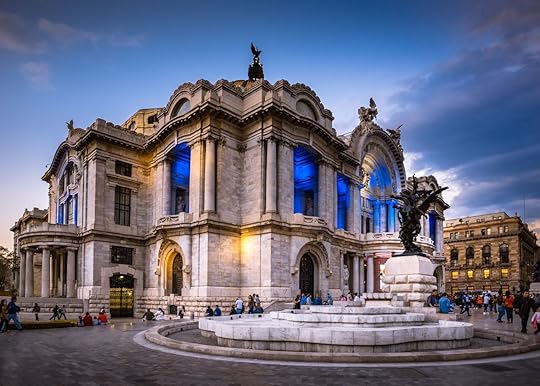
Photo: Rulo Luna Ramos
The historic center is a great place to stay because it is in the heart of the action, where most of the museums and interesting monuments and buildings are located.
The historic center of Mexico City can be quite chaotic, but there still are many quiet and picturesque spots where you can have a pleasant stay. A good location to stay is near the Zócalo, the main square of the city center. Some good lodging options in this area are:
Chillout Flat Bed & Breakfast
Downtown México Boutique Hotel
Hostal Amigo
Colonia Roma
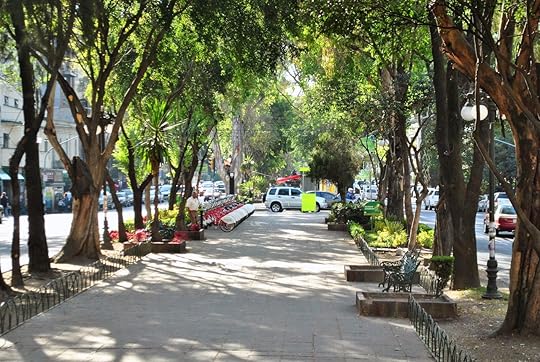
Photo: Wikimedia
Full of art galleries, coffee shops, sunny terraces, designers’ bazaars, cocktail bars, and gourmet restaurants, Roma is the city’s trendiest neighborhood. Its French-style architecture and its artsy and cosmopolitan atmosphere make Roma one of the most appealing areas in Mexico City. The two best options to stay in Roma are:
Casa de la Condesa. located in Plaza Luis Cabrera, it is a nice and affordable option
Hostal 333 and its lively street-level bar
Colonia Cuauhtémoc
Photo: Rulo Luna Ramos
Colonia Cuauhtémoc is an extraordinary area to stay. It is just steps away from Paseo de la Reforma (one of the main streets in the city), and its location is ideal to go exploring the historic center, the city’s trendy neighborhoods like Juárez, Roma, and Condesa, the Chapultepec forest and its castle, all the city’s best museums, and the upscale Polanco neighborhood. The best lodging options in Colonia Cuauhtémoc are:
The recently renovated Hotel Carlota
The more traditional, but beautiful, Hotel María Cristina
Coyoacán
Photo: Rulo Luna Ramos
The neighborhood where Frida Kahlo was born and died is an excellent option to stay in the city. It has a bohemian and relaxed atmosphere, and its geographical location is great — you can easily visit the San Ángel neighborhood and Ciudad Universitaria, UNAM’s main campus.
The area around Francisco Sosa Street and Santa Catarina Square is very picturesque has lots of cultural venues, coffee shops, green areas and thousands of things to see and do. Some lodging options here are:
Hostal & Casa de Huéspedes Tamayo
Corazoncito Coyoacán One
La Casita del Patio Verde
If you’d like to stay near Frida Kahlo’s Blue House (Casa Azul) and the Coyoacán Market, check out Hostal Cuija Coyoacán
Most interesting hotels in Mexico City
For a different lodging experience, you can choose to stay at one of these interesting hotels that offer unique accommodation in Mexico City.
Orgánico Hotel Boutique
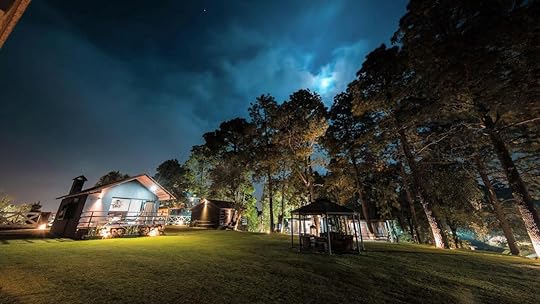
Photo: Organico Hotel Boutique
Orgánico Hotel Boutique is located in the mountains, on the skirts of Ajusco hill. The cabin-like suites will make you feel like you’ve left CDMX entirely. Here, you can go horse-riding or mountain biking, and enjoy bonfires at night. None of these activities can be done in any other hotel in the city.
Hotel Parque México

Photo: Hotel Parque Mexico
Hotel Parque México is a beautifully-decorated hotel located in the trendy Condesa neighborhood. All of the rooms, common areas, and the incredible terrace are gorgeous. Everything you see is 100% made in Mexico — including the furniture and decorations — and you can buy any of it!
La Valise

Photo: La Valise
Located in the Roma neighborhood, La Valise is a luxurious small hotel with only three rooms! This exclusivity makes the service hyper-personalized. One of the most interesting things about this tiny hotel is that every room features a different theme with its own design and ambiance. The suite named “La Terraza” is at the top floor of the hotel, and allows you to sleep under the stars with its king size bed that rolls from inside the bedroom to the exterior rooftop terrace.
Hotel Busue

Photo: BUSUE – A Boutique Experience Hotel
Hotel Busue is located in the upscale neighborhood of Polanco. We love it because it offers a real boutique experience in Mexico City — its service is super personalized, the room service is out of this world, and the suites are decorated with works of art that can all be purchased.
Best hotels with pools
It’s not that common to find hotels with pools in Mexico City, as it is a destination with so many things to see and do that you’ll spend most of your time out of the hotel. But if you’re traveling with kids, or you just want to relax, these are the best options in the city.
Hotel Hilton Santa Fe

Photo: Hilton Mexico City Santa Fe
Hotel Hilton Santa Fe probably has the best hotel pool in all Mexico City. It’s located on the rooftop, 15 stories up, so it has incredible views. Santa Fe is an area situated far from the rest of the city and it is mainly an upscale business neighborhood.
Westin Santa Fe

Photo: Westin Santa Fe, Mexico City
Also located in Santa Fe, Westin Santa Fe has a small but lovely pool on its “sky floor”. This is a counter-current pool that serves mainly for cardio and aerobic workout, but the terrace around it is so nice that you can also use it simply to relax.
The Polanco neighborhood is full of top-notch hotels with all the amenities and facilities to pamper you. Two great pools can be found at Hotel Hyatt (an indoor pool but with an outdoor sundeck), and at Habita — one of the trendiest hotels in the neighborhood, and where, from time to time, vibrant pool parties are held.
Best Airbnbs in Mexico City
Airbnb has a huge presence in the city and there are some very cool options in the trendiest neighborhoods. If you are planning to travel to Mexico City, consider staying at one of these Airbnb options.
1. Boutique patio-apartment — $75 USD
This cozy place is located in the historic Colonia Juárez, which is a lively neighborhood with trendy restaurants, hip bars, designers’ bazaars, and art galleries. It’s just steps away from Paseo de la Reforma street. It accommodates two guests.
See listing here.
2. Cozy flat in restored early-20th Century house
Located in trendy Colonia Roma, this flat is part of a restored historic house. It has a nice common garden to enjoy sunny days in Mexico City. It accommodates three guests.
See listing here.
3. Peaceful and quiet apartment/terrace — $80 USD
Another great choice in the Roma neighborhood. This apartment has a super cool terrace with hammocks and outdoor furniture.
See listing here.
4. Room in a loft with terrace — $21 USD
Having the option of enjoying a private terrace in the chaotic historic city center is quite a privilege. This loft has a nice and quiet terrace to relax after a day exploring the heart of Mexico City. The room accommodates two guests.
See listing here.
5. Nice loft in the heart of Polanco — $48 USD
This modern urban loft has a great location in the heart of Polanco neighborhood, so you’ll be able to walk to most of the area’s restaurants, bars, and points of interest. It accommodates four guests.
See listing here.
What about staying near the airport?
If Mexico City is nothing but a connection to get to your final destination, you may consider staying near the airport.
For budget travelers, Punto DF, Hostal Nova House, and Hostel Mexico DF Airport are three hostels located only minutes away from the airport.
Another option is Izzzleep, the first pod or capsule hotel in Mexico City, which is located in Terminal 1. Here you can pay per night or hour.
Options of regular hotels in or near Mexico City’s international airport are:
We Hotel Aeropuerto
Fiesta Inn Aeropuerto Ciudad de México
Camino Real Aeropuerto
More like this: How to get around Mexico City

24 hours in Yosemite National Park
Although it would take years to see all the wonders residing within Yosemite National Park, my adventure buddy, Ryan, and I had only 24 hours to take in as much hiking, sightseeing, eating, stargazing, and wildlife-watching as possible. Determined to pack our day with some of the park’s best — and leaving enough time to really soak everything in — we half-planned, half-winged through one of America’s favorite National Parks. Here’s a guide on how you can experience some of Yosemite in just 24 hours.
1
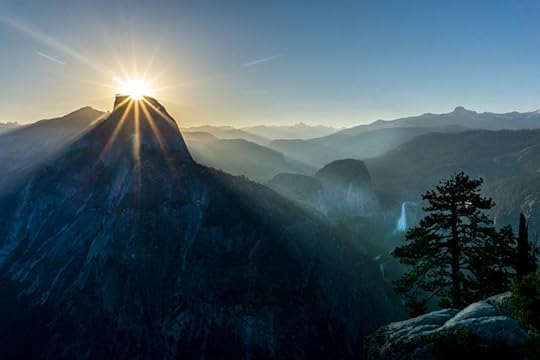
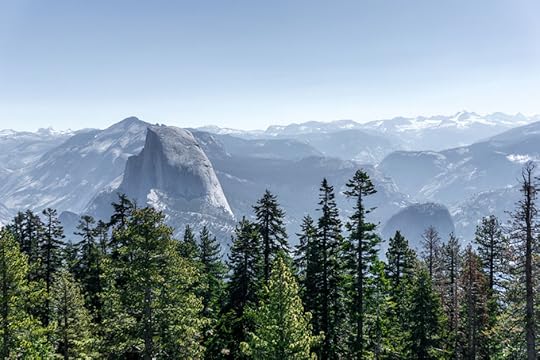
Sunrise at Glacier Point
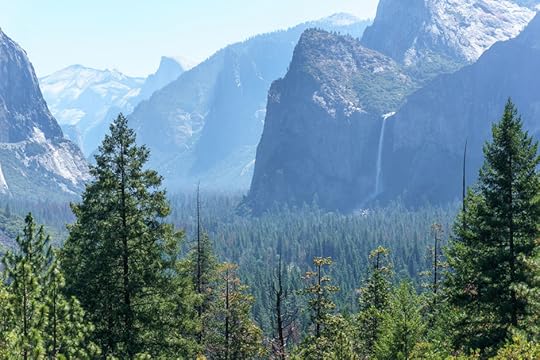
At 3,214 feet above the floor of Half Dome Village, Glacier Point is perfect for admiring the first light of the day as it illuminates the valley below. Half Dome, Yosemite Falls, Yosemite Valley, and Yosemite’s high country are all within view from Glacier Point, and it’s not hard to see why this is one of the most popular overlooks in Yosemite.
2
Breakfast at Sentinel Dome
The 2.2-mile hike to Sentinel Dome is a gorgeous way to start your day. This is a fairly easy hike with an uphill push at the end to the dome’s crest that will take hikers to a 360-degree view of the park. It’s also a perfect place to munch on breakfast.
Note: Make sure you pack out any trash and don’t feed the wildlife!
3
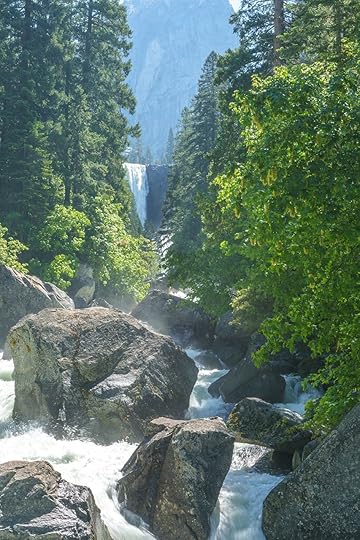
Late morning hike along the Mist Trail
A bus ride takes us to the Vernal Fall and Nevada Fall Trails. Although some could be deterred because of the trail's moderate to strenuous nature, the views at the end are worth the price. Three different main overlooks reside along the trail, giving visitors the opportunity to choose their own distance. After 400 feet of altitude gain and only .8 miles into the hike (1.6 miles round trip), a sturdy footbridge extends across the river, filled with photographers snapping shots of the distant Vernal Falls.
Intermission
Trip Planning
35 of the world’s best places to travel in 2017
Matador Team
Climbing
Here’s what it’s like to wake up on a portaledge thousands of feet up El Capitan
Ana Bulnes
Parks + Wilderness
Watch: British Columbia’s suspension bridge park comes alive with lights
Henry Miller
4
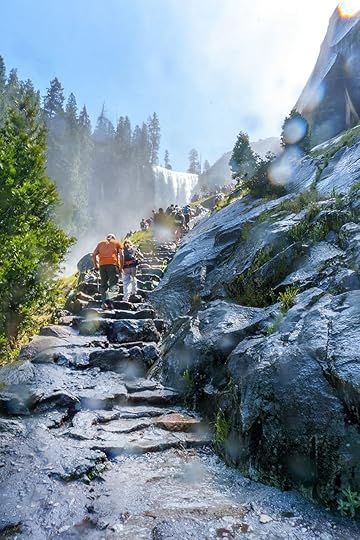
The path to Vernal Falls
1.2 miles into the path, you’ll find the wet, rocky steps to the top of Vernal Falls. The falls’ mist is enough to drench you, and it is advised to wear appropriate footwear and clothing. You’ll also want to put your electronics in a safe, dry place. The trail runs along the Merced River, and you should be careful not to get too close to its icy waters.
5
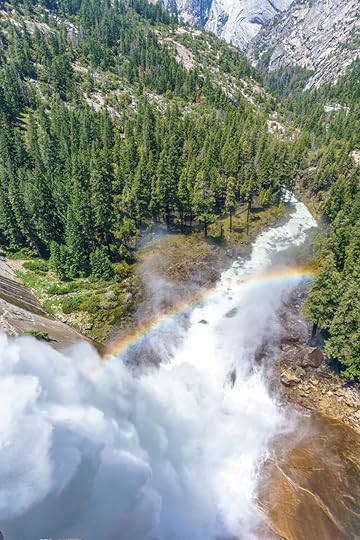
Views from high above
After a steep 2.7-mile hike to the top, we are rewarded with this awe-inspiring view of the Nevada Falls. Down below, the river disappears into the vibrant pine forest surrounding the valley.
6
Afternoon stop at Tunnel View
We only stop briefly at Tunnel View, one of the better-known spots in Yosemite. From here, you’ll be able to see El Capitan, Bridalveil Fall, and Half Dome in the distance. The valley disappears into a mid-day haze and we mark the filled parking lot as a place we want to return to for stargazing.

7
Late afternoon hike to Lower Yosemite Falls
A long day of hiking leads us back to the valley, but Ryan looks at the map and we decide we have one more hike in us. As dusk approaches, we find ourselves on the short 1-mile, round-trip trail to Lower Yosemite Falls. From further back, you can only catch a glimpse of the upper falls, but the trail will pull you into the forest and right in front of the falls’ full force.
8
Sentinel Bridge at sunset
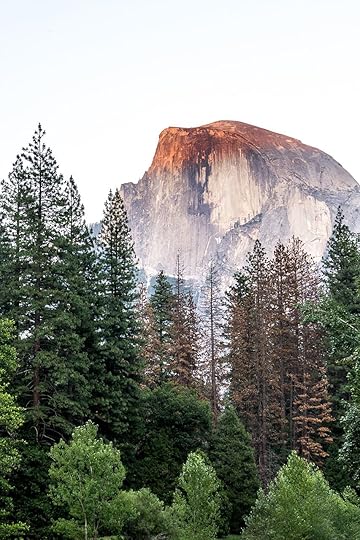
Following a dinner of camping-style, stove-cooked spaghetti and sun-warmed garlic bread, we ask a park ranger for one of the best spots to catch the sunset. “Sentinel Bridge, you’ll know it when you see it”, she replies as she points to a small dot on our map. After landing ourselves in the middle of the bridge, we understand the reason behind the tripod overpopulation all around us. This is the view of the Half Dome you want to take back home.
9
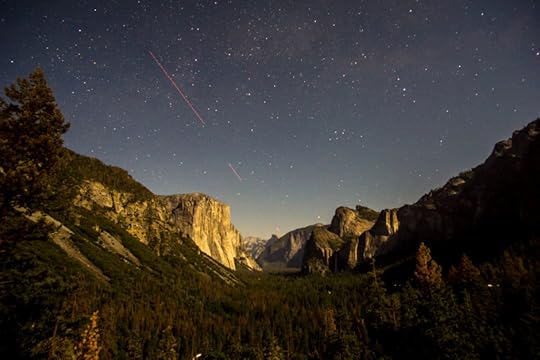
Stargazing at Tunnel View
Remembering our earlier experience at Tunnel View, we know we want to find ourselves below the stars in such a magical place. After an incredible sunset lower in the valley, we pull up to an almost empty parking lot. As the last light of day disappears from the sky, and families go back home for the evening, one by one, the stars begin to appear. The towering faces in the distance are illuminated by a crescent moon as we lounge with legs swinging off of a stone bridge. Time to breathe in Yosemite.
10
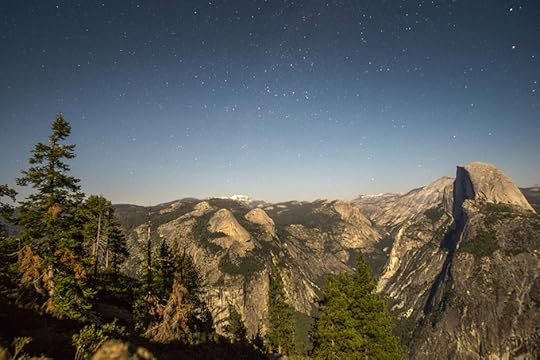
Back to the starting point
A dark, winding road carries us to where our day in Yosemite started. And here, we’re treated once again to a sweeping view of the valley, but this time there’s a sparkling sky above us.

11
24 hours later
After a chilly evening of stargazing and little sleep, we camp near Glacier Point. I set a 4 AM alarm to make it to the overlook in time for the sunrise and to take one last look at Yosemite. The perfect end to a very full 24 hours!
More like this: 12 surprising facts about America’s national parks

Tofino's Hot Springs Cove
Deep in the Clayoquot Sound is Hot Springs Cove, a remote collection of geothermal pools arranged along the ocean’s edge. The heated waters that pour from the rocks are pipin’ hot, averaging about 122°F, but they cool significantly as they get closer to the ocean.
These lands — gorgeous, serene, and secluded — were traditionally used by the First Nations people, specifically the Hesquiaht, Ahousat, and Manhousaht bands. This sheltered cove, once known as “Refuge Cove”, now Hot Springs Cove, provided calm waters for fishermen to wait out inclement weather.
The hot springs, found within the Maquinna Marine Provincial Park, are accessible only by boat or plane from Tofino. By boat, your chances of seeing wildlife — sea otters, whales (in season), sea lions, and bald eagles — are really good. You can choose to take a tour that will certainly stop for all wildlife, or a water transport taxi that probably won’t.
Once you’re dropped off, the adventure begins. A 2km (1.2mi) boardwalk weaves its way through old growth forest before depositing you to the site of the geothermal waterfalls which have been running for thousands of years. Bring sturdy shoes, because you’ll be doing a bit of rock scrambling to get to the pools. Once there, enjoy the soak for as long as you’re able — this is one adventure you don’t want to rush.
How to get there
Hot Springs Cove is accessible by boat or air. There’s a list of companies that currently have a Park Use Permit on the Maquinna Marine Park website. Most of them do tours from Tofino, but you can also arrange a water taxi service for pick up and drop off.
Need help getting to Tofino? Check out these directions.
What to consider
Hot Springs Cove is a remote location and requires a full day to see properly.
The boat trip takes about 1.5 hours and the plane ride is 20 minutes.
The 2km boardwalk to reach the springs has some 800 steps and may not be suitable for people in poor physical condition.
Clothing is NOT optional, keep yer britches on.
No glass containers in or around the pools, and no alcohol is permitted inside the park.
Also, no bathing with soaps etc. is allowed in the pools.
If you want to camp, there’s a private campground at the north end of the park (the pools are located on the south end).
Camping is rustic and self-pay ($20/per tent per night), with small tent sites.
No fires are allowed in the park.
There are no stores on site, so bring your provisions and water or you can stop for lunch at the floating Copper Moon Cafe, which is moored at the pier where the sea planes and ferries drop you off at.
More like this: Mapped: Nevada’s 20 best hot springs

December 20, 2017
Bolivia's Moon Valley
Valle de la Luna (Moon Valley) is just over 6 miles from downtown La Paz in the underrated country of Bolivia. Moon Valley, however, isn’t actually a valley at all, but rather a maze of stone spires and canyons. The rock formations are mostly composed of clay and sandstone which are all that remains of a mountain that’s been battered by the elements for centuries.
La Paz, the most densely populated urban area in all of Bolivia, is surrounded by mountains, and sits at a staggering 11,975 feet above sea level, making it the highest capital city in the world. Surrounded by mountains, it’s one of the most unique cities in South America — some would say the world. Temperatures in the area, especially at night, range from cold to much colder. It’s a dense city with incredible views of surrounding mountains, and it makes for an easy jumping off point for day trips.
Moon Valley, just 40 minutes away by bus, is a world of its own. Two circular walking tracks will send you in separate directions, each offering spectacular views. Devil’s Point, at the end of the longest track, is one of the more outstanding vistas. Due to the great variety in the mineral content, the rock formations themselves offer quite the color palette — varying from pale browns to deep reds, even slashes of purple. The vegetation, albeit sparse, is doggedly present. You’ll find several species of cactus wedged between the spires, including the hallucinogenic Choma, aka San Pedro Cactus.
Development is fast encroaching on this natural wonder and it erodes a bit more with each rainy season, so it’s definitely worth seeing while the landscape is still pristine and serene.
How to get there
You have three options: public transport, taxi, or tour.
By public transport: Take the Teleferico (cable car) green line to the end, Irpavi. Then take a taxi to the entrance, or you can walk to 8th street of Calacoto and take a minibus to Mallasa. The entrance to Valle de la Luna is just before Mallasa — tell the driver that’s where you’re going and they’ll drop you at the entrance.
By taxi: Moon Valley is about 15-20 minute drive from the southern zone of La Paz by taxi.
By tour: Tours usually arrange everything — transportation, entry fee, etc. But they will limit the amount of time you can spend at the site.
What to consider
Entry fee is $2.
Layered clothes and comfy shoes are a must.
Visit during the day.
Bring refreshments, there is nothing inside the park.
The longest walk around the valley will take you just under an hour.
It’s a good half day excursion.
More like this: Magic Spot: Salt Flats, Bolivia

Animal idioms from around the world
Sometimes you don’t even need to be an expert in a foreign language to understand its idioms. If your new French friend tells you something will happen when hens have teeth, you can imagine the odds of whatever event you’re talking about taking place are rather small (in Spanish, by the way, we say cuando las ranas críen pelo, ‘when frogs grow hair’). But it’s one thing to understand the idioms and another to use them.
Do you want to really impress native speakers? Use these idioms! The guys at GoCompare have put together this infographic with funny animal idioms from around. Find a way to insert them into your next conversation with a Dutch or Polish speaker.

More like this: Money idioms from around the world

Matador Network's Blog

- Matador Network's profile
- 6 followers

