Horton Deakins's Blog, page 34
June 21, 2011
A Man's Home

Pool at Hearst Castle, February, 2008
I'll get back to posting text when … when … well, when I get back to it. For now, I'm going to continue to share some of my best trip photos.


June 20, 2011
A Picture's Worth

Matterhorn
I don't have anything in particular to say today, but I wanted to begin sharing some photos that I've taken over the years. Most will be scenery from recent trips, but on occasion I may show you antique photos I've inherited or slides from trips in the 1960s and '70s.
The photo above is the Matterhorn, taken in 2005 in Zermatt, Switzerland. I'll try to keep it interesting by varying the locations. Auf wiedersehen!
June 18, 2011
How do you store your cups?
I want to take a moment today to reminisce. I opened the kitchen cabinet the other day to get a mug for my coffee, and it struck me that all the mugs were upright. That may not sound like anything at all to you, but it signifies a great change. You see, now that the mugs are upright, it means that I've stopped putting them on the shelf upside down.
"So what?" you ask. The answer is tied up in the reason I used to store them upside down. I did it because my mother always did it. And my mother did it because she was raised and lived most of her adult life in Oklahoma.
"I'm still waiting for the punchline," you say. "Here it is," says I. My mother came of age during the Dustbowl of the 1930's. Houses were often drafty back then — it wasn't unusual to be able to see sunlight peeking through where the walls met — and windows were the only way to cool a house. The dust went everywhere, and if you didn't want dust collecting in your freshly-washed cups, you stored them upside down.
Now my cups are upright. We no longer fear dust storms, and we have doors on our china cabinets to keep out the everyday dust. I had almost forgotten about the "upsidedown cups," but really — how could I forget?
June 16, 2011
Going Around the Horn
Actually, it's more like "substituting for the horn." Shoehorn, that is. Craig Brewer here. Didn't mean to get your hopes up if you happen to be a nautical type. I don't know about you, but I'm always losing my shoehorn, and when I haven't lost it, it's invariably in another room when I'm trying to put on my shoes.
Here's a little trick I figured out this morning. I usually wear a fairly wide belt, perhaps one and quarter to one and a half inches wide. I typically need just a little assist getting into my shoes (thus, the shoehorn), but as I was getting dressed I realized my shoehorn was in another part of the house. I hadn't put on my belt yet, so I dropped the tip of the belt into my shoe — a slip-on shoe — and used it the way you would normally use a shoehorn. It worked like a charm!
I tried this again later with my tennis shoes, but when the shoe has a tongue that hangs down, it complicates things. On the high side, though, you can do this without sitting or stooping. If you have just tucked in a dress shirt, bending over to insert a shoehorn can pull your shirt tail out a bit, and you could end up having to tuck that sucker in all over again.
No, I'll never give up my shoehorns (if I can find where I've hidden them), but this trick works in a pinch.
June 14, 2011
Anchors Away
Yes, I know, you sailors out there, the phrase is "Anchors Aweigh," the fight song of the US Naval Academy, but this is about HTML — not maritime navigation.
I'll keep this short and sweet. You're probably familiar with the anchor tag, or tag, as a way to insert a hyperlink into your markup document. You may even know that it can also be used to create a bookmark. But did you know you can use it to call a JavaScript function to "do nice things"?
Check out this markup:
If we had a JavaScript funtion called myAlert(), this code would call it and execute whatever code the function contained. At this point, we are definitely dealing with code and not markup, but I'll keep it simple. The problem, however, is that the browser still also try to navigate away from the page. There is a fix for this. I'll show it here, but I won't try to explain it. For now, just use it and trust (or some may wish to Trust but Verify):
Technically, the "onclick" is known as an event, and the function it refers to is the event handler. So, let's create that event handler. We'll need a place to put it, and that will be inside a container, which we'll locate inside the container (this is standard, but it's not the only place we could have put it). Our script container and function look like this:
function myAlert(){
alert("You clicked me!");
}
This is the complete code, everything you need to create a popup alert that says, "You clicked me!" and inhibit navigation away from the page. You can put as much code as you want in the function, but that is left as an exercise for the reader.
There is one more issue to discuss. Oftentimes your browser will block any JavaScript popups. If this happens, click the warning bar and allow the operation to continue. You might be able to change your security settings to prevent this from occuring, but it's probably not worth it, and that's out of the scope of this discussion, anyway.
That's it. Try it!
June 13, 2011
Calling for Reinforcements
It is Dr. Dubois once more, mes amis. I have made an error which I wish to correct. I did not wish to leave you with the impression that fillets are always to be composed only of glue. This is most common with the smaller models, but for the larger, faster rockets, we may wish to increase the strength of the joint between fin and rocket body tube.
There are a number of materials which are able to suffice for this purpose, but I will share with you my favorite. At the hobby store you may readily find hardwood dowels of very small cross-sectional diameter. For most models, a diameter of approximately one sixteenth of an inch, or about one and a half millimeters, will do nicely.
Cut two dowels for each fin, and make them only slightly shorter than the root edges of the fins. You may use wire cutters or even scissors to make the cuts. Cut them at angles so that the side of the dowel resting against the body tube is the longest. You may wish to use a little sandpaper to make the angled cuts smooth.
When you apply the first glue fillet, lay the dowel into the glue. Adjust its position and rotation. Hold it in place while you smooth the fillet with your finger. Alternatively, use a small amount of glue to secure the dowel before applying the fillet. This is accomplished most effectively with the cyanoacrylate gel.
When all fillets have been completed, the dowels should be barely visible. Further shaping of the ends of the dowels may be achieved during the application of the sealer and subsequent sanding.
June 12, 2011
A not-so-insurmountable problem
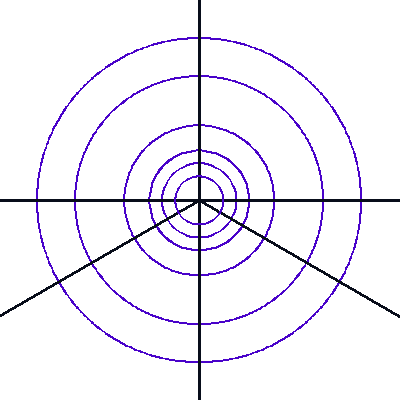
Fin Placement Template
Bonsoir, mes amis. I return now to fill in the gaps in your knowledge concerning the mounting, filleting, smoothing, and painting of model rocket fins. At this time you should have a set of fins ready to mount. If you do not, then please refer back to my posting of the twelfth of June of this year.
Above you will observe, if you please, a series of blue concentric circles with black lines drawn upon them. This is a template to help you mark the placement of fins on your rocket body tube. Print the diagram, and lay it flat upon the table. Stand your rocket body tube on this diagram, and use the circles to help you place the tube as close to the center as possible. Hold the tube very still, and use the lines and a pencil to make a small mark on the tube where the appropriate lines touch it. By appropriate, I mean to say that, if your rocket has four fins, use only the lines that form a cross. If there will be three fins, use only the top line and the two diagonal lines. The fins must all be separated by the same distances, the same angles — this should be easy to tell.
Now we must draw lines to indicate the locations for gluing the fins. For this, we need a V-shaped channel in which to lay the rocket body tube for marking. The edge of an open drawer, the underside of a shelf, a short piece of angled metal, or any of several other things you may find, or, if you have the needed skills, can build. Place the tube in the channel so that one of the straight edges touches one of the marks you have made, and, using a pencil, lightly draw a line to mark where the root edge of the fin will be anchored. Repeat this procedure for all fins. Do not draw the lines too far, just so, because you will otherwise later be trying to cover these marks with paint, and it may be very difficult to do it.
In the old days, we had only available to us white glue — none of this cyanoacrylate gel — but now, you may use the glue of your choosing. For white glue, or school glue, as you may know it, put a small amount along the root edge of the fin, and then smooth the glue with your fingertip until it becomes thin and "tacky." For cyanoacrylate glue, you must omit the part about touching it, or you will be walking around all day with a fin stuck to your fingers. Quickly and carefully, touch the bottom corner of the root edge to the bottom of the line on the rocket body and then press the root edge quickly to the entire line. For the modern glue, you must hold it in place for ten to fifteen seconds, and then you are done. For white glue, you will hold it a bit longer. Also for white glue, you will need to support the fin for a longer time with masking tape, or some other type of tape, such as painter's tape, that does not hold too firmly. The fin must point directly away from the rocket body. With white glue, you may want to wait approximately two hours between fins, but if you are careful, you may be able to install all the fins at one sitting. Do not proceed, however, until the glue is dry and the fins are firmly anchored.
Now that your fins are attached, we must apply something called "fillets." No, mes amis, not filets. Will will concentrate on dinner at another time, perhaps. No, we will create a smooth transition between the surfaces of the fin along the root edge and the body of the rocket. Smoothing this area will both decrease the drag factor of the rocket and will greatly increase the strength where the fin and rocket body meet. We do this with the white glue. Lay the rocket down on its side — gently, now; the fins are not yet at their full strength — and place something under nose end to keep the body level. A book or two will work for this purpose. If your rocket has four fins, it will naturally lie in the optimal position, but if it has three fins, use books or tape to orient the rocket so that two fin root edges can be seen from above. It is these edges to which we will apply our first fillets.
Open your glue bottle, but not too far, only just enough so that you do not have to squeeze the bottle too firmly. Apply a line of glue to the root edge-body joint, and then do the same to the top-side joint of the other fin. Run your fingertip along each joint to smooth the glue, and wipe up any excess with a wet paper towel. Do not spread the glue too far onto either the fin or the paper rocket tube. When you have done this, it is time to shift your focus onto another task, as you must allow the fillets to dry. This will take several hours, after which time you must repeat the process in order to make the fillets thick enough. But a better way is to allow only a couple of hours, just long enough so that the glue can no longer run, and then you can rotate the tube to another position in order to apply fillets to the other fins. Do not make the fillets to thick on the first try, or you will have glue dripping everywhere, spoiling the model. But neither should you make the fillets in their final form too thin. Take your time. Do it well, and you will have a rocket model to be proud of.
Now that the fins are attached and the fillets are completed, it is time to seal the surfaces of the fins to prepare them for painting. This you will do with a substance called sanding sealer, which is a type of model dope. Dope is also the name for the type of paint you will typically use for your rocket. Apply a smooth, thin layer of sealer to all fins, and allow it to dry completely. This will take several hours, perhaps overnight. When you are certain they fins are dry, use fine sandpaper to smooth them, sanding in the direction of the grain. Repeat this process until the fins are very smooth, changing to finer grits of sandpaper as you go. It will take several iterations of this to obtain good results, but it will be well worth it in the end, mes amis. As you smooth, you should also try to refine the shapes of the rounded leading edges and the tapered trailing edges.
When all fins are filleted and filled, and the launch lug is attached and filleted (we did not speak about the launch lug, but do not worry about that for now), we are ready for painting. I like to begin with a white primer and do everything with a brush, as opposed to using spray paint, which is seldom able to produce a smooth finish. The smoother the finish, as I am sure you know by now, the less drag our model will have. When your primer is completely dry, and no excess pencil marks are showing, then apply your final color. Usually one coat of dope will be enough if you have used a primer, and too much paint, especially when you are using types of paint other than dope, can add weight, thus affecting the rocket's performance.
That is all for now, friends. Enjoy your model building.
June 11, 2011
Deprecation
No, deprecation is not a bodily function. HTML elements are considered to be deprecated when they are slated for obsolescence. That is to say, in the near future, using the latest browsers, they won't work anymore.
Let's talk for a moment about a rather popular HTML tag that is now deprecated: the tag. First, you may well ask, "Who the heck decided it should be deprecated? It's all through my code!"
As I mentioned before, HTML is not code; HTML is markup. Code is instructions, or representations of instructions, to the computer processor intended to direct it to perform elements of its instruction set. Markup, on the other hand, is a way to describe how something should appear in a browser. Markup can also describe how something should be printed, but that's outside the scope of HTML and browsers.
As to who decides, these decisions are actually made by companies such as Microsoft who create the browsers that interpret the HTML. But Microsoft, and others, look to an organization called the World Wide Web Consortium, or W3C (www.w3.org), to provide standards which they may, at their discretion, incorporate into their browsers and other Web-oriented software.
Basically, what this all means is that you and I are at the mercy of the browser manufacturers, who are in turn highly influenced by the W3C (if not downright coerced). We do not get to choose the standards, but we must live with them.
"If I can't use the tag," you whine, "then what do I use instead?" Glad you asked. The answer, in a nutshell, is CSS styles. I'm not going to go into a dissertation on style sheets here; rather, I will demonstrate only a couple of ways to use inline styles to replace a font tag.
Recall that I said before that in the new XHTML standard, everything is a container. If you're still using tags, the … sequence is itself a container, but we're doing away with that, right? You are probably also nesting the tags inside a
tag, also known as a paragraph tag. I'm not going to assume, but I really hope you are both using lowercase letters in your tags and your
tags are in the form of containers, not open-ended. For example, you may already be forming your HTML thusly:
My dog has fleas
Which, in Internet Explorer 8, assuming your default font is Times New Roman, produces:
My dog has fleas
Once your browser starts supporting the HTML 5 standard, however, this won't work at all. Let's try something else.
We can still use the
container, and we are taking the defaults for "My" and for "has fleas", so right now we don't care about the formatting for those words.(Note to the budding literary editors out there—oftentimes in computer stuff, especially wherever specific instructions are given as to what to type, the comma goes OUTSIDE the quote marks. Don't doubt me on this.)
For "dog", on the other hand, we want Arial font, a much larger size, and we want it to be green. First, let's put the "dog" into a container, thusly:
My dog has fleas
Recall that is an inline element, so it doesn't jump down to the next line to display its content. This won't get us the large, green, Arial dog we are looking for, so let's add some style attributes to the span. To replace the "face" attribute, we use the "font-family" attribute:
My dog has fleas
Giving
My dog has fleas
It's clear that "dog" is displayed in the different font, but it's not as different as we'd like. We want it much bigger, and we want it to be green. The style attribute for the font color is the same in CSS as it is for the attribute in the tag for color. But size is another animal. If we try to specify "font-size:7" in our style, it does nothing, so we have to choose a different measurement (note also that if we tried to write "size:7", that also would be ignored by the browser, as are most unrecognizable styles). In this case, "font-size:3em" and "font-size:48px" will both work. I prefer to use the px units, px meaning "pixels," rather than the em units, em being a relative measurement referring to the size of the letter "M."
Here's our fully fleshed-out markup:
My dog has fleas
And the result:
My dog has fleas
But let's go one step further. Let's set the font and color of the rest of it, making it Comic Sans and red. You might think that if we styled the
container, it would override the styles of the contain, but this is not the case. The closer, more internal styles take precedence. Here is the full styling:My dog has fleas
Did you notice that I used the named color, Green, but I used the RGB hex notation for Red? That was just for fun. Here's the final rendering by the browser:
My dog has fleas
And that's it. We have applied a general, inline style to the paragraph, but we made the style for "dog" to be more specific and to override the general style. In most cases, the general style would have been applied using a style sheet, but that's beyond the scope of this posting.
Pill Minder Over Matter
Hello again, folks. Craig Brewer again. I'll be you thought I had fallen off the end of the world or something, and maybe in some ways, that's true. Or perhaps you thought I had passed on. Well, as Mark Twain said, "The rumors of my death have been greatly exaggerated."
Not to say I don't ail a bit from this or that now and then. Like most of us who have been around for at least a half century, the various and sundry practitioners of the medical arts with whom I have had the dubious honor of consulting on a regular basis have provided me with plenty of placebos and claimed cures I must ingest on a daily basis.
Now, here's the problem. I always seem to be in a hurry, and I never like to take time to set up my pill minder—you know, those little clear plastic things that have a compartment for every day of the week. Invariably, I will be short on time, or perhaps ready to climb into the sack, and my pill minder will be devoid of drugs. What to do? There's not much you can do, other than filling up a whole passel of pill minders, but then you run the risk of some doctor changing your dosages, and you have to go back and sort the whole thing out again. Or maybe you just want to carry one pill minder on your trip, but your trip will last a whole week, and if you use the pills from one compartment, you'll end up short.
I can't offer you a magic solution, but here's what I do: I make my pill minder work for eight days, adding 14% to the length of time it works for me. After filling it seven times, I've made it last for eight weeks. I don't have to fill it quite so often, so I have fewer frustrations with it.
"How does he do it?" You might ask. I'll bet most of you have figured it out already. If you're reading this, I already know you're smart. It's purdy simple, actually. Do you have some of those little paper bathroom cups? Set one down at the end of your pill minder when you're charging it with capsules, and instead of picking up seven pills, get eight. Drop the last one—or the first one; it doesn't matter—into the cup. Do the same with the rest of your meds. When you're finished, close all the little compartments, dump the pills from the cup into your hand, fill the cup with water, and swallow the pills (assuming it's the right time for them, of course!). Now you've taken your pills for the day, you still have a completely full pill minder. On top of all that, the process didn't add any inconvenience to your day whatsoever.
There. That's my two pills—er, bits.
June 7, 2011
It's not just a Tom Hanks movie
I have waited until today to post anything about D-Day just to see how others commemorated the 67th anniversary of the largest amphibious assault in the history of the world, the beginning of the end of World War II in Europe. I'm quite disappointed — there was hardly a mention of it. How easily we forget those who gave their lives so that we may blog.
All I have to say is: Go here –> http://www.army.mil/d-day