
Rinku Bhattacharya's Blog, page 76
March 10, 2015
Mint and Meyer Lemon Chicken Wings, Old Delhi and Musings
 Today’s recipe and the post may or may not be linked, but then again, linking things rest in the person’s mind. Well, the dish on hand is really about clean and fresh flavors, it is cooking wings much like a grilled Indian kebab. I personally am very fond of chicken wings, I like their moistness and also like the fact that for the most part we can leave some skin in the game.
What I do not necessarily like is the fact that a lot of chicken wing recipes fry the wings or tend to load them with heavily stuff, so, in the interest of welcoming spring and thinking fresh, I decided to pair the wings with my favorite citrus -the Meyer Lemon and cook them in the style of a kebab, except I baked and broiled them, rather than cook them over an open flame. The results for these Mint and Meyer Lemon Chicken Wings were surprisingly good! The kids enjoyed them over their share of the Discovery channel, over a program featuring donkeys. My son who is currently being spoken to about language issues, also pointed out to me that the man in the program cursed, he said “Wild Ass”.
I imagine this recipe would taste pretty good with drumsticks too! I use the powdered mint, that I made from drying our mint last summer.
When I thing of kebabs and almost all items that are inspired by the Mughal culture, I am transported back to Old Delhi, a part of India that is very close to my foodie heart. We foodies, need to find inspiration beyond the oasis and core hubs of training, which in my case ( I know, very cliched) was my grandmother’s kitchen. But, time life, and travels also shape my experiences. Over time, I have found places of inspiration one of them is Old Delhi.
Visiting Delhi, was something I needed to do (the husband’s family lives, there) and I accepted it much like the terms of an arranged marriage and then love happened. Not with all of the city, but Old Delhi stole my heart and I learned to love this part of the city with a deep, peaceful and enduring love. Every time, I visited Delhi, I carve out a day to spend amidst the hustle and bustle of this foodie haven. Meandering through streets, finding and watching the camaraderie of culinary artisans of both Hindu and Muslim persuasions, I am loved and impressed and inspired. Possibly the most interesting component is to see, how things are really done, one step at a time. Yes, away from the annals of the political enclave of buildings rests this quite community of food artisans.

The mornings are the best, as are the evenings when the food vendors do not have any competition from the rest of the commercial businesses. In winters you shall find in the early hours of the morning, a fanciful treat called Daulat ki Chaat, yes, the very one that Pamela mentions in her lovely memoir Korma, Kismet and Kheer.

This year in my meanderings, I was lucky enough to find the company of Anubhav Sapra, the distinguished foodie-in-chief of a passionate, growing outfit called Delhi food walks. Walking the bylanes with this very knowledgeable foodie, will make you feel like you are talking a day off to hang out with your best friend. The kind who scopes out everything to make sure that your food experience is perfect. What I especially enjoyed traveling with Anubhav, was being able to chat with all the food makers and hear about how they make their fare, from Birayani masala to haleem, from masala chai to milkcake there is indeed a story behind it all. Stories, to me inspire recipes and as I gradually share tales of my India travels, you will see them emerge through flavors and recipes.
 Spices!? Want them fresh and fragrant? That is also doable in Old Delhi, at Khari Baoli, India’s oldest spice market and a lardmark still considered Asia’s largest spice market. Yes, as I meander through my memories, I realize it is time to tell you about the kebabs that we were talking about, or the kebab style wings that will make your heart sing.

Print 
Mint and Meyer Lemon Wings, Old Delhi and Musings
Prep Time: 6 hours
Cook Time: 25 minutes
Total Time: 6 hours, 25 minutes
This recipe pairs chicken wings wing with my favorite citrus – the Meyer Lemon. The marinade has deep and smokey notes from cumin and cayenne and a fresh spark from ginger and garlic. It overall creates a well seasoned but light variation of chicken wings, which makes it different from the typical heavy fried or coated varieties. The seasonings work well with the most texture of the wings, the key is to allow them to marinate until well seasoned.
Ingredients
2 tablespoons whole cumin seeds1 teaspoon whole coriander seeds
1 teaspoon black peppercorns
3 cloves of garlic
2 tablespoons freshly grated ginger
11/2 teaspoons dried mint or ½ cup fresh mint leaves
1 teaspoon red cayenne pepper (more to taste)
1 teaspoon salt (adjust to taste)
2 tablespoons raw honey
2 Meyer lemons (plus more for garnishing)
2 pounds of chicken wings
2 tablespoons oil
Sliced Red onions and cilantro to garnish
Instructions
Lightly roast the cumin and coriander seeds in a skillet for about 2 to 3 minutes, until fragrant and a few shades darker.Grind to a powder with the black peppercorns.
Place in a blender with the garlic, ginger and mint leaves with a little water if needed and blend to a smooth puree.
Place in a large bowl or zip lock bag, mix in the cayenne pepper, salt and honey and coat the wings evenly and marinate for 5 hours or longer.
During the last hour of marinating cut the meyer lemons, remove the seeds and squeeze in the juice and toss well.
Pre-heat the oven to 350 degrees, grease a baking sheet and spread the wings and bake for 15 minutes.
Turn and broil on low for about 2 to 3 minutes until the wings have gentle crisp spots, turn and repeat.
Serve the wings with sliced lemon, red onions and cilantro if desired.
Notes
Most of the prep time for this recipe is in the marination.
Schema/Recipe SEO Data Markup by ZipList Recipe Plugin2.6http://www.spicechronicles.com/mint-meyer-lemon-wings-old-delhi-musings/
The post Mint and Meyer Lemon Chicken Wings, Old Delhi and Musings appeared first on Spice Chronicles.


March 9, 2015
Honey Miso Tofu and Vegetable Stir Fry
 I have resisted doing Meatless Monday posts, for various reasons, however, recently some of you have asked me for Meatless Monday inspiration and I am giving it a try beginning with this Honey-Miso Tofu Stir Fry.
If you want to make this dish vegan, you can use agave nectar for reasonable results. The sweet and savory flavors gave this dish a lovely deep complexity, and while we loved it as is if you want to add some more body to the dish by all means toss up some rice noodles.
My reasons for staying away from Meatless Monday posts really have been my fear of committing to something on the blog that is calendar bound, rather that the meatless part of things. I have a phobia an inability to post with some kind of timeline or structure, which is why you rarely see posts for occasions, except holidays that are more than three to four days long, allowing me time to finally get with things. Partly of course, I do blog what we eat, rather than what the calendar suggests. My motivation for posting this other than to respond to some of the requests is actually a little different, it is based on a discussion with my son who is trying to persuade one of his die hard meat eating friends to try and explore other possibilities, and apparently if it is on the internet it is cool… Ah! the age of still innocence.

Well, to help the young friend explore or even try more possibilities we are working towards a series of Monday posts, helping a young man stay on a healthier food track might help me try to stick to a schedule, well sort of. While we tend to have enough variation in our diet with a decent amount of vegetables showing up where needed, I think any incentive to do more never hurts. I also often make a collection of vegetarian dishes, rather than putting together a wholesome single dish vegetarian offering so I will use the Mondays to try and do just that. March promises to be a busy month, with all kinds of activities, events and book activities. The weather this week however will help things move along, it is wonderful to think of temperatures beyond the 40’s and just like that it looks like we have spring. I am event looking forward to a walk in the rain tomorrow, nothing like warm and gentle spring rain. The father in the house has begun shaking out his samplers, and I am wondering if I should get started with my herbs to welcome in a nice growing season. Before I let my musings run away with me here is the recipe, while it is still Monday
Print
Honey Miso Tofu and Vegetable Stir Fry
Prep Time: 15 minutes
Cook Time: 15 minutes
Total Time: 4 minutes
A lovely colorful one-dish meal, that is perfect with all kinds of vegetables, in my version today I have used carrots and snow peas.
Ingredients
11/2 tablespoons oil1 teaspoon sesame oil
4 cloves of garlic minced
1 tablespoon ginger minced
1 red onion, halved and thinly sliced
1 pound of extra-firm tofu, cubed
3 medium sized carrots, peeled and julienne
½ pound of snow peas
1/4 cup sliced shitake mushrooms (Optional)
1 tablespoons white miso paste
1 teaspoon tamari
¼ cup honey
1 tablespoon chili paste such as sriracha
2 tablespoons rice vinegar
1 tablespoon sesame seeds
Instructions
Heat the oil in a large wok and turn and spread to ensure that the oil coats the surface and is shimmering.Add in the sesame oil and add the garlic and ginger and saute lightly.
Add in the red onion and cook for about 3 minutes.
Add in the tofu, carrots and snow peas and the mushrooms if adding and toss well.
In a mixing bowl, add in the miso, tamari, honey, sriracha and rice vinegar and mix well.
Add to the tofu mixture and cook for about 5 minutes. Sprinkle the sesame seeds and serve hot.
Schema/Recipe SEO Data Markup by ZipList Recipe Plugin2.6http://www.spicechronicles.com/honey-miso-tofu-vegetable-stir-fry/

The post Honey Miso Tofu and Vegetable Stir Fry appeared first on Spice Chronicles.
March 7, 2015
Sweet Potato and Tapioca Cakes or Fritters (Sabudana Vada)
 Amidst all of this, I just heard some news about someone breaking up! It filled me with a sense of melancholy. Somewhere, it rustled back memories of the first time I had made these vadas, well at least their original version with potatoes.
I had picked them up from an old cookbook, somewhere and made them from my father. Crisp, crunch filled with the citrus like flavors of curry leaves, nicely spiked with green chilies and fresh cilantro leaves. These were served with ketchup, over paper towels as my father and I ate them together in the kitchen, chatting and cooking all at once.Every time I think of lighter times especially with food, I cannot help but thing of my father, and there are several layers of sorrow. The deepest layer really the fact that he did not live to see what I did with all the food that he taught me to love.
Today’s recipe modifies the original just a little to make it healthy enough to even be considered a side dish with a meal. I have added some chickpea flour as a binder since sweet potatoes are not quite as starchy as regular potatoes. Also, while the seasonings are very South Indian, in this recipe I add amchur or dried mango powder to neutralize some of the sweetness.

I have dealt with so many little things over the past couple of days, I cannot believe that it is Tuesday. The fact that my Monday started with a hangover, did not help my case. LOL! There is a lot of excitement and work building up to the release Spices and Seasons, and I do hope everyone is keeping it in mind for a gift or their next cookbook.

Well, the highlight of my weekend was actually making a couple of recipes (two from the book) and a random sweet potato variation of these classic crisp and savory tapioca spiked cakes.

All of these were taken with care for a tea (yes, I know but there was a lot of good wine with the tea, and I got a rather early start). Well, all things considered, this tea thing happened because some of us were unable to cobble together any other time and what was a lot of fun was the fact, the offbeat time allowed us to enjoy a whole bunch of food items that may or may not work some other time of the day.
Print
Sweet Potato and Tapioca Fritters
Prep Time: 1 hour
Cook Time: 20 minutes
Total Time: 1 hour, 20 minutes
A healthier remake of the classic potato and tapioca savory cakes, this one made with sweet potato.
Ingredients
1/2 cup tapioca seeds or pearls (not instant)1 large sweet potato (about 1 pound)
1 medium sized russet potato
1 tablespoon amchur (dried mango powder)
1 medium sized red onion, diced
11/2 teaspoons freshly grated ginger
10 -15 curry leaves, chopped
3 green chilies, chopped
salt to taste
3 tablespoons chopped cilantro
3 tablespoons chickpea flour or besan
Canola oil for frying
Instructions
Soak the tapioca pearls in 1 cup of hot water for at least 1 hour.In the meantime, quarter the potato and the sweet potato and boil them for about 20 minutes, until soft.
Drain the tapioca and place in a mixing bowl. Cook the sweet potato and potato, peel and place in the same mixing bowl and mash coarsely.
Add in the red onion, ginger, curry leaves, green chilies, salt and the cilantro and mash well until evenly mixed. Mix in the chickpea flour and mix well.
Shape the mixture into 3 inch cakes.
Place the oil in a large skillet to a depth of about 3 inches and heat until a dropped crumb rises to the surface.
Place the cakes in batches (leave enough room to turn without crowding). Cook each side undisturbed for about 3-4 minutes. Carefully remove the cakes, drain on paper towels and serve with chutney or ketchup.
Notes
You can substitute lemon or lime juice (about 2 tablespoons) for the amchoor or dried mango powder and increase the chickpea flour or besan by 11/2 tablespoons.
Schema/Recipe SEO Data Markup by ZipList Recipe Plugin2.6http://www.spicechronicles.com/sweet-potato-tapioca-cakes-fritters-sabudana-vada/
The post Sweet Potato and Tapioca Cakes or Fritters (Sabudana Vada) appeared first on Spice Chronicles.
March 5, 2015
Indian Onion Relish
 My first visit to an Indian restaurant in the US left me with impressions of Thalis (large Indian plated meals) and a red onion condiment (that was served at the beginning with crisp papads). I was not necessarily thrilled with this first foray of rediscovering Indian food away from home, and shall go into further depth with that on a different day. While the smells seemed familiar the food did not evoke memories of either home or the restaurant fare that I was used to in India.
Indian home cooking is very regional in content, so often difficult to replicate in restaurants, although we are definitely getting better, but still a far cry from the Indian restaurant fare back home.
I was however, mesmerized by the sweet and savory onion relish. I could not quite nail the flavor. It was different from relishes served anywhere else, in my experience thus far. Indian restaurant in India, tend to have pickled baby onions, I shall talk about them, on a different day. I have noticed that this red restaurant style relish has become a fading item even on most tables in the US. At least, I have not seen them anywhere we have frequented recently.
I also tend to be so submerged in spices, cooking and the flavors of India between classes, writing and other activities that I do not eat out all that much and when I do it is usually not Indian, although I do have Mumbai Spices on my radar. Over the years, newer items have taken over my fancy and I forgot about the red onion relish, until last month when I was planning for the pop-up event at Recologie with Judith Webber. She mentioned about the chutney that she loved so much and it joggled my memories to those early days of eating Indian food.

I wonder if Dawat in New Haven even exists anymore?
I had some ideas about the chutney and then searched some more and this recipe from the curry guy was pretty close to what I was looking for. I notched and tweaked it just a little bit and was happy with the results. This was how we served it at the pop-up. Did I tell you, I loved the plates – handmade pottery, what more could I ask for. It a perfect evening with loads of camaraderie, one of my highlights was that Susan from the farm was there and keep following my space, there shall be more popping up soon. Now for this very simple recipe, which works very well as a side to almost anything my favorite being papads, I have also served this with cheela, which worked well too! There is just one caveat to the chutney, it will keep for about 2 to 3 days, but anything longer will eventually result in the chutney turning a little bitter.
Print
Indian Onion Relish
Prep Time: 2 hours
Cook Time: 15 minutes
Total Time: 2 hours, 15 minutes
A sweet, tangy and lightly spiced onion relish that is very flavorful and extremely easy to put together.
Ingredients
2 large white onions, finely diced1 tablespoon cumin seeds
½ tablespoon black peppercorns
1/3 cup tomato ketchup
3 tablespoons fresh lime
11/2 teaspoons black salt
1 tablespoon sugar
1 teaspoon red cayenne pepper
2 tablespoons minced cilantro
Instructions
Chill the chopped onions in the refrigerator for an hour.Lightly toast the cumin seeds and black peppercorns and grind to a powder.
In a mixing bowl, add in the ketchup, powdered spices, lime juice, black salt,
and the red cayenne pepper and mix well with the chopped onions.
Return to the refrigerator and chill for another hour (can be up to 6 hours) and serve as a condiment as needed.
Schema/Recipe SEO Data Markup by ZipList Recipe Plugin2.6http://www.spicechronicles.com/indian-onion-relish/

The post Indian Onion Relish appeared first on Spice Chronicles.
March 2, 2015
Red Lentil Soup with Millet and Cauliflower
 This morning, before I could complain about the soft powdery stuff, I was greeted with a compromise- clear blue skies, temperatures that promised that the snow would melt and soft fluffy clouds. All in all, hopes of spring, a spring that is temperamental and slow and seems to be indolent in making its entrance. Even as I took a picture, I could not help noticing that the sky looked fresh and clearer, and there was a certain crispness to the sunshine. This weather with its quicksilver moods, makes me want to reach out for a hot soothing bowl of soup and working with red lentils of course is my all time favorite comfort dish. Simmered with millet, gentle seasonings, cauliflower and red bell pepper this ended up being the perfect dish for a cool kind of day.
March cooking, needs to have warmth and comfort, but it cannot be quite as heavy as the bitterly cold February weather cooking. It conveniently works well for a meatless Monday meal and of course if you are thinking of meatless for lent this dish will have your name on it. Lentils, ancient grains and some veggies in a happy marriage of equals.

We often think of fish as the quintessential l Lenten meal, after all when staying away from meat, fish offers a wonderful protein alternative, and when sourced right it can become a thing of beauty and joy forever. Given, my love for cooking fish I am often asked for fish recipes this time of the year, and given their proliferation on my blog I am more than happy to oblige however conceptually I end up with a slight problem. Possibly more philosophical than conceptual, actually… Well, the truth of the matter is that I like fish and odds are if I was giving up something, living off fish would not end up being a sacrifice… But, possibly thinking plant based for lent might help you accomplish two objectives. You will have a dish that is sans meat and lean all at once, in this dish by adding millet, I have created a one dish meal that is bound to be a table favorite. Of course, if you are dying to enjoy it with some crusty bread, go ahead, I will not judge.

This weekend was all wrapped licking the wounds of not doing so well on the second round of the competition. It was very somber in the house yesterday, however today all is back to normal. A few weeks to regroup and then it shall be time for soccer. The kid has had mixed feelings about her dance teacher, I think it might be a tad too late in the game to change that. We shall see.
Print
Red Lentil Soup with Millet and Cauliflower
Prep Time: 10 minutes
Cook Time: 30 minutes
Total Time: 40 minutes
A gentle one dish meal, that is nourishing and perfect for a pre-spring meal, this dish brings together, cauliflower, red lentils and millet.
Ingredients
3 tablespoons extra virgin olive oil1 teaspoon cumin seeds
1 medium onion, finely chopped
2 cloves garlic, minced
1 cup red lentils
4 cups of water
3/4 cup of millet
1 teaspoon salt
1 teaspoon turmeric
1 teaspoon red cayenne pepper
2 cups of cauliflower (about 1 small head)
1 red bell pepper diced
2 bay leaves
Chopped cilantro or mint to garnish
1 lime or lemon
Freshly ground black pepper to serve
Instructions
Heat the oil and add in the cumin seeds and wait until the seeds begin to sizzle. Add in the onion and garlic and cook for about 5 minutes, until the onion is soft and fragrant.Add in the red lentils, water, millet, salt, turmeric and red cayenne pepper and bring the soup to a simmer.
Cook the soup for about 15 minutes, until the lentils are fairly soft.
Add in the cauliflower and the red bell pepper and the bay leaves and cook for another 10 minutes, until the vegetables are tender. The soup should have a fairly loose consistency, add more water if needed.
Stir in the chopped cilantro or mint.
Cut the lime or lemon and squeeze in the juice.
Serve with some grinds of fresh black pepper.Schema/Recipe SEO Data Markup by ZipList Recipe Plugin2.6http://www.spicechronicles.com/red-lentil-soup-millet-cauliflower/

The post Red Lentil Soup with Millet and Cauliflower appeared first on Spice Chronicles.
February 22, 2015
Silere Alpine Merino Lamb Review
Our household is almost evenly divided, between the meat lovers (my son and I) and the two people on the fence (the husband and my daughter). In particular, to persuade my husband to be excited about lamb, I need to get it just right and the meat has to be of pretty high standards, in general he shies away from the gamey taste of lamb.
So, when I was contacted by Marx foods, to review the Silere Alpine Merino Lamb, I was very excited as one of the characteristics of this lamb was that it was leaner and in turn less gamey. This lamb is grass fed, free and open range lamb all the way from New Zealand, a country that is reputed for their sustainable practices. What came my way was two racks and a lot of loin meat, and I have cooked it five ways to try out the levels of possibilities with this meat and I have already posted two of my creations and overtime you will find and see the others. I would also encourage you to visit the Silere Website, it will make you want to hop on a plane to the other side of the world.
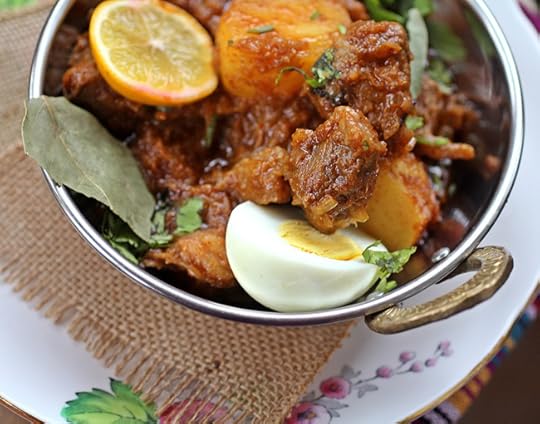
The First Dish – Lamb Dak Bungalow
 What I am doing here is essentially trimming any excess fat, and cooking the lamb in a very robust blend of spices. For the meat to hold its own in this recipe, it should be flavorful and smooth textured enough to mesh with the complexity of the curry. The makers of the alpine merino, like to pride themselves on the silky texture of the meat and indeed in this dish the meat cooked to a delicate fork tender consistency and worked very well with the bold flavors of this dish. I served it to the husband on Valentine’s day and even he agreed that the meat was very good.
 Next up, I made a Moroccan Inspired Lamb Stew, which used an almost sweet and warm spicing profile, with notes of cinnamon, garlic and allspice. Here I also used lots of vegetables and the lamb worked beautifully and cooked down to a soft consistency and did not taste gamey. In fact, the mild texture of the meat lends itself to a diversity of flavor profiles which is always the sign of a good versatile meat. The children loved the stew and actually now want more.

The loin chops had a thin layer of fat, which I had trimmed for the other two recipes and in this case I kept it on while making a birayani that is a slow cooked rice and meat casserole that is highly aromatic and complex in its spicing. The dish pairs the lamb with elegant and long grained Basmati Rice, and matches it with spices like cinnamon, cumin, cardamoms and cloves. Adding the fat, which in this case is the lamb fat is always a wildcard as it can sometimes make it taste too heavy. I had kept other fat to a minimum, and since this dish cooks low and slow the flavors of this meat came across beautifully again another winner. The traditional meats in this dish is usually beef, I found that the lamb actually works better since it is richer in taste and actually cooks in better harmony with the rice.
Lastly the racks, which I will update with pictures, was my personal test of the meat. I have always combined lamb with heavier seasonings and cooked it until it is very soft. I cooked the ribs with garlic, rosemary, olive oil and red pepper flakes at 135 degrees for 25 minutes. It is worth mentioning, that the information package that came with the lamb mentioned the lower temperature while cooking the meat, I was a little skeptical but I decided to try it. I sliced this and served it with spinach and mashed potatoes. The meat was medium done and tasted great. While rosemary and garlic are always a winning combination with lamb, I have always been skeptical of trying lamb anything other than well done. The meat sliced easily, and I squeezed fresh Meyer Lemon juice before serving to round out the flavors.
The last round of cooking was also the racks, which I marinated in a tandoori masala, burgundy and garlic marinade. The burgundy in the marinade might have been a little too strong for the meat (I never thought that was possible with lamb), and I think next time I will just try it with the traditional yogurt base. Here I added mint and cilantro to finish.
The post Silere Alpine Merino Lamb Review appeared first on Spice Chronicles.
Lamb Kacchi Birayani (Pressure Cooker)
One dish meals can be simple or complex, humble or elegant and almost everything in between. A birayani, certainly leans closer to the elegant than the humble and here again the dish presents itself in many variations. A biryani is traditionally of Central Asian origin and came to India via the moghul rulers, of course, in time the Indians have wasted no time in personalizing the dish with various regional variations.
Last evening I wanted something heavy, but not too complicated and then I remembered my kacchi birayani recipe. Anyone familiar with the traditional dish, would not consider it simple, this recipe is my personalized version that stays close to the original but is also practical enough for a family meal even when you are out and about during the day.
This particular kacchi birayani, is cooked in the Bangladeshi style of cooking, and its distinction rests in the fact that the meat and the rice is cooked together, as in the meat not being added after cooking, hence the term kacchi which means raw or uncooked.
The beauty of this dish is the amazing flavor imparted to the rice by the hours of cooking with the meat and the preferred meat for this dish is usually goat meat or beef. I personally, have used lamb and in my Bengali cookbook even offered a recipe with large jumbo shrimp, which is usually a great hit with guests when I have them over.
Cubed boneless lamb, actually cooks a little quicker than goat meat or mutton, allowing us to skip several hours of cooking and it also keeps the rice grains a little more intact. This being said, this is not prettiest of birayanis as the rice gets very soft through the cooking process, if you wish you can par cook the meat just a little bit. I shall tell you about the lamb I used shortly, you do have to wait for the next post.
 Yes, I know that is cheating! However, I do cook everything together and I have found using the pressure cooker helps me keep this a one-dish meal, cooked in a single pot. This dish does need one more level of attention, it should be marinated for several hours to allow the meat to tenderize and therefore cook well without breaking down. The list of ingredients might sound daunting, but most of them gets tossed in at the same time. For the finish, it is often finished with sliced hard boiled eggs and if you like potatoes in you birayani like a true Bengali, by all meals through them in.
 Why the Bengali variations of Birayani, have potatoes in them is really unknown some people attribute it to preference and as well all know, if you are true blue Bengali you will love your potatoes, and others speak of times of meat shortages that caused the Bengali to doctor their birayani. Now, understand with the kacchi variety you will not see things like the streaked multicolored rice, because when the rice is cooked together it does get a simple brownish gold color.
I have simplified this dish by actually cooking it a pressure cooker, (and gasp!) I have skipped any layering however, I have indeed stayed true to form and cooked the rice and meat together. I also add raisins to my version, as I tend to have them around more readily than alubukara or the dried plums. I did use local fingerling potatoes, which is about as local as you can get at our neck of the woods this time of the year. On a really happy note, I taught a home class after a long time, I have indeed missed doing them and need to revive them.
Print
Lamb Kacchi Birayani (Pressure Cooker)
Prep Time: 10 hours
Cook Time: 25 minutes
Total Time: 10 hours, 25 minutes
A pressure cooker version of a signature Bengali style birayani, where I have significantly simplified the process.
Ingredients
For the marinade1 medium sized piece of raw papaya (this is important to tenderize the meat, if you cannot find it just marinate longer)
1 cup of yogurt
1 medium sized piece of ginger
2 to 3 pods of garlic
1 teaspoon salt
1 teaspoon sugar
2 green chilies
11/2 pounds of boneless lamb (cubed)
For the birayani
1/4 cup oil
2 large onions, thinly sliced
3 to 4 bay leaves
1 large stick cinnamon, broken into smaller pieces
2 to 3 green cardamom pods
1 to 2 black cardamom pods
1 to 2 star anise
1 teaspoon salt
4 to 6 baby potatoes, peeled
11/2 cups basmati rice, washed and drained
11/2 teaspoons garam masala powder
1 teaspoon saffron strands
Slivered almonds or pistachios
Raisins
To finish
Rosewater
Chopped cilantro
Sliced hard boiled eggs
Instructions
In a blender blend the papaya, yogurt, ginger, garlic and salt into a smooth paste. Mix in the lamb and set aside for 6 hours, or overnight. I have done this up to a day and the results are wonderful.At the base of a pressure cooker, heat the oil and add in the onions and cook them until they soften, wilt and turn golden.
Set half of this aside. Add in the lamb and mix well.
Add in the bay leaves, green and black cardamom, star anise, salt and baby potatoes with the lamb.
Add in the rice and garam masala powder.
Add in 2 and 3/4 cups of water and saffron, nuts and raisins cover the pressure cooker and cook under pressure for 5 minutes.
Let it rest for 10 minutes until it cools enough to open the lid.
Sprinkle with rosewater, cilantro and sliced boiled eggs and serve
Notes
Most of the prep time is for marinating the meat.
Schema/Recipe SEO Data Markup by ZipList Recipe Plugin2.6http://www.spicechronicles.com/lamb-kacchi-birayani-pressure-cooker/
The post Lamb Kacchi Birayani (Pressure Cooker) appeared first on Spice Chronicles.
February 20, 2015
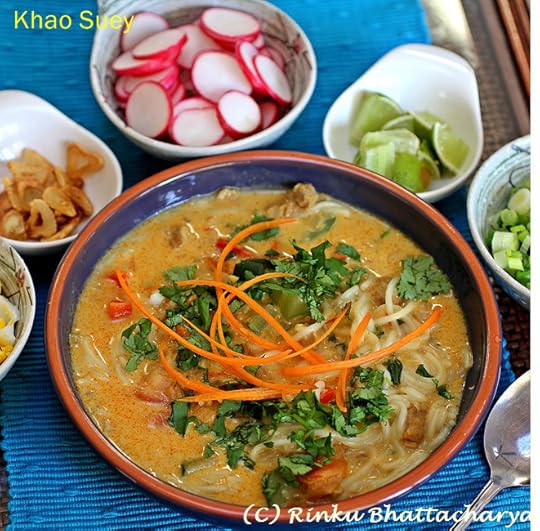
Khao Suey – A gorgeous warm bowlful
 Americans (including me) love talking weather! Let’s face it, if you are in the east coast the weather does shape your world. Speaking of the weather, if you went out this morning, it would be difficult to not feel like you had stepped into a deep freezer.
At less than zero, you stop looking at the temperature and start planning food strategies to battle the deep freeze. There are very few things that keep you warmer than a comforting bowl of noodle soup, and today we are talking Khao Suey, a noodle soup with spices, coconut and loads of personality.
In a nutshell, Khao Suey is ramen and curry rolled into one amazing delicious package. With a perfect assortment of garnishes, this creature is also loads of fun. The Khao Suey takes me back to the flavors of childhood in a nourishing and delightful way.
The Khao Suey was imported to eastern India by way of Burma, or Myanmar as my son refers to this tiny country, through trade and other associations. There are probably as many recipes for this dish as there are homes that make it, they key essential ingredients being that it adheres to a rich tasting coconut broth, that is robustly seasoned and it is served with an assortment of garnishes. There are really no hard and fast rules to the garnishes, popular variations being crisp garlic chips, sliced eggs, chopped scallions and even crisp shallots.
 Today was a really smart work at home day, the smartness resting in the fact, that I had picked the coldest day of the week to skip the commute. It was a day, that had started with low expectations, with a car that almost refused to start. Since, the beginning of the year my car which is about a decade old has been acting out. It is gently telling me that it has indeed earned its retirement. The week at work was busy, with a series of long evenings, certainly not the kind of evenings you want to have to deal with a temperamental car. I had left the car home, and walked to the station to avoid the fuss. All things considered, I was glad to be home, and to my surprise the car seemed to behave itself. I took an early morning run with it, and then stayed in catching up on work. The only detour today in the afternoon, was to stop by the WFAS station to chat Spices and Seasons with Intoxikate on her well organized and thoughtful show called #Fork This.
Back home, I decided to toss together this quick and wholesome noodle dish, which luckily was all wrapped up when the kids were home. As soon as they saw me, they asked me on cue, “Did you make something special, this evening?” A question which never fails to make me happy. After all the something special for them, bless their hearts, is always mom’s cooking.
 This variation of Khao Suey, is light and filled with generous notes of ginger, lime and chilies. A traditional khao suey is all about chicken, this variation is brimming with loads vegetables, and can be made with either chicken or finely chopped shitake mushrooms. The later has a nice meaty texture and makes this dish perfect for your lenten table. As for the noodles, I used fresh rice noodles that I have recently found at Trader Joes. I absolutely love the texture and the fresh and light taste. So, when the weather is cold, cold, cold this noodle soup is guaranteed to keep you hot, hot, hot!
Print
Khao Suey – A gorgeous warm bowlful
Prep Time: 20 minutes
Cook Time: 40 minutes
Total Time: 1 hour
Yield: Makes 4 to 6 servings
A Burmese migrant to Eastern India, this dish is popular in many Bengali homes. This is my Hudson Valley rendition.
Ingredients
For the curry soup base2 tablespoons oil
1 medium sized red onion, diced
1 tablespoon fresh ginger, finely grated
2 pods garlic, minced
1/2 pound of boneless skinless chicken, cubed
2 teaspoon powdered coriander
1 teaspoon powdered cumin
1/2 teaspoon turmeric
3/4 teaspoon red cayenne pepper
1/2 cup pureed tomatoes (optional)
2 tablespoons tamari
3 cups of broth
1 cup of coconut milk
1 medium sized zucchini, halved and thinly sliced
1 medium sized red bell pepper, chopped
1/3 cup cauliflower, florettes chopped
4 to 6 ounces rice noodles
1 lime
2 tablespoons chopped cilantro
To garnish
Oil for frying
4 pods garlic, thinly sliced
1 shallot, thinly sliced
2 hard boiled eggs, chopped
sliced jalapeno pepper
sliced scallions
Thinly sliced carrots
Instructions
Heat the oil and add in the red onion and cook for about five minutes, until soft and wilted. Keep stirring until the onion begins to turn pale golden at the edges.Add in the finely grated ginger and the garlic and mix well.
Add in the chicken, coriander, cumin, turmeric and red cayenne pepper and mix well.
Cook the chicken for about 2 minutes, until no longer pink.
Add in the pureed tomatoes if using, and the tamari and cook for 2 to 3 minutes.
Mix in the broth and the coconut milk and simmer for 5 minutes.
Add in the zucchini, red bell pepper and the cauliflower and simmer for 2 to 3 minutes.
Add in the noodles and cook until the noodles are cooked al dente.
Cut the lime and squeeze in the juice and add in the chopped cilantro and serve with the garnishes.
While the soup is cooking, heat the oil and fry the garlic until crisp and golden. Drain with a slotted spoon and place in a bowl.
Add the thinly sliced shallots and fry until crisp and place in a bowl.
Arrange the remaining garnishes in individual bowls and serve with the noodle soupSchema/Recipe SEO Data Markup by ZipList Recipe Plugin2.6http://www.spicechronicles.com/khao-suey-gorgeous-warm-bowlful/

The post Khao Suey – A gorgeous warm bowlful appeared first on Spice Chronicles.
February 15, 2015
Dak Bungalow Mutton Curry (Beat the Chills!)
 This weekend is certainly not the kind of weather to be running around, in fact, even hunkered down in my corner I cannot help feeling the chills. We often take time to go out on Valentine’s day in the evening. It gives us an opportunity to try something new and catch up on a new place. However this year since it was a weekend we actually went out for a family lunch something the kids were thrilled about. As for the evening, I cooked a relaxing dinner at home.
Among my items was a heavy lamb dish, that I have labelled Lamb Dak Bungalow, in the spirit of the cooking of colonial Dak Bungalows. Now, since we had this with a couple of other light veggie offerings it worked as a perfect balance of indulgence and heaviness.
Mostly, we were out of luck for the evening as Martha our trusted helper and baby sitter was out of town, a rare trip that I think she has more than earned to see her son in North Carolina. He is a marine and is most likely going to be deployed to Afghanistan soon. The thought of that puts fear in my heart, I do not know how many more young men need to be sacrificed or sent away before we stop fighting.
We had lunch at the Twisted Oak, I will share my experience with you soon, and had stepped out for some grocery shopping amidst the most beautiful snow storm, that sprinkled fresh soft snow just the way I like it. Here is a shot of our neighborhood, right outside out house. It was in this deep and shrouded mysterious evening, that my mind turned to Dak Bungalows and old colonial style cooking. Certainly beats going out to watch 50 Shades of Grey, I mean seriously?!
A Dak Bungalow is a outpost or guest house, dating back to British times in India and served as the official stopping points of rest for officers during their travels, and while we have been cobbling up recipes for their dishes, it would be fair to say the general recipe of the Dak Bungalow depended on the cook in the particular Dak Bungalow.

We are now seeing a fair number of these dishes re-surfacing in the menus of Kolkata’s Bengali restaurants. One of the general features of consensus tends to be the addition of both potatoes and eggs to this recipe, again a much loved Bengali addition to fancy dishes, especially the Kolkata style birayani. Now, having said that, odds are this dish was at best prepared with country chicken or goat as it was unlikely that lamb was a part of the culinary universe at that point. In this recipe, the potatoes are essential and the eggs while they are interesting you can leave them out if you really wish, as the dish is plenty rich without that.
In general, with memories of tasting this dish at 6 Ballygunge Place and general folk lore, as this was not one in either Dida (my grandmother) or mothers repertoire, but certainly now in mine when the weather is so cold, and chances are this recipe will be entertaining travelers in this little outpost where many a traveler stops by on the way to NYC. Tomorrow is a day off for me, and possibly one that I shall pay for given how busy the week promises to be with all kinds of craziness involved, but for now there is home and hearth and a warm corner that keeps me sheltered from those insanely cold temperatures out there.
Print
Dak Bungalow Mutton Curry (Beat the Chills!)
Prep Time: 6 hours
Cook Time: 1 hour, 10 minutes
Total Time: 7 hours, 10 minutes
A hearty lamb curry with a generous dose of spice, inspired by the colonial Indian outposts call Dak Bungalows.
Ingredients
For the lamb1 pound of lamb cubed and trimmed
2 limes
1 tablespoon freshly grated garlic
3/4 tablespoon freshly ground ginger
1 teaspoon salt
For the curry
4 tablespoons olive or canola oil
2 large onions, diced (about 11/4 cups)
1 large stick of cinnamon (2 inches), broken into smaller pieces
2 to 3 cloves
3 green cardamoms
1 black cardamom (optional)
2 bay leaves
2 teaspoons red cayenne pepper (adjust to taste)
1 tablespoon cumin powder
3/4 tablespoon coriander powder
1/2 teaspoon salt
1 teaspoon sugar
2 medium sized potatoes, quartered
3/4 cup water
2 hard boiled eggs
1/4 cup chopped cilantro
Instructions
Place the lamb in a mixing bowl, cut and squeeze in the lime juice. Add in the grated ginger and the garlic and salt and set aside for 4 to 6 hours.Heat the oil on medium low heat and add in the onions and cook the onions for about 7 minutes stirring occasionally until the onions are a pale toffee color. Add in the cinnamon, cloves, green cardamoms and the black cardamom if using and mix well.
Add in the lamb and the bay leaves and cook on medium heat for another 6 to 7 minutes, until the lamb is no longer pink.
Stir in the cayenne, cumin and coriander powder with the salt and sugar and cook the mixture for 3 to 4 minutes. Stir in the potatoes and the water.
You can either half the eggs and gently mix in, or cut slits along the sides and add them whole.At this point, cover the mixture and simmer for 1 hour until the lamb is very tender.
Check for seasonings and stir in the cilantro and serve with rice or chapatis.Schema/Recipe SEO Data Markup by ZipList Recipe Plugin2.6http://www.spicechronicles.com/dak-bungalow-mutton-curry-beat-chills/

The post Dak Bungalow Mutton Curry (Beat the Chills!) appeared first on Spice Chronicles.
February 11, 2015
Chicken Tikka Masala Pizza with Kale

My first taste of homemade pizza, was a humble attempt by my mother using the cheese that she had available (a seasoned Indian cheese called Amul) and peppers and shrimp. She had made it in Tanzania, where we lived for a year, a beautiful place with a blue ocean and ready access to mountains and safari parks. This pizza really was closer to a tart and was a picnic dinner that I could eat at the back of the car as we left for a long road trip. All things considered it very well might have been the mother of this fusion pizza made with Chicken Tikka Masala for the base, that is quite the hit for my family.
I had originally made this dish on a Friday, that in the midst of a busy few days, with snow and a blizzard named Nemo. Following a busy week, staying in offered a respectable change of pace.
Like the rest of the cooking world, I like to bake when I am indoors as well. My preferred baking often tends to be of the savory ilk, seems to find more favor with my family. All being at home also means, getting a good family centric meal. Today’s baking comprised of a pizza, a variety that takes this far east of Italy, all the way to India. Yes, the pizza concocted was a Chicken Tikka Masala Pizza.

It had most of the flavors of the chicken tikka, a generous dose of finely chopped kale and tossed with a touch of cheddar cheese, that reminds of that pizza that mom used to make. The chicken tikka, that is essentially boneless skewered tandoori chicken, gets a bad reputation, however done right and fresh I still think it is a good workhorse chicken kebab. If you want a vegetarian option for this recipe you can use paneer. This dish is fairly daunting to whip together from the scratch, but again whether you use leftover chicken tikka masala, or make it fresh for this recipe, you can be assured of two fairly indulgent meals, and also ones that will see you through if company arrives.
Now, my husband often says that a pizza crust is noticed only when it is not good, well, particularly in the whole wheat arena we have ended up with plenty bad. A discussion on facebook, specifically on Suvir Saran’s timeline, where his fans emphatically convinced me that his pizza crust was the one! Since, Masala Farm, the book that owned the recipe was owned by me, I figured that I really had nothing to lose. With myl whole wheat subbing, this crust was indeed the one!
It works well, with a thin and slightly nutty finish, flecked with beautiful bits of black pepper and rosemary, yes, it is the same crust that is the base for the winter squash and Brussels sprout pizza.
Print
Chicken Tikka Pizza with Kale
Prep Time: 3 hours
Cook Time: 40 minutes
Total Time: 3 hours, 40 minutes

A fusion riff on the pizza, resulting in a Chicken Tikka Pizza with a made from the scratch crust.
Ingredients
For the Pizza Dough (adapted from Masala Farm)2 cups whole wheat pastry flour or atta
11/4 teaspoons rapid rise yeast
1 teaspoon salt
11/2 teaspoons cracked black pepper
1 teaspoon rosemary leaves
2 tablespoons extra virgin olive oil
3/4 cup lukewarm water
Cornmeal for rolling the dough
For the topping
11/2 cups of chicken tikka masala or butter chicken (see my recipe linked earlier in the post)
1 cups of very finely chopped kale (I used the food processor for this)
3/4 pound ball of fresh mozzarella
1/2 cup grated cheddar
For serving
Chopped cilantro
crushed red pepper flakes
Instructions
Sift together the flour, salt and pepper and place in the bowl of a food processor.Add in the yeast and pulse lightly.
Add in the olive oil and the water in a single stream and process for about 30 seconds to a minute until the dough comes together in a ball.
Remove the dough and work on a flat surface, until smooth and well mixed.
Place in a warm place for about 2 hours and let the dough rise.
Divide the dough into 4 portions.
Pre-heat the oven to 500 degrees, and place a pizza stone in the oven and heat for 20 minutes (note, I recently made these at my friends house on a baking sheet with acceptable results.
Roll out the first ball of dough into a thin circle about 8 inches, using cornmeal as needed to create a peel and prevent sticking, and do the same with the second. (My stone allowed for 2 personal sized pizzas at at time).
Place on the pizza stone and cook for about 3 minutes, you should see the dough beginning to blister and puff at points.
Remove from the oven, and smear the top with with the chicken tikka curry and scatter uniformly with the kale.
Dot with the mozzarella and the cheddar cheese and bake for 8 minutes, until the mixture is bubbly and the crust is crisp.
Remove and place on a rack to cool slightly, repeat process for the remaining two pies.
Scatter with chopped cilantro and crushed red pepper flakes and serve hot.
Place these thin rounds on
Schema/Recipe SEO Data Markup by ZipList Recipe Plugin2.6http://www.spicechronicles.com/chicken-tikka-pizza-with-kale/

The post Chicken Tikka Masala Pizza with Kale appeared first on Spice Chronicles.


