
Rinku Bhattacharya's Blog, page 5
January 16, 2023
Herby Ginger and Tomato Fish
 This really is an old, make that very old recipe. It is however, clearly one that I think is a keeper. I simplified it even further and re-made it today. Ideally the flavors scream summer. Think tomatoes, basil, cilantro, thyme and scallions. However, ever so often I pull this out on when I need something flavorful, quick and super easy. And my Herby Ginger and Tomato Fish does not fail to brighten and satisfy. And if you are wise like me, you might actually have some summer tomatoes on hand in a sauce maybe?
I chop the tomatoes and freeze them in ziplock bags. I pull out the bags, when I need tomatoes in winter. The tomatoes are more watery than canned or regular tomatoes. However, they work beautifully in a lightly sauced dish like this one. The moisture evaporates and the tomatoes melt into a comforting sauce that adds brightness on a January day.
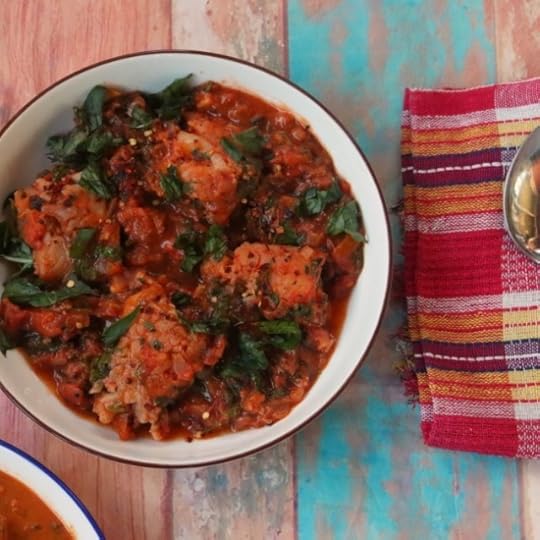
This dish used cumin and ginger for its flavorings. A lot of ginger, perked up further with some garlic and heat. And lots of herbs. Honestly, I have loads of cilantro on hand always, and at the end of the week I need to use it up. So that is when a dish like this comes in handy. I love the flavor of thyme, feel free to add whatever herb makes you happy. Tarragon or rosemary all sound good. And then there is basil.
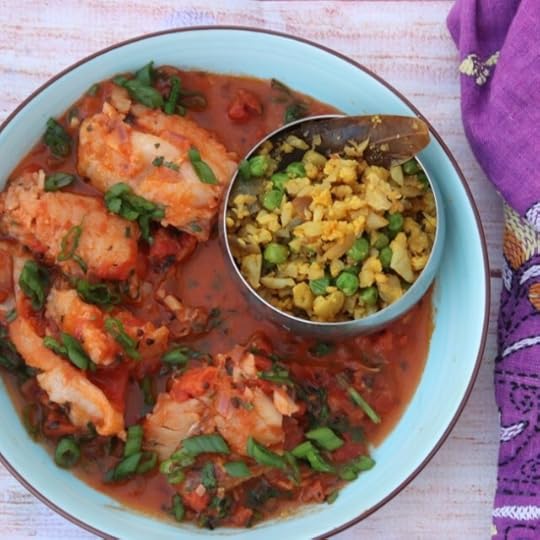
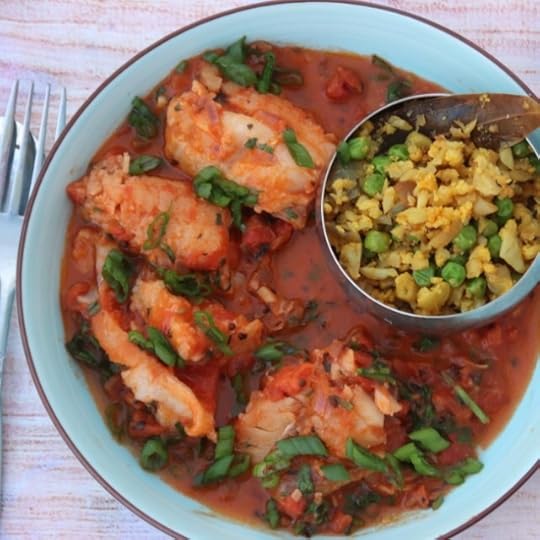
So this would work beautifully over something like this lemony quinoa. If you are feeling healthy consider this cauliflower rice version.
This ginger and tomato fish gets done quickly; and a double batch is a good idea as the flavors taste that much better the next day. Comforting, satisfying and pretty guilt free.
Any firm fleshed white fish is a good idea. I tend to use cod or halibut, just in case you are looking for ideas. With the long weekend just wrapped up, here is wishing you a great week ahead.
PrintHerby Tomato and Ginger Fish
Prep Time: 10 minutes
Cook Time: 20 minutes
Total Time: 30 minutes
Yield: Serves 4 to 6
A well seasoned super easy fish recipe with citrus, scallions, herbs and tomatoes.
Ingredients
2 pounds of any firm white fish fillets (halibut or cod usually gets my vote)1 lemon
1 tablespoon olive oil
1 teaspoon whole cumin seeds
1 tablespoon minced ginger
2 cloves of garlic minced.
1 fresh jalapeno minced.
1 teaspoon fresh thyme chopped.
1 and 1/2 cups fresh tomatoes or canned no salt diced tomatoes.
2 tablespoons natural yogurt beaten.
1/2 cup chopped cilantro leaves.
1/2 teaspoon salt
2 scallions finally chopped.
2 tablespoon torn basil leaves
Optional freshly ground black pepper.
Instructions
Zest and juice the lemon, remove the seeds if needed.Place the fish fillets on a large place and sprinkle with the lemon juice and zest and let the fish rest while you continue with the rest of your prep.
Heat the oil in a large heavy bottom skillet until smoking and add the cumin seeds and allow the seeds to sizzle and crackle.
Add in the minced ginger and garlic and cook for two to 3 minutes until the mixture is very aromatic and the garlic begins to turn pale golden.
Add in the jalapeno and the fresh thyme and the tomatoes. Cook for 5 minutes stirring lightly, until the tomatoes soften and start getting saucy.
Add in the fish with the lemon into the mixture and simmer for about 5 minutes, until the fish begins to turn flakey.
Stir in the yogurt, salt and the cilantro leaves and stir well until the cilantro leaves are wilted.
Turn off the heat and add in the scallions and the basil leaves.
Add in freshly ground black pepper if desired and enjoy!3.1https://spicechronicles.com/herby-ginger-and-tomato-fish/
The post Herby Ginger and Tomato Fish appeared first on Spice Chronicles.


January 11, 2023
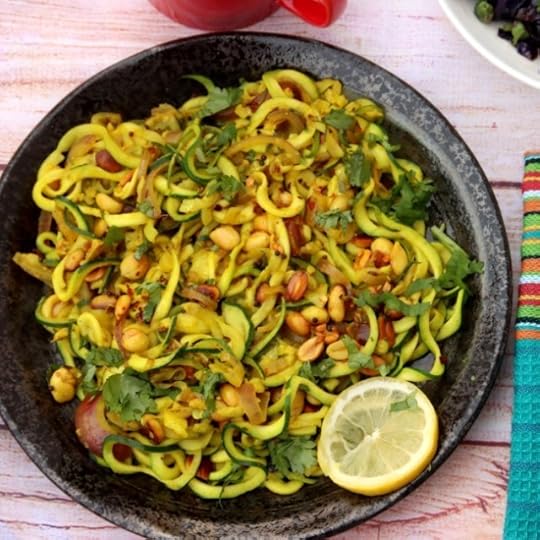
Lemon Sevai (with Zoodles) – Lemon Peanut Zucchini Noodles
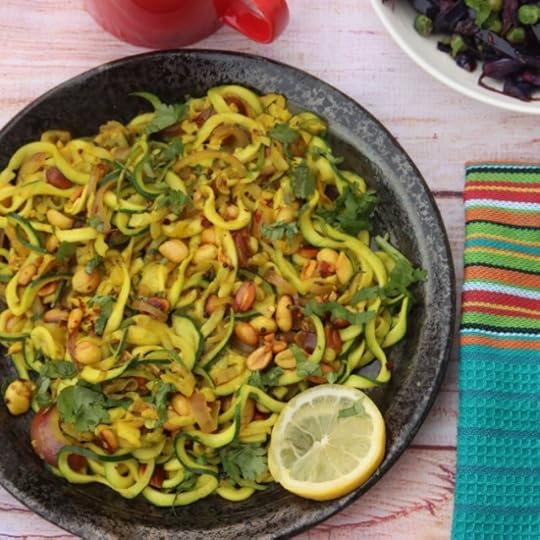 I am really excited about this version of Lemon Sevai, as it is made with spiralized zucchini noodles instead traditional rice noodles. I tried this on a whim, and the results were amazing. Light, lively and brimming with flavor this offers a perfect side dish, wholesome meal and anything in between. The flavors in the recipe are vibrant and complement the crunchy peanuts. Always happy and excited with a new experiment works out. I had last worked with spiralizing vegetables a while ago. Looks like I need to get back into action.
Essentially zoodles are made of zucchini that is run through a spiralizer. This devise pushes zucchini the zucchini in a spiralized manner, allow the zucchini to resemble noodles. Being low in carbs makes this a great choice for low carb diets. The zucchini is also neutral tasting and absorbs the flavors of the dish it is being added to. This makes it a hit for a bright and spicy dish like Sevai. The thing to watch out for is to avoid the zucchini getting overcooked and mushy.
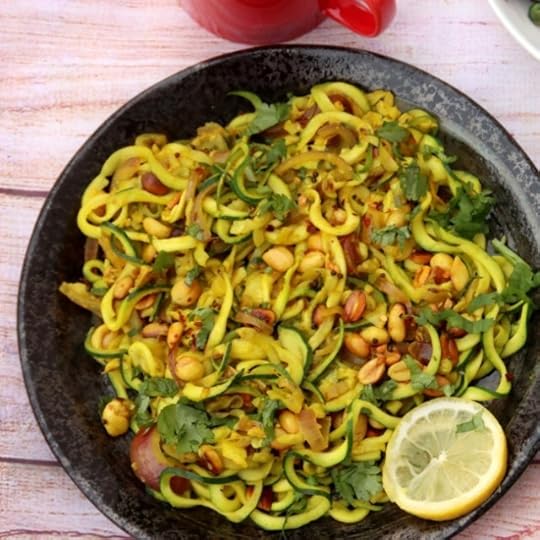

So, when substituting it for noodles. Or even using it as just a vegetable, one does not want soggy, wet vegetables on their hands. So, the zoodles should cook for about 3 minutes to get done. In short, it is not a good idea to use them for a recipe that needs a long cooking time. It works well for this Lemon Sevai, as this is a quick stir fry.
2023, is still young, and has started with its share of challenges. There are no good challenges, however replacing a car these days is very difficult. Inventory is low, and the supply of things is nowhere near normal. It is probably better than last year where people were reporting six month waiting times. But, I guess worrying about things that are beyond my control is not useful.
And, for today and now, I leave you with this bright and vibrant recipe that is done is about 20 to 30 minutes, prep time and all.
PrintLemon Sevai (with Zoodles) – Lemon Peanut Zucchini Noodles
Prep Time: 10 minutes
Cook Time: 15 minutes
Total Time: 25 minutes
Yield: Serves 3 to 4

Lemon Sevai (make with Zucchini Noodles) is a vibrant and wholesome take on the original.
Ingredients
1/2 cup shelled and unsalted peanuts1 tablespoon oil (such as grapeseed oil)
1 teaspoon of black mustard seeds
1 teaspoon of cumin seeds
1 tablespoon minced ginger
1/2 teaspoon asafetida
10 curry leaves
1 red onion, thinly sliced
1/2 teaspoon turmeric
1 and 1/2 teaspoons red pepper flakes (adjust this to taste)
2 cups (about 3 medium sized zucchinis) spiralized
4 tablespoons lemon juice (from about 1 medium sized lemon seeded)
1/2 teaspoon salt or to taste
2 to 3 tablespoons chopped cilantro
Instructions
In a pan, dry toast the peanuts stirring occasionally, until the peanuts turn fragrant and darken to a pale to darker toffee color.In a skillet, heat the tablespoon of oil until the skillet shimmers, add in the mustard seeds and cumin seeds and allow the seeds to crackle. Add in the minced ginger and the asafetida and the curry leaves.
Add in the onion and allow the onion to soften, this will take about 3 minutes.
Add in the turmeric and the red pepper flakes.
Quickly add in the spiralized zucchini allowing the spices to coat the zucchini. Cook for about 3 minutes. Mix in the toasted peanuts
Stir in the lemon juice and the salt and mix well.
Sprinkle with the chopped cilantro and serve.3.1https://spicechronicles.com/lemon-sevai-with-zoodles/
The post Lemon Sevai (with Zoodles) – Lemon Peanut Zucchini Noodles appeared first on Spice Chronicles.
January 3, 2023
Quick and Easy Chicken and Vegetable Biryani
 Today on the first working day of the new year, I am back to busy business. Running around on this rainy but warm for January day left me a little bit tired. Dinner thanks to Kevins Natural Foods, ended up being an under 30-minute exercise. This recipe is being developed for them. You can however check out the notes to see how to make this your own. It ended up being a hearty comforting meal that nourished all in the house. The epitome of a comforting winter weeknight meal. For a closer to the real deal chicken biryani, I have this for you.
So, yes, in this biryani I am using cooked chicken. To make this work, you can work this together with par cooked Basmati rice. Essentially, I pop the rice in the microwave for 12 minutes and then drain and use. Alternately, if you are a cauliflower rice fan, you can use cauliflower rice. Naturally, you will need to vary the time for the recipe. Kevins chicken packs come with premade sauces, and for this recipe I picked the Cilantro Lime Sauce. It offered the dish a nice tang (since I am not adding any yogurt) and herbaceous taste. It married the fragrant spices and created all kinds of delicious. You can also use, cooked rice in a bind. I do like some amount of finishing for the rice as I think that it absorbs the flavors better. Also sticks to the true essence of a biryani.

I also add hard boiled eggs to finish and garnish the biryani. It is a bona fide and popular thing to do. And the great news here is that it boosts both the protein and the delicious content of the dish.

Book this recipe, I have a feeling that it will come in handy on a rainy busy evening or just any evening where you are looking for a quick and cozy meal.
PrintQuick and Easy Chicken and Vegetable Biryani
Prep Time: 10 minutes
Cook Time: 20 minutes
Total Time: 30 minutes
Yield: Serves 4 to 6

A quick and easy chicken Biryani recipe made using Kevin's Natural Foods Cilantro Lime Chicken.
Ingredients
1 package Kevin's Natural Foods, cilantro lime chicken (see note)3 tablespoons coconut oil
1 or tw0 bay leaves
2 red onions, thinly sliced
1 bell pepper, cut into chunks
I red onion, thinly sliced
1 teaspoon turmeric
1 cup chopped diced tomatoes
1 cup cauliflower rice or 1 cup par cooked basmati rice (see note)
½ cup frozen peas
Hard boiled eggs and chopped cilantro to garnish
Instructions
Separate the chicken and the sauce from the Kevins package. Place the chicken on absorbent paper towels. Remove the cilantro lime sauce and place in a small bowl.Heat the oil until it is smoking. Add in the bay leaves and the sliced onions and cook until the onions soften and begin to turn brown. This takes about 4 minutes.
Add in the chicken, turmeric, bell pepper and stir well.
Add in the par cooked rice or the cauliflower rice and the tomatoes. If using the rice, add in ½ cup of water and cover and cook for 6 minutes. If using the cauliflower rice, just cover and cook for 2 minutes, no water is needed.
Remove the lid, stir in the cilantro lime sauce and the frozen peas and cover and set aside until ready to serve.
Garnish with boiled eggs and cilantro before serving.
Notes
You can make this dish with pre-cooked rice. It is easy to cook the rice until mostly done, in the microwave and then finishing the cooking. This allows us to absorb the flavors better. To par cook the rice, I microwave the rice for 12 minutes, drain and continue with the recipe.
If you want to make this with any other cooked chicken, use 1 cup of cooked chicken, 2 tablespoons of lime juice and 1/4 cup chopped cilantro.
3.1https://spicechronicles.com/quick-and-easy-chicken-and-vegetable-biryani/
The post Quick and Easy Chicken and Vegetable Biryani appeared first on Spice Chronicles.
January 1, 2023
Well Seasoned Split Pea and Oatmeal Soup
 Welcome 2023! Folklore suggests that lentils are lucky in the New Year. Well, planned or otherwise, 2023 has started with this Well Seasoned Split Pea and Oatmeal Soup. The soup is deeply flavorful, calm and comforting. In short, it helps me channel in my intended vibes for 2023. A New Year is that kind of a milestone that allows us to reflect and take a moment. For some it is through making resolutions, for others just taking a moment to pause. 2023 for me is leaning towards taking a pause, and welcoming possibilities. Here is wishing you and yours a wonderful new year! May all that you are hoping to accomplish, seem within your reach.
The year starts with me still grounded. Still recovering from the craziness of last week. I also am still carless. Lastly, I need to check in with the doctor to figure out things. A bunch of appointments looming at the second week of the year. This is a quite week of sorts. I am grateful for the company of the young ones. Grateful that I keep a well-stocked pantry that helps me tides these unexpected ups and downs. I have been exploring the joys of Instacart. My initial reaction is that it works but is expensive.

Not unlike other recipes where I use lentils from the scratch, this soup needs a little planning as in soaking the split peas overnight. No different from other from the scratch recipes that I have made with beans and legumes. The split peas married with the steel cut oatmeal. These cook together happily in the instant pot giving you wholesome comfort in about 30 minutes. I like to use mustard oil and if possible, a combination of mustard greens and spinach as it adds sharpness and flavor to the recipe.

The deeply flavorful spice infused soup gets a lot of flavors from the generous use of ginger and toasted mustard seeds. However, towards the end a second layer of flavor is added on by adding a pop of garlic and black and red cayenne pepper.

PrintWell Seasoned Split Pea and Oatmeal Soup
Prep Time: 10 minutes
Cook Time: 35 minutes
Total Time: 45 minutes
Yield: Serves 6
Serving Size: 1 bowl of soup

A comforting and flavorful soup, with split peas and oatmeal.
Ingredients
For the Soup2 tablespoons mustard oil
1 teaspoon black mustard seeds
1 tablespoon minced ginger
1 medium red onion, diced
2 medium carrots, diced
1 cup shredded butternut squash (about 1/2 pound)
3/4 cup split peas (soaked overnight)
1/4 cup steel cut oatmeal
1/2 teaspoon powdered turmeric
2 ripe tomatoes, coarsely diced (or 1/2 canned diced tomatoes)
1 cup chopped mustard greens
1 cup baby spinach leaves
1 and 1/2 teaspoons salt or to taste
For the finishing spice
1 tablespoon olive oil
1 tablespoon (about 3 cloves) fresh minced garlic
2 teaspoon red pepper flakes
Fresh lime juice and chopped cilantro to serve
Instructions
Turn the instant pot onto sauté mode. Add in the mustard oil and allow it to heat until smoking and the instant pot registers hot. Add in the black mustard seeds and wait until the seeds begin to pop.Add in the minced ginger and the red onion and sauté until they soften, about 3 to 4 minutes. Stir in the carrots, butternut squash, split peas, steel cut oatmeal, powdered turmeric, tomatoes and 4 cups of water.
Turn off the sauté mode and set on 10 minutes of high pressure. Allow the instant pot to complete cooking and release the pressure after 10 minutes.
Stir in the mustard greens and the spinach leaves and the salt.
Cover the instant pot to let the leaves wilt in while preparing the tempering.
Heat the remaining oil in a small skillet and add in the minced garlic and look for a minute or just enough for the garlic to turn fragrant and pale golden. Add in the red pepper flakes.
Pour this over the soup.
Add in fresh lime juice and chopped cilantro to taste and serve.
Notes
To make this on the stove top, simple cook in a Dutch oven or other heavy bottomed pot for an hour until the split peas are soft and creamy.
3.1https://spicechronicles.com/well-seasoned-split-pea-and-oatmeal-soup/If you like this recipe and want more ideas, do join my Indian Instant Pot and Air Fryer Facebook group. Pick up a copy of my Instant pot cookbook Instant Indian here, along with The Bengali Five Spice Chronicles and Spices and Seasons.
Do not forget to get social with me, Facebook, Twitter, Instagram, Pinterest . And of course, sharing is caring!
The post Well Seasoned Split Pea and Oatmeal Soup appeared first on Spice Chronicles.
December 21, 2022
Spicy Coconut Shrimp
 This is another recipe another recipe for Coconut Shrimp. I add a few interesting layers of spices, hence the name Spicy Coconut Shrimp. Duh! You knew that! The interesting thing done to this recipe is that I brine the shrimp before I do other good things to it. As in adding spices, coating in sweet moist coconut and breadcrumbs and then frying them until nice and crisp. In short, perfect food for the holidays! If you are into crispy shrimp of sorts, the crispy shrimp cutlet from the Bengali Five Spice Chronicles is worth a try.
Thankfully I made a double batch of these last week. The past two days have been hell on wheels for me. Yes, I totally made up that term to be dramatic. But, starting with a crazy day, and ending with a totaled car, and yours truly in the hospital it has been awful. I am currently, without a car, a little sore but beginning to get back to my routine. I am unsure about wanting to get back into a car right away. My game plan for tomorrow includes mega cooking in a comforting kind of way. Maybe nature ordered some slowdown for Christmas. And my net conclusion is that this recipe can be frozen well.

Brining the shrimp does for shrimp what brining chicken or turkey does for the turkey. It makes the shrimp moist and juicy. Brining is soaking the shrimp in a salt solution, ideally for 1 hour but 30 minutes will do if in a hurry. The first time I had brined shrimp, I did it just for the heck of it. I am quite the believer. I believe that this technique makes a huge difference when you are going to enjoy the shrimp in a drier preparation such as grilling the shrimp.

Honestly, pieces of this sweet and spicy shrimp are just perfect in pieces right off the plate. But then, it is also so much fun with a dipping sauce. But then again, what is an appetizer without dunking. Just adding in sriracha onto mayonnaise is a great idea. And then there is tamarind chutney or green chutney which are all good ideas.
PrintLime, Ginger and Green Chili Fried Shrimp
Prep Time: 2 hours, 45 minutes
Cook Time: 15 minutes
Total Time: 1 hour

A delightful recipe for brined and well-spiced fried shrimp. That extra hour is well worth the effort.
Ingredients
For the brine2 cups water
¼ cup kosher salt
2 limes
1 and 1/2 pounds of large shrimp, shelled, de-veined and tails left on
For the Spice Paste
1 inch ginger peeled
2 green chilies
1 pod garlic
1 tablespoon Greek yogurt
For the batter
1 egg
3/4 cup all-purpose flour
1 teaspoon salt
water as needed
For the coating
2 tablespoons cornstarch
1 cup breadcrumbs preferably, panko
1/2 cup sweetened coconut flakes
1/2 teaspoon salt
Canola Oil for Frying
To Garnish
Snipped Chiles and your favorite finishing herb
Instructions
Stir in the water and kosher salt. Cut the limes and squeeze in the juice. Submerge the shrimp in this mixture. Cover and place in the refrigerator for at least an hour.Drain the shrimp and rinse off. You will notice your shrimp is noticeably firmer and plumper.
Toss the shrimp in the minced ginger, garlic green chilies and the yogurt.
Next prepare an assembly line of sorts. You want to be able to dunk the shrimp in the batter, roll well in the coating, and then place on a chilling surface. I like to use a parchment lined baking sheet for the last step.
Beat the egg, stir in the flour, salt and 2/4 cup water. Gradually add to ensure a thick consistency.
Mix together the cornstarch, panko, coconut flakes and the salt and spread on a flat surface such as a large plate.
Separately, line a baking sheet with parchment paper.
Dip each piece of shrimp into the batter and roll into the coconut panko mixture, coating thoroughly and then place on the paper lined baking sheet.
When all the shrimp is done, lightly cover with plastic wrap and place in the refrigerator for 30 minutes.
Heat the oil (about 2 cups) in a medium sized wok. Add the shrimp, a few pieces at a time. Allow it to fry for 3 to 4 minutes, turn and give it a couple of minutes more. Drain on paper towels and serve with your favorite dipping sauce.
Notes
A lot of the prep time is for brining and resting the shrimp, but this recipe is one of the more complex recipes on this site.
3.1https://spicechronicles.com/spicy-coconut-shrimp/The post Spicy Coconut Shrimp appeared first on Spice Chronicles.
December 18, 2022
Applesauce with Mulling Spices
iing ttin GerrG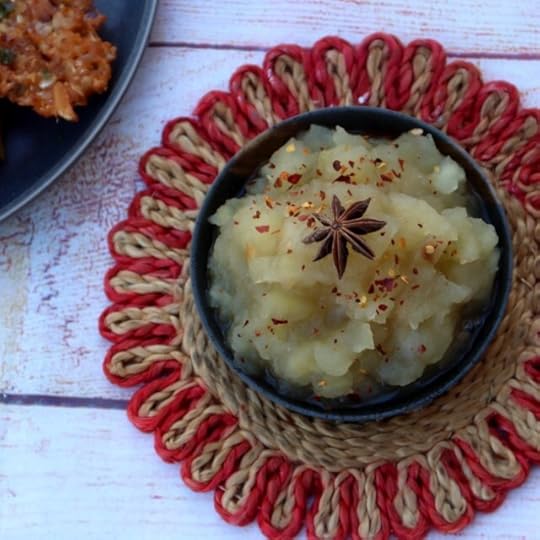
This is not a conventional applesauce. However, this applesauce made with mulling spices, specifically allspice, cinnamon and star anise. Okay the last one is just a Spice Chronicles thing. Gett In fact, I tried to make this for some latkes. It was all gone. It is that kind of good! I sometimes add in just a little bit of red pepper flakes. The spices are mostly fragrant and used whole. They impact a very gentle and nuanced flavor to the applesauce. Since they are pulled out before serving, people often just wonder about the flavor. This sauce can enhance either a sweet or savory.
Apples Used for this ApplesauceI use mostly Granny Smith apples and use brown sugar for sweetening. I have also tried using coconut sugar, if you want a natural sweetener.
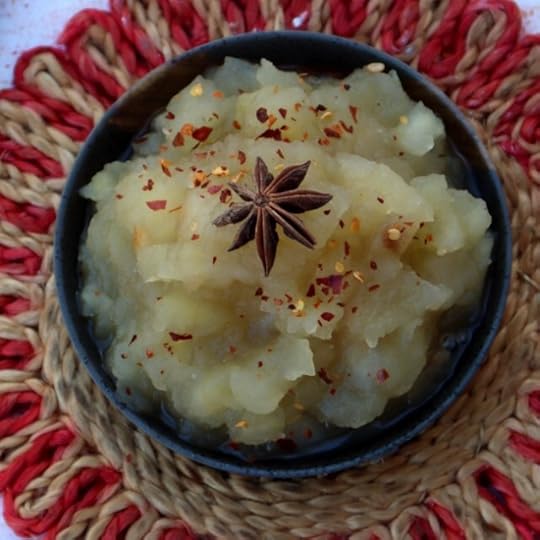
I add very little water to this recipe. It is all about the apples, with the sugar and spice to make things nicer. Cooked until the apples are soft. Not over cooked. This is naturally a matter of personal preference. In fact, I use the back of a wooden spoon to mash the apples to make my applesauce. It is a little rustic that way. In some ways, the brown sugar, the apples, and the spices are like a mashed serving of Hudson Valley fall in a bowl. As the sauce simmers, the kitchen smells warm and fragrant.
The red pepper flakes might be just a little controversial. But they do for the applesauce, what salt does for caramel. Creates that magical contrast of flavors, that challenges the palate.
Since the spices in this do get discarded, it might be a good idea to use a spice sack for this recipe. I am used fishing and digging out spices, but just saying it is a good idea for the uninitiated.
PrintApplesauce with Dates and Star Anise
Prep Time: 10 minutes
Cook Time: 20 minutes
Total Time: 30 minutes
Yield: Makes about 3/4 cup
A lightly spiced apple sauce that works very well with crackers and cheese.
Ingredients
4 Granny Smith Apples1/2 cup brown sugar
3/4 cup water or apple cider
1/2 tablespoon (about 20 all spice berries)
1 piece cinnamon (about 2 inches) broken into smaller pieces)
1- or 2-star anise
1/2 teaspoon red pepper flakes (optional)
Instructions
Peel and core the apples and cut them into smaller pieces.Place the apples in a heavy bottomed pan with the brown sugar, water or apple cider and the whole spices. It would be a good idea to use a spice bag for the spices.
Cover and simmer for about 25 minutes. The apples should have softened and mostly broken down.
Remove from the heat, discard the whole spices. Mash the apples into a sauce like consistency. The texture of this applesauce is thick and a little rustic.
Sprinkle with the red pepper flakes if using and enjoy!3.1https://spicechronicles.com/applesauce-mulling-spices/
The post Applesauce with Mulling Spices appeared first on Spice Chronicles.
December 16, 2022
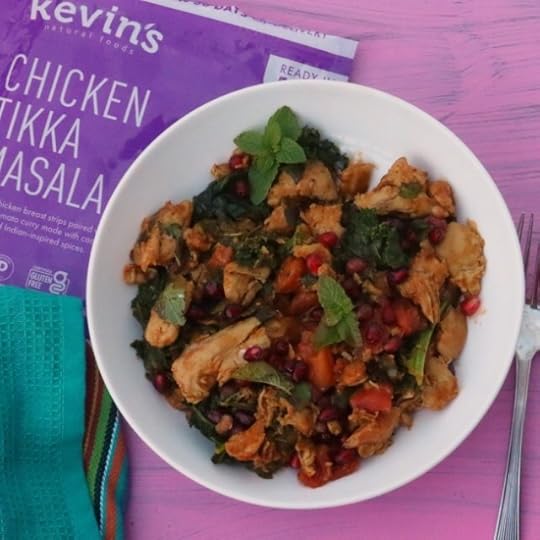
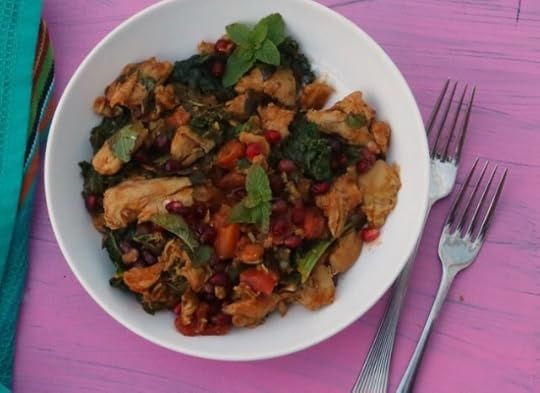
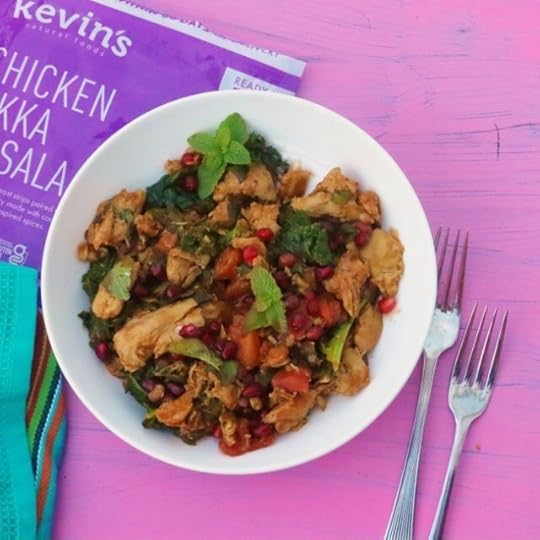
Mint and Pomegranate Chicken
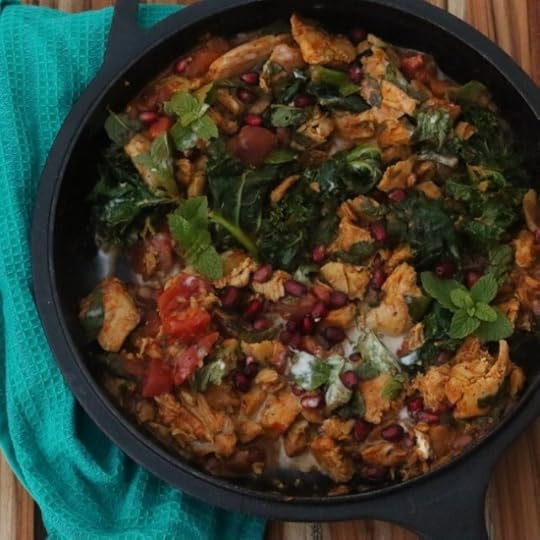 This mint and pomegranate chicken is so flavorful, vibrant and easy to put together. This post comes your way with help from Kevin’s Natural Foods. I have to confess, when it comes to premade packaged foods, I am not an easy sell. But I can be converted! Playing around with these so very convenient and flavorful helpers, I have survived a ridiculously busy week. This is made with the very vibrant mint that is still found a plenty in my garden.
The flavors are simple, in addition to the tikka masala seasoning, that comes with the package, I added whole cumin, some more tomatoes, a splash of coconut milk and kale. And of course, the mint and pomegranate seeds. I knew my son would be happy about this. The dad gobbling it up was quite the bonus. Definitely a good thing to add to my dinner rotation salvation. Need to have on hand essentials.
I will tell you this much, this week has been quite the crazy busy mad sort of week. I pulled this together in the middle of the day. The good thing about this recipe, is that it will work just as well with any kind of chicken, and shrimp or tofu. I might throw in a little extra spice or two, but I would not end up adding too much to get this show off the road.
It is great, as a complete meal by itself. Add a side of rice, cauliflower rice, or salad if you so desire. And just like that, another year draws down to a close. The last year, with the last young one in the house. In parenting, the days are long, and the years are short. And I wonder, who I will end up making these creative meals for. However, for now and for this week, this was a winner.
And tomorrow is another weekend. One with all the promise that a winter weekend brings.
PrintMint and Pomegranate Chicken
Prep Time: 5 minutes
Cook Time: 15 minutes
Total Time: 20 minutes
[image error]
An easy to pull together, saucy and flavorful mint and pomegranate chicken.
Ingredients
2 tablespoons oil1 teaspoon whole cumin seeds
1 teaspoon red pepper flakes
1 package Kevin's Natural Foods, Chicken Tikka Masala (see note)
1/2 cup diced tomatoes
1 cup chopped kale
1/4 cup coconut milk
1/2 cup fresh pomegranate seeds
1 cup chopped fresh mint
Instructions
Heat the oil until it is smoking. Add in the cumin seeds and wait until the seeds begin to sizzle.Add in the red pepper flakes.
Open the package and add in the chicken pieces and allow the chicken to brown slightly. This takes about 3 to 4 minutes.
Add in the tomatoes and the tikka masala sauce and the kale.
Allow the kale to wilt. Stir in the coconut milk and stir and bring to a simmer.
Turn off the heat and stir in the mint and pomegranate seeds and enjoy!
Notes
If doing this from the scratch,
Add 1 cup diced chicken, an extra half cup diced tomatoes and 1 teaspoon salt and cook the chicken for 10 minutes longer
The post Mint and Pomegranate Chicken appeared first on Spice Chronicles.
December 9, 2022
Masala Gobi Fry
 I love cauliflower! It is one of my favorite vegetables to fix on a weeknight. We probably eat cauliflower at least once a week. This Gobi Fry is a different take on the mild cauliflower. A variation from my usual alu gobi.
Air Fry or roast the cauliflower and then finish using a bunch of easy spices. The only essential here is
The magic of spices however is that there are surprises when you least expect them. Here mustard seeds, ginger and curry leaves team up together for a mega flavor wow!
The cauliflower is rich in most minerals. Despite its comforting flavors it is low in carbs. It makes for the perfect snacking vegetable with your favorite dish! I recently recreated this dish when my mother-in-law was visiting. The dish happens to be vegan. I subbed the garlic and onion with asafetida. That too works well.

Dry stir-fried dishes are often called Fry. There are various dishes across India that use the name fry a little loosely. Batter fried cauliflower sometimes use this quick spice techniques. In this dish I roast the cauliflower. Roasted cauliflower is mild flavored and crisp in all the right places. They gently create magic with the simple and powerful spices found in this dish.
Gobi is the Hindi word for Cauliflower. A word that my daughter still finds very funny.

For me it is the perfect weeknight side dish. However, dolled up and made fancy it can also double up as an appetizer. Serve it over toast drizzled with a little bit of green chutney. The possibilities are endless.

When planned well, all of this deliciousness can be done in just about thirty minutes. Another great practical option for your table.
PrintLight and Lively Cauliflower with Curry Leaves
Prep Time: 5 minutes
Cook Time: 20 minutes
Total Time: 25 minutes
Yield: Serves 4 to 6
A light and lively cauflower dish, flavored with ginger, curry leaves and perky mustard seeds.
Ingredients
4 to 6 tablespoons oil1 medium sized cauliflower, cut into medium sized pieces about 2 cups)
1 teaspoon salt
1/2 teaspoon turmeric
1 teaspoon mustard seeds
2 dried red chilies, broken into smaller pieces
6 to 10 curry leaves
1 small red onion, cut into a dice
1 tablespoon minced ginger
2 tomatoes, diced
1 tablespoon chopped cilantro
Instructions
Heat the oven to 400 degrees.Line a sheet pan with parchment paper. Lay the cauliflower out in a single layer.
Toss with the turmeric and salt and 1 tablespoon of oil.
Place the pan in the oven and roast the cauliflower for 15 minutes. The cauliflower should be cooked through gently crisped in parts.
In a large pan, heat the oil and add in the mustard seeds and wait until the seeds crackle. Add in the red chilies and curry leaves. In 30 seconds add in the onion and ginger and saute for about 4 to 5 minutes until the onion and ginger softens.
Add in the curry leaves and the onion and cook for 1 minute.
Add in the tomatoes and toss in the cauliflower and cook for about 2 to 3 minutes. Check for seasonings.
Sprinkle with cilantro and serve.
3.1https://spicechronicles.com/masala-gobi-fry/
The post Masala Gobi Fry appeared first on Spice Chronicles.
December 6, 2022
Narkol Shorshe Chingri – Quick and Spicy Coconut Mustard Shrimp
 Recipe Updated from September 26, 2011
This Narkol Shorshe Chingri or Coconut Mustard Shrimp is ridiculously easy. Ideally, you do need to have fresh mustard paste on hand. If you do not, fret not. Use commercial wholegrain Dijon mustard. And then believe it or not you can do the rest in the microwave. A back-to-school season dish that never fails to impress and satisfy. The power of familiar flavors! To complete a meal, serve this with rice and simple red lentils.
It is the time of the year that school starts for the kids and the days especially the weekends are filled with stuff. This year the kids try soccer for the first time.
Classic Bengali Flavors with a modern twistThis recipe uses coconut milk, stone ground mustard and mustard oil. This are very classic Bengali ingredients. These get meshed with flaked sweetened coconut. This adds a really fun texture and a touch of sweetness. And the really cool part of this is that it gets done it the microwave.

Ironically, enough this recipe is older than the kids and ahem, husband. It goes back to once upon a time when my parents were into matchmaking. Rather than truly as in really truly upset them, I met or spoke to the men they thought were suitable. In return, I obtained interesting anecdotes and recipes as they came. One such recipe is this one. It came from the mother of a suitable young man.

This recipe a little removed is what I share with you. The beauty of cooking and recipes is just that. Who knows where the mother and son are, but the beauty of the meal remains on.
And may I say, if you love recipes with a story. Do pick up a copy of my new cookbook. It will not disappoint.
PrintNarkol Shorshe Chingri – Quick and Spicy Coconut Mustard Shrimp
Prep Time: 10 minutes
Cook Time: 10 minutes
Total Time: 20 minutes
Yield: Serves 4
A simplified version of a classic Bengali Shrimp dish.
Ingredients
3 tablespoon mustard oil1 tablespoon mustard paste (see recipe)
1 and ½ tablespoon sweet coconut flakes (such as baking coconut)
½ teaspoon salt
½ teaspoon turmeric
6 green chilies, slit halfway lengthwise
1 and 1/2 pounds of large shrimp, shelled and de-veined
1/4 cup coconut milk
1/4 cup water
1 tablespoon mustard oil
For the mustard paste
2 tablespoons of mustard and 2 green chilies (soaked overnight)
Instructions
Grind the mustard to a smooth paste and use as needed. (If you are really in a bind, use stone ground commercial mustard for this recipe).Mix the mustard oil, mustard paste, coconut, salt and coconut well in a bowl.
Add the green chilies and the shrimp and let the shrimp rest for 10 minutes.
Cook the shrimp for 4 minutes and stir well,
Stir in the coconut milk and water and cook for another 3 minutes. Stir well. Drizzle with the remaining mustard oil and serve.3.1https://spicechronicles.com/narkol-shorshe-chingri-quick-spicy-coconut-mustard-shrimp/
The post Narkol Shorshe Chingri – Quick and Spicy Coconut Mustard Shrimp appeared first on Spice Chronicles.
December 4, 2022
Garam Masala – How to make and use it
 Garam Masala is probably one of the first spices to hit mainstream spice racks is fragrant and easy to make. The most common variety is the blend found in the Nothern parts of India. Made with familiar spices it is a great addition to any spice cabinet. Used correctly it also adds a flavor boost to most dishes. This recipe that I have been using for years is my mother-in-law’s recipe and something that stands the test of time.
There are regional and even global variations to garam masala. In my kitchen, I also use Bengali Garam Masala which is of course Bengali.
What Does Garam Masala MeanThe word garam means hot in Hindi. This references the warming effect that spices like cinnamon, cloves and cardamom have on the body. The world masala means a blend. So essentially it means a warming spice blend.
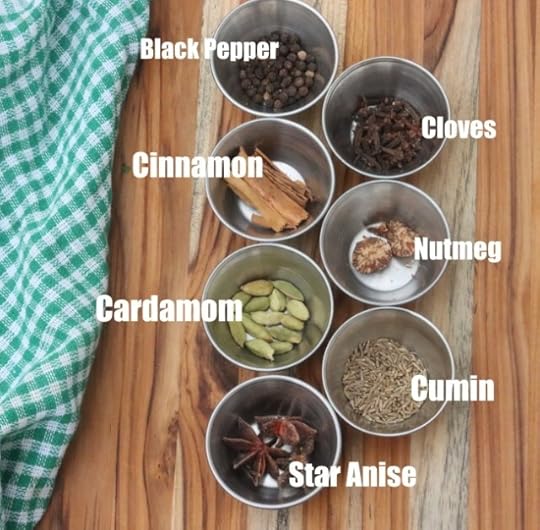
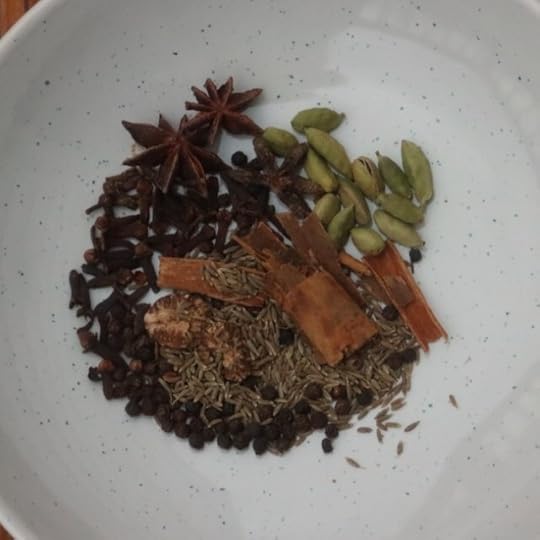
This recipe is made with seven spices- cinnamon, cardamom, cloves, nutmeg, cumin, black pepper and star anise. Sharper spices like cumin and black pepper balance out the sweeter spices to ensure a bouquet of nuanced flavors.
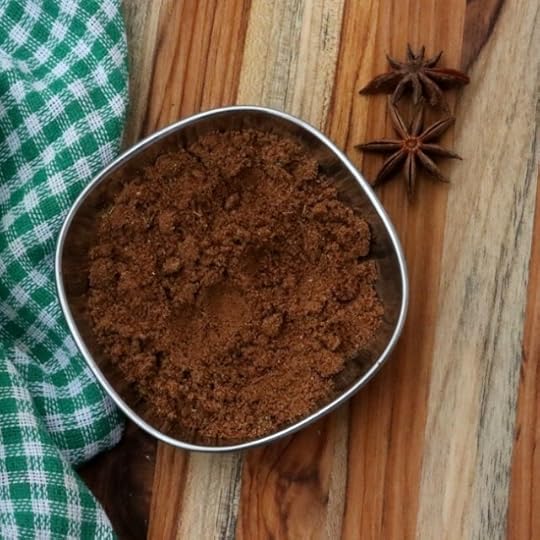
To keep the garam masala fresh make this in small batches. The blend is a finishing spice. Use this to finish stews and dishes like Chana Masala or Alu Gobi. It is great in baked goods, instead of pumpkin pie spice. The stronger flavor screams winter and fall with a much louder voice. It is great for roasting root vegetables as well. Try to avoid letting it cook for too long, as this dulls the sweetness and results in a slightly bitter taste. It is the base spice for tandoori masala, so it is great for roasting or finishing roast chicken with. It is super easy to make, but if you have to buy it from the store buy a small bottle. Replenish it when needed. The best part of making garam masala is that the kitchen smells magical for hours.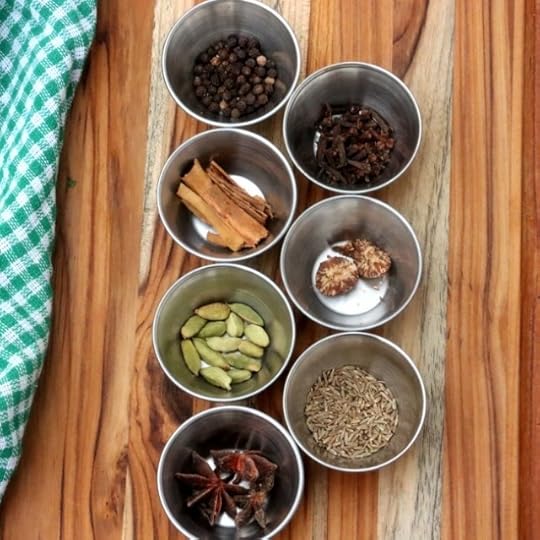
PrintGaram Masala – How to make and use it
Ingredients
2 tablespoons of whole cumin seeds1 tablespoon whole black peppercorns
2 large pieces of cinnamon (about 3 inches long, broken into smaller pieces)
1 tablespoon cloves
1 tablespoon cardamom seeds (about 20 cardamoms shelled)
2 whole pods nutmeg, broken into smaller pieces
10 pieces star anise
Instructions
Place the whole cumin seeds, black peppercorns, cinnamon, cloves, cardamom seeds, nutmeg and star anise on a small skillet and gently toast the spices until just fragrant. This takes about 4 to 5 minutes. The smell is very rich, and it is tempting to keep the spices cooking longer, but do not do this.Place the roasted spices in a coffee grinder and grind the spices until they are ground into a smooth powder. Check consistency and continue powdering until is a fine and uniform blend.
Pour this in a non-reactive jar with a tight-fitting lid and use as needed.
3.1https://spicechronicles.com/how-to-make-and-use-garam-masala/
The post Garam Masala – How to make and use it appeared first on Spice Chronicles.


