Deborah Bates's Blog, page 2
May 8, 2011
Mother's Day Gift

Good Morning Gift
When is motherhood not riddled with self-doubt? Mother's Day, with all of its precious gifts, crafts, cards and "coupons" for completing household chores is a hyper focused day when our little monsters dust off their halos and become the angels that we know are hidden beneath anything from tantrums to the closed off teen years of self-discovery. We look at these precious children and wonder "Am I doing this right?" It all goes so fast, until one day, we are sitting in a kitchen of many pots and plates with no one to cook for. How many times do I ask – "How badly did I do?"
And then the last fledgling gives me the most amazing gift….

a perfect gift
Taking the soon-to-go-to-University (and last of the flock) daughter to work at 5:45 brings a bit of mystery and surprise to the morning. As she exits the car, there is a little note taped to the inside passenger door. I point and ask what it is, but she heads off wearing a devious little smile.
The note is celebrating a little mother-daughter moment that we share. When I come home, I discover that these notes are taped around the house – on my alarm clock, mirror, stove… I am the child now, filled with the excitement of hunting for these sweet little gifts – not the least of which is the actual igniting of excitement. I am happily seeking and discovering these little bits that honor our relationship in ways that get lost in the everydayness.
She checks in with me on her break to see if I have found all of my little paper presents. Her clues lead me to what she had hoped would be the final discovery (and it is) – the most wonderful of gifts. She, of few words and untold wisdom, lets me know that I have done okay. On this day that can often leave me asking "how much have I messed up these perfect little beings?"- my child lifts my fears and lets me fly.
I can't stop crying.

Miracles of everydayness


March 8, 2011
And the Winner is….

Far from home
I have been doing a bit of traveling and following the advice of Elenore Roosevelt, doing things that scare me!
Today is the big bloggy draw for the winner of Sunshine & Rust. I counted through all of the comments (excluding my own), and did a random number draw to select the winner. A big shout out of congratulations goes out to:
Deb
March 2nd, 2011 at 12:44 pm | edit
for her comment:
But what if I did this?
(usually an adventure follows — or a learning experience, or both!!)
Deb has a blog of her own, for chronicling her own artistic adventures.
Congratulations to Deb, and…. what the heck- this was too much fun… So two more names were drawn for a bit of Threads happiness! Shout outs to:
Suzanne
March 7th, 2011 at 9:23 am | edit
AND
gjeneve
March 5th, 2011 at 11:59 am | edit
If the winners can send me an email at stitchtress-at-yahoo.com to let me know your particulars, the prize goodness will be on its way to you for some stitchy fun.
Thank you to all for the comments and to In Stitches for the opportunity to play and share what I love.
More good things to come!
Sew What You Love


March 3, 2011
Thanks for Stopping By
Next Stop on Pokey's Quilting Arts IN STITCHES Blog Tour
Welcome to Day 4 of The IN STITCHES Blog Tour
My name is Debbie Bates and I will be your tour guide today. If you missed yesterday's stop with Jackie Cardy, you may want to back track for a colourful Yorkshire Visit with silk purses, a rhubarb cloche and mention of an apple ginger trifle (yum!).
I am one of the artists featured in the second issue of Quilting Arts IN STITCHES digital eMag. My article was about using a Passport (C) or workbook format to create samples, try new techniques, tell stories or simply explore your art form. You can learn more about the article in the Feb. 23 post below, or better yet, subscribe to In Stitches! You won't be disappointed with this new, tree-friendly format that offers all sorts of up close opportunities in photos and video.
A quick introduction

Click the image to MADMEN YOURSELF!
Fans of Madmen will recognize the art of Dyna Moe in all her vintage glory! My Madmen Gravatar tells you a bit about me:
I work in Marketing, but harbour secret girlhood dreams of becoming a stewardess (before they were known as flight attendants, and back when the job was more fun!)
I prefer pumps to flats and patiently await the return of the neckerchief (close cousin of the ascot; the accessory of choice of Bruce Wayne Adam West, my hero)
Shopping is a fun pastime, but can not hold a candle to a good double shotgun game of House of the Dead two.
I wear my hair short, spiky and in its natural state of sparkly greyness
But like so many women, appearances can be deceiving - inside all of us lurks greatness – from our little "g"goddess to the artist within; the "Jackies or Marilyns" and any other super-heroine persona that we may hold close to our hearts.
I work, teach and stitch. I sew what I love and hope that you do to. Life is too short to stress over a craft that should bring us joy.
And now a teensy bit of stitching…
Super-Secret Emergency Cash Stash Key Ring
A quick little project that you can whip up from scraps or ribbon in about ten minutes: I would love to make stuff for my kids, in particular, my boys. But they really do not want my stitchy things. This little key ring hides a secret stash of cash to see them through an emergency taxi ride or spot them should their wallet be lost or stolen. It is inspired by my Mom's old charm bracelet. One particular charm was designed to look like a little gold bank building. The door opened and inside was a teeny folded twenty-dollar bill (a gift from my grandfather so that she would never be totally broke!).
Materials:
9.5 inch strip of ribbon (minimum 3/4 inch wide; 1 inch is better)
Thread of choice (strong enough to secure seams)
Grommets and setter tool (I use a Crop-A-Dile (TM))
Optional: Additional narrow ribbon or trim, tear away stabilizer as needed
The goal is to stitch a folded ribbon together, add grommets, tuck a bill inside and fold the ribbon over so that each grommeted end can be threaded onto a key ring.
If adding extra ribbon or trim, stitch this down the centre of the main ribbon OR if adding text, free-motion stitch this to one side

(1a.)

(1b.)
Finish each end of the ribbon with a zig zag stitch. (Forward and reverse a few times to bind the end of the ribbon).

Add a grommet to the centre of each ribbon end (this grommet will only be through one layer of ribbon)
Fold the ribbon wrong sides together (good side of the grommet facing out)
Stitch each long outer edge of the ribbon together. When stitching next to the grommets, you may have to pull the ribbon along as it binds under the presser foot (or hand tack this part). Be sure to leave the narrow end open – this is the opening to tuck the folded cash inside.
Add a grommet to the FOLDED edge of the ribbon (this grommet passes through two layers of ribbon).
Fold a $20 bill (or bill of choice) in half lengthwise, and fold again. The bill should now be narrow enough. Fold it over on itself to shorten the length. The bill is now approximately 1/2 inch wide by 3 inches long.

folded bill in upper right
Tuck the bill into the open end of the ribbon. Push it just beyond the grommets.

Make them flowery: make them 'manly' , make them your way.
Thread each end of the stitched ribbon onto the key ring. This ribbon takes on the feeling of a webbed strap. No one will know that there is money inside. It is just tricky enough to work the bill out of the ribbon that your loved one will think twice before using the emergency cash, so it should be available when it is really needed.


Our Tour is coming to a close
Thank you for dropping by! To share in the festive feeling of our tour, I am offering a Six Word Giveaway opportunity in the Feb 28 post below. Describe yourself or your creative style in six words. Share these in the comment field, here or there- I'll find them!) and next week (March 8th ) a random draw of eligible entries will be made for a magical crafty box filled with stitching goodness!
Be sure to continue along the tour tomorrow as 12 by 12 artisan and author, Deborah B (Boschert) is on deck. Her blog is filled with more stitchy goodness.
Safe Travels & Sew What You Love!


March 1, 2011
Day two of Blogapalooza is on

all aboard the bloggy bus
Have you been following Pokey's QA IN STITCHES Blog Tour?
Here's the link & the schedule:
Monday (Feb 28): Jane Davila: http://janedavila.blogspot.com
Tuesday: Lynn Krawczyk (March 1): http://www.fibraartysta.blogspot.com
Wednesday: Jackie Cardy(March 2): http://dogdaisychains.blogspot.com
Thursday: Deb Bates (March 3): http://stitchtress.wordpress.com
Friday: Deborah Boschert (March 4): http://deborahsjournal.blogspot.com
Saturday: Michelle Allen (March 5): http://allendesigns.typepad.com
Sunday: Liz Kettle (March 6): http://textileevolution.com/?option=com_wordpress&Itemid=203
Monday: Lyric Kinard (March 7): http://lyrickinard.blogspot.com
Tuesday (March 8): A surprise guest on Lindsey's blog will be the final stop of this tour http://www.quiltingdaily.com
Today, the Bloggy bus stops at serial artist, Lynn Krawczyk's Fibra Artysta blog. Lynn offers all sorts of fibre goodness, including video tutorials and crafting how-to's (including the 5 part art of gift wrapping series; Yum!)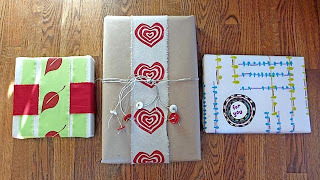
Let the fun continue!
(and don't forget to enter either the In Stitches, or my Six Word giveaways)


February 27, 2011
Blog Tour and Six Word Give-Away

You could win this box of Passport-making goodies: SUNSHINE & RUST
In Stitches Blog Tour Launches This Week
Today, Pokey Bolton announced on Quilting Daily that she will host a blog tour! I am so excited to be a part of the second edition of In Stitches and happy to be a destination for the blog tour bus this Thursday. Pokey is offering an amazing prize of all 13 episodes of the series 700 of Quilting Arts TV by answering this question on her bog entry:
What is the most enjoyable part of stitching for you? Conversely, what drives you crazy or proves frustrating at times?
Click on over to answer at Quilting Daily (but remember to stop back here to enter another give-away challenge along the blog tour)

Souvenirs of the Blog Tour: Comment and Enter to Win
In that spirit of giving, I would love to spread the joy and share some inspiration by offering a gift from here, the Stitchtress stop along the bloggy-land tour. As I work at boxing up my sewing room, I will be building a gift package of supplies to help you build a Passport of your own (or whatever your creative heart desires). As I started pulling the first bits together, the theme "Sunshine & Rust" came to mind (mostly because of the colours that seemed to be dancing together through thread, ribbon, fabric and embellishment selections). The box will include:
Your very own copy of Threads: The Basics & Beyond
A Crop-A-Dile grommet setting tool
Assorted threads (by Madeira, Linda Palaisy, Star Quilting, WonderFil and Aurifil)
Two to five meter pieces of ribbons (velvet, hand-dyed, organza, silk & more)
Assorted fabrics: from silks to velvets; sparkle organza to vintage linen and lace
Embellishments including beads, wire & scrapbooking bits
Say Six Words; Share Your Style
This book box is valued at over $100. A winner will be selected after the tour closes, on or about March 8. It is easy to enter. Simply add a comment to THIS POST that answers this challenge: Describe your personal creative style in six words and ONLY six words (a la the famed Six Word Memoirs series). For example: are you: "Traditional with a sense of humour" or "Can't cut straight; call me dada"? Nothing says that you will be forever defined by these six words – it might just describe your artist within du jour.Be serious, playful or just take a wild guess. Who is the woman (or man) behind your needle? How can you capture her in six words?

a few favourite things to send you on your creative way
Enjoy the tour and see you soon.
Please Note: Entries are open to all who meet age of majority for contest entry in their country of residence. At this point, I can assume shipping costs throughout contiguous North America or the equivalent value applied to your destination. Winning entry will be selected by random; selection made from all qualifying six word entries. Notification of winner will be made through announcement here on Stitchtress Stumbles (and email/blog contact if provided). Only one entry per person/ email address please. This is a friendly good will offer with no commercial value. Best of luck to all 'commentors'.
Say your Six Words in this post's comments


February 22, 2011
I'm In Stitches
Have you seen the digital magazine called Quilting Arts In Stitches? I had my first peek today when I got to see the article I submitted on Passport making and was excited with each click. This on-line only magazine delivers a jolt of creative, colour-rich excitement as you make your way through each article. From technique tutorials to up close artisan interviews and special product focus pieces, In Stitches brings a new way to see, learn and carry us away into the world of textile arts that we all love.

I really like the look of the eMag and the fact that I can store it on my computer instead of my over-burdened bookshelf. You can visit In Stitches at http://www.interweavestore.com/Quilti... to learn more about subscribing. Or have a look at this review for a closer look at this format: http://www.craftypod.com/2010/07/08/e...

Tuning new pages

A play on the concept of Illuminated Manuscripts
What can I say, I need a theme.
The project featurespages that play on the idea of an Illuminated Manuscript. When given the task to create several new technique pages, my first question was "what will the pages be ABOUT?" I thought that the seven heavenly virtues gave me a nice starting point of seven concepts to work with.

What more could a girl need?
Once the idea took form, the serious play began.
Piles of fabric, threads and embellishments began to grow. Some false starts and "also ran" ideas got pushed to the side and I started to bond with the work. You know that feeling, where excitement trumps fear and things start to click? That's when this addiction called 'creating' grabs hold of us and will not let us cook, eat or properly clean a toilet until an idea takes satisfactory form. Each new piece builds skill and style, but more importantly, confidence.
If you see the article, I hope that you like it.
I know that In Stitches will spark your own ideas that will take you on a whirlwind tour of inspired creating. Most of all, I hope that passing along these thoughts and how-to's helps you to connect with your own vision and voice.
Be Brave & Sew what you love.


February 14, 2011
Today & Everyday

Love is all you need.


February 7, 2011
Hari Kuyo Valentine
(Caution: These pointed valentines are sharp- handle with care)

New pins and needle: chocolate is optional
You may have read my Hari Kuyo post last year which ended with my own needle ceremony. I was inspired by the many images that I found of various celebrations in Japan. Some were quite ordinary, with plastic bins filled with well-used pins and needles. Other images were bursting with color as needles were laid to rest in the traditional soft tofu or sponge cakes under strands of colorful ribbons and fibres.
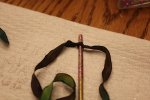
I ended my day with a candle next to a painted skewer draped in multiple colourful ribbons to celebrate the travels of my worn needles.
[image error]
Colorful displays like these inspired my Valentine with a twist
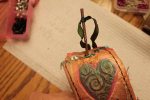
I wanted to share this celebration with my sewing friends, but the local Hallmark did not offer any Hari Kuyo cards. However, there were lots and lots of Valentines to share. Remembering the fun of the grade school tradition of sharing a small token with everyone in the class, I decided to make up a batch of small Hari Kuyo cards, complete with a beribboned skewer to aid in an impromptu ceremony if desired. The card includes a stitched velvet ribbon to hold a fresh new size 14 embroidery needle (my favourite) and two pink glass head pins.

A glitter-topped skewer holds the card

Pins and needle pierce a velvet ribbon on the lower portion of the card
HARI KUYO VALENTINE CARDS:
Materials:
Premade or home made tags
fabric slightly larger than the tag
expandable paint (gesso will also work)
Craft paints of choice (I used Jacquard Lumiere & Stewart Gill)
Heart & alphabet rubber stamps
Assorted threads (I used metallic threads and some ultra-heavy threads for bobbin stitching)
Assorted ribbons and fibres
Glitter and embellishments of choice
Wooden skewers
Optional: grommets and setting tool of choice (I use a Crop-a-dile)
Assembly:
Basically, you are creating a Valentine style card in the form of a tag. The hole at the top of the tag acts as a way to attach the skewer to the card. The ribbon that is tied to the top of the skewer gently wraps around the bottom of the card to temporarily hold it to the skewer and keep the pins from possibly flying about and pricking the recipient (that would be no way to celebrate!)
Scrape expandable paint across the fabric and impress the rubber stamp into the paint. Carefully lift the stamp away and allow to dry for about 30 minutes (follow manufacturers instructions)
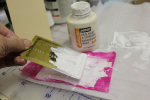

Paint one side of the tags (the other side will be covered with fabric) and allow to dry.

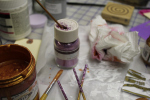
While these are drying, prepare skewers by painting them. While the flat end is still wet, dip it into the glitter.
Once dry, lightly iron the fabric to expand the paint. I iron from the back, hovering just above the fabric. You can feel the expandable paint react to the heat.
Using the tag as a guide, stitch the fabric to the tag WST (wrong sides together). If the expandable paint causes drag on your sewing machine bed, lay a sheet of tissue underneath it. This can be torn away easily after stitching.
DESIGN OPPORTUNITY: Since these are stitched from the back, it is easy to incorporate bobbin sewing with ultra heavy thread around the perimeter of the card.

stitch from the reverse side

Ultra heavy bobbin thread seen on the front of the tag
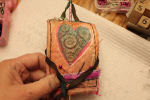
Paint the heart motifs as desired. Paint right over the bobbin stitching if you wish (I like the look of painted stitches). Allow to dry
Add a small strip of velvet ribbon across the lower portion of the card. Add additional embellishments to either side, as desired.

The velvet ribbon acts as a pin-cushion
OPTIONAL: Pop a grommet into card, using the tag hole as a guide.


Rubber stamp the back with your Hari Kuyo message.
Add a needle and pins by piercing them through the velvet ribbon. (To keep the needle sharp, try not to pierce the tag)
Tie a ribbon (approximately .75m long) around the top of the skewer. (a)
Slide the card on to the skewer through the tag hole.(b)
Gently wrap the ribbon from the back, across the front lower corners of the tag (c), and the criss-cross the ribbons and tie them at the back side of the card.(d)
(a)
(b)
(c)
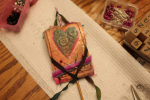
(d)
I hope that this twist on the Hari Kuyo celebration gives you a chance to remember your previous years' sewing fondly and that you can share your love of stitching with friends.
Here's to learning and growing in our sewing adventures of 2011,
the faithful use of many needles and most of all,
to sewing what we love!


February 5, 2011
It is time to gather your tired needles
 Hari Kuyo is coming…
 Will your weary pins and needles find rest?
Feb. 8 is the day for this traditional Japanese ceremony of giving thanks to our smallest tools for their service throughout the year. Wishes are made for a year of bettering our sewing, while old pins and needles are given rest in a soft sponge cake or tofu.
This day gives me the chance to ponder my previous year of stitching and look at what I hope to achieve in the next. What new direction do I wish to follow? What new skill do I want to learn and how will I improve upon what I am doing?
I could lose myself in consideration of the secret life of my sewing needles and get caught up in my own Shinto-Christian turmoil, but I am content to honour the animas of these tiny tools which make my career and art possible. This day of thanks-giving is beautiful in its simplicity.
How will you celebrate?

My 2010 needle thanks-giving


January 6, 2011
Line Upon Line; Thread Paint Tip #3

Fireworks in the bedroom with this easy bed wrap stitchery
These pretty ribbons from Renaissance Ribbons inspired this thread Painting exercise.
The thread is Coats and Clark Dual Duty XP, 5 different colours.
When just starting out, or if you have a particularly finicky fabric, try using an 8 inch hoop to create this radiating design. A layer of fusible stabilizer and additional layers of tear- away also help. You might find that another one or two layers of tear away need to be added after a while of stitching.
The neat trick to this design is that it does not have to be worked in free motion. If you are a little shy to start, you can go with the forwards and reverse method with the feed dogs engaged. It can be a bit tedious after a few hundred pushes of the reverse button- but that might be just the nudge to move into free motion stitching : )
 METHOD:
1. Mark two chalk lines at 90 degree angles. These cross hairs will help to keep you progressing in a nice circular motion.
2. Starting on one of the lines, move out from the centre and back again. Pivot slightly and then repeat. Do not stitch too tightly together. Instead, plan on repeating around the circle a second or third time to fill in areas.
3. Thread up the next color and work in the same fashion. Leave space. Work back into the first color and outward with slightly longer lines.

4. Gently press the fabric from the back, face down, over a towel covered ironing board so as not to crush the stitch lines.
5. Repeat stitching with color 3. At some point, you may need to stabilize again. It might be poor form, by I am not afraid to add more layers! This is not a bed quilt to sleep under, so a little extra stiffness will not hurt. Repeat again with colours 4 and 5.
 et Voila! You, are thread painting!
Ribbons: http://renaissanceribbons.com/wholesa...
Thread: http://www.coatsandclark.com/Products...


Deborah Bates's Blog