Mark E. Russinovich's Blog, page 2
January 4, 2012
The Case of My Mom’s Broken Microsoft Security Essentials Installation

The Case of My Mom’s Broken Microsoft Security Essentials Installation
As a reader of this blog I suspect that you, like me, are the IT support staff for your family and friends. And I bet many of you performed system maintenance duties when you visited your family and friends during the recent holidays. Every time I’m visiting my mom, I typically spend a few minutes running Sysinternals Process Explorer and Autoruns, as well as the Control Panel’s Program Uninstall page, to clean the junk that’s somehow managed to accumulate since my last visit.
This holiday, though, I was faced with more than a regular checkup. My mom recently purchased a new PC, so as a result, I spent a frustrating hour removing the piles of crapware the OEM had loaded onto it (now I would recommend getting a Microsoft Signature PC, which are crapware-free). I say frustrating because of the time it took and because even otherwise simple applications were implemented as monstrosities with complex and lengthy uninstall procedures. Even the OEM’s warranty and help files were full-blown installations. Making matters worse, several of the craplets failed to uninstall successfully, either throwing error messages or leaving behind stray fragments that forced me to hunt them down and execute precision strikes.
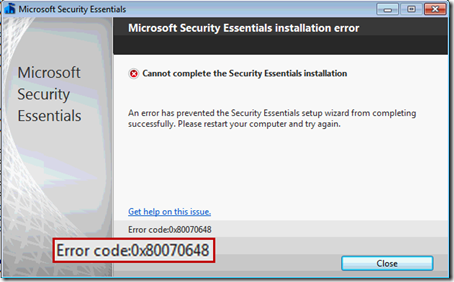
As my cleaning was drawing to a close, I noticed that the antimalware the OEM had put on the PC had a 1-year license, after which she’d have to pay to continue service. With excellent free antimalware solutions on the market, there’s no reason for any consumer to pay for antimalware, so I promptly uninstalled it (which of course was a multistep process that took over 20 minutes and yielded several errors). I then headed to the Internet to download what I – not surprisingly given my affiliation – consider the best free antimalware solution, Microsoft Security Essentials (MSE). A couple of minutes later the setup program was downloaded and the installation wizard launched. After clicking through the first few pages it reported it was going to install MSE, but then immediately complained that an “error has prevented the Security Essentials setup wizard from completing successfully.”:
The suggestion to “restart your computer and try again” is intended to deal with failures caused by interference from an unfinished uninstall of existing antimalware (or a hope that whatever unexpected error condition caused the problem is transient). I’d just rebooted, so it didn’t apply. Clicking the “Get help on this issue” link provided some generic troubleshooting steps, like uninstalling other antimalware, ensuring that the Windows Installer service is configured and running (though by default it isn’t running on Windows 7 since it’s demand-start), and if all else fails, contacting customer support.
I suspected that whatever I’d run into was rare enough that customer support wouldn’t be able to help (and what would they say if they knew Mark Russinovich was calling for tech support?), especially when I found no help on the web for error code 0x80070643. My brother in law, who is also a programmer and tech support for his neighborhood was watching over my shoulder to pick up some tips, so the pressure was on to fix the problem. Out came my favorite troubleshooting tool, Sysinternals Process Monitor (remember, “when in doubt, run Process Monitor”).
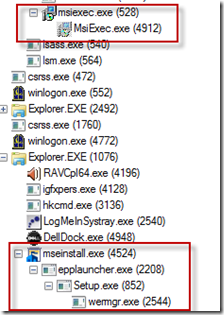
I reran the MSE setup while capturing a trace with Process Monitor. Then I opened Process Monitor’s process tree view to find what processes were involved in the attempted install and identified Msiexec.exe (Windows Installer) and a few launcher processes. I also saw that Setup.exe launched Wermgr.exe, the Windows Error Reporting Manager, presumably to upload an error report to Microsoft:
I turned my attention back to the trace output and configured a filter that excluded everything but these processes of interest. Then I began the arduous job of working my way through tens of thousands of operations, hoping to find the needle in the haystack that revealed why the setup choked with error 0x80070643.
As I scanned quickly to get an overall view, I noticed some writes to log files:
However, the messages in them revealed nothing more than the cryptic error message shown in the dialog.
After a few minutes I decided I should work my way back from where in the trace operations the error occurred, so returned to the tree, selected Wermgr.exe, and clicked “Go to event”:
This would ideally be just after the setup encountered the fatal condition. Then I paged up in the trace, looking for clues. After several more minutes I noticed a pattern that accounted for almost all the operations up that point: Setup.exe was enumerating all the system’s installed applications. I determined that by observing it queried multiple installer-related registry locations, and I could see the names of the applications it found in the Details column for some of them. Here, for example, is one of the OEM’s programs, another help file-as-an-application, that I hadn’t bothered to uninstall:
I could now move quickly through the trace by scanning for application names. A minute later I stopped short, spotting something I shouldn’t have seen: “Microsoft Security Essentials”:
I knew I hadn’t seen it listed in the installed programs list in the Control Panel in my earlier uninstall-fest, which I confirmed by rechecking.
Why were there traces of MSE when it hadn’t been installed, and in fact wouldn’t install? I don’t know for sure, but after pondering this for a few minutes I came to the conclusion that the software my mother had used to transfer files and settings from her old system had copied parts of the MSE installation she had on the old PC. She likely had used whatever utility the OEM put on PC, but I would recommend using Windows Easy Transfer. But the reason didn’t really matter at this point, just getting MSE to install successfully, and I believed I had found the problem. I deleted the keys, reran the setup, and….hit the same error.
Not ready to give up, I captured another trace. Suspecting that setup was tripping on other fragments of the phantom installation, I searched for “security essentials” in the new trace and found another reference before the setup bailed. To avoid performing this step multiple more times, I went to the registry and performed the same search, deleting about two dozen other keys that had “security essentials” somewhere in them.
I held my breath and ran the installer again, but no go:
The error code was different so I had apparently made some progress, but a web search still didn’t yield any clues. I captured yet another trace and began pouring through the operations. The install made it way past the installed application enumeration, generating tens of thousands of more operations. I scanned back from where Wermgr.exe launched, but was quickly overwhelmed. I just couldn’t spot what had made it unhappy, and that was assuming that whatever it was would be visible in the trace. My brother-in-law was growing skeptical, but I told him I wasn’t done. I was motivated by the challenge as much as the fact that I couldn’t let him tell his work buddies that he’d watched me fail.
I decided I needed the guidance of a successful installation’s trace so that I could find where things went astray. When it’s an option, like it was here, side-by-side trace comparison is a powerful troubleshooting technique. I switched to my laptop, launched a Windows 7 virtual machine, and generated a trace of MSE’s successful installation on a clean system. I then copied the log from my mom’s computer and opened both traces in separate windows, one on the top of the screen and one on the bottom.
Scrolling through the traces in tandem, I was able to synchronize them simply by looking at the shapes that the operation paths make in the window and occasionally ensuring that they were indeed in sync by looking closely at a few operations. Though it was laborious, I progressed through the trace, at times losing sync but then gaining it back. One trace being from a clean system and the other with lots of software installed caused relatively minor differences I could discount.
Finally after about 10 minutes, I found an operation that differed in what seemed to be a significant way: an open of the registry key HKCR\Installer\UpgradeCodes\11BB99F8B7FD53D4398442FBBAEF050F returned SUCCESS in the failing trace:
but NAME NOT FOUND in the working one:
Another bit of the broken installation it seemed, but without any reference to MSE, so one that hadn’t shown up in my registry search. I deleted the key, and with some forced confidence told my brother-in-law that I had solved the problem. Then I crossed my fingers and launched the setup again, praying that it would work and I could get back to the holiday festivities that were in full swing downstairs.
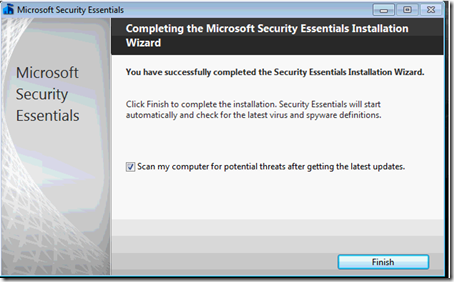
Bingo, the setup chugged along for a few seconds and finished by congratulating me on my successful install:
Another seemingly unsolvable problem conquered with Sysinternals, application of a few useful troubleshooting techniques, and some perseverance. My brother-in-law was suitably impressed and had a good story for when he returned to the office after the break, and my mother had a faster PC with free antimalware service.
I followed up with the MSE team and they are working on improving the error codes and making the setup program more robust against these kinds of issues. They also pointed me at some additional resources in case you happen to run into the same kind of problem. First, there’s a Microsoft support tool, MscSupportTool.exe, that extracts the MSE installation log files, which might give some additional information. There’s also a Microsoft ‘fix-it tool’ that addresses some installation corruption problems.
I hope that your holiday troubleshooting met with similar success and wish that your 2012 is free of computer problems!
November 28, 2011
The Case of the Installer Service Error

The Case of the Installer Service Error
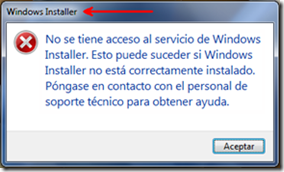
This case unfolds with a network administrator charged with the rollout of the Microsoft Windows Intune client software on their network. Windows Intune is a cloud service that manages systems on a corporate network, keeping their software up to date and enabling administrators to monitor the health of those systems from a browser interface. It requires a client-side agent, but on one particular system the client software failed to install, reporting this error message:
The dialog’s error message translates to “The Windows Installer Service could not be accessed. This can occur if the Windows Installer is not correctly installed. Contact your support personnel for assistance.”
The administrator, having seen one of my Case of the Unexplained presentations where I advised, “when in doubt, run Process Monitor,” downloaded a copy from Sysinternals.com and captured a trace of the failed install. He followed the standard troubleshooting technique of looking backward from the end of the trace for operations that might be the cause, but after about a half hour of analysis he gave up and switched to a different approach. Instead of looking for clues in the trace, he thought he might be able to find clues by comparing the trace of the failing system to another captured on a system where the client installed successfully.
A few minutes later he had a second trace to compare side-by-side. He set a filter to include only events generated by Msiexec.exe, the client setup program, and proceeded through the events in the trace from the problematic system, correlating them with corresponding events on the working one. He eventually got to a point where the two traces diverged. Both traces have references to HKLM\System\CurrentControlSet\Services\BFE, but the failed trace then has registry queries of the ComputerName registry key:
The working system’s trace, on the other hand, continues with operations from a new instance of Msiexec.exe, something he noticed because the process ID of the subsequent Msiexec.exe operations were different from the earlier ones:
It still wasn’t clear from the failed trace what caused the divergence, however. After pondering the situation for a few minutes he was just about to give up when the thought crossed his mind that the answer might lie in the operations that the filter was hiding. He deleted the filter he’d applied that included only events from Msiexec.exe from both traces and resumed comparing traces from the point of divergence.
He immediately saw that the trace from the working system had many events from a Svchost.exe process that weren’t present in the failed trace. Working under the assumption that the Svchost.exe activity was unrelated, he added a filter to exclude it. Now the traces lined up again with events from Services.exe matching in both traces:
The matching operations didn’t go on for very long, however. Only a dozen or so operations later the trace from the failing system had a reference to HKLM\System\CurrentControlSet\Services\Msiserver\ObjectName with a NAME NOT FOUND error:
The trace from the working system had the same operation, but with a SUCCESS result:
Sure enough, right-clicking on the path and selecting “Jump to…” from Process Monitor’s context menu confirmed that not only was the ObjectName value missing from the failing system’s Msiserver key, but the entire key was empty. On the working system it was populated with the registry values required to configure a Windows service:
Somehow the service registration for the MSI service had been corrupted, something the initial error dialog had stated but without guidance for how to fix the problem. And how the service had been corrupted would likely remain forever a mystery, but the important thing now was fixing it. To do so, he simply used Regedit’s export functionality to save the contents of the key from the working system to a .reg file and then imported the file to the corrupted system. After the import, he reran the Microsoft Intune installer and it succeeded without any issues.
With the help of Process Monitor and some diligence, he’d spent about forty-five minutes fixing a problem that would have ended up costing him several hours if he’d had to reimage the system and restore its applications and configuration.
You can find more tips on running Process Monitor, as well as additional illustrative troubleshooting cases, in my Windows Sysinternals Administrator’s Reference, a book I recently published with Aaron Margosis. If you’ve read it, please leave a review on Amazon.com.
November 8, 2011
Fixing Disk Signature Collisions

November 7, 2011
Fixing Disk Signature Collisions
Disk cloning has become common as IT professionals virtualize physical servers using tools like Sysinternals Disk2vhd and use a master virtual hard disk image as the base for copies created for virtual machine clones. In most cases, you can operate with cloned disk images unaware that they have duplicate disk signatures. However, on the off chance you attach a cloned disk to a Windows system that has a disk with the same signature, you will suffer the consequences of disk signature collision, which renders unbootable any of the disk’s installations of Windows Vista and newer. Reasons for attaching a disk include offline injection of files, offline malware scanning , and – somewhat ironically – repairing a system that won’t boot. This risk of corruption is the reason that I warn in Disk2vhd’s documentation not to attach a VHD produced by Disk2vhd to the system that generated the VHD using the native VHD support added in Windows 7 and Windows Server 2008 R2.
I’ve gotten emails from people that have run into the disk signature collision problem and see from a Web search that there’s little clear help for fixing it. So in this post, I’ll give you easy repair steps you can follow if you’ve got a system that won’t boot because of a disk signature collision. I’ll also explain where disk signatures are stored, how Windows uses them, and why a collision makes a Windows installation unbootable.
Disk Signatures
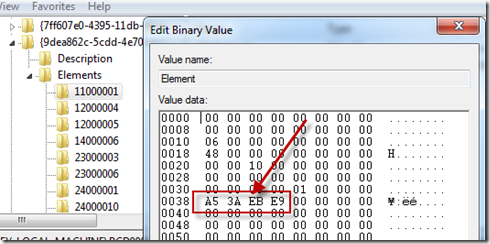
A disk signature is four-byte identifier offset 0x1B8 in a disk’s Master Boot Record, which is written to the first sector of a disk. This screenshot of a disk editor shows that the signature of my development system’s disk is 0xE9EB3AA5 (the value is stored in little-endian format, so the bytes are stored in reverse order):
Windows uses disk signatures internally to map objects like volumes to their underlying disks and starting with Windows Vista, Windows uses disk signatures in its Boot Configuration Database (BCD), which is where it stores the information the boot process uses to find boot files and settings. When you look at a BCD’s contents using the built-in Bcdedit utility, you can see the three places that reference the disk signature:
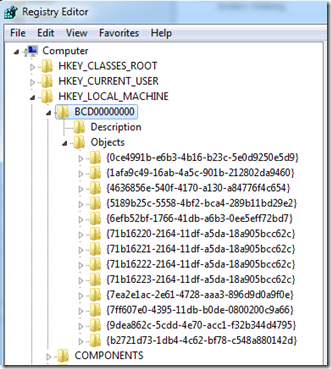
The BCD actually has additional references to the disk signature in alternate boot configurations, like the Windows Recovery Environment, resume from hibernate, and the Windows Memory Diagnostic boot, that don’t show up in the basic Bcdedit output. Fixing a collision requires knowing a little about the BCD structure, which is actually a registry hive file that Windows loads under HKEY_LOCAL_MACHINE\BCD00000:
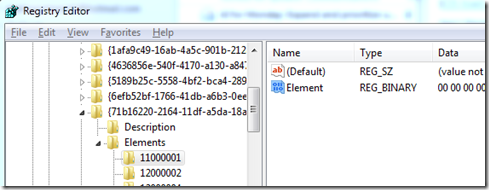
Disk signatures show up at offset 0x38 in registry values called Element under keys named 0x11000001 (Windows boot device) and 0x2100001 (OS load device):
Here’s the element corresponding to one of the entries seen in the Bcdedit output, where you can see the same disk signature that’s stored in my disk’s MBR:
Disk Signature Collisions
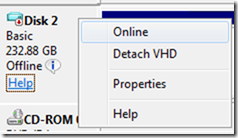
Windows requires the signatures to be unique, so when you attach a disk that has a signature equal to one already attached, Windows keeps the disk in “offline” mode and doesn’t read its partition table or mount its volumes. This screenshot shows how the Windows Disk Management administrative utility presents an offline disk that I caused when I attached the VHD Disk2vhd created for my development system to that system:
If you right-click on the disk, the utility offers an “Online” command that will cause Windows to analyze the disk’s partition table and mount its volumes:
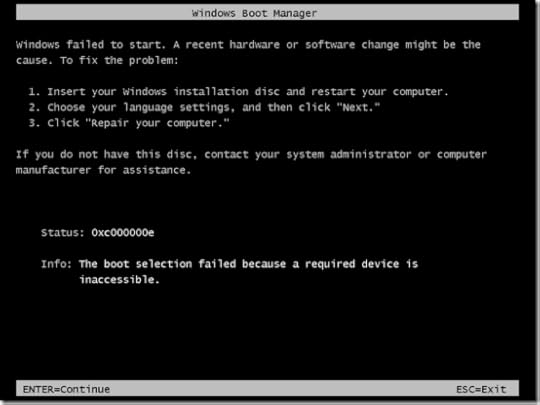
When you chose the Online menu option, Windows will without warning generate a new random disk signature and assign it to the disk by writing it to the MBR. It will then be able to process the MBR and mount the volumes present, but when Windows updates the disk signature, the BCD entries become orphaned, linked with the previous disk signature, not the new one. The boot loader will fail to locate the specified disk and boot files when booting from the disk and give up, reporting the following error:
Restoring a Disk Signature
One way to repair a disk signature corruption is to determine the new disk signature Windows assigned to the disk, load the disk’s BCD hive, and manually edit all the registry values that store the old disk signature. That’s laborious and error-prone, however. In some cases, you can use Bcdedit commands to point the device elements at the new disk signature, but that method doesn’t work on attached VHDs and so is unreliable. Fortunately, there’s an easier way. Instead of updating the BCD, you can give the disk its original disk signature back.
First, you have to determine the original signature, which is where knowing a little about the BCD becomes useful. Attach the disk you want to fix to a running Windows system. It will be online and Windows will assign drive letters to the volumes on the disk, since there’s no disk signature collision. Load the BCD off the disk by launching Regedit, selecting HKEY_LOCAL_MACHINE, and choosing Load Hive from the File menu:
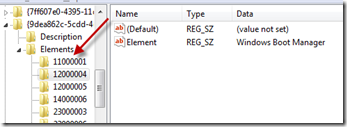
Navigate to the disk’s hidden \Boot directory in the file dialog, which resides in the root directory of one of the disk’s volumes, and select the file named “BCD”. If the disk has multiple volumes, find the Boot directory by just entering x:\boot\bcd, replacing the “x:” with each of the volume’s drive letters in turn. When you’ve found the BCD, pick a name for the key into which it loads, select that key, and search for “Windows Boot Manager”. You’ll find a match under a key named 12000004, like this:
Select the key named 11000001 under the same Elements parent key and note the four-byte disk signature located at offset 0x38 (remember to reverse the order of the bytes).
With the disk signature in hand, open an administrative command prompt window and run Diskpart, the command-line disk management utility. Enter “select disk 2”, replacing “2” with the disk ID that the Disk Management utility shows for the disk. Now you’re ready for the final step, setting the disk signature to its original value with the command “uniqueid disk id=e9eb3aa5”, substituting the ID with the one you saw in the BCD:
When you execute this command, Windows will immediately force the disk and its corresponding volumes offline to avoid a signature collision. Avoid bringing the disk online again or you’ll undo your work. You can now detach the disk and because the disk signature matches the BCD again, Windows installations on the disk will boot successfully. You might find yourself in a situation where you have no choice but to cause a collision and have Windows update a disk signature, but at least now you know how to repair it when you do.
You can find out more about Disk2vhd in the Sysinternals Administrator’s Reference by me and Aaron Margosis.
October 3, 2011
The Case of the Mysterious Reboots

October 2, 2011
The Case of the Mysterious Reboots
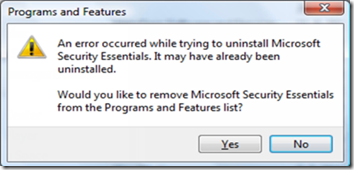
This case opens when a Sysinternals power user, who also works as a system administrator at a large corporation, had a friend report that their laptop had become unusable. Whenever the friend connected it to a network, their laptop would reboot. The power user, upon getting hold of the laptop, first verified the behavior by connecting it to a wireless network. The system instantly rebooted, first into safe mode, then again back into a normal Windows startup. He tried booting the laptop into safe mode directly, hoping that whatever was causing the problem would be inactive in that mode, but logging on only resulted in an automatic logoff. Returning to a normal boot, he noticed that Microsoft Security Essentials (MSE) was installed and tried to launch it. Double-clicking the icon had no effect, however, and double-clicking its entry in the Programs and Features section of the Control Panel resulted in an error message:
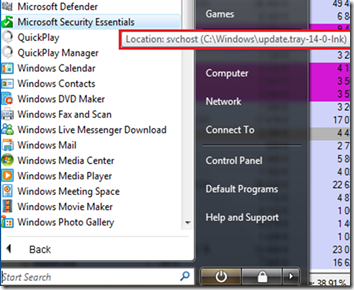
Hovering his mouse over the MSE icon in the start menu gave the explanation: the link was pointing at a bogus location likely created by malware:
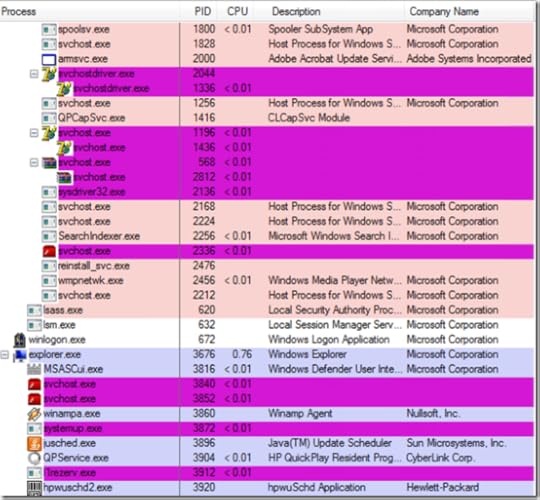
Because he couldn’t get to the network, he couldn’t easily repair the corrupted MSE installation. Wondering if the Sysinsternals tools might help, he copied Process Explorer and Autoruns to a USB key, and then copied them from the key to the laptop, which he was now convinced was infected. Launching Process Explorer, he was greeted with the following process tree:
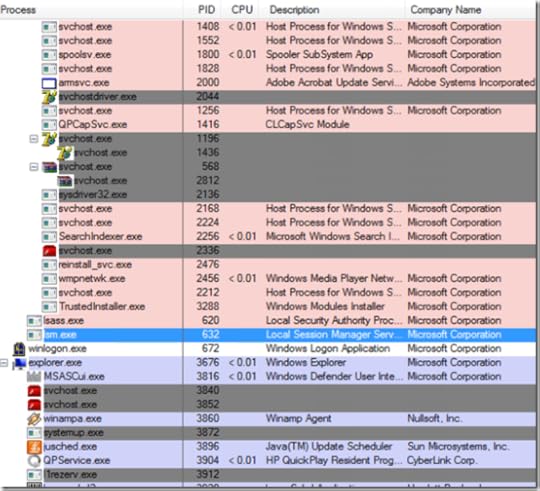
In my Blackhat presentation, Zero Day Malware Cleaning with the Sysinternals Tools, I present a list of characteristics commonly exhibited by malicious processes. They include having no icon, company name, or description, residing in the %Systemroot% or %Userprofile% directories, and being “packed” (encrypted or compressed). While there’s a class of sophisticated malware that doesn’t have any of these attributes, most malware still does. This case is a great example. Process Explorer looks for the signatures of common executable compression tools like UPX, as well as heuristics that include Portable Executable image layouts used by compression engines, and highlights matches in a “packed” highlight color. The default color, fuchsia, is visible on about a dozen processes in the process view. Further, every single one of the highlighted processes lacks a description and company name (though a few have icons).
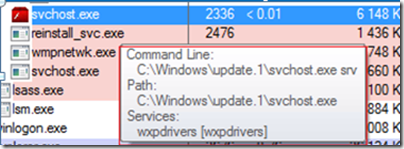
Many of them also have names that are the same, or similar to, legitimate Windows system executables. The one highlighted below has a name that matches the Windows Svchost.exe executable, but has an icon (borrowed from Adobe Flash) and resides in a nonstandard directory, C:\Windows\Update.1:
Another process with a name not matching that of any Windows executable, but whose name, Svchostdriver.exe, is similar enough to confuse someone not intimately familiar with Windows internals, actually has TCP/IP sockets listening for connections, presumably from a botmaster:
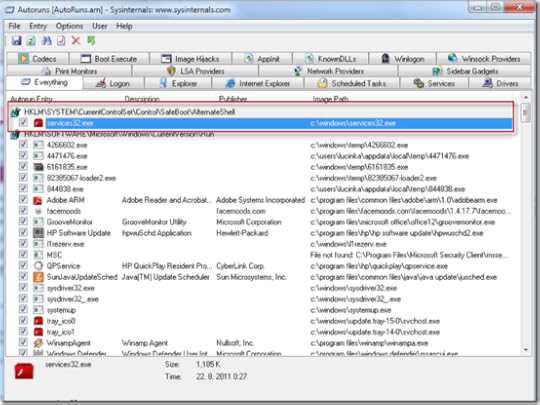
There was no question that the computer was severely infected. Autoruns revealed malware using several different activation points, and explained that the reason even Safe Mode with Command Prompt didn’t work properly was because a bogus executable called Services32.exe (another legitimate-looking name) had registered as the Safe Mode AlternateShell, which is by default Cmd.exe (command prompt):
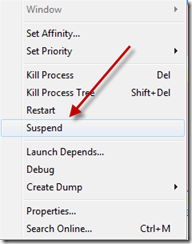
My recommendation for cleaning malware is to first leverage antimalware utilities if possible. Antimalware might address some or all of an infection, so why do work if you don’t have to? But this system couldn’t connect to the Internet, preventing easily repairing the MSE installation or downloading other antimalware like the Microsoft Malicious Software Removal Tool (MSRT). The power user had seen me use the Process Explorer suspend functionality at a conference to suspend malware processes in order to prevent them from restarting each other when someone trying to clean the system terminates one. Maybe if he suspended all the processes that looked malicious he’d be able to connect to the network without having the system reboot? It was worth a shot.
Right-clicking on each malicious process in turn, he selected Suspend from the context menu to put the process into a state of limbo:
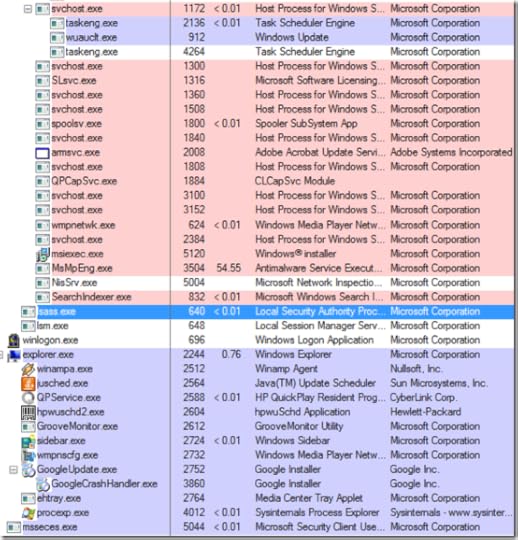
When he was done, the process tree looked like this, with suspended processes colored grey:
Now to see if the trick worked: he connected to the wireless network. Bingo, no reboot. Now connected to the Internet, he proceeded to download MSE, install it, and perform a thorough scan of the system. The engine cranked along, reporting discovered infections as it went. When it finished, it had found four separate malware strains, , , , and :
After rebooting, which was noticeably faster than before, he connected to the network without trouble. As a final check, he launched Process Explorer to see if any suspicious processes remained. To his relief, the process tree looked clean:
Another case solved with the help of the Sysinternals tools! The new Windows Sysinternals Administrator’s Reference, authored by Aaron Margosis and me, covers all the tools and their features in detail, giving you the tools and techniques required to solve problems related to sluggish performance, misleading error messages, and application crashes. And if you’re interested in cyber-security, be sure to get a copy of my technothriller Zero Day.
August 2, 2011
The Case of the Hung Game Launcher

August 1, 2011
The Case of the Hung Game Launcher
I love the cases people send me where the Sysinternals tools have helped them successfully troubleshoot, but nothing is more satisfying than using them to solve my own cases. This case in particular was fun because, well, solving it helped me get back to having fun.
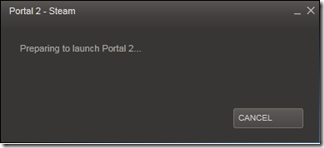
When I have time, I occasionally play PC games to let off steam (pun intended, as you’ll see). One of my favorites over the last few years was the puzzle game, Portal. I enjoyed the first Portal so much that I pre-ordered Portal 2 on Valve’s Steam network when it became available and played through it within a few hours of its release. Since then, I’ve been playing community-developed maps. Last Saturday I started a particularly fun map, a winner from a community map contest, but didn’t have time to finish it in one sitting. The next morning I returned to my PC, double-clicked on the Portal 2 desktop icon, and got the standard Steam launch dialog. The game normally launches in a couple of seconds, but this time the dialog just sat there:
I killed Steam and double-clicked again, but again the dialog hung. I captured a Process Monitor trace and looked at the stacks of Steam’s threads in Process Explorer, but didn’t see any clues. Figuring that perhaps Portal 2’s configuration or installation had somehow been corrupted, I deleted Portal 2, re-downloaded it, and reinstalled it. That didn’t fix the problem, though. With Portal 2 reset to a clean state, that left either Steam or some general Windows issue to blame. The next step was therefore to reinstall Steam.
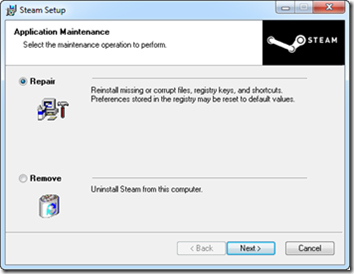
I first went to the Uninstall or Change a Program page in the Control Panel, but double-clicking on the Steam entry brought up a dialog asking me to confirm uninstalling it and warning that doing so would delete all local content. I didn’t want to risk losing my game settings or have to reinstall all my games, so I aborted the uninstall. Most Microsoft Installer Service (MSI)-based installers have a repair option that reinstalls the application without deleting user data or configuration, so I went to the Steam home page, downloaded and executed the Steam installer. Sure enough, the install wizard offered the repair option:
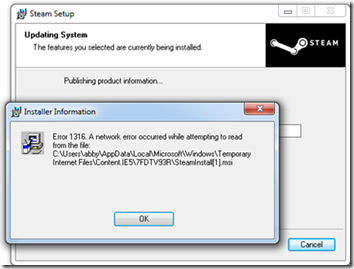
When I pressed the Next button, though, I was greeted with an obviously misleading error message that reported a network error while trying to read from a local file:
I turned to Process Monitor again and captured a trace of the failed repair operation. The error message referred to a file named SteamInstall[1].msi, so I searched the log file for that string. The first hit was the data value read in a query of a registry value under HKCR\Installer\Products named PackageName:
The next hits, a few operations later, were attempts by the installer to read from the file location printed in the error dialog:
That the installer was reading the file name from an existing registry key and the file’s location was in Internet Explorer’s (IE’s) download cache suggested that it was trying to launch the copy of itself that had performed the initial install. Because I had originally launched the installer via IE directly from the Valve web site, just like I was doing now, the download location was in IE’s download cache, but the file must have aged out and been deleted since then.
The Process Monitor trace revealed that the installer was reading the original location from the registry, so if I pointed the registry at the installer’s new download location, I could trick it into launching itself, rather than looking for the previous copy that was now missing. I scanned the log for the new download location by searching for Steaminstall.msi and found its path, another download cache location:
I then went back to the registry query’s entry, right-clicked on it, and selected “Jump To” from the context menu. That caused Process Monitor to launch Regedit and navigate directly to the registry key, where I updated the LastUsedSource and PackageName values to reflect the new download location:
Next, I dismissed the installer’s error dialog, which I had left open, and pressed the wizard’s Next button to try the repair again. This time, Steam proceeded to reinstall and the wizard concluded with a message of success:
Crossing my fingers, I launched Portal 2. Steams’s ‘Preparing to Launch’ dialog flashed for a second and then Portal 2’s splash screen took over the screen: case closed. Uninstalling and then reinstalling Steam and all the games would have likely lead to the same conclusion, but Process Monitor had surely saved me a lot of time and possibly even my saved game state and configurations. In just a few minutes I was back to solving puzzles of a different kind.
Check out the new Windows Sysinternals Administrator’s Reference by me and Aaron Margosis for more tips on using all 70+ Sysinternals tools to troubleshoot and manage your Windows systems! Buy a copy by August 15, email the receipt to me at markruss@microsoft.com and I’ll enter you for a drawing of one of 10 signed copies of Zero Day I’m giving away.
Mark Russinovich is a Technical Fellow on the Windows Azure team at Microsoft and is author of Windows Internals, The Windows Sysinternals Administrator’s Reference, and the cyberthriller Zero Day: A Novel. You can contact him at markruss@microsoft.com .
Mark E. Russinovich's Blog
- Mark E. Russinovich's profile
- 366 followers


