
Nina Olsson's Blog, page 3
December 31, 2015
It's new year! Lets set the table for 2016! -
Cork up the champagne! We got another new sparkly year full of possibilities ahead! My mind have been brewing over next years food and ways of eating it, but first, I think it's a good idea to pay tribute to this year we're saying farewell to. So here we go:
Dear 2015,
Thank you for being a really sweet and reliable year, you made a solid basis for me to dream up new ideas and venture into creative projects like starting this blog! I will look back at you without major regrets and cherish many moments we had together!
Yours truly! - Nina
Here's a few highlights:
SLOW SUNDAYS
- I made kombucha as part of my Slow Sunday projects on the blog. These naturally fizzy sodas are made by fermenting tea and it’s a really funky magic! Though the slimy mother yeast looks pretty icky, the result is a fantastic flavor. I was close to nailing a faux coca cola kombucha, all natural, but it needs a new brew for more testing. The fermenting time takes three weeks so this is slow with a capital S! to be continued in 2016.
"Good food is a celebration of life! "
Sophia Loren
I ATE OUT TOO...
- I wont forget eating the most wonderful corn tempura and miso flavored ice cream at fabulous Shibumi in Stockholm. Or the best hummus I ever tasted at Sir Hummus, a vegan Amsterdam spot that serves only that one dish!
INSPIRATION WAS EVERYWHERE
- Netflix aired a fabulous documentary serie - “Chef's table”, following world famous chefs sharing their visions and daily life. I especially enjoyed the episode with Francis Mallman, a haute cuisine chef who lives on a remote island in Argentina were he is slow cooking using primitive techniques like baking under layers of earth. Going to eat at his place takes hours of travel in the wilderness. A Very inspiring and thought provoking serie.
SMOOTH DINNERS
- Our children didn't complain once over a meat free life style.
I SPOTTED A CHANGE FOR GOOD
- During 2015 there was a small revolution taking place in the supermarkets. In the beginning of the year - the health food section in my local supermarket consisted of prune juice and weight watcher snack bars. A year later the shelves of a whole aisle were stocked with everything from bees pollen to special flours and rarer grains. Good stuff that we only could buy in the fancier health food store before. And I see the same change in many places. Healthy eating has really gone mainstream, and that's a good thing.
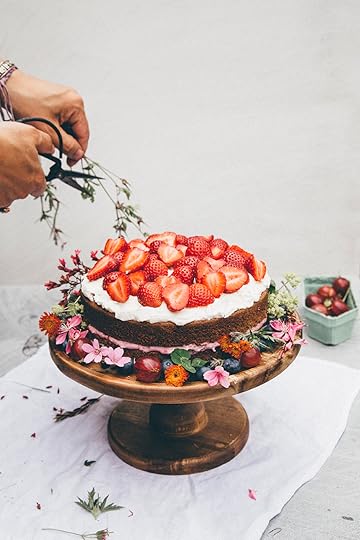
I revisited Swedish classics this year, adding my own twists. This strawberry Midsummer cake was a favorite!
FREQUENTLY MADE
The food that were on rotation in my in 2015 kitchen was:
- raw cakes, and lots of cashew in various forms
- street food! - like burgers and pizzas, made healthier and plant based
- zaatar, cumin and other middle eastern spices were frequently starring in dishes like the Shakshuka!
- Swedish classics, made healthier and often veganized (like my cinnamon buns)
GREEN PRINTS
- I worked on a completely green issue for Swedens most read food magazine - Buffé, with only plant based recipes. The response was amazing and there was great praise from readers, but it wasn't all free from controversy. To say some readers where provoked by a completely vegetarian issue is to put it mildly. It's an interesting time we live in, a sort of fast changing evolution, where old ways of thinking food - is replaced by ...
- A modern way to eat!
it's a great book title isn’t it? This vegetarian cookbook by Anna Jones might be the best illustration of the major change in food that's happening now. I love the selection of dishes - all with a healthy feel but not compromising flavor and culinary sophistication. Other great books I enjoyed this year was: My new roots by Sara Britton and At home in the whole food kitchen by Amy Chaplin, all three books, are well written with recipes you just want to cook up straight away!
Working as an art director, my love for magazines is deeply rooted despite the prediction that print is a dying market. I love reading my subscribed Bon Appetit every month and I get every copy of Jamie magazine, Elle food (the dutch version is awesome) and Delicious magazine. All perfect swooning material together with a cup of tea, These magazines always inspire my styling and photography.
AND BOOM
- My instagram went from 1200 followers to 22.600 in a year, I'm so happy and grateful for the positive response throughout 2015! Instagram is a fantastic community where people can support and share inspiration with each other like no other place online. It's a real contrast to other communities where it quickly can turn more sinister. A handful of my favorite instagrammers took part in the N/A pesto challenge last summer, check them out here.

The Slow Sundays on the blog shared recipes for kombucha, pickles, pestos and jams.
"An apron is just a cape on backwards"
anonymous
A TRAVEL IN TASTE
Remembering the words of Ottolenghi from an interview I made in 2013, he talked about the power of food in bringing people together. I have kept that idea in mind since. During 2015 I enjoyed flavors from all the corners of the world, shortening the distance between myself and other foodies around the planet. I enjoyed Japanese, Indonesian, African, Middle eastern, American, Scandinavian, and French style foods.
AND LET's FOOD AROUND 2016!
I wanna thank YOU! For visiting and leaving comments after cooking the recipes, here and on IG. It's really lovely to hear from you.
So a year has passed and its time to to look ahead again. In the spring 2016 the blog will get a tiny makeover and new features will be added. We'll kick of January with some extra rebooting recipes! See you in 2016
Nina


September 20, 2015
Spicy green cabbage and sweet potato Crisps / Slow Sunday: Crispin it!

Crisp'n dip!
One of the most entertaining parts of eating healthy is all the inventive ways you can turn "bad food" into better and tastier versions. Pizzas, burgers, cakes and the likes, are going through a renaissance as they've become popular makeover dishes for health conscious foodies everywhere. In this Slow Sunday post, I'm celebrating the healthy veggie crisp! Yay! An addictive brilliant reinvention of the old school, deep fried potato crisp. I used to love those baddies as a kid, we would get store bought bags and crunch away on our movie nights, dipping them in spicy sour cream sauces. Crisps have a good place in my food memories. My crush on chips was a few years before the news broke on the dangers of eating trans fats (found in hardened industrial oils). There's good and bad fat and those store bought crisps were full of the worst kind. Luckily, since then I've found a way to keep enjoying the good crunch with better options.

These healthy crisps are addictive!
The homemade veggie crisp is quite something, it's got life and beauty! And it has texture to die for. I'ts perfect for parties, plenty more fun than olives and nuts! It brings elegance and a rustic touch when garnished on dishes, a popular topper in gastronomic eateries. But eating healthy crisps doesn't have to be fancy, it's just as good as a snack, on week night dinner, or why not next to the popcorn during a Netflix session.
Buying a bag of crisp is cheap and fast, but making your own is slow, mindful and worth every extra penny spent on organic veggies. The recipes in this post is for cabbage and sweet potato crisps. But there's so many more veggies, especially root ones, that are top notch to crisp. Peep back into the blog again soon, for a free downloadable designed cheat sheet, with times, temperatures and spice suggestions for a variety of veggie crisps. It's coming to the blog this fall. Until then here's a little more crispiration and slow recipes for that perfect crunch!
A FEW CRISPY TIPS:1. Beautify it! Mix different colored crisps together for a beautiful styling. The green cabbage (you can use kale too) and sweet potato are pretty together. Add finely shaved beets with salt and honey and you have a stunning trio in your bowl.
2. Cute party portions! Serve the crisps in small paper lined cups as a starter on a buffet table, keep the dip close by.
3. Be Resilient. During a fridge clean out, when you find root veggies or greens that need to be used, roast them into crisps. A sure comeback and new life for tired veg.
4. Be an artist! Create your own flavored crisps by playing around with spices. Have fun with it.
5. It's a duo thing. Like with burgers, who are as good as their toppings. A good crisp get's even better with a great dip sauce. Make your own favorite dip sauces for your dipping.
These recipes are made to be enjoyed together, by mixing the crisps in one bowl and serve with the dip sauce. Both crisps can be served independently and used as garnish on savory dishes and salads. The dip sauce is good with other roasted veg too.
Here's how to make your own slow crisps and my fave lemony dip sauce:
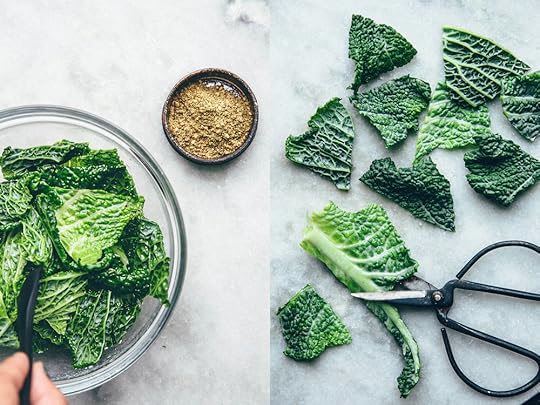
Cut little triangles after removing the stem, add to a bowl and flavor before baking.
GREEN CABBAGE ZAATAR CRISPS
Serves a few as a snack
INGREDIENTS:
one green cabbage (Savoy) head, or kale, choose organic.
1 tbsp olive oil for baking
1 ½ tbsp Zaatar spice mix
a wee pinch of fine salt
HOW TO:
Preheat the oven to 200℃. Wash the cabbage leaves, and cut the stems out with a scissor. Make bite sized pieces (triangles are nice and easy shapes) and add to a bowl. Add the olive oil and sprinkle the zaatar and salt over while tossing the cabbage to get an even coating of oil and spice. Place on a papered tray and bake for 15 minutes (for kale, bake 20 minutes). Let it cool and serve with dip sauce.

Zaatar is one of my favorite spices and it goes so good with lots of foods. This is a perfect match.
SWEET POTATO CINNAMON CRISPS
Serves a few as a snack
INGREDIENTS:
2-3 sweet potatoes, peeled
1 tbsp olive oil for baking
1 tbsp apple vinegar cider
½ tsp ground cinnamon
a good pinch of fine salt
HOW TO:
Preheat the oven to 150℃. Half the sweet potatoes and shave in thin slices with a cheese cutter or a mandolin (need to be quite thin or they won't crisp). Add the slices to a bowl and mix with olive oil, apple cider vinegar, and salt. Place on a papered tray and sprinkle with cinnamon. Bake in the oven for 15- 30 minutes, It's important to keep an eye and check the dryness to decide if they are done, the crisps should curl upand be fairly dry before yout ake them out of the oven. Let cool and serve with dip.

Sweet potato slices waiting to be dusted with cinnamon.
LEMONY AND CASHEW GARLIC DIP SAUCE
Makes a small bowl of sauce
INGREDIENTS:
1 tbsp cashew butter
the juice of ½ lemon
2 tbsp extra virgin olive oil
a pinch of salt
1 garlic clove
1 tsp honey
2 tbsp almond milk
HOW TO:
Mix all the dip ingredients in a bowl and set aside until serving.

Simple and classy at the same time:)
September 1, 2015
Clean Crunch & Green Mash!

It’s possible to have cooking success almost every dinner! I'm convinced. The secret variety in texture, Mixing variety for delicious sensations. To further illustrate the power of texture, think about “the one ingredient meal”, a mini trend favored by chefs eager to show off their creative skills. Eating one ingredient cooked in various ways not only reveals new sides to that various vegetables, but also how texture itself changes flavor. Take a potato or beet, A thin baked crisp taste very different then a pure or mash of the same vegetable.
Mixed texture is also good when combining a bunch of ingredients. To experiment with texture go wild! Cook in various manners. Just add some basic flavors like salt and lemon, honey and garlic or create more interest by adding, ginger or and chili. Learning to think like a good chef is a great start for making your own dishes from scratch. Once you nailed this way of thinking and cooking, you have a great base for all kinds of dishes.
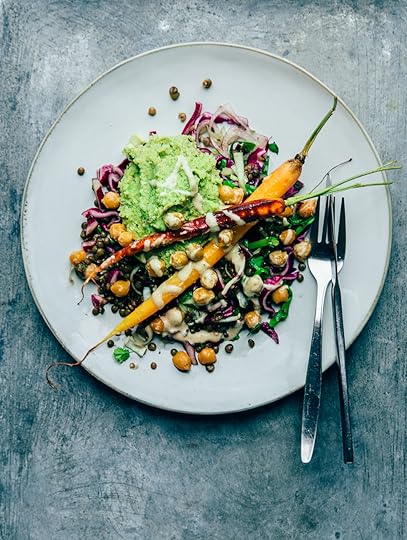
But hey, you are probably interested in the dish on the photo! My family was so enthusiastic during dinner that I knew this had to be a blog post soon. It’s healthy, clean, and vegan. Playing with a bunch of contrasts: textures, sweet and savory, and hot with cold. There’s so much interesting happening in this dish that your mouths kind of shouting - Wait, slow down! I have to savor this. The various parts of this meal can all be enjoyed individually or combined with other dishes. Here's the recipe. Bon appetit!
CLEAN GREEN CRUNCH & MASHServes 4 pers
Working order: start with cooking lentils and roasting the carrots, The rest is done in a flash!
INGREDIENTS
The green Mash
400 gr (a tin) pre-cooked chickpeas
1 medium sized, broccoli in pieces, steamed for 6 minutes, stem removed
1-2 tbsp olive oil
a pinch of fine sea salt
HOW TO:
Blend the chickpeas with the steamed broccoli with olive oil and salt until smooth. Cover and keep warm in the oven on low heat until serving.
Lentil salad
500 gr de puy or beluga lentils, cooked according to instructions
½ red cabbage head, cleaned and stem removed, finely shredded
300 gr fresh green leaves, like spinach and rucola, washed and roughly chopped
½ tsp cumin
3 tbsp soy sauce
2 cloves of garlic, crushed
¾ tsp fine sea salt and more to taste
2 tbsp olive oil
3-4 shallots, finely chopped
1 tbsp cilantro, finely chopped
1-2 tbsp chili sauce (like Sriracha)
Optional:
1 tbsp tamarind sauce
HOW TO: In a pan, fry the shallots on medium heat with one tbsp oil for a few minutes, until transparent. Add another tbsp oil and the cooked lentils to the pan and stir it together with the onion. Add the rest of the ingredients except the red cabbage, the green leaves and the fresh coriander. Stir it together for a couple of minutes. Turn of the heat and add the lentil mix with the shredded red cabbage, green leaves and cilantro, to a bowl. Toss around and set aside until serving.
Honey Roasted Carrots
2-3 young organic carrots per person (if you can find multi colored ones, it will look great!)
1cup olive oil for drizzle and baking
2-3 tbsp honey, drippy a good pinch of sea salt
1 tbsp lemon juice
HOW TO:
Preheat oven to 175 ℃, Place the carrots in an oven tray, drizzle with olive oil, honey and lemon, sprinkle salt and let it roast for 40 minutes.
Toasted chickpeas
I ½ tsp ras el hanout, spice mix
1 tbsp coconut oil
400 gr Chickpeas pre-cooked
HOW TO:
Add coconout oil to a pan and the fry chickpeas with the Ras el Hanout.
Almond tahini sauce
1 tbsp tahini sauce
2 tbsp extra virgin olive oil
juice of a ½ lemon
3 tbsp almond milk
1 clove of garlic, pressed
1 tsp honey
HOW TO:
Whizz together all the sauce ingredients in a bowl and set aside before serving.
Clean crunch & green mash!
It’s possible to have cooking success almost every dinner! I'm convinced. Just think like a top chef. The magic word is texture! Mixing different ones make for delicious sensations. Just imagine the irresistible taste of a crispy veg with a slab of silky dip cream. Combined textures are your taste buds wettest dreams!
To further illustrate the power of texture, think about “the one ingredient meal”, a mini trend favored by chefs eager to show off their creative skills. Eating one ingredient cooked in various ways not only reveals new sides to that ingredient, but also how texture itself changes flavor. Take a potato or beet, A thin baked crisp taste very different then a pure or mash of the same vegetable.
Of course mixed texture is also good when combining a bunch of ingredients too. It will work with everything! Beans, legumes, greens, fruit, seeds, and nuts. To experiment with texture go wild! Cook in various manners. Just add some basic flavors like salt and lemon, honey and garlic or create more interest by adding, ginger or and chili. Learning to think like a good chef is a great start for making your own dishes from scratch. Once you nailed this way of thinking and cooking, you have a great base for all kinds of dishes, and it’s a great way to eat your veggies.
But hey, you are probably interested in the dish on the photo! My family was so enthusiastic during dinner that I knew this had to be a blog post soon. It’s healthy, clean, and vegan. Playing with a bunch of contrasts: textures, sweet and savory, and hot with cold. There’s so much interesting happening in this dish that your mouths kind of shouting - Wait, slow down! I have to saveur this. The various parts of this meal can all be enjoyed individually or combined with other dishes. Here's the recipe. Bon appetit!
CLEAN GREEN CRUNCH & MASHServes 3-4 pers
Working order: start with cooking lentils and roasting the carrots, the rest is done in a flash!
INGREDIENTS
The green Mash
400 gr (a tin) pre-cooked chickpeas
1 medium sized, broccoli in pieces, steamed for 6 minutes, stem removed
1-2 tbsp olive oil
a pinch of fine sea salt
HOW TO:
Blend the chickpeas with the steamed broccoli with olive oil and salt until smooth. Cover and keep warm in the oven on low heat until serving.
Lentil salad
500 gr de puy or beluga lentils, cooked according to instructions
½ red cabbage head, cleaned and stem removed, finely shredded
300 gr fresh green leaves, like spinach and rucola, washed and roughly chopped
½ tsp cumin
3 tbsp soy sauce
2 cloves of garlic, pressed
¼ tbsp fine sea salt
2 tbsp cocoa oil
3-4 shallots, finely chopped
1 tbsp cilantro, finely chopped
1-2 tbsp chili sauce (like Sriracha)
Optional:
1 tbsp tamarind sauce
HOW TO: In a pan, fry the shallots on medium heat with one tbsp coconut oil for a few minutes, until transparent. Add another tbsp coconut oil and the cooked lentils and to the pan stir it together with the onion. Add the rest of the ingredients except the red cabbage, the green leaves and the cilantro. Stir it together for a couple of minutes. Turn of the heat and add the lentil mix with the shredded red cabbage, green leaves and cilantro, to a bowl. Toss around and set aside until serving.
Honey roasted Carrots
2-3 young organic carrots per person (if you can find multi colored ones, it will look great!)
1cup olive oil for drizzle and baking
2-3 tbsp honey, drippy a good pinch of sea salt
1 tbsp lemon juice
HOW TO:
Preheat oven to 175 ℃, Place the carrots in an oven tray, drizzle with olive oil, honey and lemon, sprinkle salt and let it roast for 40 minutes.
Toasted chickpeas
I ½ tsp ras el hanout, spice mix
1 tbsp coconut oil
400 gr Chickpeas pre-cooked
HOW TO:
Add coconout oil to a pan and the fry chickpeas with the Ras el Hanout.
Almond tahini sauce
1 tbsp tahini sauce
2 tbsp extra virgin olive oil
juice of a ½ lemon
3 tbsp almond milk
1 clove of garlic, pressed
1 tsp honey
HOW TO:
Whizz together all the sauce ingredients in a bowl and set aside before serving.
August 23, 2015
Jam session - Slow Sunday

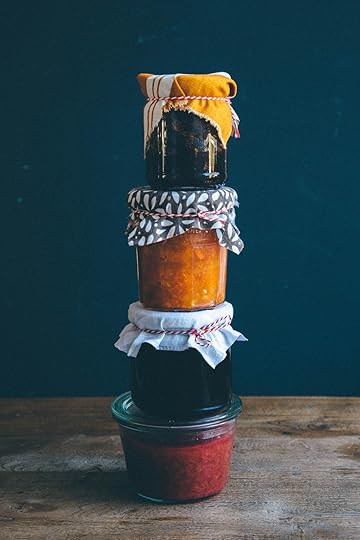
Summer is drawing its last breath, and all I can think about is extending it. After a few weeks in France getting my creative juices restored, it's time for some jamming. Slow Sundays are back with some basic skills and recipes, and this time it's extra tasty: who can resist a home made jam? There's an abundance of ripe berries and fruits this time of year, and it's starts to be time to preserve these goodies. The black and raspberry bushes in our garden are waiting to be picked, eaten fresh or frozen, or, made into delicious jams with a little less sugar than the traditional recipes.
It smells divine when jam is cooking, is this slow cooking happiness? I think so. The sun is shining outside and it's the end of summer, the gardens are bursting of delicious wonders, and were saving these moments in jars. Our children are picking the ripe berries into cups and bowls and I get a mix of raspberries and blackberries from our back yard, that's perfect for making something similar to a "Queens Jam" (drottningsylt), a popular swedish style of jam. We just need to add some blueberries to it. We add biological blueberries from the local store and voila! Our own version has bit more blackberries and less sugar, we name it "Purple Haze".
Coming back from France, where jam is part of "the small breakfast" "le petit déjeuner" my love for jam was renewed this summer. A little jam gives a finish to any dish it's applied to, it's dreamy good with coconut whip on a pancake, delicious on a crunchy toast, paired with cheese, and it's a really good idea to serve with savory foods.
Jam is one of my childhood food superstars, and probably yours too:) it's right up there with ice cream and pancakes. I can literally remember having my fingers in a jar and loving the taste of my favorite flavor in a porridge. These days I prefer it with cheese or savory dishes. I'm not such a sweet tooth anymore and It makes jam a more occasional enjoyment in our home.
Store bought versions are not so much fun, they're nothing like a home made jam. It's taste so much better and gives a more luxurious feeling eating a jam made with fresh ingredients from around the corner, and made with love.
[image error]
For the other jams in this jam session, I picked other goodies that are plentiful and in season now. I found beautiful pears and carrots, and a big bunch of brilliant rhubarb stalks. "Purple Haze" gets to be our classic summer berry jam, and even though its made to be preserved, I think it will disappear quicker than a flash onto toasts this week. My grownup taste buds wants a bit more variation and variety, so I also make really delicious alternatives like onion, carrot and rhubarb jams. These beauties will brighten up everything from pancakes to tagines for a little while! If you feel inspired to raid your garden or local store for a jam session, here's a little Guide to jam basics and four delicious recipes to go.

Cheese and jam - a perfect match.
[image error]
Pears added, the aromas in the kitchen are pure heaven.
Before we get to the jam basics and recipes, I'd like to share some jam inspiration from Bob Marley, just because.. I was humming this all afternoon long :)
from We're jammin', by Bob Marley:
We're jammin':
I wanna jam it wid you.
We're jammin', jammin',
And I hope you like jammin', too.
and:
We're jammin' -
To think that jammin' was a thing of the past;
We're jammin',
And I hope this jam is gonna last.
[image error]
Purple Haze Jam, a version of Swedish "Drottningsylt", with rasp- blackberries and blueberries.
JAM BASICS:
Fruit and berries: Use organic and fresh, in season ingredients. Jamming is the perfect way to preserve an abundant harvest. It's also so easy that you can do small batches often, in this way your garden berries won't go to waste when the ripen in different times.
Rinse and clean before cooking. You can also make jams from veggies, pumpkin and cucumber. These are just a few examples of creative jams you can enjoy. Please add tips of interesting jams in the comment field.
The Sugar: Your fruit to sugar ratio is traditionally 1:1 in weight, so 500 gram fruit or berries would be mixed with 500 gram sugar. That's your starting point. I'm adding less sugar in these recipes, around two thirds of the fruit and berry weight. Sugar is the preservative in jam, so keep in mind with less sugar the jam will keep less long. Using less sugar, it's smart to store the jam in the fridge, but with these yummy jams you might not have to think about storing them for a longer period :) Another job for the sugar is to activate the gel reaction together with natural or store bought pectin (see below).
Though I normally use palm sugar, honey or brown sugar for baking and cooking. For making jam, white sugar has a neutral taste and the other options has a flavor that will overpower the freshness of fruit and berries. So bare with white sugar and comfort yourself knowing that jam is only eaten in small measures.
Pectin: pectin is a substance in fruit and berries that is released during cooking. The gel quality of pectin is essentially what makes jam - jam! It's often stored in the skin of fruit and berries so don't peel unnecessary. Young fruit has more pectin than mature ones, but less flavor, so it's a good idea to use a mix of young and ripe for best taste and consistency. You can add store bought pectin, but I never did and never had the need for it.
Acidity: Go lemony! The sugar, fruit, and pectin needs a little acidity to bond and form the consistency that we know as jam, it also enhances the flavor. A bit of lemon juice creates a perfect balance.
Storage: Sterilize clean glass pots and lids by leaving them in boiled water for a few minutes. let the jam cool of after canning. Then close the lids and store in the fridge. After opening they will keep for at least a week.
Making your own jams: You can experiment and create your own jams easily, the classic formula is mixing fruit and sugar with a wee bit of lemon and additional flavorings like vanilla, cinnamon etc. Cooking it for 5 -20 minutes slowly, using sterile jars. Why stop there, there's a whole world of new jams to be discovered. A jam with chili? veggies and fruit together, you name it.
4 delicious jams:
SUNSET JAM
Delicious confit of pears and carrot with hints of vanilla and ginger, perfect as spread on bread and with cheeses.
Makes on big jar or two small:
INGREDIENTS:
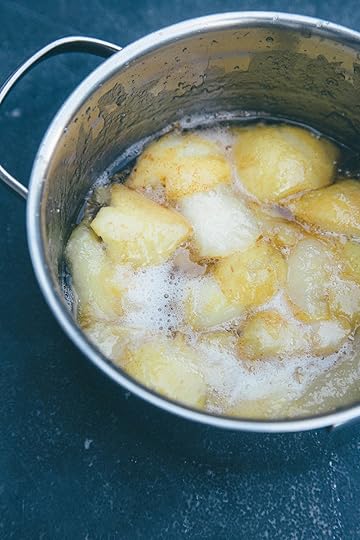
350 gram medium sized carrots, peeled and chopped in coins
150 gram carrots, peeled, grated, make one half finely grated and the other half, coarse
Water to boil
2-3 medium sized ripe pears, cut into smaller pieces, seeds and house discarded
Seeds from one vanilla pod
ca 1 cm fresh ginger, grated or pressed
300 gram white sugar (you use up to 500 gram for more sweetness)
Juice of 2 organic lemons
zest from 2 organic lemons
HOW TO:
Boil the carrot coins until soft and tender. Drain and keep a wee bit of water in the bottom of the pan. Add the pear pieces and grated carrot and bring to a slow boil. Add sugar and stir gently with a wooden spoon. Keep the slow boil and let it putter while adding the vanilla seeds and ginger, stir carefully and let it simmer for up to 20 minutes. Turn of the heat and let it cool in the pan for a few minutes before pouring into a jar. Leave to cool without a lid, you can cover it with a thin mesh or textile if you want to keep it protected, as soon as its cooled off, put a lid on and keep it in the fridge until serving. Voila!
PURPLE HAZE
This is my version of the Swedish classic and my childhood favorite "Drottningsylt", a jam made of raspberries and blueberries. My version has blackberries and a wee hint of vanilla and lemon added. This jam is good with everything, from pancakes and toasts to cheese boards.
Makes on big jar or two small:
INGREDIENTS:
250 gram raspberries and blackberries, cleaned
250 gram blueberries, cleaned
350 gram white sugar (you use up to 500 gram for more sweetness)
seeds of one vanilla pod
2-3 tbsp lemon juice
HOW TO:
Add the berries to a pan and bring to a slow boil. Stir gently. Add the sugar, lemon juice and vanilla and let simmer and bubble together for 5 to 10 minutes. Turn of the heat and let it cool in the pan for a few minutes before pouring into a jar. Leave to cool without a lid, you can cover it with a thin mesh or textile if you want to keep it protected, as soon as its cooled off, put a lid on and keep it in the fridge until serving. Voila!
IT"S AN ONION CONFITA grown up jam with caramelized onions. Delicious with pizza blancos, pies, tartines, veggie burgers, and excellent topping on savory dishes in general.
Makes on big jar or two small:
INGREDIENTS:
300 gram red onion, finely sliced
200 gram shallots
150 gram white sugar
0,6 cups balsamic vinegar 1.5 dl)
3 tbsp red port wine (Optional)
2 tbsp olive oil or coconut oil for frying
1 tbsp finely chopped fresh or dried rosemary
HOW TO:
Add oil to a heated pan and fry the onions slowly on medium heat while stirring until the onion is transparent and has started to caramelize. Add the sugar, stir gently and let it cook together slowly for a few minutes. Add balsamic vinegar, sugar, and rosemary (and port wine if you opted for that). Stir and let it bubble on slow heat for a few minutes. Turn of the heat and let it cool in the pan for a few minutes before pouring into a jar. Leave to cool without a lid, you can cover it with a thin mesh or textile if you want to keep it protected, as soon as its cooled off, put a lid on and keep it in the fridge until serving. Voila!
RHUBIRhubarb gives a special edge wherever it's used, I love it with yoghurt and fruit, on pancakes and cheese. It's especially good with warm bread like scones and together with coconut whip it's heavenly!
Makes on big jar or two small:
500 gram, Rhubarb, cleaned and cut into small pieces
350 gram white sugar
seeds from one vanilla pot
Juice of half a lemon
HOW TO:
Add the chopped rhubarb to a heated pan and leave it to for a few minutes, gently stirring on medium high heat. Add sugar lemon and vanilla, and stir on a slow boil for 10-15minutes. Turn of the heat and let it cool in the pan for a few minutes before pouring into a jar. Leave to cool without a lid, you can cover it with a thin mesh or textile if you want to keep it protected, as soon as its cooled off, put a lid on and keep it in the fridge until serving. Voila!

Jams are perfect gifts, dress them up in fab textiles or make charming labels. Give your jam creation a name, it deserves it :)
A final note on the photography and styling for the jam session, if you're interesting in seeing more, I'm posting addtional shots on my VSCO gallery this week.
Happy Jamming!
July 26, 2015
Real slow Sunday: The Mindful Foodie Recharge

Since the Slow Sunday series started in the beginning of the summer I have been pickling vegetables, baked sourdough breads and preserved my garden herbs with pesto making and brewed deliciously funky kombucha sodas. This Sunday I'm doing the slowest of things: taking a paus! Much needed, it's time for a vacation and I'm on way to the south of France for an inspiring sun drenched time and ventures into the wild mountain area of Provence. That said, I'm bringing my camera and I will for sure bring back plenty of inspiration from Cote d'Azur and the Alpes Maritime.
I'm a great believer in pausing and reflecting with regular intervals. It's a great way to refresh and refine visions for life and work. Being mindful and taking care of ourselves is crucial in our modern society, especially with an online life that never sleeps. All of us, bloggers, productive instagrammers and devoted foodies, need to learn how to tune in to rest and drop out of the daily spin to keep the creative spark burning. So with this post I'd like to encourage you to take a well deserved break from striving and working hard for a moment. And I'm going to use food as your subject of rest.
Tips for devoted foodies on taking a break from kitchen ambitions.For a week or so, try reducing your drive for new heights. This will make you appreciate and produce even better culinary creations when you step back into your daily tempo again:
1. Rest your mind from searching for recipes and don't try to impress your friends, partner or family by cooking new dishes for them to try on a daily basis. Have yourself a week where dinners are easy. Make yourself and everyone else happy by remaking some absolute favorites that you can make, standing on your head almost :) Also, if the kitchen is your domain normally, let's someone else impress you with well cooked meals.
2. Don't let everything drop by eating out at McCrap everyday just because your recharging your creative juices. Eat simple and healthy. Juices porridges and smoothies, etc will make you feel (and look) great, while you're mind is getting prepared for future food discoveries.
3.Rediscover simplicity. Eat simple and familiar food, take the opportunity to make friends with your favorite flavors again. This can create new ideas in the future for dishes.
4. Don't invite people over for dinner if you're the cook. Meet up at a favorite cafe or restaurant instead or make a picnic where you can bring fresh fruit and bread and cheese.
5. If you travel in foreign places or even in your own home town. Be open to trying new foods that is offered to you, take interest in new food without having to immediately turn it into a new recipe or blog post :D. Later when you are ready to be in full productive mode this can be a wonderful source of inspiration.
6. Don't chase inspiration online or read to many cook books either. Let it rest a little and you will enjoy it much more later after your time out.
7. Reflect on the big picture instead of the daily cooking. What does eating mean to you? Thinking about this can refine your vision about food and what you want to cook for yourself and others. Are you happy with your daily rituals around food? Do you see ethical and social values that you want to bring into your style of eating? Can it be healthier? More inclusive and curious about other cultures? If you cook for others and share inspiration around eating, how can you improve their lives with better food?
This is how I'm going to lower my kitchen ambitions during my summer holiday. I'm not inviting a bunch of people or hosting parties, which I love, but it burns energy quickly. I'm looking forward to discovering and not planning meals too much while traveling. When I make my own meals, it's mostly going to be real simple, like market finds of olives, cheese and fruits. I'm also going to have countless cups of coffee and occasional glasses of wine on sunny french terrasses and think about all sorts of other things than food too.
In the spirit of this post, I'm going to repost one of my favorite recipes again. It's one of the most pinned recipes from the blog on Pinterest, and has been featured on other blogs since posting it a few months ago. It's easy and one of the tastiest egg dishes I know. If you want to read a bit more about Shakshuka, I have written a post about this deliciousness here.
Shakshukaserves 2-3 people
INGREDIENTS:
In the pan
olive oil or coconut oil
1 red or yellow onion, or a couple of shallots, or why not mix them all.
2 garlic cloves, crushed and mixed with a teaspoon salt
1 red bell pepper, cut in strips
4-5 cherry tomatoes halved (optional)
1 tsp paprika powder
1 tsp ground coriander
1 tsp ground cumin
1 handful of fresh herbs like coriander, mint, parsley and basil, chopped
400 g (a regular tin) plum tomatoes 1 tbsp runny Honey
ca 1.5 dl water
4 free range eggs
optional in the pan:
1 tbsp Harissa or 1 tsp chili paste
to serve:
bread
1 handful fresh herbs, chopped
garlic yoghurt sauce
A small handful of fresh herbs, preferably coriander and mint
A handful of feta or goat cheese crumble (optional
Zaatar spice mix (optional)
garlic yoghurt sauce
2 dl yoghurt
1 tbsp runny honey
I clove garlic, crushed in a little bit of salt
1 tsp extra virgine olive oil
INSTRUCTIONS:
Chop the onion in small even pieces. Oil your pan, and fry the onion on medium heat for 5 minutes while stirring. Add the bell pepper strips and the ground cumin and the halved cherry tomatoes if opted for that. Fry for another 5 minutes, keep stirring.
Add plum tomatoes, the garlic salt, honey, coriander, fresh herbs, and the harissa if you opted for that, and let it all simmer for 10 minutes on low heat. Stir occasionally, and add a little water if it starts to burn and dry out. Prepare the yoghurt sauce by mixing the ingredients in a bowl and set aside. Return to the Shakshuka and before adding the eggs, add a bit of water if needed. With a spoon make four little shallow deepenings in the surface and crack an egg in each. Leave the whole loveliness for 10 minutes on low heat.
Serve with sprinkled fresh herbs and zaatar (if you opt for that) and drizzled garlic sauce, scoop up the shakshuka with bread. Enjoy!
July 19, 2015
Kombucha! Brew your own natural sodas - Slow Sunday

There were quite some jokes about making "sunshine" instead of "moonshine" while brewing my first batch of Kombucha! My crush on this fermented tea is what inspired me to begin with the Slow Sunday posts here on the blog. And it's slow. Real slow, taking 2-4 weeks to brew a batch.
Kombucha originates from Asia where it's been brewed for 5000 years. It's becoming increasingly popular with health conscious foodies everywhere. Being a fermented tea and a probiotic drink, its healing powers are currently debated by believers and sceptics. There are claims that kombucha can fight off cancer and aids, but no studies can support these superhero qualities yet. Still, Kombucha is praised health communities world wide as a healing drink. To me, I'm already sold by the fact that it's a real home brew soda, and it tastes heavenly, which is enough for me to wanna brew a batch.
The taste itself is special, complex and addictive. I was amazed by how good it was when I had my first sip a few years ago. Ever since I've been wanting more, and recently I had the good fortune of being given a SCOBY, the yeast mother that is the starter of every kombucha batch. I have to admit that the SCOBY looks a bit scary! It's a slimey, stringey fungus. It will keep forever but it needs a bit of love and feeding, just like a sourdough starter.
[image error]
With every new batch there's new SCOBYs being made. They can be used to make new batches of kombucha, and if you get too many, give them away to friends! If you can't get a hold of a SCOBY, from someone you know, you can purchase one online. You can also make your own SCOBY! There's an excellent guide on TheKitchn's web site, check it out here.
Have yourself an Indigo Dream, or why not make your own flavors . It takes time, but I'll promise you that it's easy peasy.
The whole fun thing about making your own kombucha is that you can make your own flavors. Imagine that you're hosting a birthday party for someone and you brew a special flavor for them. Your own brew brand in other words. Why not make your own little labels to go with the bottles.
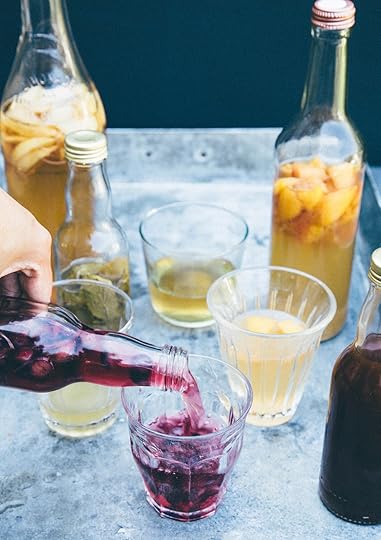
For this post I made a few tasty flavors! We had a small informal kombucha tasting at home and I'm going to share with you the most liked recipes. My "kombucha cola", smelled just like coca cola, so I thought to myself that the original coca cola most have been a simple mix of kombucha and coffee. But I need to tweak the amount of coffee and try a few more tricks to get there. Expect an update when I solve the cola recipe! If I do.
In the second fermentation stage, you can add any flavoring you like. Clean kombucha is also very delicious, without any extras.

Pretty much what you need: A big jar, sugary tea, a SCOBY (as seen on the bottom of the tea filled jar), bottles, sieves, lids and time, lots of time.
The most popular of the kombucha samples was the "apple ginger" and the "blueberry". I really liked the "mint kombucha" but the younger members of our tribe thought it was a difficult one. The peach flavored version was liked by everyone. How about that? Ready to start your own mini brewery? Here's how to:
THE BASIC
what you need:
time: It takes about 2 - 4 weeks to make a batch. It's real slow food. The fermentation does most of the work.
First fermentation
1 SCOBY ("symbiotic 'colony' of bacteria and yeast"), get from a friend or by one online.
3 1/2 quarts water (3.3 litre)
1 cup sugar (2.3 dl)
7 - 8 tea bags, organic black or green tea
2 cups starter kombucha, unpasteurized, store-bought or home brewed from an earlier batch.
Second fermentation
additional flavoring, fruit, teas and spices etc.
Equipment
big jar (4 litre), sterilized
cloth & rubber band or string
a funnel
a sieve
bottles and lids
HOW TO:
Making the tea: In a big pot, boil the water and remove from heat. Add the sugar and let it dissolve into the water. Leave the tea bags in the water until it's cool. Remove teabags and add starter tea. Pour the tea into a large glass jar and carefully add the SCOBY. Cover the opening of the jar with a cloth. Use a rubber band or string to keep a tight fit.
Let the brew ferment for up to 2 weeks. Leave the jar in a dark corner with room temperature. Check it now and then, (if it smells very bad, something has gone wrong and you should throw away the batch). After a week you can start tasting the kombucha which will be very sweet at first and then gradually become more sour and vinegary, as well as being more fizzy. When you reach a level of sourness and sweetness that you like, then it's time for the second fermentation. This usually occurs after 2 weeks.
Time to bottle and carbonate for 2-3 days: Remove the SCOBYS from the batch and gently place them in a smaller jar with 2 cups of the kombucha juice. This will be your starter juice for the next batch. Pour the kombucha into bottles using a funnel and a sieve or a straining cloth. Leave 1/2 inch of space at the top for additional flavorings. Add pieces of fruit, herbs, juices or other flavoring that you can think of. Make sure the lids are firmly closed and set the bottles aside for 2-3 days for a second fermentation. The kombucha carbonates during this period. Stop the fermentation process on the second or third day by refridgerating. Leave in the fridge until serving, wait at least 10 hours before drinking. Drink within a month.
Sunshine brew
Peach flavoured kombucha
Golden, sweet, and a real flirty summer kombucha.
INGREDIENTS:
1 peach
1 bottle of kombucha ( all measures work)
How to:
Add pieces of peach to a bottle of kombucha when you start the second fermentation.
Mint and lime flavored kombucha
Fresh as toothpaste! But way tastier, a grown up taste according to my mini survey at home.
my favorite out of these flavors. I like special flavors often. Not everyone does.
INGREDIENTS:
1 lime
5-6 leaves of mint
1 bottle of kombucha ( all measures work)
How to:
Add mint leaves and lime pieces to a bottle of kombucha when you start the second fermentation.
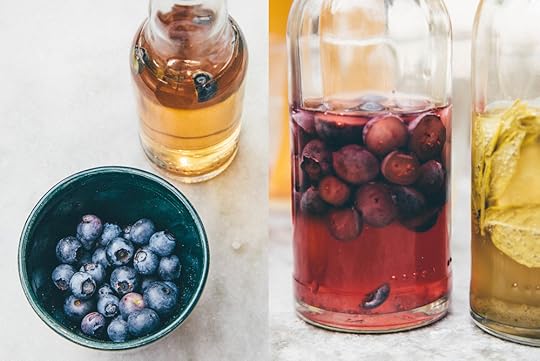
Blueberry flavored kombucha
INGREDIENTS:
a handful of blueberries, washed and halved
1 bottle of kombucha ( all measures work)
How to:
Add the pieces of blueberries to a bottle of kombucha when you start the second fermentation.
Apple and ginger flavored kombucha
INGREDIENTS:
1 apple, cut into pieces, seeds removed
1 tsp of fresh ginger root, finely sliced
1 bottle of kombucha (all measures work)
How to:
Add pieces of apple and ginger to a bottle of kombucha when you start the second fermentation.
Enjoy!
I would like to thank Christo Markham for giving me a SCOBY, he makes amazing buildings and ovens in clay and bakes the best sourdough bread.
More inspiration:
Get inspired by Kombucha Brooklyn's website, plenty of knowledge and inspiration.
Reading tip: There is an excellent book about "Wild fermentation" by Sandor Ellix Katz, he's one of the advocates of kombuchas greatness and an expert on wild fermentation, you can buy his book here.

Flavored Kombuchas!
June 14, 2015
Let’s go bananas
A moist and nourishing banana bread is perfect on a rainy grey day. So I made a very tasty loafwith my boyfriend today. He insisted we first caramelize the bananas before adding them to the dough. It really tasted heavenly so caramelizing is a sure keeper. But if you want to save time you can skip that step and add just mashed raw bananas to the dough instead.
This bread is lovely with coffee or tea, and a slice of cheese. I prefer it au naturel, because it's really good on its own. A perfect mix of sweet and savory. The chia seeds adds an extra health boost and though it tastes sinfully like a cake, it’s perfectly wholesome. Here’s my recipe, if you make an awesome banana bread and want to share it, leave a comment to your recipe in the comments.
Caramelized banana bread with chia seeds and nutsMakes one loaf
INGREDIENTS:
cake
2 ripe bananas
¾ cup oats
1 ⅔ cup spelt flour
½ cup cashew nut or walnut, roughly chopped
2 tsp baking powder
1 cup almond milk
1 tbsp lemon juice
t tsp salt
⅛ cup agave syrup or honey
1 tbsp chia seeds
toppings
a handful of Pumpkin seeds and sesame seeds to top
HOW TO:
1. Heat up your oven to 200 ℃.
2. Peal and halve the bananas.
3. Warm up a frying pan and add a bit of coconut oil. Fry the banana halves for a few minutes until they are nicely caramelized.
4. Remove the bananas from the pan and mash in a bowl.
5. Add almond milk, chia seeds agave syrup and lemon juice, mix well.
6. In a separate bowl, mix the rest of the cake ingredients (the dry ingredients).
7. Add the banana mix to the dry bowl, mix well with a wooden spoon.
8. Grease a cake rectangular baking mold (ca size 1.5 litre). And wop in the dough evenly.
9. Top with pumpkin and sesame seeds.
10. Bake in the oven for one hour.
11. Take out to cool a bit before serving. Enjoy!
Nina Olsson's Blog

- Nina Olsson's profile
- 9 followers

