
Nina Olsson's Blog, page 2
September 8, 2020
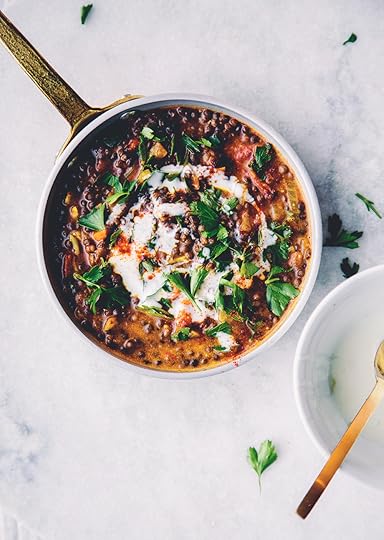
Dragon Bowl

Making a dragon bowl is more about attitude than sticking to a set of specific ingredients. It’s about putting together whatever seasonal legumes, grains and veggies you have at home. My dragon bowl is crowned with shredded nori to stay on theme. So far, all the dragon bowls I’ve tasted on my travels have been topped with a seaweed and served with a soy-based dressing, a nod to the birth country of macrobiotics: Japan.
This dragon bowl has a mix of flavours that complement each other well: curried cauliflower, beetroot dip, sautéed kale and wholegrain rice.
serves 4
Preheat the oven to 200°C (400°F), Gas Mark 6, and line an oven tray with baking paper. Cook the rice according to the packet instructions.
Make the curried cauliflower and beetroot dip. Mix the salt, the turmeric, garam masala and chilli powder with the olive oil in a bowl. Add the chopped cauliflower and toss to coat. Arrange on the baking tray. Place the beetroot in a separate small ovenproof dish (so that it doesn’t discolour the cauliflower) and place it on the tray. Bake for 25 minutes, turning the cauliflower and the beetroot after 15 minutes.
Blend the dressing ingredients together to make a smooth dressing. Taste and add more shoyu or tamari and/or lemon or lime juice if needed. Set aside.
For the sautéed kale, mix the olive oil with the miso paste. Heat a frying pan on a medium-high heat and add the olive oil and miso mixture. Add the kale and sauté until wilted. Sprinkle with the shichimi togarashi or red chilli flakes. Transfer to a bowl and set aside.
To finish the beetroot dip, blend the cooked beetroot with the white beans, tahini and lemon juice. Taste and add salt if needed.
Compose the bowls with the rice and wilted kale. Top with the curried cauliflower and carrots and add a dollop of the beetroot dip. Sprinkle with the sesame seeds, top with the nori and drizzle with the dressing.
200g (7oz) brown, red or black rice (or a mix of them all)
2 carrots, grated or julienned
2 tablespoons toasted sesame or pumpkin seeds
1⁄4 sheet nori, cut into thin strips
for the curried cauliflower:
1 teaspoon salt, plus extra to taste
1 teaspoon ground turmeric
1⁄2 teaspoon garam masala
1⁄3 teaspoon chilli powder, or to taste 1 tablespoon olive oil
1 small cauliflower head, chopped into chunks
for the beetroot dip:
2 medium beetroot, trimmed and- greens reserved for frying with the kale
70g (21⁄2oz) cannellini beans
1⁄2 teaspoon tahini
1 teaspoon lemon juice
for the tamari and almond dressing:
2 tablespoons shoyu or tamari
1 garlic clove, crushed
1⁄2 teaspoon grated fresh root ginger
1 tablespoon almond or cashew butter 1 tablespoon lemon or lime juice
1 tablespoon water
1 tablespoon agave syrup
1 tablespoon extra virgin olive oil
for the sautéed kale:
1 tablespoon olive oil
1 tablespoon red or brown miso paste 70g (21⁄2oz) kale, hard stems removed, chopped
2 pinches of shichimi togarashi or red chilli flakes
Vegan and gluten-free notes
VE ✔︎
GF Use tamari instead of shoy sauce.


March 27, 2018
Kasha with Rhubarb and Peanut Butter

This buckwheat porridge will make your taste buds dance and sing! it's one of my favourite breakfasts and you can make it all year around by swopping the rhubarb compote for other fruit or berries.
Buckwheat has a lot going for it. It’s gluten free, adapts to both savoury and sweet dishes, and is full of good nutrition. It’s actually not a grain but a seed and has a nutty, slightly bitter flavour when cooked. Kasha – buckwheat porridge, is made by toasting the buckwheat before simmering, which intensifies its nutty flavour. The delicious rhubarb and pear compote adds tangy sweetness and the spoonful of peanut butter a creamy, savoury finish.
Eating wholegrains daily is a sure way of accessing many of the important nutrients we need, keeping our digestive system healthy and our weight in check. Too many people miss out on the benefits of grains by choosing refined products instead of wholegrain. Eating wholegrains decreases the chances of developing serious diseases, such as diabetes and heart problems. Making whole grain porridges is a great way of getting that extra fiber into your digestion.
Toppings make all the difference, and there's always room for new ideas. Feel free to share your favourite toppings in the comment field below.
This recipe is originally published in my book Bowls of Goodness (Kyle Books 2017).
Kasha with Rhubarb and Peanut ButterSERVES 4
RHUBARB AND PEAR COMPOTE
250g rhubarb, trimmed and chopped
2 pears, halved, peeled and cored
juice of 1 orange
1 teaspoon freshly grated ginger
4 tablespoons coconut sugar or brown sugar
PORRIDGE
1 teaspoon coconut oil
150g buckwheat, soaked overnight and drained
300ml almond milk
2 tablespoons maple or agave syrup
few drops of vanilla extract
salt
TO SERVE
almond milk or milk of your choice
1 tablespoon natural peanut butter
TO SERVE
1. For the rhubarb compote, add the ingredients to a small pan and bring to the boil, let it simmer for 5 minutes and remove from heat. Set aside to cool.
2. For the porridge, heat a small saucepan and melt the coconut oil. Add the buckwheat and stir until golden. Add the milk and a pinch of salt. Let it slowly simmer for 15 minutes or until the milk is absorbed.
3. Remove from the heat and add the maple syrup and vanilla extract, stir and mix with the porridge. Serve with a splash of cold milk, rhubarb compote and a spoonful of peanut butter.
Vegan ✓ Gluten Free ✓
February 15, 2018
Mushroom & Lentil Burger with Kimchi Mayonnaise

I'm super excited to share this easy and delicious veggie burger recipe with you. Today is the publishing day ( the official birth day for a book) for my smoking hot, brand new book - Veggie Burger Atelier! Veggie Burgers are truly a food of our times, if you consider the huge transition towards plant based eating that is taking place all over the world today. Could a dish be more symbolic for this change? Other reasons for loving the Veggie Burger is that it's climate smart and creative! You can easily whop up patties from pulsing together grains, beans or lentils and veggies at home and fry them in a few minutes. Now you know what to do with your leftover veggie meals, right! There's no limit to what you can combine as long as you maintain the important balance between firmness, juiciness, flavour and texture, in my book I've dedicated a chapter to this alchemy in order to steer you into making perfect patties from scratch at home. It's really incredibly easy and delicious. And if you think that a veggie burgers need to look and taste just like a beef burger, drop that assumption right now :D because it's limiting you in discovering a whole new way of eating veggie burgers. Veggie burgers are a dish in it's own right and you can easily make it in your own style.
This burger is adapted from my book (in the book it's titled the Future classic Veggie Burger), Just for the blog version, I've added beetroot for a beautiful colour as I made into a Valentines Special! As in the book version I'm topping with root crisps, which gives a lovey crispy texture, root crisps are one of my favourite toppings as it balances the texture so nicely with the patty. Mayonnaise is a must and you can easily use vegan mayonnaise here, I hotted it up with the juice of my current obsession - kimchi, a fermented korean cabbage pickle, if you are not a kimchi fan, use mustard or another hot sauce, or keep it simple with just plain mayo. Another lovely topping is sprouts and fresh herbs! It adds a fresh crispiness and a clean taste to the bite. When making the veggie burger, feel free to add something you have at home such as chopped kale, fry it and add it to the mixture if you feel like customising the recipe. Does the mixture need extra firming, add more panko or rice. Always taste the mixture before shaping the patties, Adjust the flavour, if needed. Bon Appetit!
To order Veggie Burger Atelier in the US, click here.
To order Veggie Burger Atelier in the UK and Europe, click here.
Mushroom & Lentil Burger with Kimchi MayonnaiseFor the Patties:
Olive oil or ghee, for frying
About 9 ounces (250 g) mushrooms
1 cup (200 g) cooked, rinsed, and drained black or dark green lentils
50g grated raw or cooked beetroot
1 cup (100 g) back beans, cooked, drained, and mashed with a fork
1 tablespoon fresh thyme leaves
Scant 1 ½ cups (70 g) panko bread crumbs, or gluten-free bread crumbs
6 ½ tablespoons (80 g) cooked brown rice 2 tablespoons fresh parsley leaves, finely chopped
½ cup (50 g) grated Parmesan cheese, or Rawmesan
1 ½ tablespoons (23 g) Sriracha
2 tablespoons (30 ml) soy sauce, or tamari 2 cloves garlic, crushed
1 tablespoon (15 ml) balsamic vinegar
1 teaspoon pimentón (smoked paprika)
3⁄4 teaspoon salt, plus more to taste
1⁄4 teaspoon freshly ground black pepper, plus more to taste
Toppings
Pickles, I used cucumber and radishes in rice vinegar here, carrot ribbons and sliced onion is also delicious with this burger
Fresh sprouts of your choice, I use radish sprouts here
fresh herbs, I use chopped coriander (cilantro) here
Avocado slices
Optional: vegan or dairy cheese
Mixed root crisps, use store bought or home made (see recipe instructions below), You'll need one sweet potato and one beetroot, peeled and thinly sliced
Kimchi Mayo:
1 tablespoon Kimchi Juice ( can be substituted with sriracha)
3 tablespoons mayonnaise
4 brioche buns ( or other bread), halved and slightly toasted
To make the kimchi mayonnaise: In a small bowl, stir together the mayonnaise and kimchi juice until smooth. Refrigerate until assembly.
If you are making your own root crisps: In a medium-sized bowl, toss the sweet potato and beet slices with the olive oil. Season to taste with salt and pepper and place the slices in a single layer on the prepared sheet. Roast for 40 minutes, turning the crisps over about halfway through the cooking time. Keep an eye on the crisps for the last 15 minutes to avoid burning. Remove from the oven and let cool. The crisps keep in an airtight container for 3 days.
To make the patties: Place a skillet over medium-high heat and add 1 tablespoon (15 ml olive oil or 14 g ghee) fat for frying. Add the mushrooms and fry for 5 to 7 minutes, stirring, or until fragrant and shriveled in size. Transfer to a large bowl and combine with the remaining patty ingredients. Refrigerate the mixture for 30 minutes, or up to 24 hours covered.
Divide the mixture into 4 equal portions and shape each into a patty. Place a skillet over medium-high heat and add a drizzle of olive oil or 1 tablespoon (14 g) ghee. Fry the patties for 4 to 6 minutes per side, or until nicely browned.
Assemble the burgers on the toasted buns with the toppings.
Tip. Add 1 tablespoon (15 ml) liquid smoke to the mixture for an extra smokey flavour.
October 9, 2017
Ramen Wonder

Ramen Wonder Soba noodles with crispy tofu in spicy ramen broth
How are you? I'm peeking back in here for a moment to share one of my favourites soups and what could be more fitting now that fall has arrived with cold and dreary weather.
For me, the past few months have been all about making two more books, and I've realised my limits and decided to return to blogging more fully again, when the last pages of the third book is sent to my publisher. - Mean while, I'll be sharing book recipes and short posts like this one, a recipe for a deliciously healthy ramen noodle soup bowl.
Ramen noodles are the Andy Warhol of food these days! What started as a cheap post-war budget dish in Japan is now a worldwide phenomenon. It’s easy to understand why: the creativity involved in making a good ramen fuses the authentic food traditions of Asia with the rest of the world.
The key to a perfect ramen bowl lies in using quality broth, which requires patience and time – up to two days for some recipes. I’ve put together this ramen recipe so that you can make the most delicious savoury, ramen soup in no time. If you already have prepared dashi or vegetable broth it’s done in a flash. If you need to make dashi or vegetable broth, factor in at least 45 minutes of broth cooking or more. The real flavour punch comes from the tare – a spice mixture dissolved into the broth.
In the spirit of ramen, I fused Japanese ingredients with flavours from other world kitchens. Mixing shoyu, tamarind, miso, tahini and sriracha makes this bowl full of flavour. Toppings are optional, but a mixture of fresh raw vegetables like carrot, cucumber and avocado makes a beautiful pairing with the savoury shiitake, chives and eggs. Try adding a crispy crunch with toasted coconut flakes and nuts (serondeng).
This recipe is originally published in my book Bowls of Goodness, which has just released with an American edition available here. You find the UK edition here and translated editions on amazon or in a regular walk in book store.
SERVES 4
1.2 litres (5 cups) dashi or vegetable broth
handful of dried shiitake mushrooms
500g ( 1-1 ½ lbs) mixed soup vegetables (like sliced carrots and broccoli florets)
pinch of salt
200g (8oz) soba or ramen noodles
TARE
2 tablespoons miso paste (I use yellow)
50 ml ( ¼ cup) tablespoons tamari or shoy sauce
50 ml ( ¼ cup) mirin
5 garlic cloves, crushed
1 ½ tablespoons Sriracha
3 tablespoons chickpea flour
1 ½ tablespoon tahini
1 tablespoon toasted sesame oil
1 tablespoon tamarind paste
½ tablespoon freshly grated ginger
ADD-INS
(OPTIONAL)
fresh shiitake mushrooms
cucumber, cut into matchsticks
spring onions, sliced
pickles (I use pickled red cabbage here)
1 boiled medium egg per bowl, shelled and halved
sprinkles of seroendeng (an Indonesian flavour maker, a mix of crushed toasted coconut and peanuts)
fried tofu cubes
TOPPINGS
handful of chives, handful of black sesame seeds,
sprinkling of shichimi togarashi or red chilli flakes
Make it vegan: omit the egg.
Make it gluten free: use soba noodles instead of ramen noodles and tamari sauce instead of shoyu (soy) sauce.
How to:
Pour the dashi or vegetable broth into a large pan. Bring to the boil over a medium–high heat. Add dried shiitake and soup vegetables to the broth with a pinch of salt. Lower the heat and let the broth simmer until you are ready to assemble.
Transfer 200ml (¾ cup) of clear broth to a small pan. Bring to the boil then let it simmer. Add the tare ingredients, blend until smooth and let it putter over a low heat until serving.
Prepare the add-ins and toppings and cook the noodles according to their instructions. Rinse the noodles in cold water and set aside. Pour the remaining litre of hot vegetable broth into serving bowls. Stir the tare into the broth. Divide the drained noodles, add-ins and toppings between the bowls. Customize your heat and strenght of avour. Keep conditments like sriracha, shoy sauce and roasted sesame oil on the table.
March 6, 2017
Leek Soup - Bowls of Goodness!

My winter pale nose has been getting a wee bit of tan today! To celebrate the arrival of spring outside my house, I'm sharing this old time favorite recipe from Bowl of Goodness, this recipe is one of the more popular ones to make and post on Instagram so far, apart from the Loyal Lentil Chili. Just look at how lovely Sara from @Shisodelicious made her version here.
If you post a creation that you made from the book on Instagram, tag me in the picture if you like me to see the post, and use the hashtags #bowlsofgoodnessbook or #bowlsofgoodness. Talking about bowls of goodness, here's a soup that you will want to make again and again. x Nina
Leek SoupCreamy potatoes and leek soupThis comforting and filling potato and leek soup is always a hit! The leeks give it a wonderful flavour and the potatoes add substance. If you prefer, you can substitute the potatoes for Jerusalem artichokes. This soup is based on the classic French Vichysoisse, but tweaked by replacing the heavy cream with the lighter creaminess of almond milk, almond butter and crème fraîche. Use vegan crème fraîche to make it completely plant based.
VEGAN Use olive oil instead of butter and vegan crème fraîche.
GLUTENFREE Serve with gluten-free bread.
Serves 4
500g potatoes, peeled and diced
drizzle of olive oil or 2 tablespoons butter
5 leeks, cleaned and cut into pieces
750ml vegetable broth
350ml almond milk
50ml white wine
25ml almond butter
75ml crème fraîche orvegan crème fraîche
1 teaspoon salt
black pepper
to serve
bread
extra virgin olive oil
In a large pan, boil the potatoes until soft then drain and set aside. In a frying pan over a medium–high heat, heat a drizzle of olive oil or 2 tablespoons of butter and sauté the leeks for 2-3 minutes, until soft.
In a large saucepan, combine the leeks with the potatoes and the remaining soup ingredients and bring to the boil. Reduce the heat to low and let it simmer for 10 minutes. Remove from the heat, transfer to a food processor and blend until smooth. Serve with bread and a drizzle of extra virgin olive oil.
Tip! This soup can be served cold and warm, the traditional Vichysoisse soup is often served cold.
January 9, 2017
The "Bowls of Goodness" book, Loyal Lentil Chili and blog makeover!
Happy New Healthy Year, dear friends! This is indeed the very first blog post in a very long time but as a bonus it comes with a brand new blog look and exciting news!
My favourite dutch blogger duo Suus and Johann from Food Bandits helped me change the blogs landing page and made some extra pretty tweaks on the design. I'm so happy with the new look and can warmly recommend their services as well as the delicious sweet recipes on their blog.
It's also only two days left until my book Bowls of Goodness is released in stores and I'm pre-celebrating with sharing an already popular recipe from the book here. Since it was removed from the blog almost a year ago I still get weekly emails from readers asking for this particular dish. No wonder, The Loyal Lentil Chili is one of my long time favourites too and what could be more fitting than a hearty bowl of spiced lentils now that it's freezing cold outside and we all crave nourishing and delicious comfort foods.
If you are curious about the book pop back into this blog space in a couple of days as I'll be sharing the story around behind it. I'm so excited about the recipes and many of them have been personal favourites for a long time. For those of you who already pre-ordered the book, I can't wait to see your results on Instagram, hashtag #bowlsofgoodnessbook or #bowlsofgoodness and tag me in the photo if you want me to see your post.
Scroll down for the recipe!
The Loyal Lentil ChilliLentil chilli with butternut squash, coconut milk, pepper and lime
Excerpt from "Bowls of Goodness"
Do you have a dish that never fails you, like a loyal friend, who keeps showing up and impresses you by always being top-notch? I have a few and this lentil chilli has been the star of my regular repertoire for years. This is also one of the most made and loved recipes from my blog. Lentils can come across as a bit dull sometimes, but this dish is nothing like it. With flavours that really sing together – earthy cumin and cinnamon, tangy lime and coriander, hot chilli and garlic – it harmonises perfectly with sweet butternut squash and chewy lentils. Instead of butternut squash you can use cooked pumpkin, aubergine or any other fleshy vegetable you have.
SERVES 4
250 puy or beluga lentils
1 tablespoon coconut or olive oil
5–7 shallots, finely chopped
4 garlic cloves, finely chopped to a
paste with 1 teaspoon salt
11/2 teaspoons ground cumin
1 teaspoon ground turmeric
1 teaspoon ground cinnamon
1 teaspoon paprika
1 teaspoon ground coriander
1 red pepper, halved, deseeded and
finely chopped
1-2 red chillies, deseeded and
finely chopped
2 tomatoes, finely chopped
400g butternut squash, cooked
and chopped into small pieces
400ml coconut milk
1 tablespoon tahini
1 tablespoons honey or agave syrup
juice of 1 lime
3 tablespoons soy sauce
2 tablespoons extra virgin olive oil
salt and pepper
simple yogurt sauce:
200g yogurt or vegan yogurt
(soygurt or coconut yogurt)
1 teaspoon honey or agave syrup
drizzle of extra virgin olive oil
quickest cucumber salad
1/2 cucumber, shaved into ribbons
4 tablespoons rice vinegar
to serve:
fresh coriander
hot sauce, like sriracha
cooked brown rice or other
whole grain
lime wedges
Cook the lentils according to the packet instructions, rinse, drain and set aside. Heat a frying pan over a medium–high heat. Add the oil and gently fry the shallots until transparent. Add the garlic, spices, pepper, chilli and tomatoes and fry for a few minutes over a medium–low heat. Stir in the lentils, squash, tahini and honey. Pour in the coconut milk and stir, then let the chilli simmer over a medium–low heat for 5 minutes, adding a little water if needed and stirring regularly. Add the lime juice and soy, then let it simmer for a further few minutes while stirring. Taste and adjust the seasoning with salt and pepper. Remove from the heat. Mix the ingredients for the yogurt sauce. Make the cucumber salad by combining the shaved cucumber and rice vinegar. Drizzle the chilli with extra virgin olive oil, top with freshly chopped coriander and serve with the cool yogurt sauce and salad. Serve with a hot sauce, rice and lime as extras on the table.

December 27, 2016
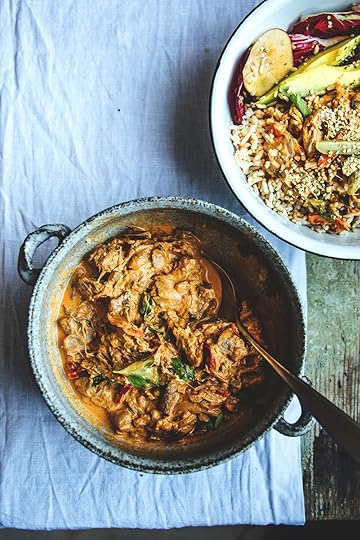
Jackfruit Stroganoff
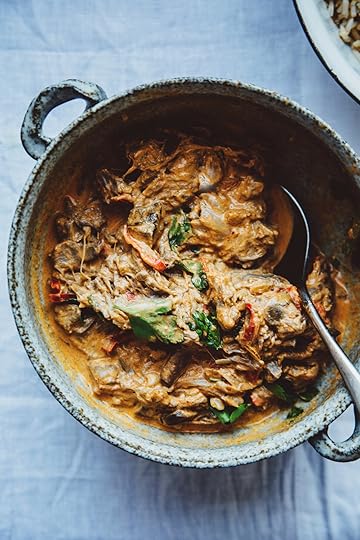
I was thinking about making stroganoff for quite a while now so when my delivery box from the local asian supermarket arrived with lots of jackfruit I knew the moment had come. And because I love this dish so much I'm sharing the recipe for jackfruit stroganoff with the world today :D
I've made a few vegan and vegetarian versions of stroganoff in the past. Mushroom and turnip stroganoff, root fruit stroganoff and lentil stroganoff, but I have to say that this version with jackfruit is just the best so far! I used sour cream like the old school recipes call for, but I've successfully made creamy delicious stroganoff with both coconut milk, and vegan creme fraiche in the past so feel free to substitute the sour cream for your choice of cream.
Stroganoff is a russian stew traditionally made with beef and sour cream, but the big thing about stroganoff in my opinion is the paprika flavored sauce. Packing this stew with savor from sautéed mushrooms, garlic and onion plus adding the texture of jackfruit makes the beef redundant! And jackfruit stroganoff is absolutely wonderful!
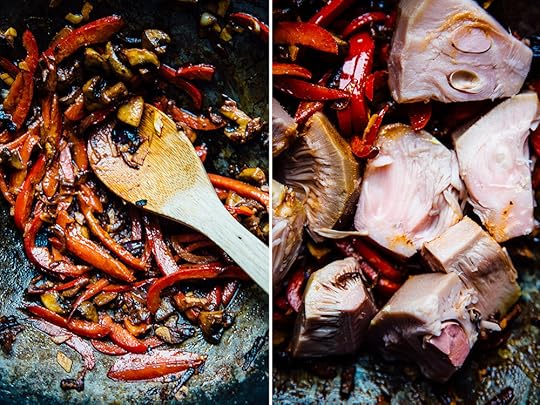
Lots of flavor from mushroom, garlic, pepper and onion. Jackfruit pieces will slowly break into in a fleshy, stringy texture after cooking for 20 minutes.
For those new to jackfruit, - it's a BIG fruit hanging in the jack trees of southern Asia. The young fruit is suitable for savory dishes and popular in vegan cooking, where it's often used in dishes like faux pulled pork, the texture when cooked is stringy and meaty and its cooked taste is neutral and takes flavor from spices and sauces easily. When buying jackfruit, look for the green or young jackfruit in water or brine. Mature jackfruit taste like sweet fruit and it's often sold in syrup, don't buy ripe jackfruit in syrup for savory cooking! jackfruit is good for us too. It's rich in fiber and vitamins, especially A and B-6. So add it to your shopping list. It can be hard to find but a tip is to order a bigger quantity online in places like amazon and stock up.
Jackfruit Stroganoff
serves 2-4 people
INGREDIENTS
vegetable oil for frying
1-2 red onion, thinly sliced
100g mushrooms, cleaned and quartered
2 garlic cloves, crushed
1 ½ tablespoon smoked paprika powder
1 red bell pepper, thinly sliced
700 ml vegetable stock or water
ca 450 g ( 2 tins x a 425 g net) young jackfruit in water, drained
¾ tablespoon salt
¼ teaspoon black pepper
1 tablespoon mustard
150 ml sour cream or creme fraiche (substitute with a vegan cream or coconut milk if you prefer)
¼ teaspoon lemon zest
a handful of freshly chopped parsley
toppings
Serve with brown rice, pickled cucumber and extra sour cream/vegan sour cream. A fresh and tangy salad makes the perfect side dish with stroganoff.
Heat up a pan to medium high heat and fry the the onion, mushroom, garlic, smoked paprika powder and bell pepper for 8-10 minutes while stirring. Add the jackfruit, and vegetable broth, salt and pepper and let it putter while occasionally stirring and mashing the jackfruit for 20 minutes. Add your cream (sour cream, coconut milk, vegan cream or low fat), mustard, lemon zest, and sprinkle with parsley. Stir to combine and let it putter for another 3-4 minutes. Taste and adjust with with salt and pepper if needed. Serve with rice, salad and pickled cucumber.
Bon appétit!

For more delicious bowl food, try the Loyal Lentil Chili in the previous post or order my new book Bowls of Goodness here, now available in Australia also, here.
May 18, 2016
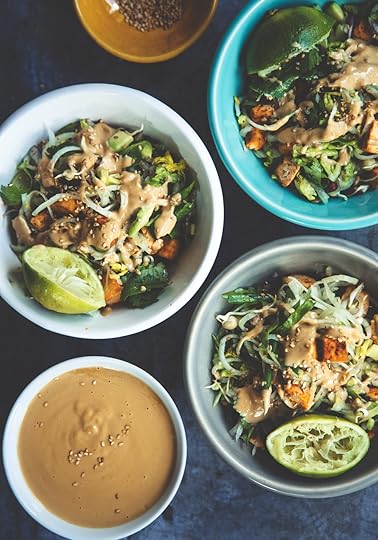
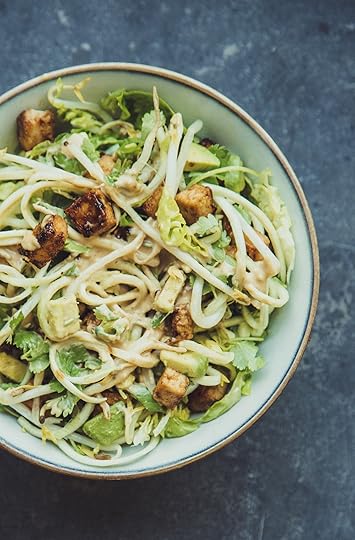
Tofu Doodle Salad with Peanut dressing
E
Here's a delicious gluten free noodle dish! It's fresh, delicious and reminiscent of the flavour in raw Asian spring rolls. Crisp with a sauce that adds an edge.
This dish has three main elements:
A cool fresh salad with coriander, sprouts, scallions and crispy romaine salad.Tofu, cooked in the best way possible - crispy fried and flavoured with chilli, soy and maple syrupA peanut sauce - with strong character that defines the dish!Personally I don't think marinating tofu is a super idea - you want the tofu to be as dry as possible when you fry it for that crispiness to appear. Use firm tofu and press it between two plates with a paper kitchen towels under the tofu Place something heavy above the top plate and squeeze out excess moist.
I like a strong punch, so I maxed the lime, ginger and shoy for a strong flavour. Though taste buds are like people - often different - I've made an option in the recipe so that you can choose a milder or stronger flavour.
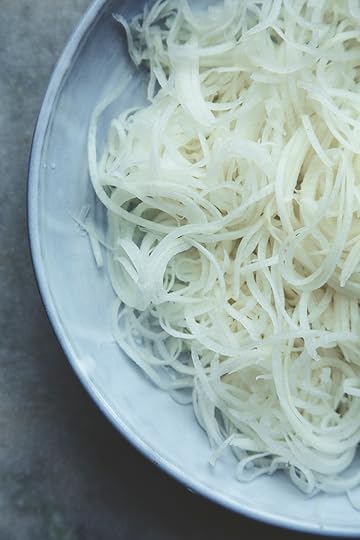
Doodles! Daikon noodles.
ZOODLES AND OTHER PLANT NOODLES
Zucchini noodles
Zoodles are bands of spiralized raw zucchini. They're perfect to use as a substitute for any pasta or noodle dish, personally I think they fit the best with Mediterranean dishes, like vegetarian lentil Bolognese and just simply with tomato, pesto, parmesan; or just herbs, olive oil and salt. There is one minus with zoodles - they release the plant juices easily and therefore lose their bouncy shape and go soggy fast, especially in a sauce. They can add to the juiciness of a dish and some people like that a lot. Though with food styling or if you're making an Instagram shot, you might wanna consider adding the zoodles just before it's time to shoot or serve for a firmer zoodle.
Carrot noodles
Carrots make great noodles, they stay firm and have a delicious and slightly sweet taste. They work across many flavour palates, but pair extra well with North African and Indian dishes, regions where carrot salads are a common cooling contrast to spicier ingredients.
Daikon noodles ( doodles :D )
I made daikon noodles recently and they look magical as you can see in the image above. They're almost perfect in every sense, from appearance, to taste and firmness, and they fit wonderfully with Asian dishes. There's just one catch, daikon smells of sulphur!! And when you spiralize a whole daikon, it can be at bit overwhelming for a sensitive nose. Serving doodles is a risk! I experienced that half of the table loved it while the other half couldn't bare the smell. There could be ways of masking the sulphuric smell with vinegar to try for experimental home cooks.
Sweet potato, parnsip and all other plants that can be spiralized.
Plenty of plants can become plant noodles. If they're firm enough, can be eaten raw, and fit into the spiralizing tool - there's no reason not to get creative. Raw sweet potato noodles are delicious, as are parnsip. Explore new kinds of noodles by spiralizing your veggies at home.
EQUIPMENT!
EQUIPMENT!
There are tools that cost a pretty penny and then there's a whole range down to really cheap ones. I've got a little plastic cone that was less then 10 euros (10 dollars) and it's easy to use. But you don't need to have a special tool, although it's quite fun and useful if you find one you like. You can also make tagliatelle shaped zoodles with a cheese slicer and a knife. Sometimes I also use a julienne knife that cuts beautiful straight thin slices of vegetables. Anything that slices thin will do.
Asian salad with Crispy Tofu and Peanut sauce
serves 4
INGREDIENTS
250g firm tofu
500g daikon or zucchini or carrot (you can use regular noodles as well if, use soba or rice noodles for a gluten free meal )
1 tbsp maple syrup or agave syrup or honey
2 tbsp tamari or shoyu sauce
1 tbsp toasted sesame oil
1 tsp shichimi togarashi or other chilli flakes
150 g romaine lettuce, shredded
4 scallions, thinly sliced
2 avocados
2 handfuls coriander, chopped
2 handfuls beansprouts
1 tbsp toasted sesame seeds
salt to taste
PEANUT DRESSING
100 ml natural peanut butter
2-4 tbsp tamari soy (use 2 tbsp for a milder sauce - and up to 4 tbsp for a stronger punch)
2-4 tbsp fresh lime juice (use 2 tbsp for a milder sauce - and up to 4 tbsp for a stronger punch)
2 tbsp rape seed oil
½ -1 tbsp fresh ginger grated(use ½ tbsp for a milder sauce and 1 for a stronger punch)
2 tbsp palm sugar or brown sugar
water to thin
HOW TO
Mix the ingredients for the peanut sauce until smooth, add small amounts of water to thin the sauce until desired thickness.
Spiralize the daikon/zucchini or carrots into noodles. Peel and half the avocado, remove the pit and cut the avocado into small pieces.
Stir and fry the tofu in a pan with 1-2 tbsp rape seed oil on medium to high heat until it's golden and crispy, pour over the tamari mix and allow the tofu to absorb it. Remove from heat.
Toss the the ingredients except the sauce together in bowl and serve with the peanut sauce.
Asian salad with ginger peanut dressing - And a mini plant noodle guide
Dear readers, I've missed talking with you here. As I draw closer to the deadline when my book manuscript needs to be finished, there's been little focus and time left for the blog. But I have been dying to update here from the sea of ideas that wash over me during the book writing. Though I cannot publish the recipes that will be in the book here, I developed a recipe for a Swedish magazine recently that I really love to bits so I'm sharing it here with all you lovers of Asian flavours.
Whenever I post a zoodle or plant based noodle dish on Instagram, I notice that this way of replacing wheat pasta with plant noodles is not familiar to everyone out there so I've written a mini "zoodle and plant noodle" guide further down this post.
Back to this salad: it's fresh, delicious and reminiscent of the flavour in raw Asian spring rolls - very crisp and raw, with a sauce that sets a strong edge. If you like raw pad Thai, you will be somewhat familiar with the direction.
This dish has three main elements:
A cool fresh salad with coriander, sprouts, scallions and crispy romaine salad.Tofu, cooked in the best way possible - crispy fried and flavoured with chilli, soy and maple syrupA peanut sauce - with strong character that defines the dish!Tofu can be tricky! And personally I don't think marinating tofu is a super idea - you want the tofu to be as dry as possible. A tip is to use use firm tofu and press it between two plates. Place something heavy above the top plate to really squeeze out extra fluids.
Fry the tofu just before serving as it stays fresh and crisp in flavour only for a short while.
A little extra note on buying tofu: buy organic tofu from the organic food store if you can. If you're not sure that you want to eat GMO then that's your best choice since most tofu sold elsewhere is most likely originating from a GMO crop.
It's all in the sauce: I like a strong punch, so I maxed the lime, ginger and shoy for a strong flavour. Though taste buds are like people - often different - I've made an option in the recipe so that you can choose a milder or stronger flavour.
Doodles! Daikon noodles.
ZOODLES AND OTHER PLANT NOODLES
Zucchini noodles
Zoodles are bands of spiralized raw zucchini. They're perfect to use as a substitute for any pasta or noodle dish, personally I think they fit the best with Mediterranean dishes, like vegetarian lentil Bolognese and just simply with tomato, pesto, parmesan; or just herbs, olive oil and salt. There is one minus with zoodles - they release the plant juices easily and therefore lose their bouncy shape and go soggy fast, especially in a sauce. They can add to the juiciness of a dish and some people like that a lot. Though with food styling or if you're making an Instagram shot, you might wanna consider adding the zoodles just before it's time to shoot or serve for a firmer zoodle.
Carrot noodles
Carrots make great noodles, they stay firm and have a delicious and slightly sweet taste. They work across many flavour palates, but pair extra well with North African and Indian dishes, regions where carrot salads are a common cooling contrast to spicier ingredients.
Daikon noodles ( doodles :D )
I made daikon noodles recently and they look magical as you can see in the image above. They're almost perfect in every sense, from appearance, to taste and firmness, and they fit wonderfully with Asian dishes. There's just one catch, daikon smells of sulphur!! And when you spiralize a whole daikon, it can be at bit overwhelming for a sensitive nose. Serving doodles is a risk! I experienced that half of the table loved it while the other half couldn't bare the smell. There could be ways of masking the sulphuric smell with vinegar to try for experimental home cooks.
Sweet potato, parnsip and all other plants that can be spiralized.
Plenty of plants can become plant noodles. If they're firm enough, can be eaten raw, and fit into the spiralizing tool - there's no reason not to get creative. Raw sweet potato noodles are delicious, as are parnsip. Explore new kinds of noodles by spiralizing your veggies at home.
EQUIPMENT!
EQUIPMENT!
There are tools that cost a pretty penny and then there's a whole range down to really cheap ones. I've got a little plastic cone that was less then 10 euros (10 dollars) and it's easy to use. But you don't need to have a special tool, although it's quite fun and useful if you find one you like. You can also make tagliatelle shaped zoodles with a cheese slicer and a knife. Sometimes I also use a julienne knife that cuts beautiful straight thin slices of vegetables. Anything that slices thin will do.
Asian salad with cripsy tofu and peanut sauce
serves 4
INGREDIENTS
NOODLES
250g firm tofu
600 g zucchini or other noodles (carrot, or regular cold cooked soba noodles work like a charm too)
1 tbsp maple syrup
2 tbsp tamari soy
1 tbsp toasted sesame oil
1 tsp shichimi togarashi or other chilli flakes
150 g romaine lettuce
4 scallions
2 avocados
2 handfuls chopped coriander
2 handfuls beansprouts
1 tbsp toasted sesame seeds
salt to taste
PEANUT DRESSING
100 ml natural peanut butter
2-4 tbsp tamari soy (use 2 tbsp for a milder sauce - and up to 4 tbsp for a stronger punch)
2-4 tbsp fresh lime juice (use 2 tbsp for a milder sauce - and up to 4 tbsp for a stronger punch)
2 tbsp rape seed oil
½ -1 tbsp fresh ginger grated(use ½ tbsp for a milder sauce and 1 for a stronger punch)
2 tbsp palm sugar or brown sugar
water to thin
HOW TO
Mix the ingredients for the peanut sauce until smooth, add water to thin to desired thickness.
Spiralize the zucchini into zoodles. Shred the romaine lettuce and cut the scallions into thin rounds. Split and deseed the avocado, cut it into small pieces. Mix maple syrup, tamari, lime juice, sesame oil and chilli flakes.
Stir and fry the tofu in a pan with 1-2 tbsp rape seed oil on medium to high heat until it's golden and crispy, pour over the tamari mix and allow the tofu to absorb it. Remove from heat.
Mix the zoodles, romaine lettuce, scallions, avocado, coriander, bean sprouts and sprinkle a little salt over. Divide into serving bowls and top with tofu and sesame seeds. Serve straight away with the peanut sauce.
February 6, 2016
Thin crust spelt pizza with beet & chèvre (vegan option)

If you have followed me for a while you have probably noticed my undying love for pizzas, burgers, tacos and the like. I like these street foods elevated, with quality ingredients - made healthy. There should be no need to feel guilty or sad after a delicious pizza dinner when you're eating the new generation style pizzas.
I like my crust really thin! In this recipe I chose to use a whole grain spelt flour instead of regular wheat flour, this creates a tougher chew than regular refined wheat flour which makes a crispier crust. But trust me - the whole grain crust has a charm that is easy to love.
I have a couple of pizzas lined up for the blog, and in this post I'm sharing a long time favourite of mine - the beet and chèvre pizza, inspired by the "to die for" pizzas I enjoyed in the south of France - rather than classic Italian ones. On the coastline between Nice and Marseille they serve Pissaladière - the best pizzas I ever ate ( - sorry Italy! ). The Provencial pizzas have a choice of toppings that I love, less tomato based and more white pizzas. In my recipe here, I'm swapping the French style pastry dough for my healthier whole grain alternative, but using the French style of toppings - this way I still get the satisfaction of my French holiday pizzas - the perfect marriage between healthy and tasty! How about that?
Oven baked chèvre on slices of beetroot drizzled with honey (or agave) and topped with herbs is a combination I often return to in various forms - I make salads and burgers with this combination. Add roasted nuts and you've got pure perfection. Transferring the formula to a pizza is heavenly - the beet and chèvre pizza is really juicy and full of flavour. The aromatic thyme and rucola creates interest - and enhances the beet and the tangy chèvre. You'll want to make this again and again if you try it.
For a wholly vegan pizza, you can use vegan chèvre (see link in recipe below). It's going to be really delicious too!

Make a huge dough and invite people to bake their own pizzas.
Pizzas are like tacos and burgers - the perfect vessel for creative variations. I'll make a bunch of different toppings in one baking session! Leftovers in the fridge might end up on a pizza too. I make some pizzas more minimal, with just olive oil, salt, cheese and a herb, while others are topped with a whole salad. It's also part of the fun - that it's spontaneous and room for flavour play!
It's just not the pizza and it's toppings that can be varied, but also how it's baked. Pizzas can be baked in a pan or in an earth oven, or why not on the bbq?
In my old house we had an earth oven in the garden. I really enjoyed gathering around the pizza oven with friends and family- The fire is sparkling, the aromas of hot bread spreading, everybody is helping out and it's a really relaxed and cosy way of hanging out...
The pizza made in a traditional clay and stone oven comes out more crispy. Due to the high temperature, it's baked in a minute or two. The beauty of outdoor pizza baking is that it's great for a get together. Just put up a few tables to bake on and keep toppings available, prepare enough dough and let everyone bake and top their own pizzas. It's hands on and fun, a success formula for a party! You don't need an earth oven, it's also doable with an outdoor grill. The pizzas will bake a little slower than in the earth oven, but grilled pizzas are incredibly good and all the rage right now. Famous chefs Rachel Khoo and Jamie Olivier are both fans of bbq grilled pizzas.
If you are interested in building your own earth oven, it's not that expensive or difficult. Find a workshop in your neighborhood - and after learning the skills for two days you'll be able to build your own oven with the help of friends.
If you're in my neighborhood - the north of Netherlands, you can contact my friend and earth oven builder Christo Markham for information on workshops (he also teaches abroad). During the summer of 2016 a number of natural building and sour dough baking workshops will be given at the Sekoya center in Schoorl, north of Amsterdam. It's truly an inspiring place and a real hippie haven for yoga and craft workshops. I used to live on the premises with my family and I'm still a part of the small community there. If you come from afar, there's a charming bed and breakfast, and camping facilities provided by Leoni, the owner. From April and onward - there's also a yurt available for rent. Oh, and not to forget - there's a pizza night at the end of every workshop!
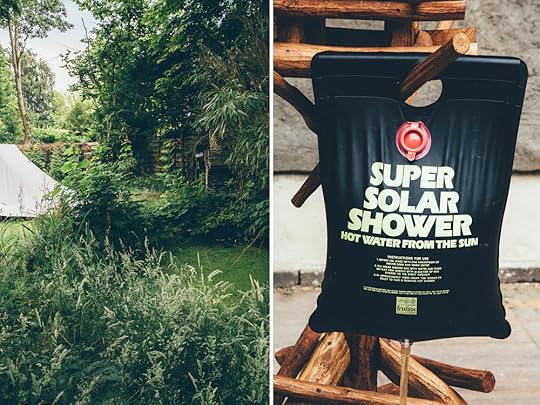
Camping at Sekoya Center in Schoorl, - a nature reserve area by the sea with a forest and dune landscape that is by far the most lush and extra ordinary landscape found in the Netherlands.

My favorite pizzas are with french style toppings.
This recipe is made for baking in a regular modern electric or gas stove oven. Take in to account that every oven differs. Check your pizza and adjust baking time as needed. For a bbq pizza, place the pizza on a papered baking tray and place over the fire on a rooster. In an earth oven the baking time is 1 - 3 minutes.
Thin Crust Spelt Pizza with Beets & ChèvreMakes 8 pizzas
INGREDIENTS
whole grain spelt flour pizza crust
2 tsp dry active yeast (usually 1 sachet)
1 ¼ cups warm (not hot) water
3 ½ cups whole wheat grain
1 tbsp agave sugar or honey
¼ cup olive oil for baking
2 tsp fine salt
semolina flour for dusting (optional, use spelt flour if you prefer)
toppings
sugo, (see recipe below or get a jar of quality store bought organic sugo)
a bunch of arugula
200 gram chèvre (find the recipe for vegan chevre from this Rawesome Vegan life here)
1 raw beetroot, peeled and thinly sliced
½ tsp honey (or agave syrup for a vegan pizza) per pizza
1 red onion, sliced
2 handful pine nuts
a handful of thyme sprigs
a big handful of basil
a handful of hemp seeds (optional)
extra virgin olive oil
fine salt
Best ever sugo
(Italian tomato sauce)
Makes a jar
3-4 tbsp olive oil for baking
ca 400 gram good quality tinned plum tomatoes
3 cloves garlic, crushed in 1 tsp fine salt
2 shallots, chopped
a handful of fresh basil, chopped
1-2 tbsp dried italian spice mix (oregano, basil, marjolein), optional
1 tsp agave syrup or honey
a pinch good ground fresh black pepper
salt to taste
HOW TO:
the pizza dough
With a spoon mix the dry yeast with the warm (not hot) water together with the agave syrup in a small bowl. Let it rest for 10 minutes. The mixture should look a bit foamy.
In a mixing bowl, sieve the salt over the spelt whole grain flour and mix it well.
Mix in the yeast mix with the flour using dough hooks on slow speed, while slowly pouring in the olive oil and increasing the speed of the mixer until the dough is smooth and elastic (you can also mix and work the dough by hand).
Knead the dough for a few minutes by hand on a floured surface.
Put the oil a large bowl. Place the dough in the bowl and let it rest under a towel for 1 ½ hour.
Preheat the oven to 230 ℃
Tip: The dough will last for 3 days in the fridge wrapped in plastic film after resting.
sugo:
Slowly fry the shallots on medium low heat in olive oil for a couple of minutes.
Add the plum tomatoes and garlic, stir and break up the tomatoes well.
Add agave syrup (or honey), basil and spices, sir and let it simmer for 5 -10 minutes.
Add salt and pepper to taste and remove from heat.
Keep your toppings close by.
pizzas
Punch down the dough and place it on a flour dusted working surface.
Split the dough in 8 pieces and knead each piece lightly into a little ball.
Place a baking paper on your oven tray
Sprinkle a little semolina flour on the paper (optional). Form one pizza ball with a rolling pin into a round shape. The pizza base should be very thin - only a few millimeters.
Add 1-2 spoons sugo, swirl it on the surface of the pizza with a spoon. You can skip the sugo if you want to make a white pizza and in that case you sprinkle olive oil and a little salt instead of the sugo.
Add slices of beetroot, crumbles of chèvre (or spoons), 2-3 sprigs of fresh thyme and pine nuts. Top with rucola and a few basil leaves.
Swirl a spoon of honey or agave over the betroot and chèvre.
Sprinkle a tiny bit of salt and pepper over everything.
Bake in the oven for 15 minutes. Now this time can differ between ovens so you need to watch the pizzas so they don't burn and maybe add a few extra minutes to get a firm crust.
Remove from the oven and serve straight away.
Repeat step 5 and onwards with each ball of dough.

This beautiful oven is built by artisan baker and natural buildings teacher Christo Markham.
Nina Olsson's Blog

- Nina Olsson's profile
- 9 followers

