Robin L. Cole's Blog, page 4
January 16, 2015
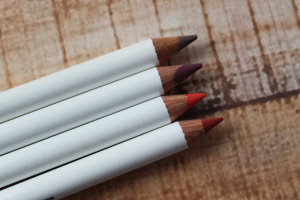
Obsessed with OCC: Cosmetic Colour Pencils Review
 “A long-wearing multipurpose pencil for the eyes, lips, and body. This versatile range of cosmetic pencils perfectly complement Lip Tar. From everyday neutrals to bold hues, each pencil can stand alone as highly pigmented liners for the eyes and beyond.”
I know, I know; I promised to show you how to apply a Lip Tar this week. And I intended to; I really did.
Only, when I got to talking about lip liners almost immediately during the Tar application process, I realized I just *had* to mention this other OCC product too… But I didn’t want a long gushing description of them overtaking the post… And it just didn’t feel right to tease you with only a mere mention of them, without having previously reviewed them somewhere else on this blog, for those of you who wanted to learn about them more in-depth.
So, next week we will discuss Lip Tar application; I super-pinkie promise! But for today, we’re going to talk about OCC Cosmetic Colour Pencils.
 OCC is know for their wild, crazily pigmented colors. Their Lip Tars really run the full spectrum; you can find just about every shade of red, peach, and pink your little heart desires–but the bolder, more makeup obsessed of us can also dive on in to pastel blues, neon corals, grey-toned taupes, and electric purples.
Only problem with that? Lip Tars are, by their very liquid-y nature, a bit of a mess to apply without the coralling help of a lip liner. And just what do you do pair with a bright neon-pink Lip Tar like Anime? Not a whole lot of liners out there on the market for something like that…
Until OCC created these; their fantastic Cosmetic Colour Pencils.
::insert the singing of a choir of angels here::
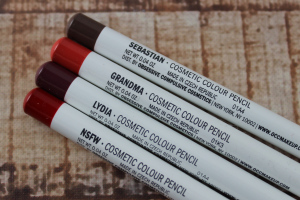
These pencils comes in 14 different shades (as of the time of this post), including some of their iconic (and hard to match) shades: Pool Boy, Anime, NSFW, Hoochie, Black Dhalia? They’re all there. But OCC did us one better; they also included some stunning neutrals in the collection too, like the warm, beige Trick and the a plum-toned taupe Sebastian. They even hit on two of my absolute favorite Lip Tars, giving us spot-on matches for Lydia’s plummy gorgeousness and the hard-to-match electric coral Grandma!
The downside, if there is one, is the price: these bad boys retail for $16.00 each. Yes; that’s on the pricey end for a liner; no bones about it. (Although I was previously addicted to the Too Faced Perfect Lip Liners, which hit my wallet for $17.00 a pop, so I didn’t really blink at the price on these.) However; these are not just lip liners, remember. They can be used on the body for all kinds of body art (and you best bet mine will be come next Halloween!) and most of them can be used on the eyes as well! (The “not recommended for eye use colors being Anime, Black Dhalia, Grandma, Hoochie, Lydia, NSFW, and Trick.) So, you’re getting a little more bang for your buck and… Well, those amazing colors are just worth it!
I chose to be practical an only pick up a few colors that I thought I would use most often. (Because as much as I love Pool Boy, I’m just not really into rocking aquatic blue lips or eye liner all that often.)
Lydia (darkroom plum) and Grandma (clean classic coral) are two of my favorite Tars, and colors I often wear solo. Until now I could only use a clear, anti-feathering liner with them as I had no liners to match–so I was super stoked to see those colors in the collection! I also picked up Sebastian (plum-toned taupe) and NSFW (true red) to fill holes in my liner collection. I’ve always had a soft spot for the Sebastian Tar so I was pretty sure I’d love the Pencil, and I was sorely lacking in red liners, so NSFW seemed like a no-brainer.
These things are, in my opinion, damn near perfect. They have dethroned the Too Faced liners as my reigning favorite (though I so still love my Perfect Pink and Perfect Nude). These Cosmetic Colour Pencils are, in a word, amazing. The colors are stinking gorgeous, and they are super pigmented. They come to a nice firm point, but yet are soft enough to glide on to the skin with ease. They don’t pull or skip; they’ve given me smooth, consistent lines each and every time. I’ve found that you don’t need much pressure at all to get a good, solid line. They’re soft enough to give you that glide, but at the same time they aren’t so soft that they smear either.
While I always preferred the automatic sharpening kind of liners to traditional pencils, I am totally willing to overlook that for these. They sharpen pretty easily, without a terrible loss of product. I found out the hard way that they can be dinged/smooshed in the sharpener if you’re not careful (sorry Lydia!), so… Uh; yeah. Be careful.
Swatch
 From left to right (thinly applied and then more heavily): Lydia, Sebastian, Grandma, and NSFW.
Verdict
I love these pencils.
Right now, out of the few I have, Grandma has seen the most use by far, as I wear the corresponding Tar far more often than any of the others. Y’all know how I love my coral lippies–a color that has always been terribly hard for me to find in a decent lip liner. Grandma has filled that void and, oh man; she has filled it well. (That sounded a bit… gross.) I would repurchase that color alone again and again. If they ever chose to discontinue it, I would cry big, fat baby tears.
That said, I really do love them all equally. They’ve all far surpassed my expectations of a liner. All of them are awesome and I do not have a single regret about any of them. As it stands, I’m dying to get my hands on Black Dhalia, Anime, and Trick. (Soon, my preciouses; soooooon.)


January 9, 2015
Obsessed with OCC: Lip Prep
 Welcome, my lovelies, to my new All OCC, All the Time pretty much weekly series: Obsessed with OCC!
::throws confetti … then pouts because she realizes she needs to vacuum it up before a cat eats it::
Ahem. I am a rabid fan of Obsessive Compulsive Cosmetics–namely their amazing Lip Tars. For those who are already in the know about Lip Tars, skip the rest of this paragraph. For those who aren’t and want to know just what the hell a Lip Tar is, it is a highly pigmented liquid lipstick. They go on slick and moist, but dry down to a metallic or matte finish. (There are Stained Glosses as well, which remain slick and juicy looking, but we’ll talk more about those at a later date.) They come in just about every color of the rainbow, including some wacky looking primary colors (blue, orange) and shades (pure white, black). Their unique, liquid formula means they can be easily mixed to create a staggering variety of custom colors. Also, they are vegan, free of cruelty, and gluten-free.
I plan to update this series just about every Friday, during which I will review an OCC product (mostly Lip Tars, but also hoping to branch out to some of their other products as well). Along with my review, I will be giving you swatchies of my favorite Lip Tar blends too, to show you which colors I most frequently use to make custom colors. Some will be everyday wearable; some will be a little wacky–but I hope, either way, you find the posts in this series to be fun and informative. (Didn’t I just go all infomercial serious right there?)
Anyhow. To make finding a particular shade or product easier, I’m thinking of installing a Lip Tar Library page link up at the top there, by my contact and service information. (Also, that Library will keep my from having to repeat my standard “What is a Lip Tar” speech every time I post–which I’m sure many of you would prefer!) So look for that in coming weeks as well!
“But wait, beauty blogger lady, where is the Lip Tar in that sneak peak photo up there?!” you might be asking.
Well, there is Lip Tar pictured, because there is no actual OCC product in today’s Obsessed with OCC post. But wait! Hold on and bare with me. This is not a bait-n-switch, I swear. Instead, today we will be discussing an important first step that you really must consider before you start purchasing and applying Lip Tars like a madwoman: Lip Prep.
Lip care really is THE most important thing to consider, before you ever bring a Lip Tar near your lips. While I am a huge fan of the awesome colors, pigmentation, and lasting power of Lip Tars, there is no denying that they can be incredibly drying. This is even more noticeable on people who have dry lips in the first place (me!), and if you do not take the extra steps to exfoliate away that dead skin and hydrate the lip area before application, you’re more likely to wind up with a hot mess on your mouth–flakes, cracking, patchiness. None of that is pretty, and none of us want that, so let’s take a moment to discuss how we can prevent it.
(And, of course, the tips and suggestions in this post can apply to any lip product application! Even if you are not interested in ever letting a Lip Tar anywhere near your mouth, proper lip care will make any lipstick look worlds better. Promise!)
So, what do I mean by lip prep? Prepping the lips for a good makeup application is really a two step process: exfoliation and hydration.
I’m sure 90% of us already use lip balms of some sort when our lips start feeling dry, but without exfoliating first, that’s not really not solving the problem. That dry, cracked upper layer of skin remains and the balm is only a temporary solution. Until you get that top layer off, most balms aren’t reaching below it to give your lips the moisture they are meant to impart.
Let’s talk scrubbin’!
Exfoliation
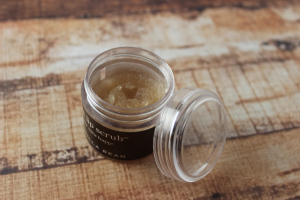 No two ways about it; you gotta scrub those babies good if you’re going to rock a Lip Tar.
What do you use to exfoliate?
There are plenty of pre-made scrubs on the market. My personal favorite is the Lip Scrub by Sara Happ (which you can learn more about by following that link), and like most of the lip scrubs on the market, the exfoliating “grains” in it are made from sugar–a wonderfully gentle, natural exfoliant that happens to have the side effect of tasting good!
However, if budget is a factor–or you just happen to run out of scrub and need to take matters in to your own hands–this is one of the simplest skin care products to make at home.
Homemade Lip Scrub
1 part honey
1 part sugar
drizzle of carrier oil (I like coconut oil or jojoba oil, but you can even use olive oil in a pinch!)
Mix the honey and sugar.
Slowly stir in the carrier oil of your choice, until reaches a smooth–but not runny–consistency.
Store the mixture in a clean, airtight pot. That’s it folks; super simple!
When you should exfoliate?
Do you scrub your lips in morning or at night? This is really a personal decision and it can go either way–it depends on your lips. I, personally, have incredibly dry lips. Annoyingly so, really. I used to scrub at night, apply a thick balm (which, again, we will discuss shortly), and wake up to smoother, softer lips. Those morning lips were perfectly acceptable for pretty much any lipstick or gloss out there that I have tried.
With Lip Tars, however? Not so much. Like I said, Lip Tars can be seriously drying–and on my chronically dry lips, they pretty much always are. So, I found that I had to switch up my routine and start exfoliating in the morning, and applying a lighter balm that sunk into my lips quicker, before each application. I still do a deeper, nightly exfoliation (followed by that thicker balm) now and then, but as a rule if I want to wear a Tar, I exfoliate that morning.
You might find a nightly exfoliation is enough. Or, you might even find you only need to exfoliate a few times a week–everyone’s skin is difference, and that includes the lips! Experiment. Figure out which time of the day and what regularity works best for you.
How do you exfoliate your lips?
At either time, on whatever day, the process of exfoliating is incredibly simple and easy to work in to your daily routine.
Dampen your lips with some water.
Apply a tiny bit of the scrub (little goes a long way here) and gently rub it back and forth over your lips for about 1 minute. You can also purse/rub your lips together to exfoliate as well. I usually use a combination of both motions.
Wet a soft washcloth with warm water and gently wipe off the excess scrub. (Sugar-based scrubs tend to break down during the exfoliation process, so do not be surprised if there are not a lot of granules left on your lips to remove!)
Apply a good balm to lock in that hydration while your lips are soft and fresh!
Which brings us to…
Hydration
There are three zillion lip balms out there on the market. (True story. I counted.) And I’ve probably tried close to half of them.
I find lips balms fall into two categories: heavy and light (and also “crappy” I guess, but we’re not going to talk about those here). Which kind of balm you are going to use depends on when you are exfoliating your lips.
Heavyweight Balms
Heavier balms are going to be your nighttime/overnight balms. By heavy, I mean anything that has a really thick consistency or a balm that is very emollient, and may leave a slick residue on your lips.
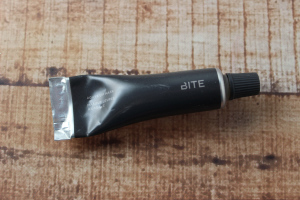 My first favorite for heavyweight balms is actually a lip mask, which I have gushed about before–Bite Beauty Agave Lip Mask. This stuff carries a pretty hefty price tag, but a little goes a very long way! (I’ve had the same tube since my original review back in August and, as you can see, I’ve barely used 1/4 of the tube!) I have yet to find a comparable dupe at a lower price-point, but I love it so much and its lasting so long, I will likely repurchase it despite the price.
This stuff is thick, rich, and mega hydrating. This is the balm I apply after I have done a nighttime exfoliation, as it stays on my lips all throughout the night and gives them a serious dose of moisture. If you have seriously chapped lips, check this stuff out; it has made a huge improvement to mine!
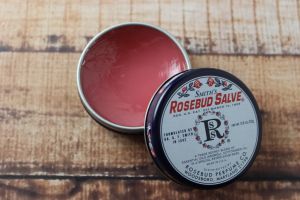 The other nighttime lip product I use is Rosebud Salve. This stuff is pretty darn cheap (especially compared to the Agave Lip Mask!) and one pot lasts me a full year, even with nightly application. Since I no longer scrub my lips every night (choosing to do them in the morning instead), I don’t need to use the heavy lip mask nighty. On the nights when I don’t scrub, I instead apply this Salve before bed. It is petroleum based, so it has a lot of slip to it, and it is quite healing to dry skin.
It does a fantastic job of cushioning, protecting, and hydrating my lips–but unfortunately its far too “greasy” to use in the morning, right before applying a Tar. I find that the Salve–and other “wet” balms like it–need a few hours to really sink in and hydrate. If I were to wipe it off just a half hour or so after applying it, it wouldn’t do the trick. So, for morning I use…
Lightweight Balms
Lightweight balms will be your morning balms; something that provides a touch of moisture to the lips, essentially priming it before applying your lip color. You do not want a balm that is too thick and will be hard to remove the excess of, nor do you want to use anything that will leave a slick or greasy residue on the lips (as Lip Tars do not play well with those textures).
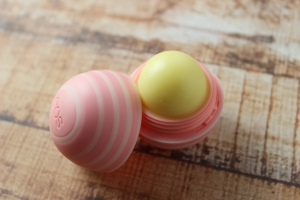 My personal favorite balm for this time of the day is my EOS Visibly Soft Lip Balm in the Coconut Milk variety. I have used a few of the different EOS flavors and this one is hands down my favorite. I love the scent and I find this particular formula to be leaps and bounds above the rest when it comes to hydrating my lips.
After I exfoliate in the morning, I rub this bad boy back and forth across my lips two-three times and let it settle in while I drink my morning coffee and apply the rest of my face makeup. When it comes time to tackle my lips, I blot away any remaining surface moisture and go about my merry way. Works like a charm and doesn’t interfere with my Lip Tars one bit!
I know I sound like a broken record by now but, experiment! You might not like my particular recommendations; you might love them. I have seriously tried no less than thirty different lip balms over the past few years before finally discovering the few that work best for me. You might have to kiss some frogs before you find your prince!
Balm Application
This is pretty straightforward.
After your lips are freshly exfoliated and dried off, apply the balm in whichever way you most prefer.
Make sure to give it a good, solid coating (if its a heavy, overnight balm) or an ample amount of time to sink in (if its a lighter, morning balm).
With either, gently wipe off any excess balm before you sit down to apply your Lip Tar.
Apply your Lip Tar and go about your day!
Verdict (But Not Really)
Aaaaand, that’s it folks! You’re lips should be properly prepped and ready for whatever lip color you choose to apply.
Next week we will be discussing How to Apply a Lip Tar so come on back if you’d like to learn more!


